标签:
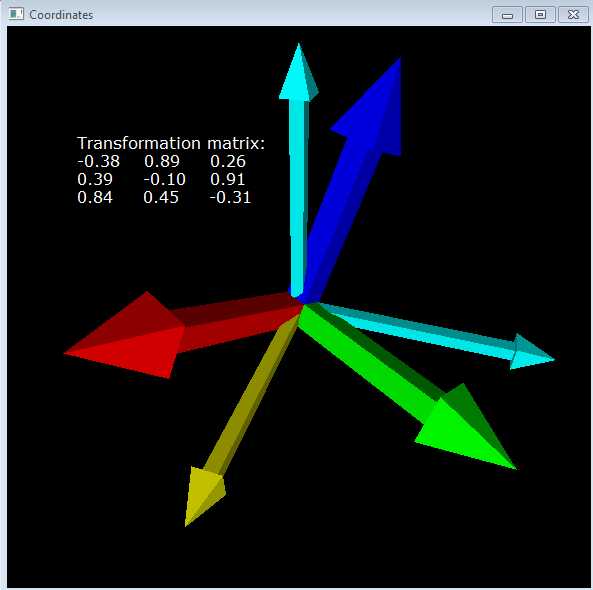
使用arrow( )创建三个坐标轴代表一个坐标系,其中X0-Y0-Z0为参考坐标系(固定不动),X-Y-Z为运动坐标系,这两个坐标系原点重合,运动坐标系可以绕参考坐标系或其自身旋转。在屏幕上输出一个转换矩阵,该矩阵描述了动坐标系相对于参考坐标系的姿态,矩阵第一列表示动坐标系的X轴在参考坐标系中的方向,第二列表示动坐标系的Y轴在参考坐标系中的方向,第二列表示动坐标系的Z轴在参考坐标系中的方向。显而易见,当两个坐标系姿态一致时,转换矩阵为3阶单位矩阵。
程序中按键盘的上下方向坐标系绕Y轴旋转,按左右键坐标系绕Z轴旋转,按W,S键绕X轴旋转。由于本例子使用的是VPython5,对于键盘事件只支持轮询方式检测,即在while循环中不停地检测是否有按键按下。在最新的VPython6中支持了键盘事件响应,可以自定义事件响应的回掉函数。
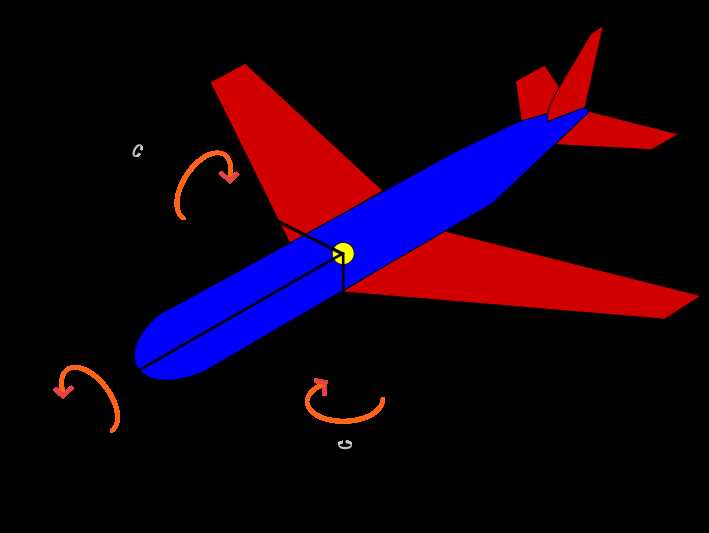
对于绕Z轴旋转这一动作来说,可以使绕参考坐标系的Z轴,也可以是绕动坐标系自身的Z轴。绕自身坐标轴旋转的角度称为欧拉角,而飞行器和航海中常用的RPY角(Roll-Pitch-Yaw:横滚、俯仰、偏航)是绕固定坐标系旋转。
对于旋转三个坐标轴来说可以将其放在一个自定义的旋转函数中,每次旋转只需调用该函数;也可以将其添加进同一个frame,旋转frame时frame中的所有对象都会跟着一起旋转。注意:下面的程序中旋转frame时是绕着参考坐标系的坐标轴旋转的,调用自定义的旋转函数旋转坐标系时是按照动坐标系的坐标轴旋转的。
 1 # -*- coding: utf-8 -*-
 2 from visual import *
 3
 4 scene.title = ‘Coordinates‘ # 设置窗口标题
 5 scene.width = 600           # 设置窗口宽度和高度
 6 scene.height = 600
 7 scene.forward = (-1,-1,-1)  # 设置camera视线方向
 8
 9 # Create a frame object,group objects together to make a composite object
10 f = frame()
11
12 # 定义参考坐标系
13 X0 = arrow(pos=(0,0,0), axis=(1,0,0), color=color.cyan, shaftwidth=0.05)
14 Y0 = arrow(pos=(0,0,0), axis=(0,1,0), color=color.cyan, shaftwidth=0.05)
15 Z0 = arrow(pos=(0,0,0), axis=(0,0,1), color=color.yellow,shaftwidth=0.05)
16
17
18 # 定义运动坐标系的X,Y,Z轴
19 X = arrow(frame = f, pos=(0,0,0), axis=(1,0,0), color=(1,0,0), shaftwidth=0.1)
20 Y = arrow(frame = f, pos=(0,0,0), axis=(0,1,0), color=(0,1,0), shaftwidth=0.1)
21 Z = arrow(frame = f, pos=(0,0,0), axis=(0,0,1), color=(0,0,1), shaftwidth=0.1)
22
23 tf_str = ‘Transformation matrix:\n%-8.2f %-8.2f %-8.2f\n%-8.2f %-8.2f %-8.2f\n%-8.2f %-8.2f %-8.2f\n‘%(1,0,0,0,1,0,0,0,1)
24
25 # With the label object you can display 2D text in a box, and the label always faces forward
26 info = label(pos=(-0.5,0.5,0), text = tf_str, box=False, opacity=0, height=16)
27
28
29 delta_angle = radians(2)  # 2°
30
31 def rotate_axis(angle, axis, origin):
32     X.rotate(angle=angle, axis=axis, origin=origin)
33     Y.rotate(angle=angle, axis=axis, origin=origin)
34     Z.rotate(angle=angle, axis=axis, origin=origin)
35
36 while True:
37     rate(100)
38
39     if scene.kb.keys: # event waiting to be processed?
40         s = scene.kb.getkey() # get keyboard info
41
42         # 按左右箭头绕Z轴旋转
43         if s == ‘left‘:
44             #f.rotate(angle=delta_angle, axis=Z.axis, origin=(0,0,0))
45             rotate_axis(angle = delta_angle, axis = Z.axis, origin = (0,0,0))
46         elif s == ‘right‘:
47             #f.rotate(angle=-delta_angle, axis=Z.axis, origin=(0,0,0))
48             rotate_axis(angle = -delta_angle, axis = Z.axis, origin = (0,0,0))
49
50         # 按上下箭头绕Y轴旋转
51         if s == ‘up‘:
52             #f.rotate(angle=delta_angle, axis=Y.axis, origin=(0,0,0))
53             rotate_axis(angle = delta_angle, axis = Y.axis, origin = (0,0,0))
54         elif s == ‘down‘:
55             #f.rotate(angle=-delta_angle, axis=Y.axis, origin=(0,0,0))
56             rotate_axis(angle = -delta_angle, axis = Y.axis, origin = (0,0,0))
57
58         # 按w,s键绕X轴旋转
59         if s == ‘w‘:
60             #f.rotate(angle=delta_angle, axis=X.axis, origin=(0,0,0))
61             rotate_axis(angle = delta_angle, axis = X.axis, origin = (0,0,0))
62         elif s == ‘s‘:
63             #f.rotate(angle=-delta_angle, axis=X.axis, origin=(0,0,0))
64             rotate_axis(angle = -delta_angle, axis = X.axis, origin = (0,0,0))
65
66         info.text = ‘Transformation matrix:\n%-8.2f %-8.2f %-8.2f\n%-8.2f %-8.2f %-8.2f\n%-8.2f %-8.2f %-8.2f\n‘67                         % (X.axis[0],Y.axis[0],Z.axis[0],68                            X.axis[1],Y.axis[1],Z.axis[1],69                            X.axis[2],Y.axis[2],Z.axis[2])
标签:
原文地址:http://www.cnblogs.com/21207-iHome/p/5251246.html