标签:


说明:
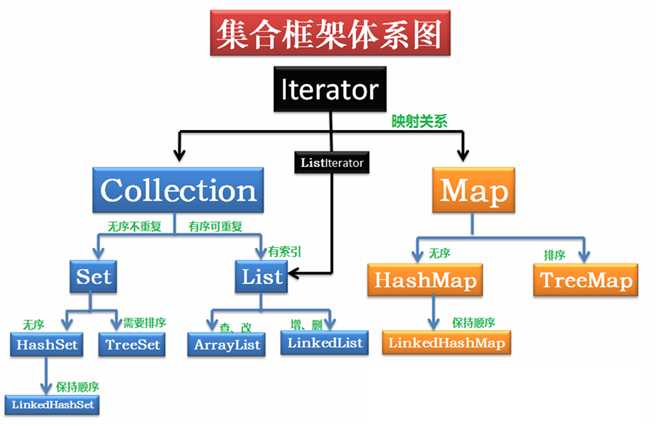
集合接口:6个接口(短虚线表示),表示不同集合类型,是集合框架的基础。
抽象类:5个抽象类(长虚线表示),对集合接口的部分实现。可扩展为自定义集合类。
实现类:8个实现类(实线表示),对接口的具体实现。
· Collection 接口是一组允许重复的对象。
· Set 接口继承 Collection,但不允许重复,使用自己内部的一个排列机制。
· List 接口继承 Collection,允许重复,以元素安插的次序来放置元素,不会重新排列。
· Map接口是一组成对的键-值对象,即所持有的是key-value pairs。Map中不能有重复的
key。拥有自己的内部排列机制。
· 容器中的元素类型都为Object。从容器取得元素时,必须把它转换成原来的类型。
JAVA的集合框架中定义了一系列的类,这些类都是存储数据的容器。与数组、StringBuffer(StringBuilder)相比,它的特点是:
1.用于存储对象
2.集合长度可变
3.不可以存储基本数据类型
Set接口和List接口都实现了Collection接口,因此很明显的,Collection接口中存放的是Set接口和List接口的共性内容。
Collection接口中的方法:
package p01.BaseCollectionDemo;

import java.util.ArrayList;
import java.util.Collection;
import java.util.Iterator;
public class CollectionDemo01 {
    public static void main(String args[])
    {
        //show1();
        //show2();
        //show3();
        //show4();
        show5();

    }
    private static void show5() {
        /*
         * 演示retainAll、toArray方法
         */
        Collection coll=new ArrayList();
        coll.add("abc1");
        coll.add("abc2");
        coll.add("abc3");
        coll.add("abc4");
        System.out.println(coll);
        Collection coll1=new ArrayList();
        coll1.add("abc1");
        coll1.add("abc3");
        coll1.add("abc4");
        coll1.add("abc8");
        System.out.println(coll1);

        System.out.println(coll.retainAll(coll1));
        System.out.println(coll);//与removeAll相反,只取相同的部分

    }
    private static void show4() {

        /*
         * 演示size、Iterator
         */
        Collection coll=new ArrayList();
        coll.add("abc1");
        coll.add("abc2");
        coll.add("abc3");
        coll.add("abc4");
        System.out.println(coll);
        System.out.println(coll.size());
        for(Iterator it=coll.iterator();it.hasNext();)
        {
            System.out.println(it.next());
        }
    }
    private static void show3() {
        /*
         * 演示contains、containsAll、isEmpty方法
         */
        Collection coll=new ArrayList();
        coll.add("abc1");
        coll.add("abc2");
        coll.add("abc3");
        coll.add("abc4");
        System.out.println(coll);
        Collection coll1=new ArrayList();
        coll1.add("abc5");
        coll1.add("abc6");
        coll1.add("abc7");
        coll1.add("abc8");
        System.out.println(coll1);

        coll.addAll(coll1);
        System.out.println(coll);

        System.out.println(coll.containsAll(coll1));
        System.out.println(coll.contains("abc1"));
        coll.remove("abc1");
        System.out.println(coll.contains("abc1"));

        coll.clear();
        System.out.println(coll.isEmpty());

    }
    private static void show2() {
        /*
         * 演示remove、removeAll、clear方法
         */
        Collection coll=new ArrayList();
        coll.add("abc1");
        coll.add("abc2");
        coll.add("abc3");
        coll.add("abc4");
        System.out.println(coll);
        Collection coll1=new ArrayList();
        coll1.add("abc5");
        coll1.add("abc6");
        coll1.add("abc7");
        coll1.add("abc8");
        System.out.println(coll1);

        coll.addAll(coll1);
        System.out.println(coll);

        coll.removeAll(coll1);
        System.out.println(coll);

        coll.remove("abc1");
        System.out.println(coll);

        coll.clear();
        System.out.println("打印集合元素:"+coll);
    }
    public static void show1()
    {
        /*
         * 演示add、addAll
         */
        Collection coll=new ArrayList();
        coll.add("abc1");
        coll.add("abc2");
        coll.add("abc3");
        coll.add("abc4");
        System.out.println(coll);
        Collection coll1=new ArrayList();
        coll1.add("abc5");
        coll1.add("abc6");
        coll1.add("abc7");
        coll1.add("abc8");
        System.out.println(coll1);

        coll.addAll(coll1);
        System.out.println(coll);
    }
}
1.遍历
框架中有一个很重要的接口Iterator,使用这个接口可以遍历框架中其它所有的容器。
Java中的Iterator功能比较简单,并且只能单向移动:
(1) 使用方法iterator()要求容器返回一个Iterator。第一次调用Iterator的next()方法时,它返回序列的第一个元素。注意:iterator()方法是java.lang.Iterable接口,被Collection继承。
(2) 使用next()获得序列中的下一个元素。
(3) 使用hasNext()检查序列中是否还有元素。
(4) 使用remove()将迭代器新返回的元素删除。
Iterator是Java迭代器最简单的实现,为List设计的ListIterator具有更多的功能,它可以从两个方向遍历List,也可以从List中插入和删除元素。
两种遍历的方式很像,但是又有些不同,推荐使用第一种。

package p01.BaseCollectionDemo;

import java.util.ArrayList;
import java.util.Collection;
import java.util.Iterator;


public class IteratorDemo {

    public static void main(String[] args) {
        Collection coll=new ArrayList();
        coll.add("abc1");
        coll.add("abc2");
        coll.add("abc3");
        coll.add("abc4");

        Demo01(coll);
        Demo02(coll);


    }

    private static void Demo02(Collection coll) {
        Iterator it=coll.iterator();
        while(it.hasNext())
        {
            System.out.print(it.next()+" ");
        }
        System.out.println();
    }

    private static void Demo01(Collection coll) {
        for(Iterator it=coll.iterator();it.hasNext();)
        {
            System.out.print(it.next()+" ");
        }
        System.out.println();
    }

}
分析:第一种方式遍历集合的特点就是遍历完成之后迭代器对象会随着for循环结束而在内存中被清除;而第二种方式虽然达到了遍历的效果,但是循环结束之后迭代器所占用的内存并没有被释放,浪费了一部分内存
2.迭代原理
由于每一种容器内部的数据结构可能都不同,只是用一种接口怎么才能达到遍历个各种容器的目的呢?
分析:容器内部都维护着一个实现了Iterator接口的对象,每个对象在容器内部的操作均不同(它们仅操作本类内部的成员),但是提供了同样的遍历方法:hasNext和Next,通过这两个方法,就可以得到容器内所有的对象了。也就是说Iterator对象必须依赖于具体的容器,因为每一种容器的数据结构都不相同。对于使用容器者而言,具体的实现并不重要,只要通过容器获取到该实现的迭代器的对象即可,也就是iterator方法。Iterator接口也就是对所有Collection容器进行元素取出的公共接口。
标签:
原文地址:http://www.cnblogs.com/zxqstrong/p/5297724.html