标签:
一.工程打成JAR包。
1. eclipse下有一工程JsnTxJar,右键工程名选择Export。


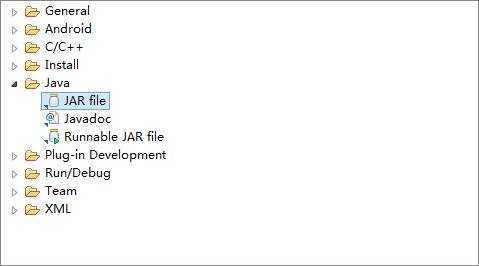
选择Java->JAR file

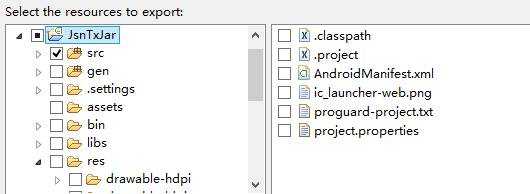
下图所示左边一栏只勾选src,右边一栏都不用勾选。(如果assets中有文件,assets选不选均可。如果不勾选,那么assets中的文件将不被打进JAR包,随后可将这些文件复制到使用这个JAR包的工程assets目录中。如果勾选,assets中的文件将被打进JAR包,如果使用这个JAR包的工程assets目录下还有相同的文件,在运行时就会报错文件重复)

然后设置一下导出路径即可完成。
二.引入JAR包。
现Eclipse下有一工程ReferJar。
1. 把打好的JAR包复制到ReferJar下的libs文件夹中,刷新一下这个文件夹。
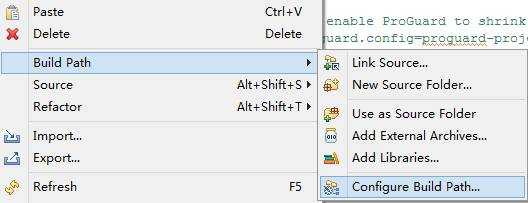
2. 右键点击工程名,选择Build Path->Configure Build Path.

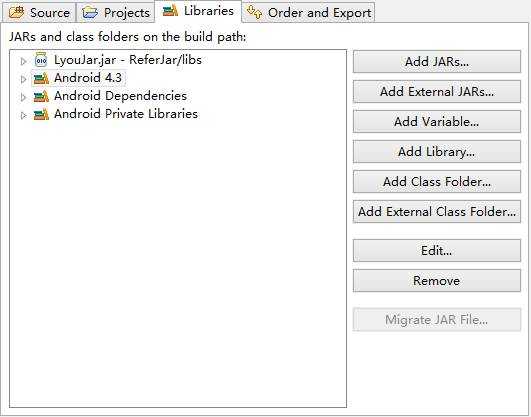
在Libraries一栏中选择Add JARs

然后选择ReferJar下刚复制到lib中的JAR包即可
3. 需要注意的几点。
I.如果JAR包中要用到图片、布局、字串等资源,将这些文件复制到ReferJar工程下的res相应的资源文件中,不要与ReferJar原有的资源文件重名。以这种方式处理jar包中的资源时,JAR包的代码中不能再使用R.layout.、R.string.等形式来引用资源,因为导出jar的时候里面的R.id已经替换为一个int常量,而在新的程序中资源id会重新生成,两者不匹配就会产生问题。可以通过字段名称动态获取资源id。可以封装一个类用于获取资源id。
publicclass Resource {
publicstaticint getLayoutId(Context context, String layoutName) {
return context.getResources().getIdentifier(layoutName, "layout",
context.getPackageName());
}
publicstaticint getStringId(Context context, String stringName) {
return context.getResources().getIdentifier(stringName, "string",
context.getPackageName());
}
publicstaticint getDrawableId(Context context, String drawableName) {
return context.getResources().getIdentifier(drawableName,
"drawable", context.getPackageName());
}
publicstaticint getStyleId(Context context, String styleName) {
return context.getResources().getIdentifier(styleName, "style",
context.getPackageName());
}
publicstaticint getId(Context context, String idName) {
return context.getResources().getIdentifier(idName, "id",
context.getPackageName());
}
publicstaticint getColorId(Context context, String colorName) {
return context.getResources().getIdentifier(colorName, "color",
context.getPackageName());
}
publicstaticint getArrayId(Context context, String arrayName) {
return context.getResources().getIdentifier(arrayName, "array",
context.getPackageName());
}
}
II.JAR包用到的AndroidManifest.xml配置信息复制到ReferJar的AndroidManifest.xml中。
III.如果JAR包中叶引入了其他JAR包,把这些JAR包复制到ReferJar工程下的libs文件夹下。
三. 把资源文件打进JAR包
1.图片
JAR包中使用的图片在打包的时候可以打进assets中,在使用图片是可取为Drawable。
publicstatic Drawable getDrawableFromAssets(Context context,String imageFileName) {
Drawable result=null;
InputStream is=null;
try {
is=context.getAssets().open(imageFileName);
result=Drawable.createFromStream(is, imageFileName);
is.close();
is=null;
} catch (IOException e) {
// TODO Auto-generated catch block
e.printStackTrace();
}
return result;
}
2.布局
用动态布局取代.xml布局。
至于selecter.xml可用StateListDrawable取代。
public StateListDrawable getBgListDrawable(Context context, String normalImgName, String pressedImgName) {
StateListDrawable bgListDrawable = new StateListDrawable();
Drawable normal = getDrawableFromAssets(context,normalImgName);
Drawable pressed = getDrawableFromAssets(context,pressedImgName);
//这里注意顺序,如果android.R.attr.state_enabled状态写到前面,则不会显示按钮的pressed效果,因为不论按钮是否被按下,都符合state_enabled状态
bgListDrawable.addState(newint[] { android.R.attr.state_pressed },
pressed);
bgListDrawable.addState(newint[] { android.R.attr.state_enabled },
normal);
return bgListDrawable;
}
btn.setBackgroundDrawable(getBgListDrawable(context, ”img_normal”, ”img_pressed”));
3.字串
建议直接使用字符串常量代替字串资源。
一.工程打成JAR包。
1. eclipse下有一工程JsnTxJar,右键工程名选择Export。

选择Java->JAR file

下图所示左边一栏只勾选src,右边一栏都不用勾选。(如果assets中有文件,assets选不选均可。如果不勾选,那么assets中的文件将不被打进JAR包,随后可将这些文件复制到使用这个JAR包的工程assets目录中。如果勾选,assets中的文件将被打进JAR包,如果使用这个JAR包的工程assets目录下还有相同的文件,在运行时就会报错文件重复)

然后设置一下导出路径即可完成。
二.引入JAR包。
现Eclipse下有一工程ReferJar。
1. 把打好的JAR包复制到ReferJar下的libs文件夹中,刷新一下这个文件夹。
2. 右键点击工程名,选择Build Path->Configure Build Path.

在Libraries一栏中选择Add JARs

然后选择ReferJar下刚复制到lib中的JAR包即可
3. 需要注意的几点。
I.如果JAR包中要用到图片、布局、字串等资源,将这些文件复制到ReferJar工程下的res相应的资源文件中,不要与ReferJar原有的资源文件重名。以这种方式处理jar包中的资源时,JAR包的代码中不能再使用R.layout.、R.string.等形式来引用资源,因为导出jar的时候里面的R.id已经替换为一个int常量,而在新的程序中资源id会重新生成,两者不匹配就会产生问题。可以通过字段名称动态获取资源id。可以封装一个类用于获取资源id。
publicclass Resource {
publicstaticint getLayoutId(Context context, String layoutName) {
return context.getResources().getIdentifier(layoutName, "layout",
context.getPackageName());
}
publicstaticint getStringId(Context context, String stringName) {
return context.getResources().getIdentifier(stringName, "string",
context.getPackageName());
}
publicstaticint getDrawableId(Context context, String drawableName) {
return context.getResources().getIdentifier(drawableName,
"drawable", context.getPackageName());
}
publicstaticint getStyleId(Context context, String styleName) {
return context.getResources().getIdentifier(styleName, "style",
context.getPackageName());
}
publicstaticint getId(Context context, String idName) {
return context.getResources().getIdentifier(idName, "id",
context.getPackageName());
}
publicstaticint getColorId(Context context, String colorName) {
return context.getResources().getIdentifier(colorName, "color",
context.getPackageName());
}
publicstaticint getArrayId(Context context, String arrayName) {
return context.getResources().getIdentifier(arrayName, "array",
context.getPackageName());
}
}
II.JAR包用到的AndroidManifest.xml配置信息复制到ReferJar的AndroidManifest.xml中。
III.如果JAR包中叶引入了其他JAR包,把这些JAR包复制到ReferJar工程下的libs文件夹下。
三. 把资源文件打进JAR包
1.图片
JAR包中使用的图片在打包的时候可以打进assets中,在使用图片是可取为Drawable。
publicstatic Drawable getDrawableFromAssets(Context context,String imageFileName) {
Drawable result=null;
InputStream is=null;
try {
is=context.getAssets().open(imageFileName);
result=Drawable.createFromStream(is, imageFileName);
is.close();
is=null;
} catch (IOException e) {
// TODO Auto-generated catch block
e.printStackTrace();
}
return result;
}
2.布局
用动态布局取代.xml布局。
至于selecter.xml可用StateListDrawable取代。
public StateListDrawable getBgListDrawable(Context context, String normalImgName, String pressedImgName) {
StateListDrawable bgListDrawable = new StateListDrawable();
Drawable normal = getDrawableFromAssets(context,normalImgName);
Drawable pressed = getDrawableFromAssets(context,pressedImgName);
//这里注意顺序,如果android.R.attr.state_enabled状态写到前面,则不会显示按钮的pressed效果,因为不论按钮是否被按下,都符合state_enabled状态
bgListDrawable.addState(newint[] { android.R.attr.state_pressed },
pressed);
bgListDrawable.addState(newint[] { android.R.attr.state_enabled },
normal);
return bgListDrawable;
}
btn.setBackgroundDrawable(getBgListDrawable(context, ”img_normal”, ”img_pressed”));
3.字串
建议直接使用字符串常量代替字串资源。
标签:
原文地址:http://www.cnblogs.com/lilylovelypig/p/5322542.html