标签:
UIView 等会效果简单实现,哪一个登录页面的demo来举例子吧.
+ (void)animateWithDuration:(NSTimeInterval)duration animations:(void (^)(void))animations;
UIView的一个类方法,可以看出这个方法里面只有两个参数:
duration: 动画持续时间;
animations:动画闭包,在这个闭包中你可以改变UIView的各种动画属性(这个方法中可以同时改变多个属性);
// 闭包里面是textField最终出现的位置,前提是你已经设置好了textField的位置.
   [UIView animateWithDuration:0.5 animations:^{
       self.emailTextField.frame = CGRectMake(30, self.userImg.frame.origin.y + self.userImg.bounds.size.height + 30, screen_width - 60, 40);
       self.pwdTextField.frame = CGRectMake(30, self.emailTextField.frame.origin.y + self.emailTextField.bounds.size.height, screen_width - 60, 40);

   } completion:nil];
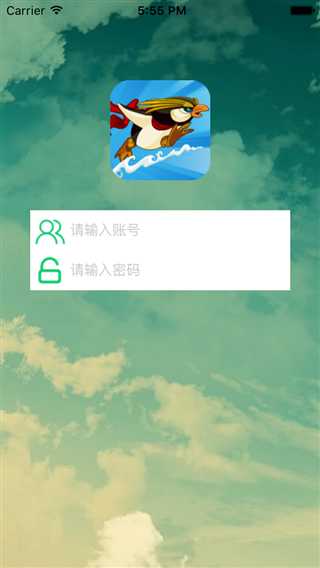
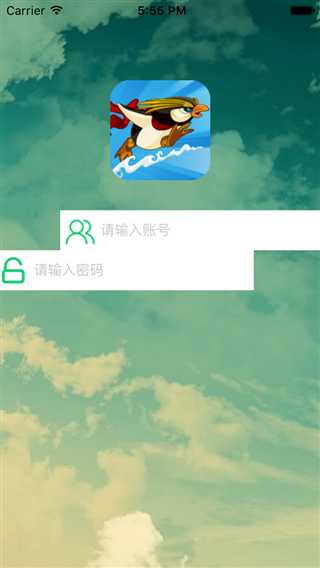
这个就是上面的代码动画出现的过程截图,emailText 和 pwdTextField 分别重两次移动到中间位置;
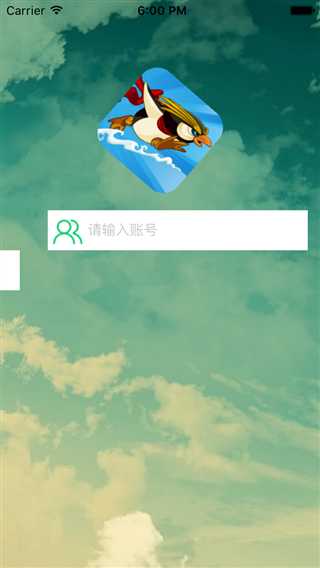
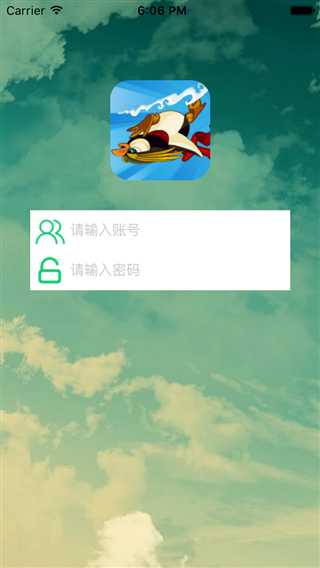
+ (void)animateWithDuration:(NSTimeInterval)duration delay:(NSTimeInterval)delay options:(UIViewAnimationOptions)options animations:(void (^)(void))animations completion:(void (^ __nullable)(BOOL finished))completion;
这个方法多了几个参数:
delay:延时时间;
options:动画效果,比如重复动画、前后运动等;
[UIView animateWithDuration:0.5 delay:0 options:UIViewAnimationOptionCurveEaseInOut  animations:^{
        self.emailTextField.frame = CGRectMake(30, self.userImg.frame.origin.y + self.userImg.bounds.size.height + 30, screen_width - 60, 40);
    } completion:nil];
    CGAffineTransform rotation = CGAffineTransformMakeRotation(M_PI);
[UIView animateWithDuration:0.5 delay:0.3 options:UIViewAnimationOptionCurveLinear animations:^{
        self.pwdTextField.frame = CGRectMake(30, self.emailTextField.frame.origin.y + self.emailTextField.bounds.size.height, screen_width - 60, 40);
        self.userImg.transform = rotation;
    } completion:nil];
这个过程里有头像的转动,emailText 和 pwdTextField 分别重两次移动到中间位置;
这两个添加动画效果的方法的代码附在下面:
//
//  ViewController.m
//  loginDemo20160330
//
//  Created by miaoguodong on 16/3/30.
//  Copyright © 2016年 miaoguodong. All rights reserved.
//

#import "ViewController.h"
#define screen_width ([UIScreen mainScreen].bounds.size.width)
#define screen_height ([UIScreen mainScreen].bounds.size.height)
@interface ViewController ()

@property (weak, nonatomic) IBOutlet UIImageView *loginBgImg;
@property (weak, nonatomic) IBOutlet UIImageView *userImg;

@property (weak, nonatomic) IBOutlet UITextField *emailTextField;
@property (weak, nonatomic) IBOutlet UITextField *pwdTextField;


@end

@implementation ViewController
- (void)dealloc
{
    self.loginBgImg = nil;
    self.userImg = nil;
    self.emailTextField = nil;
    self.pwdTextField = nil;
}

- (void)viewDidLoad {
    [super viewDidLoad];


    self.loginBgImg.frame = CGRectMake(0, 0, screen_width, screen_height);
    self.loginBgImg.image = [UIImage imageNamed:@"BgImage"];

    self.userImg.frame = CGRectMake((self.loginBgImg.bounds.size.width - 100)/2, 80, 100, 100);
    self.userImg.image = [UIImage imageNamed:@"usrIcon"];

    self.emailTextField.frame = CGRectMake(screen_width, self.userImg.frame.origin.y + self.userImg.bounds.size.height + 30, screen_width - 60, 40);
    self.pwdTextField.frame = CGRectMake(-screen_width, self.emailTextField.frame.origin.y + self.emailTextField.bounds.size.height, screen_width - 60, 40);
//    self.emailTextField.frame = CGRectMake(30, self.userImg.frame.origin.y + self.userImg.bounds.size.height, screen_width - 60, 40);
//    self.pwdTextField.frame = CGRectMake(30, self.emailTextField.frame.origin.y + self.emailTextField.bounds.size.height, screen_width - 60, 40);

    UIView *emailLeftView = [[UIView alloc]initWithFrame:CGRectMake(0, 0, self.emailTextField.bounds.size.height, self.emailTextField.bounds.size.height)];
    UIImageView *eleftImg = [[UIImageView alloc]initWithFrame:CGRectMake(4, 4, 32, 32)];
    eleftImg.image = [UIImage imageNamed:@"user"];
    [emailLeftView addSubview:eleftImg];
    self.emailTextField.leftView = emailLeftView;
    self.emailTextField.leftViewMode = UITextFieldViewModeAlways;

    UIView *pwdLeftView = [[UIView alloc]initWithFrame:CGRectMake(0, 0, self.pwdTextField.bounds.size.height, self.pwdTextField.bounds.size.height)];
    UIImageView *pleftImg = [[UIImageView alloc]initWithFrame:CGRectMake(4, 4, 32, 32)];
    pleftImg.image = [UIImage imageNamed:@"pwd"];
    [pwdLeftView addSubview:pleftImg];
    self.pwdTextField.leftView = pwdLeftView;
    self.pwdTextField.leftViewMode = UITextFieldViewModeAlways;

    // 简单设置 text输入框出现

//   [UIView animateWithDuration:0.5 animations:^{
//       self.emailTextField.frame = CGRectMake(30, self.userImg.frame.origin.y + self.userImg.bounds.size.height + 30, screen_width - 60, 40);
//       self.pwdTextField.frame = CGRectMake(30, self.emailTextField.frame.origin.y + self.emailTextField.bounds.size.height, screen_width - 60, 40);
//
//   } completion:nil];

    // 设置 text输入框有动画效果的飞入
    [UIView animateWithDuration:0.5 delay:0 options:UIViewAnimationOptionCurveEaseInOut  animations:^{
        self.emailTextField.frame = CGRectMake(30, self.userImg.frame.origin.y + self.userImg.bounds.size.height + 30, screen_width - 60, 40);
    } completion:nil];
    CGAffineTransform rotation = CGAffineTransformMakeRotation(M_PI);
    [UIView animateWithDuration:0.5 delay:0.3 options:UIViewAnimationOptionCurveLinear animations:^{
        self.pwdTextField.frame = CGRectMake(30, self.emailTextField.frame.origin.y + self.emailTextField.bounds.size.height, screen_width - 60, 40);
        self.userImg.transform = rotation;
    } completion:nil];


    // Do any additional setup after loading the view, typically from a nib.
}

- (void)viewWillAppear:(BOOL)animated
{

}

- (void)didReceiveMemoryWarning {
    [super didReceiveMemoryWarning];
    // Dispose of any resources that can be recreated.
}

@end
标签:
原文地址:http://www.cnblogs.com/ting-miao/p/5338230.html