标签:
WPF MVVM+EF增删改查 简单示例(一)实现了对学生信息的管理。
现在需求发生变更,在录入学生资料的时候同时需要录入学生的图片信息,并且一名学生只能有一张图片资料。并可对学生的图片资料进行更新。
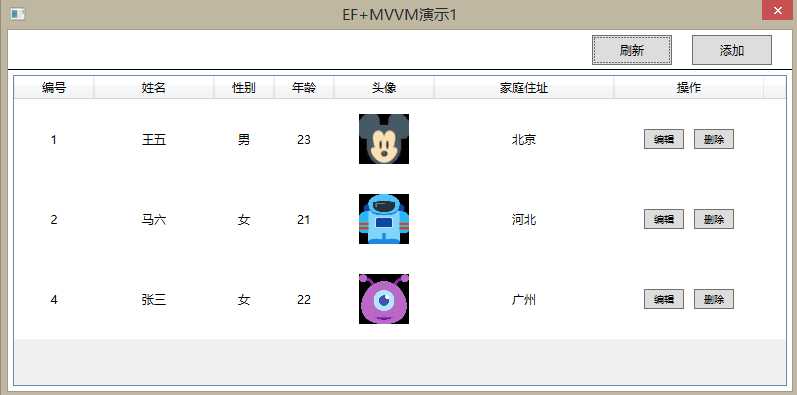
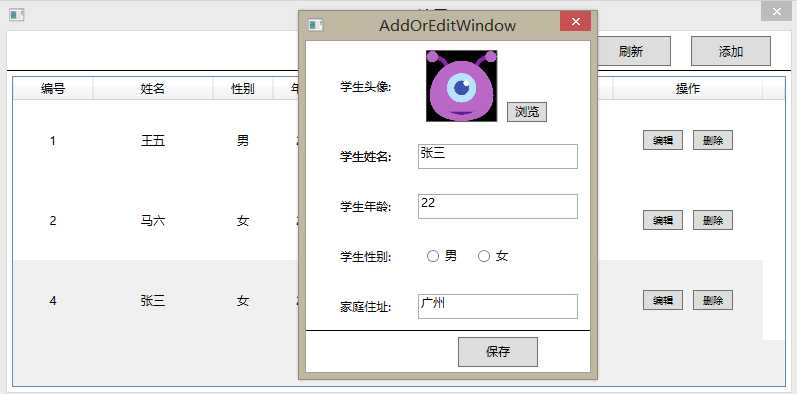
添加了那些功能,先看看效果图:


第一步:添加实体类StudentPhotoEntity.cs
  public class StudentPhotoEntity
    {
        public int StudentId { get; set; }
        public byte[] StudentPhoto { get; set; }
        public virtual StudentEntity Student { get; set; }
    }
第二步:修改实体类StudentEntity.cs
  public class StudentEntity
    {
        public int StudentId { get; set; }
        public string StudentName { get; set; }
        public int StudentAge { get; set; }
        public int StudentSex { get; set; }
        public string StudentAddress { get; set; }
        public virtual StudentPhotoEntity StudentPhoto { get; set; }

    }
第三步:添加StudentPhotoEntityMapping.cs
  public class StudentPhotoEntityMapping : EntityTypeConfiguration<StudentPhotoEntity>
    {
        public StudentPhotoEntityMapping()
        {
            this.HasKey(t => t.StudentId);
            this.ToTable("StudentPhoto");
            this.Property(t => t.StudentPhoto).HasColumnName("StudentPhoto").HasColumnType(SqlDbType.Image.ToString()).IsRequired();
        }
    }
第四步:修改StudentEntityMapping.cs
  public class StudentEntityMapping : EntityTypeConfiguration<StudentEntity>
    {
        public StudentEntityMapping()
        {
            this.HasKey(t => t.StudentId);
            this.ToTable("Student");
            this.Property(t => t.StudentId).HasColumnName("StudentId").HasDatabaseGeneratedOption(DatabaseGeneratedOption.Identity).IsRequired();
            this.Property(t => t.StudentName).HasColumnName("StudentName").HasColumnType(SqlDbType.NVarChar.ToString()).HasMaxLength(50).IsRequired();
            this.Property(t => t.StudentAge).HasColumnName("StudentAge").HasColumnType(SqlDbType.Int.ToString()).IsRequired();
            this.Property(t => t.StudentSex).HasColumnName("StudentSex").HasColumnType(SqlDbType.Int.ToString()).IsRequired();
            this.Property(t => t.StudentAddress).HasColumnName("StudentAddress").HasColumnType(SqlDbType.NVarChar.ToString()).HasMaxLength(200).IsRequired();

            this.HasRequired(t => t.StudentPhoto).WithRequiredPrincipal(i => i.Student);
            this.HasOptional(t => t.StudentPhoto).WithRequired(i => i.Student);
        }
    }
第五步:更新数据库
1,将连接字符串修改为绝对路径
2,打开“程序包管理器控制台”
3,输入Add-Migration命令 回车
4,输入Name 回车
5,输入Update-Database 回车
6,修改链接字符串
第六步:修改StudentControl.xaml在DataGrid中添加列
   <DataGridTemplateColumn Header="头像" Width="100" >
                    <DataGridTemplateColumn.CellTemplate>
                        <DataTemplate  >
                            <Grid>
                                <Image Source="{Binding StudentPhoto.StudentPhoto,Converter={StaticResource convertImageAndByte}}" Stretch="Fill" Width="50" Height="50" HorizontalAlignment="Center" VerticalAlignment="Center" ></Image>
                            </Grid>
                        </DataTemplate>
                    </DataGridTemplateColumn.CellTemplate>
                </DataGridTemplateColumn>
第七步:修改AddOrEditWindow.xaml添加图片输入控件
  <StackPanel Grid.Row="0" Grid.Column="1" Orientation="Horizontal" VerticalAlignment="Center" Margin="20,0,0,0">
            <Border BorderThickness="0.6" BorderBrush="Black">
                <Image x:Name="img" Width="70" Height="70" Stretch="Fill" Source="{Binding CurrentStudentEntity.StudentPhoto.StudentPhoto,Mode=TwoWay,Converter={StaticResource convertImageAndByte}}"></Image>
            </Border>
            <Button  Width="40" Height="20" VerticalAlignment="Bottom" Margin="10,0,0,0" Content="浏览" Click="Button_Click"> </Button>
        </StackPanel>
第八步:修改AddOrEditViewModel.cs中的Save()方法
 private void Save()
        {
            StudentEntity student = new StudentEntity()
            {
                StudentName = CurrentStudentEntity.StudentName,
                StudentAge = CurrentStudentEntity.StudentAge,
                StudentSex = IsChecked ? 0 : 1,
                StudentAddress = CurrentStudentEntity.StudentAddress,
                StudentPhoto = new StudentPhotoEntity()
                {
                   StudentPhoto = CurrentStudentEntity.StudentPhoto.StudentPhoto
                }
            };
            if (IsAdd)
            {
                StudentDal.Insert(student);
            }
            else
            {
                student.StudentId = CurrentStudentEntity.StudentId;
                student.StudentPhoto.StudentId = CurrentStudentEntity.StudentId;
                StudentDal.Update(student);
            }
        }
第九步:添加一个转换器类,实现图片与byte[]的相互转化
  [System.Windows.Data.ValueConversion(typeof(byte[]), typeof(ImageSource))]
    public class ConvertImageAndByte : System.Windows.Data.IValueConverter
    {
        public object Convert(object value, Type targetType, object parameter, System.Globalization.CultureInfo culture)
        {
            byte[] binaryimagedata = value as byte[];
            if (binaryimagedata == null) return "";
            using (Stream imageStreamSource = new MemoryStream(binaryimagedata, false))
            {

                JpegBitmapDecoder jpeDecoder = new JpegBitmapDecoder(imageStreamSource, BitmapCreateOptions.PreservePixelFormat, BitmapCacheOption.OnLoad);
                ImageSource imageSource = jpeDecoder.Frames[0];
                return imageSource;
            }

        }

        public object ConvertBack(object value, Type targetType, object parameter, System.Globalization.CultureInfo culture)
        {
            if (value == null)
                return "";
            string path = value.ToString().Substring(8, value.ToString().Length - 8);
            System.Drawing.Bitmap bitmap;
            BitmapSource bmp = new BitmapImage(new Uri(path, UriKind.Absolute));
            using (MemoryStream outStream = new MemoryStream())
            {
                BitmapEncoder enc = new BmpBitmapEncoder();

                enc.Frames.Add(BitmapFrame.Create(bmp));
                enc.Save(outStream);
                bitmap = new System.Drawing.Bitmap(outStream);
            }
            System.Drawing.Bitmap bm = new System.Drawing.Bitmap(bitmap);

            System.IO.MemoryStream stream = new System.IO.MemoryStream();
            bm.Save(stream, System.Drawing.Imaging.ImageFormat.Jpeg);
            byte[] imgBytes = stream.ToArray();
            stream.Close();


            return imgBytes;
        }
    }
此文仅作学习中的记录,希望对看到此文的同学有一点点的帮助。
文中如果有不正确的地方欢迎指正。
WPF MVVM+EF增删改查 简单示例(二) 1对1 映射
标签:
原文地址:http://www.cnblogs.com/qindongshou/p/5354955.html