标签:
select server
#!/usr/bin/env python
# -*- coding:utf-8 -*-
#_*_coding:utf-8_*_
__author__ = ‘Alex Li‘
import select
import socket
import sys
import queue
# Create a TCP/IP socket
server = socket.socket(socket.AF_INET, socket.SOCK_STREAM)
server.setblocking(False)
# Bind the socket to the port
server_address = (‘localhost‘, 10000)
print(sys.stderr, ‘starting up on %s port %s‘ % server_address)
server.bind(server_address)
# Listen for incoming connections
server.listen(5)
# Sockets from which we expect to read
inputs = [ server ]
# Sockets to which we expect to write
outputs = [ ]
message_queues = {}
while inputs:
# Wait for at least one of the sockets to be ready for processing
print( ‘\nwaiting for the next event‘)
readable, writable, exceptional = select.select(inputs, outputs, inputs,2)
# Handle inputs
for s in readable:
if s is server: #new connection
# A "readable" server socket is ready to accept a connection
connection, client_address = s.accept()
print(‘new connection from‘, client_address)
connection.setblocking(False)
inputs.append(connection)
# Give the connection a queue for data we want to send
message_queues[connection] = queue.Queue()
else:
data = s.recv(1024)
if data:
# A readable client socket has data
print(sys.stderr, ‘received "%s" from %s‘ % (data, s.getpeername()) )
message_queues[s].put(data)
# Add output channel for response
if s not in outputs:
outputs.append(s)
else:
# Interpret empty result as closed connection
print(‘closing‘, client_address, ‘after reading no data‘)
# Stop listening for input on the connection
if s in outputs:
outputs.remove(s) #既然客户端都断开了,我就不用再给它返回数据了,所以这时候如果这个客户端的连接对象还在outputs列表中,就把它删掉
inputs.remove(s) #inputs中也删除掉
s.close() #把这个连接关闭掉
# Remove message queue
del message_queues[s]
# Handle outputs
for s in writable:
try:
next_msg = message_queues[s].get_nowait()
except queue.Empty:
# No messages waiting so stop checking for writability.
print(‘output queue for‘, s.getpeername(), ‘is empty‘)
outputs.remove(s)
else:
print( ‘sending "%s" to %s‘ % (next_msg, s.getpeername()))
s.send(next_msg)
# Handle "exceptional conditions"
for s in exceptional:
print(‘handling exceptional condition for‘, s.getpeername() )
# Stop listening for input on the connection
inputs.remove(s)
if s in outputs:
outputs.remove(s)
s.close()
# Remove message queue
del message_queues[s]
select client
#!/usr/bin/env python
# -*- coding:utf-8 -*-
import socket
import sys
messages = [ ‘This is the message. ‘,
‘It will be sent ‘,
‘in parts.‘,
]
server_address = (‘localhost‘, 10000)
# Create a TCP/IP socket
socks = [ socket.socket(socket.AF_INET, socket.SOCK_STREAM),
socket.socket(socket.AF_INET, socket.SOCK_STREAM),
socket.socket(socket.AF_INET, socket.SOCK_STREAM),
socket.socket(socket.AF_INET, socket.SOCK_STREAM),
]
# Connect the socket to the port where the server is listening
print >>sys.stderr, ‘connecting to %s port %s‘ % server_address
for s in socks:
s.connect(server_address)
for message in messages:
# Send messages on both sockets
for s in socks:
print >>sys.stderr, ‘%s: sending "%s"‘ % (s.getsockname(), message)
s.send(message)
# Read responses on both sockets
for s in socks:
data = s.recv(1024)
print >>sys.stderr, ‘%s: received "%s"‘ % (s.getsockname(), data)
if not data:
print >>sys.stderr, ‘closing socket‘, s.getsockname()
s.close()
###########################################################################################
http://www.cnblogs.com/alex3714/articles/5248247.html
事件驱动
简而言之,事件驱动分为二个部分:第一,注册事件;第二,触发事件。 如果想使用某一个事件驱动框架,得按照它定义的规则,自己写事件,注册,然后触发。
自定义事件驱动框架,命名为:“qiang”:
#!/usr/bin/env python
# -*- coding:utf-8 -*-
# event_drive.py
event_list = []
def run():
for event in event_list:
obj = event()
obj.execute()
class BaseHandler(object):
"""
用户必须继承该类,从而规范所有类的方法(类似于接口的功能)
"""
def execute(self):
raise Exception(‘you must overwrite execute‘)
最牛逼的事件驱动框架
程序员使用“qiang”:
#!/usr/bin/env python
# -*- coding:utf-8 -*-
from source import event_drive
class MyHandler(event_drive.BaseHandler):
def execute(self):
print ‘event-drive execute MyHandler‘
event_drive.event_list.append(MyHandler)
event_drive.run()
论事件驱动与异步IO
事件驱动编程是一种编程范式,这里程序的执行流由外部事件来决定。它的特点是包含一个事件循环,当外部事件发生时使用回调机制来触发相应的处理。另外两种常见的编程范式是(单线程)同步以及多线程编程。
让我们用例子来比较和对比一下单线程、多线程以及事件驱动编程模型。下图展示了随着时间的推移,这三种模式下程序所做的工作。这个程序有3个任务需要完成,每个任务都在等待I/O操作时阻塞自身。阻塞在I/O操作上所花费的时间已经用灰色框标示出来了。
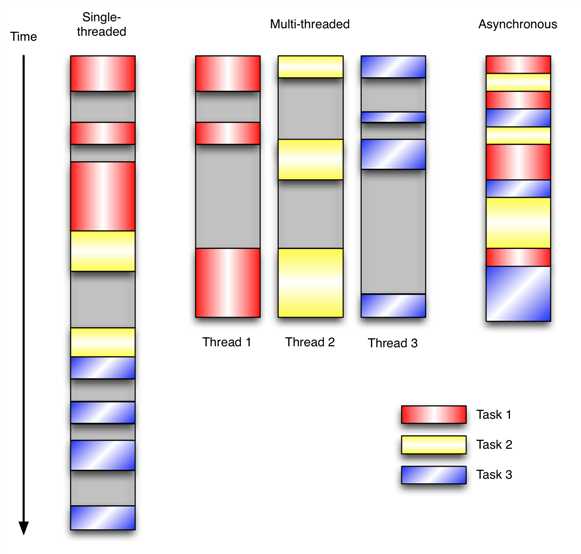
在单线程同步模型中,任务按照顺序执行。如果某个任务因为I/O而阻塞,其他所有的任务都必须等待,直到它完成之后它们才能依次执行。这种明确的执行顺序和串行化处理的行为是很容易推断得出的。如果任务之间并没有互相依赖的关系,但仍然需要互相等待的话这就使得程序不必要的降低了运行速度。
在多线程版本中,这3个任务分别在独立的线程中执行。这些线程由操作系统来管理,在多处理器系统上可以并行处理,或者在单处理器系统上交错执行。这使得当某个线程阻塞在某个资源的同时其他线程得以继续执行。与完成类似功能的同步程序相比,这种方式更有效率,但程序员必须写代码来保护共享资源,防止其被多个线程同时访问。多线程程序更加难以推断,因为这类程序不得不通过线程同步机制如锁、可重入函数、线程局部存储或者其他机制来处理线程安全问题,如果实现不当就会导致出现微妙且令人痛不欲生的bug。
在事件驱动版本的程序中,3个任务交错执行,但仍然在一个单独的线程控制中。当处理I/O或者其他昂贵的操作时,注册一个回调到事件循环中,然后当I/O操作完成时继续执行。回调描述了该如何处理某个事件。事件循环轮询所有的事件,当事件到来时将它们分配给等待处理事件的回调函数。这种方式让程序尽可能的得以执行而不需要用到额外的线程。事件驱动型程序比多线程程序更容易推断出行为,因为程序员不需要关心线程安全问题。
当我们面对如下的环境时,事件驱动模型通常是一个好的选择:
1. 程序中有许多任务,而且…
2. 任务之间高度独立(因此它们不需要互相通信,或者等待彼此)而且…
3. 在等待事件到来时,某些任务会阻塞。
当应用程序需要在任务间共享可变的数据时,这也是一个不错的选择,因为这里不需要采用同步处理。
网络应用程序通常都有上述这些特点,这使得它们能够很好的契合事件驱动编程模型。
Twsited异步网络框架
Twisted是一个事件驱动的网络框架,其中包含了诸多功能,例如:网络协议、线程、数据库管理、网络操作、电子邮件等
Protocols
Protocols描述了如何以异步的方式处理网络中的事件。HTTP、DNS以及IMAP是应用层协议中的例子。Protocols实现了IProtocol接口,它包含如下的方法:
makeConnection 在transport对象和服务器之间建立一条连接
connectionMade 连接建立起来后调用
dataReceived 接收数据时调用
connectionLost 关闭连接时调用
Transports
Transports代表网络中两个通信结点之间的连接。Transports负责描述连接的细节,比如连接是面向流式的还是面向数据报的,流控以及可靠性。TCP、UDP和Unix套接字可作为transports的例子。它们被设计为“满足最小功能单元,同时具有最大程度的可复用性”,而且从协议实现中分离出来,这让许多协议可以采用相同类型的传输。Transports实现了ITransports接口,它包含如下的方法:
write 以非阻塞的方式按顺序依次将数据写到物理连接上
writeSequence 将一个字符串列表写到物理连接上
loseConnection 将所有挂起的数据写入,然后关闭连接
getPeer 取得连接中对端的地址信息
getHost 取得连接中本端的地址信息将transports从协议中分离出来也使得对这两个层次的测试变得更加简单。可以通过简单地写入一个字符串来模拟传输,用这种方式来检查。
Twisted深入
http://krondo.com/an-introduction-to-asynchronous-programming-and-twisted/
http://blog.csdn.net/hanhuili/article/details/9389433
optparse --- 解析输入参数的模块
azureuser@MyUbuntuVM:~/pythonScripts$ cat optparseExample.py
#!/usr/bin/env python
import optparse
parser = optparse.OptionParser()
parser.add_option("-f", "--file", dest="filenames",help="file help info")
parser.add_option("-q", "--quiet", dest="quietnames",help="quiet help info")
(options,args) = parser.parse_args([‘-f‘,‘aa‘,‘dd‘,‘-qbb‘,‘cc‘])
print(options,args)
(options,args) = parser.parse_args()
print(options,args)
azureuser@MyUbuntuVM:~/pythonScripts$ python3 optparseExample.py
{‘quietnames‘: ‘bb‘, ‘filenames‘: ‘aa‘} [‘dd‘, ‘cc‘]
{‘quietnames‘: None, ‘filenames‘: None} []
azureuser@MyUbuntuVM:~/pythonScripts$ python3 optparseExample.py -f ab -q abc
{‘filenames‘: ‘aa‘, ‘quietnames‘: ‘bb‘} [‘dd‘, ‘cc‘]
{‘filenames‘: ‘ab‘, ‘quietnames‘: ‘abc‘} []
azureuser@MyUbuntuVM:~/pythonScripts$ python3 optparseExample.py -f ab 11 -q abc 22
{‘quietnames‘: ‘bb‘, ‘filenames‘: ‘aa‘} [‘dd‘, ‘cc‘]
{‘quietnames‘: ‘abc‘, ‘filenames‘: ‘ab‘} [‘11‘, ‘22‘]
azureuser@MyUbuntuVM:~/pythonScripts$
#############################################################################################################
http://www.cnblogs.com/wupeiqi/articles/5132791.html
redis
pip3 install redis
redis commands:
./redis-cli
keys * -- > check all keys
set name aa ex 5 --- > timeout = 5
save -- > save values to disk
redis是一个key-value存储系统。和Memcached类似,它支持存储的value类型相对更多,包括string(字符串)、list(链表)、set(集合)、zset(sorted set --有序集合)和hash(哈希类型)。这些数据类型都支持push/pop、add/remove及取交集并集和差集及更丰富的操作,而且这些操作都是原子性的。在此基础上,redis支持各种不同方式的排序。与memcached一样,为了保证效率,数据都是缓存在内存中。区别的是redis会周期性的把更新的数据写入磁盘或者把修改操作写入追加的记录文件,并且在此基础上实现了master-slave(主从)同步。
一、Redis安装和基本使用
wget http://download.redis.io/releases/redis-3.0.6.tar.gz
tar xzf redis-3.0.6.tar.gz
cd redis-3.0.6
make
启动服务端
1
src/redis-server
启动客户端
src/redis-cli
redis> set foo bar
OK
redis> get foo
"bar"
二、Python操作Redis
sudo pip install redis
or
sudo easy_install redis
or
源码安装
详见:https://github.com/WoLpH/redis-py
API使用
redis-py 的API的使用可以分类为:
连接方式
连接池
操作
String 操作
Hash 操作
List 操作
Set 操作
Sort Set 操作
管道
发布订阅
1、操作模式
redis-py提供两个类Redis和StrictRedis用于实现Redis的命令,StrictRedis用于实现大部分官方的命令,并使用官方的语法和命令,Redis是StrictRedis的子类,用于向后兼容旧版本的redis-py。
#!/usr/bin/env python
# -*- coding:utf-8 -*-
import redis
r = redis.Redis(host=‘10.211.55.4‘, port=6379)
r.set(‘foo‘, ‘Bar‘)
print r.get(‘foo‘)
2、连接池
redis-py使用connection pool来管理对一个redis server的所有连接,避免每次建立、释放连接的开销。默认,每个Redis实例都会维护一个自己的连接池。可以直接建立一个连接池,然后作为参数Redis,这样就可以实现多个Redis实例共享一个连接池。
#!/usr/bin/env python
# -*- coding:utf-8 -*-
import redis
pool = redis.ConnectionPool(host=‘10.211.55.4‘, port=6379)
r = redis.Redis(connection_pool=pool)
r.set(‘foo‘, ‘Bar‘)
print r.get(‘foo‘)
3、操作
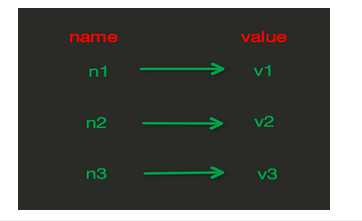
String操作,redis中的String在在内存中按照一个name对应一个value来存储。如图:
set(name, value, ex=None, px=None, nx=False, xx=False)
在Redis中设置值,默认,不存在则创建,存在则修改
参数:
ex,过期时间(秒)
px,过期时间(毫秒)
nx,如果设置为True,则只有name不存在时,当前set操作才执行
xx,如果设置为True,则只有name存在时,岗前set操作才执行
setnx(name, value)
设置值,只有name不存在时,执行设置操作(添加)
setex(name, value, time)
# 设置值
# 参数:
# time,过期时间(数字秒 或 timedelta对象)
psetex(name, time_ms, value)
# 设置值
# 参数:
# time_ms,过期时间(数字毫秒 或 timedelta对象)
mset(*args, **kwargs)
批量设置值
如:
mset(k1=‘v1‘, k2=‘v2‘)
或
mget({‘k1‘: ‘v1‘, ‘k2‘: ‘v2‘})
get(name)
获取值
mget(keys, *args)
批量获取
如:
mget(‘ylr‘, ‘wupeiqi‘)
或
r.mget([‘ylr‘, ‘wupeiqi‘])
getset(name, value)
设置新值并获取原来的值
getrange(key, start, end)
# 获取子序列(根据字节获取,非字符)
# 参数:
# name,Redis 的 name
# start,起始位置(字节)
# end,结束位置(字节)
# 如: "武沛齐" ,0-3表示 "武"
setrange(name, offset, value)
# 修改字符串内容,从指定字符串索引开始向后替换(新值太长时,则向后添加)
# 参数:
# offset,字符串的索引,字节(一个汉字三个字节)
# value,要设置的值
setbit(name, offset, value)
# 对name对应值的二进制表示的位进行操作
# 参数:
# name,redis的name
# offset,位的索引(将值变换成二进制后再进行索引)
# value,值只能是 1 或 0
# 注:如果在Redis中有一个对应: n1 = "foo",
那么字符串foo的二进制表示为:01100110 01101111 01101111
所以,如果执行 setbit(‘n1‘, 7, 1),则就会将第7位设置为1,
那么最终二进制则变成 01100111 01101111 01101111,即:"goo"
# 扩展,转换二进制表示:
# source = "武沛齐"
source = "foo"
for i in source:
num = ord(i)
print bin(num).replace(‘b‘,‘‘)
特别的,如果source是汉字 "武沛齐"怎么办?
答:对于utf-8,每一个汉字占 3 个字节,那么 "武沛齐" 则有 9个字节
对于汉字,for循环时候会按照 字节 迭代,那么在迭代时,将每一个字节转换 十进制数,然后再将十进制数转换成二进制
11100110 10101101 10100110 11100110 10110010 10011011 11101001 10111101 10010000
-------------------------- ----------------------------- -----------------------------
武 沛 齐
getbit(name, offset)
# 获取name对应的值的二进制表示中的某位的值 (0或1)
bitcount(key, start=None, end=None)
# 获取name对应的值的二进制表示中 1 的个数
# 参数:
# key,Redis的name
# start,位起始位置
# end,位结束位置
bitop(operation, dest, *keys)
# 获取多个值,并将值做位运算,将最后的结果保存至新的name对应的值
# 参数:
# operation,AND(并) 、 OR(或) 、 NOT(非) 、 XOR(异或)
# dest, 新的Redis的name
# *keys,要查找的Redis的name
# 如:
bitop("AND", ‘new_name‘, ‘n1‘, ‘n2‘, ‘n3‘)
# 获取Redis中n1,n2,n3对应的值,然后讲所有的值做位运算(求并集),然后将结果保存 new_name 对应的值中
strlen(name)
# 返回name对应值的字节长度(一个汉字3个字节)
incr(self, name, amount=1)
# 自增 name对应的值,当name不存在时,则创建name=amount,否则,则自增。
# 参数:
# name,Redis的name
# amount,自增数(必须是整数)
# 注:同incrby
incrbyfloat(self, name, amount=1.0)
# 自增 name对应的值,当name不存在时,则创建name=amount,否则,则自增。
# 参数:
# name,Redis的name
# amount,自增数(浮点型)
decr(self, name, amount=1)
# 自减 name对应的值,当name不存在时,则创建name=amount,否则,则自减。
# 参数:
# name,Redis的name
# amount,自减数(整数)
append(key, value)
# 在redis name对应的值后面追加内容
# 参数:
key, redis的name
value, 要追加的字符串
Hash操作,redis中Hash在内存中的存储格式如下图: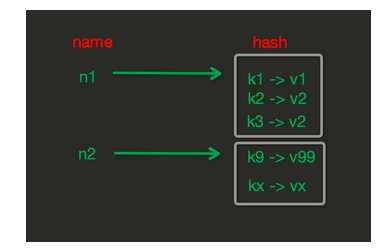
hset(name, key, value)
# name对应的hash中设置一个键值对(不存在,则创建;否则,修改)
# 参数:
# name,redis的name
# key,name对应的hash中的key
# value,name对应的hash中的value
# 注:
# hsetnx(name, key, value),当name对应的hash中不存在当前key时则创建(相当于添加)
hmset(name, mapping)
# 在name对应的hash中批量设置键值对
# 参数:
# name,redis的name
# mapping,字典,如:{‘k1‘:‘v1‘, ‘k2‘: ‘v2‘}
# 如:
# r.hmset(‘xx‘, {‘k1‘:‘v1‘, ‘k2‘: ‘v2‘})
hget(name,key)
# 在name对应的hash中获取根据key获取value
hmget(name, keys, *args)
# 在name对应的hash中获取多个key的值
# 参数:
# name,reids对应的name
# keys,要获取key集合,如:[‘k1‘, ‘k2‘, ‘k3‘]
# *args,要获取的key,如:k1,k2,k3
# 如:
# r.mget(‘xx‘, [‘k1‘, ‘k2‘])
# 或
# print r.hmget(‘xx‘, ‘k1‘, ‘k2‘)
hgetall(name)
获取name对应hash的所有键值
hlen(name)
# 获取name对应的hash中键值对的个数
hkeys(name)
# 获取name对应的hash中所有的key的值
hvals(name)
# 获取name对应的hash中所有的value的值
hexists(name, key)
# 检查name对应的hash是否存在当前传入的key
hdel(name,*keys)
# 将name对应的hash中指定key的键值对删除
hincrby(name, key, amount=1)
# 自增name对应的hash中的指定key的值,不存在则创建key=amount
# 参数:
# name,redis中的name
# key, hash对应的key
# amount,自增数(整数)
hincrbyfloat(name, key, amount=1.0)
# 自增name对应的hash中的指定key的值,不存在则创建key=amount
# 参数:
# name,redis中的name
# key, hash对应的key
# amount,自增数(浮点数)
# 自增name对应的hash中的指定key的值,不存在则创建key=amount
hscan(name, cursor=0, match=None, count=None)
# 增量式迭代获取,对于数据大的数据非常有用,hscan可以实现分片的获取数据,并非一次性将数据全部获取完,从而放置内存被撑爆
# 参数:
# name,redis的name
# cursor,游标(基于游标分批取获取数据)
# match,匹配指定key,默认None 表示所有的key
# count,每次分片最少获取个数,默认None表示采用Redis的默认分片个数
# 如:
# 第一次:cursor1, data1 = r.hscan(‘xx‘, cursor=0, match=None, count=None)
# 第二次:cursor2, data1 = r.hscan(‘xx‘, cursor=cursor1, match=None, count=None)
# ...
# 直到返回值cursor的值为0时,表示数据已经通过分片获取完毕
hscan_iter(name, match=None, count=None)
# 利用yield封装hscan创建生成器,实现分批去redis中获取数据
# 参数:
# match,匹配指定key,默认None 表示所有的key
# count,每次分片最少获取个数,默认None表示采用Redis的默认分片个数
# 如:
# for item in r.hscan_iter(‘xx‘):
# print item
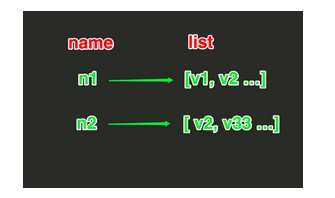
List操作,redis中的List在在内存中按照一个name对应一个List来存储。如图:
lpush(name,values)
# 在name对应的list中添加元素,每个新的元素都添加到列表的最左边
# 如:
# r.lpush(‘oo‘, 11,22,33)
# 保存顺序为: 33,22,11
# 扩展:
# rpush(name, values) 表示从右向左操作
lpushx(name,value)
# 在name对应的list中添加元素,只有name已经存在时,值添加到列表的最左边
# 更多:
# rpushx(name, value) 表示从右向左操作
llen(name)
# name对应的list元素的个数
linsert(name, where, refvalue, value))
# 在name对应的列表的某一个值前或后插入一个新值
# 参数:
# name,redis的name
# where,BEFORE或AFTER
# refvalue,标杆值,即:在它前后插入数据
# value,要插入的数据
r.lset(name, index, value)
# 对name对应的list中的某一个索引位置重新赋值
# 参数:
# name,redis的name
# index,list的索引位置
# value,要设置的值
r.lrem(name, value, num)
# 在name对应的list中删除指定的值
# 参数:
# name,redis的name
# value,要删除的值
# num, num=0,删除列表中所有的指定值;
# num=2,从前到后,删除2个;
# num=-2,从后向前,删除2个
lpop(name)
# 在name对应的列表的左侧获取第一个元素并在列表中移除,返回值则是第一个元素
# 更多:
# rpop(name) 表示从右向左操作
lindex(name, index)
在name对应的列表中根据索引获取列表元素
lrange(name, start, end)
# 在name对应的列表分片获取数据
# 参数:
# name,redis的name
# start,索引的起始位置
# end,索引结束位置
ltrim(name, start, end)
# 在name对应的列表中移除没有在start-end索引之间的值
# 参数:
# name,redis的name
# start,索引的起始位置
# end,索引结束位置
rpoplpush(src, dst)
# 从一个列表取出最右边的元素,同时将其添加至另一个列表的最左边
# 参数:
# src,要取数据的列表的name
# dst,要添加数据的列表的name
blpop(keys, timeout)
# 将多个列表排列,按照从左到右去pop对应列表的元素
# 参数:
# keys,redis的name的集合
# timeout,超时时间,当元素所有列表的元素获取完之后,阻塞等待列表内有数据的时间(秒), 0 表示永远阻塞
# 更多:
# r.brpop(keys, timeout),从右向左获取数据
brpoplpush(src, dst, timeout=0)
# 从一个列表的右侧移除一个元素并将其添加到另一个列表的左侧
# 参数:
# src,取出并要移除元素的列表对应的name
# dst,要插入元素的列表对应的name
# timeout,当src对应的列表中没有数据时,阻塞等待其有数据的超时时间(秒),0 表示永远阻塞
自定义增量迭代
# 由于redis类库中没有提供对列表元素的增量迭代,如果想要循环name对应的列表的所有元素,那么就需要:
# 1、获取name对应的所有列表
# 2、循环列表
# 但是,如果列表非常大,那么就有可能在第一步时就将程序的内容撑爆,所有有必要自定义一个增量迭代的功能:
def list_iter(name):
"""
自定义redis列表增量迭代
:param name: redis中的name,即:迭代name对应的列表
:return: yield 返回 列表元素
"""
list_count = r.llen(name)
for index in xrange(list_count):
yield r.lindex(name, index)
# 使用
for item in list_iter(‘pp‘):
print item
Set操作,Set集合就是不允许重复的列表
sadd(name,values)
# name对应的集合中添加元素
scard(name)
获取name对应的集合中元素个数
sdiff(keys, *args)
在第一个name对应的集合中且不在其他name对应的集合的元素集合
sdiffstore(dest, keys, *args)
# 获取第一个name对应的集合中且不在其他name对应的集合,再将其新加入到dest对应的集合中
sinter(keys, *args)
# 获取多一个name对应集合的并集
sinterstore(dest, keys, *args)
# 获取多一个name对应集合的并集,再讲其加入到dest对应的集合中
sismember(name, value)
# 检查value是否是name对应的集合的成员
smembers(name)
# 获取name对应的集合的所有成员
smove(src, dst, value)
# 将某个成员从一个集合中移动到另外一个集合
spop(name)
# 从集合的右侧(尾部)移除一个成员,并将其返回
srandmember(name, numbers)
# 从name对应的集合中随机获取 numbers 个元素
srem(name, values)
# 在name对应的集合中删除某些值
sunion(keys, *args)
# 获取多一个name对应的集合的并集
sunionstore(dest,keys, *args)
# 获取多一个name对应的集合的并集,并将结果保存到dest对应的集合中
sscan(name, cursor=0, match=None, count=None)
sscan_iter(name, match=None, count=None)
# 同字符串的操作,用于增量迭代分批获取元素,避免内存消耗太大
有序集合,在集合的基础上,为每元素排序;元素的排序需要根据另外一个值来进行比较,所以,对于有序集合,每一个元素有两个值,即:值和分数,分数专门用来做排序。
zadd(name, *args, **kwargs)
# 在name对应的有序集合中添加元素
# 如:
# zadd(‘zz‘, ‘n1‘, 1, ‘n2‘, 2)
# 或
# zadd(‘zz‘, n1=11, n2=22)
zcard(name)
# 获取name对应的有序集合元素的数量
zcount(name, min, max)
# 获取name对应的有序集合中分数 在 [min,max] 之间的个数
zincrby(name, value, amount)
# 自增name对应的有序集合的 name 对应的分数
r.zrange( name, start, end, desc=False, withscores=False, score_cast_func=float)
# 按照索引范围获取name对应的有序集合的元素
# 参数:
# name,redis的name
# start,有序集合索引起始位置(非分数)
# end,有序集合索引结束位置(非分数)
# desc,排序规则,默认按照分数从小到大排序
# withscores,是否获取元素的分数,默认只获取元素的值
# score_cast_func,对分数进行数据转换的函数
# 更多:
# 从大到小排序
# zrevrange(name, start, end, withscores=False, score_cast_func=float)
# 按照分数范围获取name对应的有序集合的元素
# zrangebyscore(name, min, max, start=None, num=None, withscores=False, score_cast_func=float)
# 从大到小排序
# zrevrangebyscore(name, max, min, start=None, num=None, withscores=False, score_cast_func=float)
zrank(name, value)
# 获取某个值在 name对应的有序集合中的排行(从 0 开始)
# 更多:
# zrevrank(name, value),从大到小排序
zrangebylex(name, min, max, start=None, num=None)
# 当有序集合的所有成员都具有相同的分值时,有序集合的元素会根据成员的 值 (lexicographical ordering)来进行排序,而这个命令则可以返回给定的有序集合键 key 中, 元素的值介于 min 和 max 之间的成员
# 对集合中的每个成员进行逐个字节的对比(byte-by-byte compare), 并按照从低到高的顺序, 返回排序后的集合成员。 如果两个字符串有一部分内容是相同的话, 那么命令会认为较长的字符串比较短的字符串要大
# 参数:
# name,redis的name
# min,左区间(值)。 + 表示正无限; - 表示负无限; ( 表示开区间; [ 则表示闭区间
# min,右区间(值)
# start,对结果进行分片处理,索引位置
# num,对结果进行分片处理,索引后面的num个元素
# 如:
# ZADD myzset 0 aa 0 ba 0 ca 0 da 0 ea 0 fa 0 ga
# r.zrangebylex(‘myzset‘, "-", "[ca") 结果为:[‘aa‘, ‘ba‘, ‘ca‘]
# 更多:
# 从大到小排序
# zrevrangebylex(name, max, min, start=None, num=None)
zrem(name, values)
# 删除name对应的有序集合中值是values的成员
# 如:zrem(‘zz‘, [‘s1‘, ‘s2‘])
zremrangebyrank(name, min, max)
# 根据排行范围删除
zremrangebyscore(name, min, max)
# 根据分数范围删除
zremrangebylex(name, min, max)
# 根据值返回删除
zscore(name, value)
# 获取name对应有序集合中 value 对应的分数
zinterstore(dest, keys, aggregate=None)
# 获取两个有序集合的交集,如果遇到相同值不同分数,则按照aggregate进行操作
# aggregate的值为: SUM MIN MAX
zunionstore(dest, keys, aggregate=None)
# 获取两个有序集合的并集,如果遇到相同值不同分数,则按照aggregate进行操作
# aggregate的值为: SUM MIN MAX
zscan(name, cursor=0, match=None, count=None, score_cast_func=float)
zscan_iter(name, match=None, count=None,score_cast_func=float)
# 同字符串相似,相较于字符串新增score_cast_func,用来对分数进行操作
其他常用操作
delete(*names)
# 根据删除redis中的任意数据类型
exists(name)
# 检测redis的name是否存在
keys(pattern=‘*‘)
# 根据模型获取redis的name
# 更多:
# KEYS * 匹配数据库中所有 key 。
# KEYS h?llo 匹配 hello , hallo 和 hxllo 等。
# KEYS h*llo 匹配 hllo 和 heeeeello 等。
# KEYS h[ae]llo 匹配 hello 和 hallo ,但不匹配 hillo
expire(name ,time)
# 为某个redis的某个name设置超时时间
rename(src, dst)
# 对redis的name重命名为
move(name, db))
# 将redis的某个值移动到指定的db下
randomkey()
# 随机获取一个redis的name(不删除)
type(name)
# 获取name对应值的类型
scan(cursor=0, match=None, count=None)
scan_iter(match=None, count=None)
# 同字符串操作,用于增量迭代获取key
4、管道
redis-py默认在执行每次请求都会创建(连接池申请连接)和断开(归还连接池)一次连接操作,如果想要在一次请求中指定多个命令,则可以使用pipline实现一次请求指定多个命令,并且默认情况下一次pipline 是原子性操作。
#!/usr/bin/env python
# -*- coding:utf-8 -*-
import redis
pool = redis.ConnectionPool(host=‘10.211.55.4‘, port=6379)
r = redis.Redis(connection_pool=pool)
# pipe = r.pipeline(transaction=False)
pipe = r.pipeline(transaction=True)
r.set(‘name‘, ‘alex‘)
r.set(‘role‘, ‘sb‘)
pipe.execute()
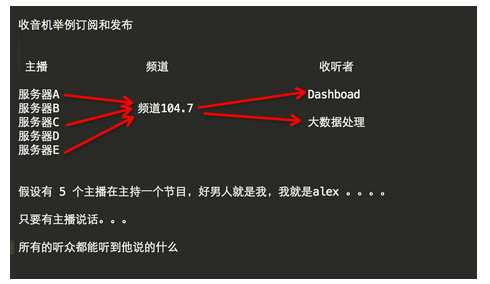
5. 发布订阅
cat redis_helper.py
#!/usr/bin/env python
# -*- coding:utf-8 -*-
import redis
class RedisHelper:
def __init__(self):
self.__conn = redis.Redis(host=‘10.211.55.4‘)
self.chan_sub = ‘fm104.5‘
self.chan_pub = ‘fm104.5‘
def public(self, msg):
self.__conn.publish(self.chan_pub, msg)
return True
def subscriber(self):
pub = self.__conn.pubsub()
pub.subscribe(self.chan_sub)
pub.parse_response()
return pub
订阅者:
#!/usr/bin/env python
# -*- coding:utf-8 -*-
from redis_helper import RedisHelper
obj = RedisHelper()
redis_sub = obj.subscriber()
while True:
msg= redis_sub.parse_response()
print msg
发布者:
#!/usr/bin/env python
# -*- coding:utf-8 -*-
from redis_helper import RedisHelper
obj = RedisHelper()
obj.public(‘hello‘)
更多参见:https://github.com/andymccurdy/redis-py/
http://doc.redisfans.com/
##################################################################################
RabbitMQ
RabbitMQ是一个在AMQP基础上完整的,可复用的企业消息系统。他遵循Mozilla Public License开源协议。
MQ全称为Message Queue, 消息队列(MQ)是一种应用程序对应用程序的通信方法。应用程序通过读写出入队列的消息(针对应用程序的数据)来通信,而无需专用连接来链接它们。消 息传递指的是程序之间通过在消息中发送数据进行通信,而不是通过直接调用彼此来通信,直接调用通常是用于诸如远程过程调用的技术。排队指的是应用程序通过 队列来通信。队列的使用除去了接收和发送应用程序同时执行的要求。
install
http://www.rabbitmq.com/install-debian.html
wget http://www.rabbitmq.com//releases/rabbitmq-server/v3.6.1/rabbitmq-server_3.6.1-1_all.deb
apt-get install erlang
dpkg -i rabbitmq-server_3.6.1-1_all.deb
pip3 install pika
生产者:
user@MyUbuntuVM:~/pythonScripts/rabbitmq$ cat produce.py
#!/usr/bin/env python
import pika,time
connection = pika.BlockingConnection(pika.ConnectionParameters(host=‘localhost‘))
channel = connection.channel()
channel.queue_declare(queue=‘hello‘)
channel.basic_publish(exchange=‘‘,routing_key=‘hello‘,body=‘at %s Hello World!‘%time.strftime("%Y-%m-%d %H:%M:%S"))
print("Sent ‘hello world!‘")
connection.close()
消费者:
user@MyUbuntuVM:~/pythonScripts/rabbitmq$ cat consume.py
#!/usr/bin/env python
import pika,time
connection=pika.BlockingConnection(pika.ConnectionParameters(host=‘localhost‘))
channel = connection.channel()
channel.queue_declare(queue=‘hello‘)
‘‘‘once we restart rabbitmq server, the queue will disappear, so if we execute consume.py before produce.py, will return error: no queue hello -- > if we comment the upper declare sentence,because queue hello has gone, produce.py does not execute, below basic_consume already uses queue hello, then you will see the error.‘‘‘
def callback(ch,method,properties,body):
print("at %s received %r" %(time.strftime("%Y-%m-%d %H:%M:%S"),body))
#print("ch: %s, method: %s, properties: %s" %(ch,method,properties))
‘‘‘ch: <pika.adapters.blocking_connection.BlockingChannel object at 0x7f0a53268208>,
method: <Basic.Deliver([‘consumer_tag=ctag1.08f318df4d11438b98e7ab9a20d5721d‘, ‘deliv ery_tag=1‘, ‘exchange=‘, ‘redelivered=False‘, ‘routing_key=hello‘])>,
properties: <BasicProperties>‘‘‘
channel.basic_consume(callback,queue=‘hello‘,no_ack=True)
print("waiting for message. press ctrl+c to exit.")
channel.start_consuming()
消费者no_ack=False:
user@MyUbuntuVM:~/pythonScripts/rabbitmq$ cat consumeNo_ackFalse.py
#!/usr/bin/env python
import pika
import time
connection = pika.BlockingConnection(pika.ConnectionParameters(host=‘localhost‘))
channel = connection.channel()
channel.queue_declare(queue=‘hello‘)
def callback(ch,method,properties,body):
print("at %s received %s" %(time.strftime("%Y-%m-%d %H:%M:%S"),body))
print(‘method,‘,method)
print(‘properties,‘,properties)
#time.sleep(10)
#print("at %s ok" %time.strftime("%Y-%m-%d %H:%M:%S"))
ch.basic_ack(delivery_tag = method.delivery_tag)
channel.basic_consume(callback,queue=‘hello‘,no_ack=False)
print("waiting for messages. press ctrl+c to exit.")
channel.start_consuming()
消费者prefetch_count=1:
user@MyUbuntuVM:~/pythonScripts/rabbitmq$ cat consumePrefetch.py
#!/usr/bin/env python
import pika,time
connection=pika.BlockingConnection(pika.ConnectionParameters(host=‘localhost‘))
channel = connection.channel()
channel.queue_declare(queue=‘hello‘)
def callback(ch,method,properties,body):
print("at %s received %r" %(time.strftime("%Y-%m-%d %H:%M:%S"),body))
#print("ch: %s, method: %s, properties: %s" %(ch,method,properties))
‘‘‘ch: <pika.adapters.blocking_connection.BlockingChannel object at 0x7f0a53268208>,
method: <Basic.Deliver([‘consumer_tag=ctag1.08f318df4d11438b98e7ab9a20d5721d‘, ‘deliv ery_tag=1‘, ‘exchange=‘, ‘redelivered=False‘, ‘routing_key=hello‘])>,
properties: <BasicProperties>‘‘‘
channel.basic_qos(prefetch_count=1)
channel.basic_consume(callback,queue=‘hello‘,no_ack=True)
print("waiting for message. press ctrl+c to exit.")
channel.start_consuming()
生产者 持久型queue:
user@MyUbuntuVM:~/pythonScripts/rabbitmq$ cat produceDurable.py
#!/usr/bin/env python
‘‘‘remember after executing this script, restart rabbitmq server, then execute consumeDurable.py see if can still receive the message‘‘‘
import pika
import time
connection = pika.BlockingConnection(pika.ConnectionParameters(host=‘localhost‘))
channel = connection.channel()
channel.queue_declare(queue=‘hello1‘,durable=True)
channel.basic_publish(exchange=‘‘,routing_key=‘hello1‘,body=‘at %s Hello World!‘%time.strftime("%Y-%m-%d %H:%M:%S"),properties=pika.BasicProperties(delivery_mode=2,))
print("sent ‘Hello World!‘")
connection.close()
消费者:
user@MyUbuntuVM:~/pythonScripts/rabbitmq$ cat consumeDurable.py
#!/usr/bin/env python
import pika
import time
connection = pika.BlockingConnection(pika.ConnectionParameters(host=‘localhost‘))
channel= connection.channel()
#channel.queue_declare(queue=‘hello1‘,durable=True)
‘‘‘here we don‘t even to declare the queue name if we declared once.after restart rabbitmq server, we don‘t need to declare here either.‘‘‘
def callback(ch,method,properties,body):
print("at %s received %s"%(time.strftime("%Y-%m-%d %H:%M:%S"),body))
print(‘properties,‘,properties)
print(‘method,‘,method)
channel.basic_consume(callback,queue=‘hello1‘,no_ack=True)
print("waiting for messages. press ctrl+c to exit.")
channel.start_consuming()
发布者:
user@MyUbuntuVM:~/pythonScripts/rabbitmq$ cat publish.py
#!/usr/bin/env python
‘‘‘pub and sub is not like simple queue. simple queue is like you come,you get this message,next time another guy comes, he gets another message. pub and sub is like everyone can receive the same messages. because it is going to send message to all queues. and sub should execute before pub, otherwise sub will miss the message if pub sent already. subscribe.py will generate random queue names.‘‘‘
import pika
import sys
import time
connection=pika.BlockingConnection(pika.ConnectionParameters(host=‘localhost‘))
channel=connection.channel()
channel.exchange_declare(exchange=‘logs‘,type=‘fanout‘)
message=‘ ‘.join(sys.argv[1:]) or ‘at %s Info:hello world.‘%time.strftime("%Y-%m-%d %H:%M:%S")
channel.basic_publish(exchange=‘logs‘,routing_key=‘‘,body=message)
print("sent %r " %message)
connection.close()
订阅者:
user@MyUbuntuVM:~/pythonScripts/rabbitmq$ cat subscribe.py
#!/usr/bin/env python
import pika
connection=pika.BlockingConnection(pika.ConnectionParameters(host=‘localhost‘))
channel=connection.channel()
channel.exchange_declare(exchange=‘logs‘,type=‘fanout‘)
result = channel.queue_declare(exclusive=True)
queue_name = result.method.queue
channel.queue_bind(exchange=‘logs‘,queue=queue_name)
print(‘waiting for messages. press ctrl+c to exit.‘)
def callback(ch,method,properties,body):
print(" received %r" % body)
print("queue name: ", queue_name)
channel.basic_consume(callback,queue=queue_name,no_ack=True)
channel.start_consuming()
发布者exchange type=direct:
user@MyUbuntuVM:~/pythonScripts/rabbitmq$ cat publishDirect.py
#!/usr/bin/env python
import pika
import sys
connection=pika.BlockingConnection(pika.ConnectionParameters(host=‘localhost‘))
channel=connection.channel()
channel.exchange_declare(exchange=‘direct_logs‘,type=‘direct‘)
severity = sys.argv[1] if len(sys.argv) > 1 else ‘info‘
message = ‘ ‘.join(sys.argv[2:]) or ‘hello world‘
channel.basic_publish(exchange=‘direct_logs‘,routing_key=severity,body=message)
print("sent %r %r" %(severity, message))
connection.close()
订阅者:
user@MyUbuntuVM:~/pythonScripts/rabbitmq$ cat subscribeDirect.py
#!/usr/bin/env python
import pika
import sys
connection = pika.BlockingConnection(pika.ConnectionParameters(host=‘localhost‘))
channel=connection.channel()
channel.exchange_declare(exchange=‘direct_logs‘,type=‘direct‘)
result = channel.queue_declare(exclusive=True)
queue_name = result.method.queue
severities = sys.argv[1:]
if not severities:
sys.stderr.write("usage: %s info warning error \n" % sys.argv[0])
sys.exit()
for severity in severities:
channel.queue_bind(exchange=‘direct_logs‘,queue=queue_name,routing_key=severity)
‘‘‘ this routing_key should be the same with publishDirect.py‘s routing_key,otherwise won‘t receive the message.‘‘‘
print("waiting for messages. press ctrl+c to exit.")
def callback(ch,method,properties,body):
print("%s %s %s" %( method.routing_key,body,queue_name))
channel.basic_consume(callback,queue=queue_name,no_ack=True)
channel.start_consuming()
发布者exchange type=topic:
user@MyUbuntuVM:~/pythonScripts/rabbitmq$ cat publishTopic.py
#!/usr/bin/env python
import pika
import sys
connection=pika.BlockingConnection(pika.ConnectionParameters(host=‘localhost‘))
channel = connection.channel()
channel.exchange_declare(exchange=‘topic_logs‘,type=‘topic‘)
routing_key = sys.argv[1] if len(sys.argv) > 1 else ‘anno.info‘
message = ‘ ‘.join(sys.argv[2:]) or ‘Hello world‘
channel.basic_publish(exchange=‘topic_logs‘,routing_key=routing_key,body=message)
‘‘‘exchange type is ‘topic‘, obscure match. if the sender routing key is ab, the receiver routing key sets to ab.# can receive, but not ab.*‘‘‘
print("sent %r %r " % (routing_key,message))
connection.close()
订阅者:
user@MyUbuntuVM:~/pythonScripts/rabbitmq$ cat subscribeTopic.py
#!/usr/bin/env python
import pika
import sys
connection = pika.BlockingConnection(pika.ConnectionParameters(host=‘localhost‘))
channel = connection.channel()
channel.exchange_declare(exchange=‘topic_logs‘,type=‘topic‘)
result = channel.queue_declare(exclusive=True)
queue_name = result.method.queue
binding_keys = sys.argv[1:]
if not binding_keys:
sys.stderr.write("usage: %s binding_key ...\n" %sys.argv[0])
sys.exit()
for binding_key in binding_keys:
channel.queue_bind(exchange=‘topic_logs‘,queue=queue_name,routing_key=binding_key)
‘‘‘exchange type is ‘topic‘, obscure match. if the sender routing key is ab, the receiver r
outing key sets to ab.# can receive, but not ab.*‘‘‘
print("waiting for message. press ctrl+c to exit.")
def callback(ch,method,properties,body):
print("%s %s " %(method.routing_key,body))
channel.basic_consume(callback,queue=queue_name,no_ack=True)
channel.start_consuming()
标签:
原文地址:http://www.cnblogs.com/joey251744647/p/5371971.html