标签:
本文会从内部原理到具体实现来详细介绍如何开发一个简洁而实用的Android图片加载缓存框架,并在内存占用与加载图片所需时间这两个方面与主流图片加载框架之一Universal Image Loader做出比较,来帮助我们量化这个框架的性能。通过开发这个框架,我们可以进一步深入了解Android中的Bitmap操作、LruCache、LruDiskCache,让我们以后与Bitmap打交道能够更加得心应手。若对Bitmap的大小计算及inSampleSize计算还不太熟悉,请参考这里:高效加载Bitmap。由于个人水平有限,叙述中必然存在不准确或是不清晰的地方,希望大家能够指出,谢谢大家:)
在着手进行实际开发工作之前,我们先来明确以下我们的需求。通常来说,一个实用的图片加载框架应该具备以下2个功能:
下面我们来具体描述下这些需求。
我们先来简单的复习下同步与异步的概念:
同步加载就是我们发出加载图片这个调用后,直到完成加载我们才继续干别的活,否则就一直等着;异步加载也就是发出加载图片这个调用后我们可以直接去干别的活。
我们的应用有时候需要从网络上加载图片,有时候需要从磁盘加载,有时候又希望从内存中直接获取。因此一个合格的图片加载框架应该支持从不同的来源来加载一个图片。对于网络上的图片,我们可以使用HttpURLConnection来下载并解析;对于磁盘中的图片,我们可以使用BitmapFactory的decodeFile方法;对于内存中的Bitmap,我们直接就可以获取。
关于对图片的压缩,主要的工作是计算出inSampleSize,剩下的细节在下面实现部分我们会介绍。
缓存功能对于一个图片加载框架来说是十分必要的,因为从网络上加载图片既耗时耗电又费流量。通常我们希望把已经加载过的图片缓存在内存或磁盘中,这样当我们再次需要加载相同的图片时可以直接从内存缓存或磁盘缓存中获取。
访问内存的速度要比访问磁盘快得多,因此我们倾向于把更加常用的图片直接缓存在内存中,这样加载速度更快,内存缓存的不足在于由于内存空间有限,能够缓存的图片也比较少。我们可以选择使用SDK提供的LruCache类来实现内存缓存,这个类使用了LRU算法来管理缓存对象,LRU算法即Least Recently Used(最近最少使用),它的主要思想是当缓存空间已满时,移除最近最少使用的缓存对象。关于LruCache类的具体使用我们下面会进行详细介绍。
磁盘缓存的优势在于能够缓存的图片数量比较多,不足就是磁盘IO的速度比较慢。磁盘缓存我们可以用DiskLruCache来实现,这个类不属于Android SDK,它的源码可以从这里获取:http://developer.android.com/intl/zh-cn/samples/DisplayingBitmaps/src/com.example.android.displayingbitmaps/util/DiskLruCache.html。无法访问的同学请看文末给出的本文示例代码的地址,其中包含了DiskLruCache。
DisLruCache同样使用了LRU算法来管理缓存,关于它的具体使用我们会在后文进行介绍。
首先我们来看一下LruCache类的定义:
public class LruCache<K, V> {
    private final LinkedHashMap<K, V> map;

    ...

    public LruCache(int maxSize) {
        if (maxSize <= 0) {
            throw new IllegalArgumentException("maxSize <= 0");
        }
        this.maxSize = maxSize;
        this.map = new LinkedHashMap<K, V>(0, 0.75f, true);
    }
    ...
}
由以上代码我们可以知道,LruCache是个泛型类,它的内部使用一个LinkedHashMap来管理缓存对象。
初始化LruCache的惯用代码如下所示:
1 //获取当前进程的可用内存(单位KB)
2 int maxMemory = (int) (Runtime.getRuntime().maxMemory() /1024);
3 int memoryCacheSize = maxMemory / 8;
4 mMemoryCache = new LruCache<String, Bitmap>(memoryCacheSize) {
5     @Override
6     protected int sizeOf(String key, Bitmap bitmap) {
7         return bitmap.getByteCount() / 1024;
8     }
9 };
在以上代码中,我们创建了一个LruCache实例,并指定它的maxSize为当前进程可用内存的1/8。我们使用String作为key,value自然是Bitmap。第6行到第8行我们重写了sizeOf方法,这个方法被LruCache用来计算一个缓存对象的大小。我们使用了getByteCount方法返回Bitmap对象以字节为单位的方法,又除以了1024,转换为KB为单位的大小,以达到与cacheSize的单位统一。
LruCache类通过get方法来获取缓存对象,get方法的源码如下:
 1 public final V get(K key) {
 2         if (key == null) {
 3             throw new NullPointerException("key == null");
 4         }
 5
 6         V mapValue;
 7         synchronized (this) {
 8             mapValue = map.get(key);
 9             if (mapValue != null) {
10                 hitCount++;
11                 return mapValue;
12             }
13             missCount++;
14         }
15
16         /*
17          * Attempt to create a value. This may take a long time, and the map
18          * may be different when create() returns. If a conflicting value was
19          * added to the map while create() was working, we leave that value in
20          * the map and release the created value.
21          */
22
23         V createdValue = create(key);
24         if (createdValue == null) {
25             return null;
26         }
27
28         synchronized (this) {
29             createCount++;
30             mapValue = map.put(key, createdValue);
31
32             if (mapValue != null) {
33                 // There was a conflict so undo that last put
34                 map.put(key, mapValue);
35             } else {
36                 size += safeSizeOf(key, createdValue);
37             }
38         }
39
40         if (mapValue != null) {
41             entryRemoved(false, key, createdValue, mapValue);
42             return mapValue;
43         } else {
44             trimToSize(maxSize);
45             return createdValue;
46         }
47     }
通过以上代码我们了解到,首先会尝试根据key获取相应value(第8行),若不存在则会新建一个key-value对,并将它放入到LinkedHashMap中。从get方法的实现我们可以看到,它用synchronized关键字作了同步,因此这个方法是线程安全的。实际上,LruCache类对所有可能涉及并发数据访问的方法都作了同步。
在添加缓存对象之前,我们先得确定用什么作为被缓存的Bitmap对象的key,一种很直接的做法便是使用Bitmap的URL作为key,然而由于URL中存在一些特殊字符,所以可能会产生一些问题。基于以上原因,我们可以考虑使用URL的md5值作为key,这能够很好的保证不同的url具有不同的key,而且相同的url得到的key相同。我们自定义一个getKeyFromUrl方法来通过URI获取key,该方法的代码如下:
    private String getKeyFromUrl(String url) {
        String key;
        try {
            MessageDigest messageDigest = MessageDigest.getInstance("MD5");
            messageDigest.update(url.getBytes());
            byte[] m = messageDigest.digest();
            return getString(m);
        } catch (NoSuchAlgorithmException e) {
            key = String.valueOf(url.hashCode());
        }
        return key;
    }
    private static String getString(byte[] b){
        StringBuffer sb = new StringBuffer();
        for(int i = 0; i < b.length; i ++){
            sb.append(b[i]);
        }
        return sb.toString();
    }
得到了key后,我们可以使用put方法向LruCache内部的LinkedHashMap中添加缓存对象,这个方法的源码如下:
 1 public final V put(K key, V value) {
 2         if (key == null || value == null) {
 3             throw new NullPointerException("key == null || value == null");
 4         }
 5
 6         V previous;
 7         synchronized (this) {
 8             putCount++;
 9             size += safeSizeOf(key, value);
10             previous = map.put(key, value);
11             if (previous != null) {
12                 size -= safeSizeOf(key, previous);
13             }
14         }
15
16         if (previous != null) {
17             entryRemoved(false, key, previous, value);
18         }
19
20         trimToSize(maxSize);
21         return previous;
22 }
从以上代码我们可以看到这个方法确实也作了同步,它将新的key-value对放入LinkedHashMap后会返回相应key原来对应的value。
我们可以通过remove方法来删除缓存对象,这个方法的源码如下:
public final V remove(K key) {
        if (key == null) {
            throw new NullPointerException("key == null");
        }

        V previous;
        synchronized (this) {
            previous = map.remove(key);
            if (previous != null) {
                size -= safeSizeOf(key, previous);
            }
        }

        if (previous != null) {
            entryRemoved(false, key, previous, null);
        }

        return previous;
}
这个方法会从LinkedHashMap中移除指定key对应的value并返回这个value,我们可以看到它的内部还调用了entryRemoved方法,如果有需要的话,我们可以重写entryRemoved方法来做一些资源回收的工作。
通过查看DiskLruCache的源码我们可以发现,DiskLruCache就存在如下一个私有构造方法:
private DiskLruCache(File directory, int appVersion, int valueCount, long maxSize) {
        this.directory = directory;
        this.appVersion = appVersion;
        this.journalFile = new File(directory, JOURNAL_FILE);
        this.journalFileTmp = new File(directory, JOURNAL_FILE_TMP);
        this.valueCount = valueCount;
        this.maxSize = maxSize;
}
因此我们不能直接调用构造方法来创建DiskLruCache的实例。实际上DiskLruCache为我们提供了open静态方法来创建一个DiskLruCache实例,我们来看一下这个方法的实现:
public static DiskLruCache open(File directory, int appVersion, int valueCount, long maxSize)
            throws IOException {
        if (maxSize <= 0) {
            throw new IllegalArgumentException("maxSize <= 0");
        }
        if (valueCount <= 0) {
            throw new IllegalArgumentException("valueCount <= 0");
        }

        // prefer to pick up where we left off
        DiskLruCache cache = new DiskLruCache(directory, appVersion, valueCount, maxSize);
        if (cache.journalFile.exists()) {
            try {
                cache.readJournal();
                cache.processJournal();
                cache.journalWriter = new BufferedWriter(new FileWriter(cache.journalFile, true),
                        IO_BUFFER_SIZE);
                return cache;
            } catch (IOException journalIsCorrupt) {
//                System.logW("DiskLruCache " + directory + " is corrupt: "
//                        + journalIsCorrupt.getMessage() + ", removing");
                cache.delete();
            }
        }

        // create a new empty cache
        directory.mkdirs();
        cache = new DiskLruCache(directory, appVersion, valueCount, maxSize);
        cache.rebuildJournal();
        return cache;
}
从以上代码中我们可以看到,open方法内部调用了DiskLruCache的构造方法,并传入了我们传入open方法的4个参数,这4个参数的含义分别如下:
以下代码展示了初始化DiskLruCache的惯用代码:
File diskCacheDir= getAppCacheDir(mContext, "images");
if (!diskCacheDir.exists()) {
    diskCacheDir.mkdirs();
}
mDiskLruCache = DiskLruCache.open(diskCacheDir, 1, 1, DISK_CACHE_SIZE);
以上代码中的getAppCacheDir是我们自定义的用来获取磁盘缓存目录的方法,它的定义如下:
public static File getAppCacheDir(Context context, String dirName) {
    String cacheDirString;
    if (Environment.MEDIA_MOUNTED.equals(Environment.getExternalStorageState())) {
        cacheDirString = context.getExternalCacheDir().getPath();
    } else {
        cacheDirString = context.getCacheDir().getPath();
    }
    return new File(cacheDirString + File.separator + dirName);
}
接下来我们介绍如何添加、获取和删除缓存对象。
先通过以上介绍的getKeyFromUrl获取Bitmap对象对应的key,接下来我们就可以把这个Bitmap存入磁盘缓存中了。我们通过Editor来向DiskLruCache添加缓存对象。首先我们要通过edit方法获取一个Editor对象:
String key = getKeyFromUrl(url);
DiskLruCache.Editor editor = mDiskLruCache.edit(key);
获取到Editor对象后,通过调用Editor对象的newOutputStream我们就可以获取key对应的Bitmap的输出流,需要注意的是,若我们想通过edit方法获取的那个缓存对象正在被“编辑”,那么edit方法会返回null。相关的代码如下:
if (editor != null) {
    OutputStream outputStream = editor.newOutputStream(0); //参数为索引,由于我们创建时指定一个节点只有一个缓存对象,所以传入0即可
}
获取了输出流后,我们就可以向这个输出流中写入图片数据,成功写入后调用commit方法即可,若写入失败则调用abort方法进行回退。相关的代码如下:
//getStream为我们自定义的方法,它通过URL获取输入流并写入outputStream,具体实现后文会给出
if (getStreamFromUrl(url, outputStream)) {
    editor.commit();
} else {
    //返回false表示写入outputStream未成功,因此调用abort方法回退整个操作
    editor.abort();
}
mDiskLruCache.flush(); //将内存中的操作记录同步到日志文件中
下面我们来看一下getStream方法的实现,这个方法实现很直接简单,就是创建一个HttpURLConnection,然后获取InputStream再写入outputStream,为了提高效率,使用了包装流。该方法的代码如下:
public boolean getStreamFromUrl(String urlString, OutputStream outputStream) {
    HttpURLConnection urlCOnnection = null;
    BufferedInputStream bis = null;
    BufferedOutputStream bos = null;

    try {
        final URL url = new URL(urlString);
        urlConnection = (HttpURLConnection) url.openConnection();
        bis = new BufferedInputStream(urlConnection.getInputStream(), BUF_SIZE);

        int byteRead;
        while ((byteRead = bis.read()) != -1) {
            bos.write(byteRead);
        }
        return true;
    }catch (IOException e) {
        e.printStackTrace();
    } finally {
        if (urlConnection != null) {
            urlConnection.disconnect();
        }
        //HttpUtils为一个自定义工具类
        HttpUtils.close(bis);
        HttpUtils.close(bos);
    }
    return false;
}
经过以上的步骤,我们已经成功地将图片写入了文件系统。
我们使用DiskLruCache的get方法从中获取缓存对象,这个方法的大致源码如下:
 1 public synchronized Snapshot get(String key) throws IOException {
 2         checkNotClosed();
 3         validateKey(key);
 4         Entry entry = lruEntries.get(key);
 5         if (entry == null) {
 6             return null;
 7         }
 8
 9         if (!entry.readable) {
10             return null;
11         }
12
13         /*
14          * Open all streams eagerly to guarantee that we see a single published
15          * snapshot. If we opened streams lazily then the streams could come
16          * from different edits.
17          */
18         InputStream[] ins = new InputStream[valueCount];19         ...
20         return new Snapshot(key, entry.sequenceNumber, ins);
21  }
我们可以看到,这个方法最终返回了一个Snapshot对象,并以我们要获取的缓存对象的key作为构造参数之一。Snapshot是DiskLruCache的内部类,它包含一个getInputStream方法,通过这个方法可以获取相应缓存对象的输入流,得到了这个输入流,我们就可以进一步获取到Bitmap对象了。在获取缓存的Bitmap时,我们通常都要对它进行一些预处理,主要就是通过设置inSampleSize来适当的缩放图片,以防止出现OOM。我们之前已经介绍过如何高效加载Bitmap,在那篇文章里我们的图片来源于Resources。尽管现在我们的图片来源是流对象,但是计算inSampleSize的方法是一样的,只不过我们不再使用decodeResource方法而是使用decodeFileDescriptor方法。
相关的代码如下:
 1 Bitmap bitmap = null;
 2 String key = getKeyFromUrl(url);
 3 DiskLruCache.Snapshot snapShot = mDiskLruCache.get(key);
 4 if (snapShot != null) {
 5     FileInputStream fileInputStream = (FileInputStream) snapShot.getInputStream(0); //参数表示索引,同之前的newOutputStream一样
 6     FileDescriptor fileDescriptor = fileInputStream.getFD();
 7     bitmap = decodeSampledBitmapFromFD(fileDescriptor, dstWidth, dstHeight);
 8     if (bitmap != null) {
 9         addBitmapToMemoryCache(key, bitmap);
10     }
11 }
第7行我们调用了decodeSampledBitmapFromFD来从fileInputStream的文件描述符中解析出Bitmap,decodeSampledBitmapFromFD方法的定义如下:
public Bitmap decodeSampledBitmapFromFD(FileDescriptor fd, int dstWidth, int dstHeight) {
    final BitmapFactory.Options options = new BitmapFactory.Options();
    options.inJustDecodeBounds = true;
    BitmapFactory.decodeFileDescriptor(fd, null, options);
    //calInSampleSize方法的实现请见“Android开发之高效加载Bitmap”这篇博文
    options.inSampleSize = calInSampleSize(options, dstWidth, dstHeight);
    options.inJustDecodeBounds = false;
    return BitmapFactory.decodeFileDescriptor(fd, null, options);
}
第9行我们调用了addBitmapToMemoryCache方法把获取到的Bitmap加入到内存缓存中,关于这一方法的具体实现下文会进行介绍。
同步加载的相关代码需要在工作者线程中执行,因为其中涉及到对网络的访问,并且可能是耗时操作。同步加载的大致步骤如下:首先尝试从内存缓存中加载Bitmap,若不存在再从磁盘缓存中加载,若不存在则从网络中获取并添加到磁盘缓存中。同步加载的代码如下:
public Bitmap loadBitmap(String url, int dstWidth, int dstHeight) {
    Bitmap bitmap = loadFromMemory(url);
    if (bitmap != null) {
        return bitmap;
    }
    //内存缓存中不存在相应图片
    try {
        bitmap = loadFromDisk(url, dstWidth, dstHeight);
        if (bitmap != null) {
            return bitmap;
        }
        //磁盘缓存中也不存在相应图片
        bitmap = loadFromNet(url, dstWidth, dstHeight);
    } catch (IOException e) {
        e.printStackTrace();
    }

    return bitmap;
}
loadBitmapFromNet方法的功能是从网络上获取指定url的图片,并根据给定的dstWidth和dstHeight对它进行缩放,返回缩放后的图片。loadBitmapFromDisk方法则是从磁盘缓存中获取并缩放,而后返回缩放后的图片。关于这两个方法的实现在下面“图片的缓存”部分我们会具体介绍。下面我们先来看看异步加载图片的实现。
异步加载图片在实际开发中更经常被使用,通常我们希望图片加载框架帮我们去加载图片,我们接着干别的活,等到图片加载好了,图片加载框架会负责将它显示在我们给定的ImageView中。我们可以使用线程池去执行异步加载任务,加载好后通过Handler来更新UI(将图片显示在ImageView中)。相关代码如下所示:
 1 public void displayImage(String url, ImageView imageView, int dstWidth, int widthHeight) {
 2     imageView.setTag(IMG_URL, url);
 3     Bitmap bitmap = loadFromMemory(url);
 4     if (bitmap != null) {
 5         imageView.setImageBitmap(bitmap);
 6         return;
 7     }
 8
 9     Runnable loadBitmapTask = new Runnable() {
10         @Override
11         public void run() {
12             Bitmap bitmap = loadBitmap(url, dstWidth, dstHeigth);
13             if (bitmap != null) {
14                 //Result是我们自定义的类,封装了返回的Bitmap以及它的URL和作为它的容器的ImageView
15                 Result result = new Result(bitmap, url, imageView);
16                 //mMainHandler为主线程中创建的Handler
17                 Message msg = mMainHandler.obtainMessage(MESSAGE_SEND_RESULT, result);
18                 msg.sendToTarget();
19              }
20         }
21     };
22     threadPoolExecutor.execute(loadBitmapTask);
23 }
从以上代码我们可以看到,异步加载与同步加载之间的区别在于,异步加载把耗时任务放入了线程池中执行。同步加载需要我们创建一个线程并在新线程中执行loadBitmap方法,使用异步加载我们只需传入url、imageView等参数,图片加载框架负责使用线程池在后台执行图片加载任务,加载成功后会通过发送消息给主线程来实现把Bitmap显示在ImageView中。我们来简单的解释下obtainMessage这个方法,我们传入了两个参数,第一个参数代表消息的what属性,这时个int值,相当于我们给消息定的一个标识,来区分不同的消息;第二个参数代表消息的obj属性,表示我们附带的一个数据对象,就好比我们发email时带的附件。obtainMessage用于从内部的消息池中获取一个消息,就像线程池对线程的复用一样,通过这个方法获取校区更加高效。获取了消息并设置好它的what、obj后,我们在第18行调用sendToTarget方法来发送消息。
下面我们来看看mMainHandler和threadPoolExecutor的创建代码:
private static final int CORE_POOL_SIZE = CPU_COUNT + 1; //corePoolSize为CPU数加1
private static final int MAX_POOL_SIZE = 2 * CPU_COUNT + 1; //maxPoolSize为2倍的CPU数加1
private static final long KEEP_ALIVE = 5L; //存活时间为5s

public static final Executor threadPoolExecutor = new ThreadPoolExecutor(CORE_POOL_SIZE, MAX_POOL_SIZE, KEEP_ALIVE, TimeUnit.SECONDS, new LinkedBlockingQueue<Runnable>());

private Handler mMainHandler = new Handler(Looper.getMainLooper()) {
    @Override
    public void handleMessage(Message msg) {
        Result result = (Result) msg.what;
        ImageView imageView = result.imageView;
        String url = (String) imageView.getTag(IMG_URL);
        if (url.equals(result.url)) {
            imageView.setImageBitmap(result.bitmap);
        } else {
            Log.w(TAG, "The url associated with imageView has changed");
        }
    };
};
从以上代码中我们可以看到创建mMainHandler时使用了主线程的Looper,因此构造mMainHandler的代码可以放在子线程中执行。另外,注意以上代码中我们在给imageView设置图片时首先判断了下它的url是否等于result中的url,若相等才显示。我们知道ListView会对其中Item的View进行复用,刚移出屏幕的Item的View会被即将显示的Item所复用。那么考虑这样一个场景:刚移出的Item的View中的图片还在未加载完成,而这个View被新显示的Item复用时图片加载好了,那么图片就会显示在新Item处,这显然不是我们想看到的。因此我们通过判断imageView的url是否与刚加载完的图片的url是否相等,并在
只有两者相等时才显示,就可以避免以上提到的情况。
我们在图片加载框架类(FreeImageLoader)的构造方法中初始化LruCache和DiskLruCache,相关代码如下:
private LruCache<String, Bitmap> mMemoryCache;
private DiskLruCache mDiskLruCache;

private ImageLoader(Context context) {
    mContext = context.getApplicationContext();
    int maxMemory = (int) (Runtime.getRuntime().maxMemory() /1024);
    int cacheSize = maxMemory / 8;
    mMemorySize = new LruCache<String, Bitmap>(cacheSize) {
        @Override
        protected int sizeof(String key, Bitmap bitmap) {
            return bitmap.getByteCount() / 1024;
        }
    };
    File diskCacheDir = getAppCacheDir(mContext, "images");
    if (!diskCacheDir.exists()) {
        diskCacheDir.mkdirs();
    }
    if (diskCacheDir.getUsableSpace() > DISK_CACHE_SIZE) {
        //剩余空间大于我们指定的磁盘缓存大小
        try {
            mDiskLruCache = DiskLruCache.open(diskCacheDir, 1, 1, DISK_CACHE_SIZE);
        } catch (IOException e) {
            e.printStackTrace();
        }
    }
}
内存缓存的添加与获取我们已经介绍过,只需调用LruCache的put与get方法,示例代码如下:
private void addToMemoryCache(String key, Bitmap bitmap) {
    if (getFromMemoryCache(key) == null) {
        //不存在时才添加
        mMemoryCache.put(key, bitmap);
    }
}

private Bitmap getFromMemoryCache(String key) {
    return mMemoryCache.get(key);
}
接下来我们看一下如何从磁盘缓存中获取Bitmap:
private loadFromDiskCache(String url, int dstWidth, int dstHeight) throws IOException {
    if (Looper.myLooper() == Looper.getMainLooper()) {
        //当前运行在主线程,报错
        Log.w(TAG, "should not Bitmap in main thread");
    }

    if (mDiskLruCache == null) {
        return null;
    }

    Bitmap bitmap = null;
    String key = getKeyFromUrl(url);
    DiskLruCache.Snapshot snapshot = mDiskLruCache.get(key);
    if (snapshot != null) {
        FileInputStream fileInputStream = (FileInputStream) snapshot.getInputStream(0);
        FileDescriptor fileDescriptor = fileInputStream.getFD();
        bitmap = decodeSampledBitmapFromFD(fileDescriptor, dstWidth, dstHeight);
        if (bitmap != null) {
            addToMemoryCache(key, bitmap);
        }
    }

    return bitmap;
}
把Bitmap添加到磁盘缓存中的工作在loadFromNet方法中完成,当从网络上成功获取图片后,会把它存入磁盘缓存中。相关代码如下:
private Bitmap loadFromNet(String url, int dstWidth, int dstHeight) throws IOException {
    if (Looper.myLooper() == Looper.getMainLooper()) {
        throw new RuntimeException("Do not load Bitmap in main thread.");
    }

    if (mDiskLruCache == null) {
        return null;
    }

    String key = getKeyFromUrl(url);
    DiskLruCache.Editor editor = mDiskLruCache.edit(key);
    if (editor != null) {
        OutputStream outputStream = editor.newOutputStream(0);
        if (getStreamFromUrl(url, outputStream)) {
            editor.commit();
        } else {
            editor.abort();
        }
        mDiskLruCache.flush();
    }
    return loadFromDiskCache(url, dstWidth, dstHeight);
}
以上代码的大概逻辑是:当确认当前不在主线程并且mDiskLruCache不为空时,从网络上得到图片并保存到磁盘缓存,然后从磁盘缓存中得到图片并返回。
以上贴出的两段代码在最开头都判断了是否在主线程中,对于loadFromDiskCache方法来说,由于磁盘IO相对耗时,不应该在主线程中运行,所以只会在日志输出一个警告;而对于loadFromNet方法来说,由于在主线程中访问网络是不允许的,因此若发现在主线程,直接抛出一个异常,这样做可以避免做了一堆准备工作后才发现位于主线程中不能访问网络(即我们提早抛出了异常,防止做无用功)。
另外,我们在以上两段代码中都对mDiskLruCache是否为空进行了判断。这也是很必要的,设想我们做了一堆工作后发现磁盘缓存根本还没有初始化,岂不是很冤枉。我们通过两个if判断可以尽量避免做无用功。
现在我们已经实现了一个简洁的图片加载框架,下面我们来看看它的实际使用性能如何。
关于性能优化的姿势,Android Developer已经给出了最佳实践方案,胡凯大神整理了官方的性能优化典范,请见这里:Android性能专题。这里我们主要从内存分配和图片的平均加载时间这两个方面来看一下我们的图片加载框架是否能达到勉强可用的程度。完整的demo请见这里:FreeImageLoader
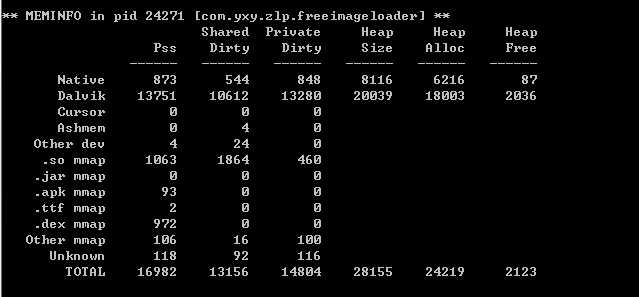
运行我们的demo,待图片加载完全,我们用adb看一下我们的应用的内存分配情况,我这里得到的情况如下图所示:

从上图我们可以看到,Dalvik Heap分配的内存为18003KB, Native Heap则分配了6212KB。下面我们来看一下FreeImageLoader平均每张图片的加载时间。
这里我们获取平均加载时间的方法非常直接,基本思想是如以下所示:
//加载图片前的时间点
long beforeTime = System.currentTimeMillis();
//加载图片完成的时间点
long afterTime = System.currentTimeMillis();
//total为图片的总数,averTime为加载每张图片所需的平均时间
int averTime = (int) ((afterTime - beforeTime) / total)
然后我们维护一个计数值counts,每加载完一张就加1,当counts为total时我们便调用一个回调方法onAfterLoad,在这个方法中获取当前时间点并计算平均加载时间。具体的代码请看上面给出的demo地址。
我这里测试加载30张图片时,平均每张所需时间为1.265s。下面我们来用Universal Image Loader来加载这30张图片,并与我们的FreeImageLoader比较一下。
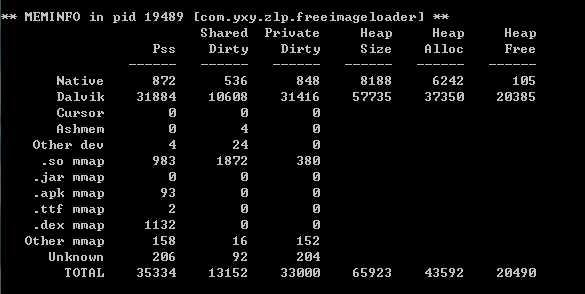
我这里用UIL加载图片完成后,得到的内存情况如下:

我们可以看到在,Native Heap的分配上,FreeImageLoader与UIL差不多;在Dalvik Heap分配上,UIL的大小快达到了FreeImageLoader的2倍。由于框架的量级不同,这说明不了FreeImageLoader在内存占用上优于UIL,但通过这个比较我们可以认为我们刚刚实现的框架还是勉强可用的:)
我们再来看一下UIL的平均加载时间,我这里测试的结果是1.516ms,考虑到框架量级的差异,看来我们的框架在加载时间上还有提升空间。
经过以上的步骤,我们可以看到,实现一个具有基本功能的图片加载框架并不复杂,但我们可以做的还有更多:
由于个人一直对图片加载框架充满浓厚的兴趣,日后也会不断的探索这一方面的相关技术,有新的收获时会来与大家共同分享:)
1. Displaying Bitmap Efficiently
2. 《Android开发艺术探索》
标签:
原文地址:http://www.cnblogs.com/absfree/p/5366545.html