标签:
前言:
UITableView是ios开发中最常用的控件之一,几乎所有的应用都要用到,tableview继承UIScrollView,因此它不仅可以显示多行数据,而且具有scrollview的一些操作功能,比如滑动,自动偏移等等,因此非常强大。 而且tableview采用了数据源模式,因此只需要更改它的数据源,即可实现tableview显示数据的变化,而且tableviewcell还具有复用性。 所以tableview是一个在显示大量数据时及其好的选择。
1.
tableview采用的是代理模式,有UITableViewDelegate和UITableViewDataSource两个协议,其中数据源协议DataSource中有2个回调方法是必须实现的,
@protocol UITableViewDataSource<NSObject>

@required

- (NSInteger)tableView:(UITableView *)tableView numberOfRowsInSection:(NSInteger)section;
- (UITableViewCell *)tableView:(UITableView *)tableView cellForRowAtIndexPath:(NSIndexPath *)indexPath;
开发者只需要实现数据源的回调和设置好相应的代理,UITableView会自动生成表视图,并将数据显示出来。而开发修改表视图也只需要修改数据源即可。
2.
表视图的实现有2种,一种是直接建立tableviewcontroller,系统会自动生成一个填满界面的tableview,并自动生成相应的一些代理回调方法。另一种是自己在viewcontroller中添加一个tableview。需要注意的是,如果controller是放在一个导航控制器中,不论哪种形式都会显示导航栏,然后tableview才会在剩下的部分进行布局。本文自己添加一个tableview到界面中。
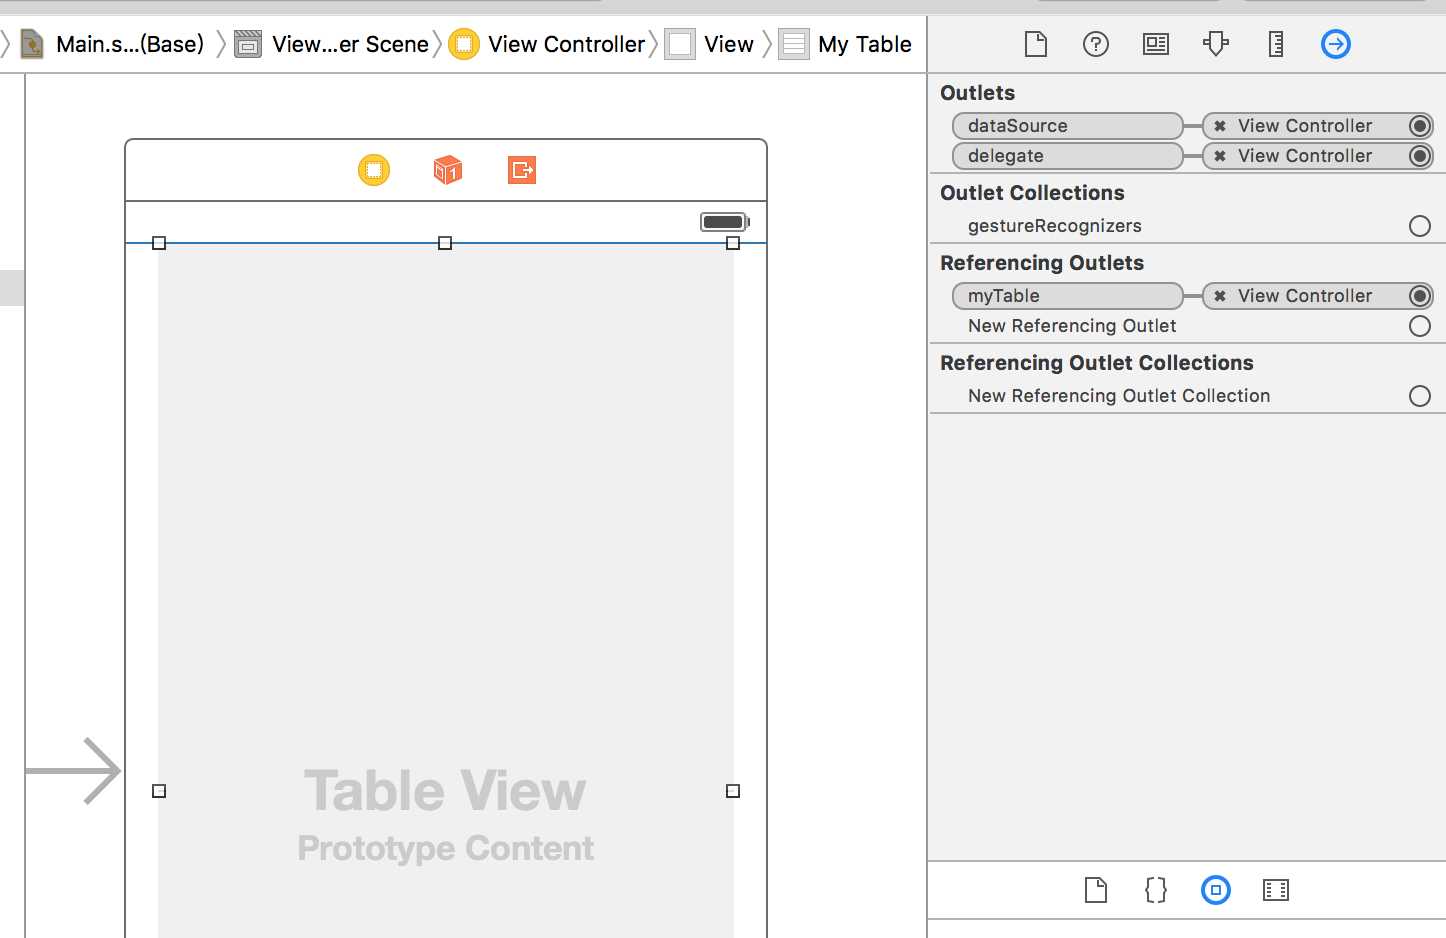
使用StoryBoard拖动一个tableview,然后右上角设置代理。
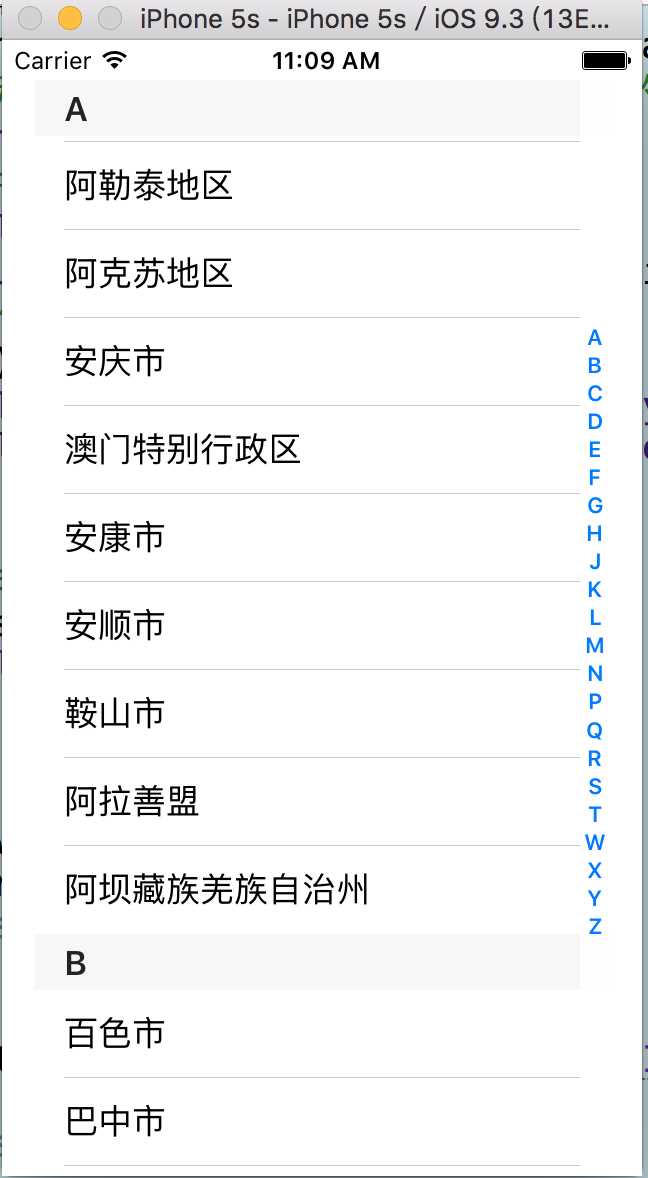
然后我们就可以来实现tableview了,首先我们实现一个显示全国各省市的tableview;
//
//  ViewController.m
//  Blog
//
//  Created by 曹文文 on 16/4/11.
//  Copyright © 2016年 Joey. All rights reserved.
//

#import "ViewController.h"
@interface ViewController ()<UITableViewDataSource,UITableViewDelegate>
@property (weak, nonatomic) IBOutlet UITableView *myTable;
@property (nonatomic,strong) NSArray *titlesArr;//节头标题数组
@property (nonatomic,strong) NSArray *cityArr;  //数据源数组
@end

@implementation ViewController

- (void)viewDidLoad {
    [super viewDidLoad];
    [self initDataSource];
}
//设置数据源
-(void)initDataSource{
    NSBundle *bundle=[NSBundle mainBundle];
    _cityArr=[NSArray arrayWithContentsOfFile:[bundle pathForResource:@"city" ofType:@"plist"]];
    _titlesArr=@[@"A",@"B",@"C",@"D",@"E",@"F",@"G",@"H",@"J",@"K",@"L",@"M",@"N",@"P",@"Q",@"R",@"S",@"T",@"W",@"X",@"Y",@"Z"];
}
#pragma mark DataSource
//设置节数
-(NSInteger)numberOfSectionsInTableView:(UITableView *)tableView{
    return _cityArr.count;
}
//设置每一节的行数
-(NSInteger)tableView:(UITableView *)tableView numberOfRowsInSection:(NSInteger)section{
    NSArray *citys=_cityArr[section];
    return citys.count;
}
//设置cell数据源
-(UITableViewCell*)tableView:(UITableView *)tableView cellForRowAtIndexPath:(NSIndexPath *)indexPath{
    //设置cell重用标识,因为tableviewcell是可以重用的
    static NSString *identifier=@"identifier";
    //创建一个cell并且使其可以重用
    UITableViewCell *cell=[tableView dequeueReusableCellWithIdentifier:identifier];
    //如果cell是空的那么需要为其开辟一个内存空间
    if (cell==nil) {
        cell=[[UITableViewCell alloc]initWithStyle:UITableViewCellStyleDefault reuseIdentifier:identifier];
    }
    //这里可以设置cell的一些数据
    NSArray *citys=_cityArr[indexPath.section];
    cell.textLabel.text=citys[indexPath.row];
    return cell;
}
//设置每一节标题
-(NSString*)tableView:(UITableView *)tableView titleForHeaderInSection:(NSInteger)section{
    return _titlesArr[section];
}
//设置表视图右边索引
- ( NSArray *)sectionIndexTitlesForTableView:(UITableView *)tableView{
    return _titlesArr;
}
@end
3.
系统提供了4种tableview的cell样式,分别为default,subtitle,value1,value2。
default :默认样式,只能显示一行文字在textlabel中 subtitle:可以显示2行文字,多一行detailTextLabel,且默认字体比textlabel小。
value1:相比subtit多了左侧图片 value2:textlabel个detailTextLabel显示在同一行。
但是这些并不够用,我们往往需要自定义cell。 在自定义时,我们往往选择XIB进行界面的布局,这样更加形象化和方便添加约束。
首先我们新建一个UITableviewcell的文件,并生成XIB。(如果自定义的cell中并不涉及数据,那么只需要一个XIB即可);

设置好约束,然后Control拖到.h 文件中,并写一个setData方法,在setdata方法中对控件进行传值。
-(void)setData:(CellitemModel *)model{
    self.title.text=model.title;
    self.subtitle.text=model.subtitle;
    [self.image sd_setImageWithURL:[NSURL URLWithString:model.imagePath]];
    NSDate *date=[[NSDate alloc]init];
    NSDateFormatter *form=[[NSDateFormatter alloc]init];
    [form setDateFormat:@"YYYYMMdd"];
    NSString *  locationString=[form stringFromDate:date];
    self.time.text=locationString;

}
好吧,我因为后天接口不对应,自己加的图片和时间。大概就是这么个意思,利用oc的kvc模式,可以轻松的实现赋值。
这个model是自己生成的,用于存储数据,实现方式如下:
#import <Foundation/Foundation.h>
//每个cell所需数据,要一一对应
@interface CellitemModel : NSObject
@property (nonatomic,strong)NSString *title;
@property (nonatomic,strong)NSString *subtitle;
@property (nonatomic,strong)NSString *imagePath;
@end
//用于存储多组数据的数组
@interface CellcontentModel : NSObject
@property (nonatomic,strong) NSMutableArray *contents;
@end
别忘记在.m中写个懒加载,为contents开辟内存空间,在以后的使用时就不必再写了
#import "CellitemModel.h"

@implementation CellitemModel

@end
@implementation CellcontentModel

-(NSMutableArray *)contents
{
    if (_contents==nil) {
        _contents=[NSMutableArray new];
    }
    return _contents;
}

@end
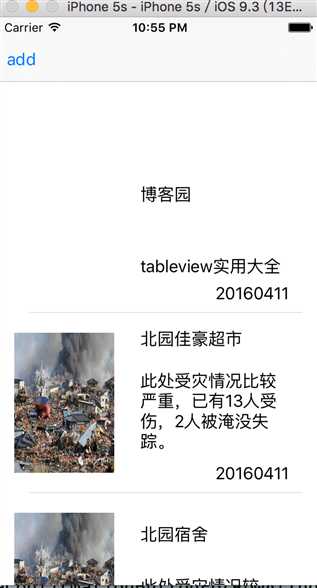
然后有了view有了model,就需要在controller中将这些东西用起来。
@interface ViewController ()<UITableViewDataSource,UITableViewDelegate>
@property (weak, nonatomic) IBOutlet UITableView *myTable;
@property (nonatomic,strong) NSArray *titlesArr;//节头标题数组
@property (nonatomic,strong) NSArray *cityArr;  //数据源数组
@property (nonatomic,strong) CellcontentModel *model;
@end

@implementation ViewController
- (void)viewDidLoad {
    [super viewDidLoad];
    [self requestData];
}
//网络请求
-(void)requestData{
    _model=[CellcontentModel new];
    NSURLSession *session=[NSURLSession sharedSession];
    NSURLRequest *request=[NSURLRequest requestWithURL:[NSURL URLWithString:@"http://115.28.26.84:8091/getServerTxt.aspx?path=PointInfo.txt"]];
    NSURLSessionDataTask *Task=[session dataTaskWithRequest:request completionHandler:^(NSData * _Nullable data, NSURLResponse * _Nullable response, NSError * _Nullable error) {
        if (error) {
            NSLog(@"%@",error);
        }
        else {
            NSArray *arr=[NSJSONSerialization JSONObjectWithData:data options:NSJSONReadingMutableLeaves error:nil];

            for (int i=0; i<arr.count; i++) {
                NSDictionary *dic=arr[i];
                CellitemModel *model=[CellitemModel new];
                model.title=[dic objectForKey:@"name"];
                model.subtitle=[dic objectForKey:@"details"];
                model.imagePath=@"http://awb.img1.xmtbang.com/wechatmsg/article/20140513/1174568b31b846e7b10f5785f1432216.jpg";
                [_model.contents addObject:model];
            }
            //在网络请求结束时候刷新列表,数据才会显示出来
            [_myTable reloadData];
        }

    } ];
    [Task resume];
   }
#pragma mark DataSource
//设置节数
-(NSInteger)numberOfSectionsInTableView:(UITableView *)tableView{
    return 1;
}
//设置每一节的行数
-(NSInteger)tableView:(UITableView *)tableView numberOfRowsInSection:(NSInteger)section{
    return _model.contents.count;
}
//设置cell数据源
-(UITableViewCell*)tableView:(UITableView *)tableView cellForRowAtIndexPath:(NSIndexPath *)indexPath{
    static NSString *identifier=@"identifier";
    //将自定义的cell用于重用
    CustomCell *cell=(CustomCell*)[tableView dequeueReusableCellWithIdentifier:identifier];
    if (cell==nil) {
    //获取自定义的cell这个对象,并存在于一个数组中,这个方法在有多个简单自定义cell时尤其好用,他们可以在同一个xib中,只需要一个数组即可
        NSArray *nibArr=[[NSBundle mainBundle]loadNibNamed:@"CustomCell" owner:self options:nil];
        if (nibArr) {
            cell=[nibArr firstObject];
        }
    }
    //执行自定义cell的setdata方法,将数据传入,每次生成一个cell都会执行一遍。
    [cell setData:_model.contents[indexPath.row]];
    return cell;
    }
-(CGFloat)tableView:(UITableView *)tableView heightForRowAtIndexPath:(NSIndexPath *)indexPath{
    return 180;
}
效果图如下:

4.tableview的操作
tableviewcell有一个系统默认的select事件。 还有很多实用的交互功能。
tableviewcell的删除操作:
-(BOOL)tableView:(UITableView *)tableView canEditRowAtIndexPath:(NSIndexPath *)indexPath{
    return YES;
}
-(NSString*)tableView:(UITableView *)tableView titleForDeleteConfirmationButtonForRowAtIndexPath:(NSIndexPath *)indexPath{
    return @"快删除!";
}
-(CGFloat)tableView:(UITableView *)tableView heightForRowAtIndexPath:(NSIndexPath *)indexPath{
    return 180;
}
-(void)tableView:(UITableView *)tableView commitEditingStyle:(UITableViewCellEditingStyle)editingStyle forRowAtIndexPath:(NSIndexPath *)indexPath{
    if (editingStyle==UITableViewCellEditingStyleDelete) {
        [_model.contents removeObjectAtIndex:indexPath.row];
        [_myTable deselectRowAtIndexPath:indexPath animated:YES];
    }
}
效果:

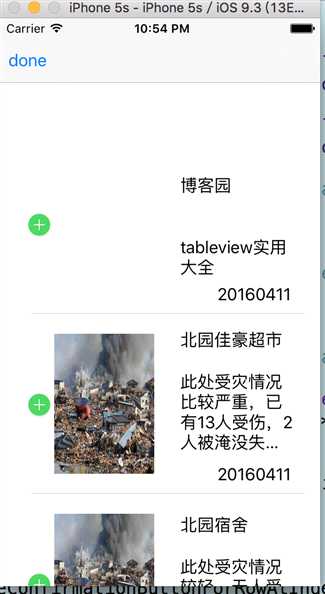
表视图的添加功能:
-(void)initnavgationbar{
//点击后取消编辑状态
    _cancel=[[UIBarButtonItem alloc]initWithTitle:@"done" style:UIBarButtonItemStylePlain target:self action:@selector(Cancel)];
//点击后进入编辑状态
    _Addbar=[[UIBarButtonItem alloc]initWithTitle:@"add" style:UIBarButtonItemStylePlain target:self action:@selector(Addcell)];
    self.navigationItem.leftBarButtonItem=_Addbar;
}
-(void)Addcell{
    [_myTable setEditing:YES];
    self.navigationItem.leftBarButtonItem=_cancel;
}
-(void)Cancel{
    [_myTable setEditing:NO];
    self.navigationItem.leftBarButtonItem=_Addbar;
}
-(UITableViewCellEditingStyle)tableView:(UITableView *)tableView editingStyleForRowAtIndexPath:(NSIndexPath *)indexPath{
    return UITableViewCellEditingStyleInsert;
}
-(BOOL)tableView:(UITableView *)tableView canEditRowAtIndexPath:(NSIndexPath *)indexPath{
    return YES;
}
-(NSString*)tableView:(UITableView *)tableView titleForDeleteConfirmationButtonForRowAtIndexPath:(NSIndexPath *)indexPath{
    return @"快删除!";
}
-(CGFloat)tableView:(UITableView *)tableView heightForRowAtIndexPath:(NSIndexPath *)indexPath{
    return 180;
}
-(void)tableView:(UITableView *)tableView commitEditingStyle:(UITableViewCellEditingStyle)editingStyle forRowAtIndexPath:(NSIndexPath *)indexPath{
    if (editingStyle==UITableViewCellEditingStyleDelete) {
        [_model.contents removeObjectAtIndex:indexPath.row];
        [_myTable deselectRowAtIndexPath:indexPath animated:YES];
    }
    else if(editingStyle==UITableViewCellEditingStyleInsert){
        CellitemModel *model=[CellitemModel new];
        model.title=@"博客园";
        model.subtitle=@"tableview实用大全";
        [_model.contents insertObject:model atIndex:indexPath.row];
        [self.myTable reloadData];
    }
}
效果图:
tableview实现排序:
-(void)initnavgationbar{
    _cancel=[[UIBarButtonItem alloc]initWithTitle:@"done" style:UIBarButtonItemStylePlain target:self action:@selector(Cancel)];
    _Addbar=[[UIBarButtonItem alloc]initWithTitle:@"add" style:UIBarButtonItemStylePlain target:self action:@selector(Addcell)];
    self.navigationItem.leftBarButtonItem=_Addbar;
}
-(void)Addcell{
    [_myTable setEditing:YES animated:YES];
    self.navigationItem.leftBarButtonItem=_cancel;
}
-(void)Cancel{
    [_myTable setEditing:NO animated:NO];
    self.navigationItem.leftBarButtonItem=_Addbar;
}
-(BOOL)tableView:(UITableView *)tableView canMoveRowAtIndexPath:(NSIndexPath *)indexPath{
    if (indexPath.row==0) {
        return NO;
    }
    return YES;
}
-(BOOL)tableView:(UITableView *)tableView canEditRowAtIndexPath:(NSIndexPath *)indexPath{
    return YES;
}
//移动行的方法
-(void)tableView:(UITableView *)tableView moveRowAtIndexPath:(NSIndexPath *)sourceIndexPath toIndexPath:(NSIndexPath *)destinationIndexPath{
    //改变数据源
    NSMutableArray *datasource=[NSMutableArray arrayWithArray:_model.contents];
    CellitemModel *model=[CellitemModel new];
    model=[datasource objectAtIndex:sourceIndexPath.row];
    [datasource removeObjectAtIndex:sourceIndexPath.row];
    [datasource insertObject:model atIndex:destinationIndexPath.row];
    _model.contents=[NSMutableArray arrayWithArray:datasource];
}
-(NSIndexPath*)tableView:(UITableView *)tableView targetIndexPathForMoveFromRowAtIndexPath:(NSIndexPath *)sourceIndexPath toProposedIndexPath:(NSIndexPath *)proposedDestinationIndexPath{
    //如果目标为第一行,即超出了节的限制,那么返回相应节的第二行
    if(proposedDestinationIndexPath.row==0)
    {
        return [NSIndexPath indexPathForRow:1 inSection:proposedDestinationIndexPath.section];
    }
    return proposedDestinationIndexPath;
}
//将删除或添加的效果去掉
-(UITableViewCellEditingStyle)tableView:(UITableView *)tableView editingStyleForRowAtIndexPath:(NSIndexPath *)indexPath{
    return UITableViewCellEditingStyleNone;
}
//编辑时不会向右缩进
-(BOOL)tableView:(UITableView *)tableView shouldIndentWhileEditingRowAtIndexPath:(NSIndexPath *)indexPat{
    return NO;

}
实现的效果:

tableview的多选功能,主要方式是需要给自定义的cell添加一个BOOL型属性,来判断是否被选中,然后对cell进行背景色的变化,和添加动画和复选框来表示出来。
标签:
原文地址:http://www.cnblogs.com/JoeyCao/p/5380742.html