标签:
Dialect用于和数据API进行交流,根据配置文件的不同调用不同的数据库API,从而实现对数据库的操作,如:
|
1
2
3
4
5
6
7
8
9
10
11
12
13
|
MySQL-Python mysql+mysqldb://<user>:<password>@<host>[:<port>]/<dbname> pymysql mysql+pymysql://<username>:<password>@<host>/<dbname>[?<options>] MySQL-Connector mysql+mysqlconnector://<user>:<password>@<host>[:<port>]/<dbname> cx_Oracle oracle+cx_oracle://user:pass@host:port/dbname[?key=value&key=value...] 更多详见:http://docs.sqlalchemy.org/en/latest/dialects/index.html |
步骤一:
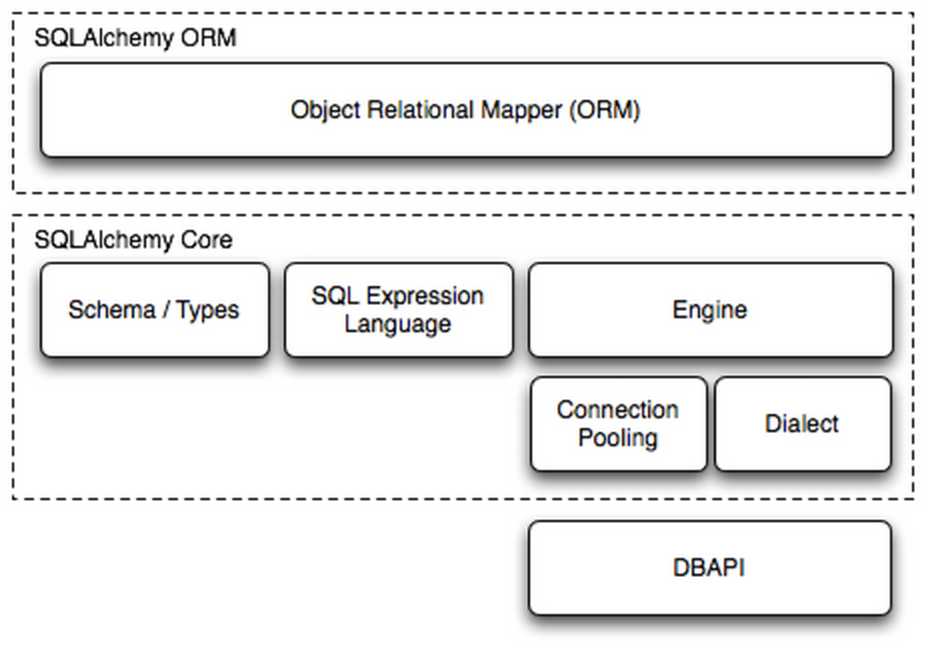
使用 Engine/ConnectionPooling/Dialect 进行数据库操作,Engine使用ConnectionPooling连接数据库,然后再通过Dialect执行SQL语句。
|
1
2
3
4
5
6
7
8
9
10
11
12
13
14
15
16
17
18
19
20
21
22
23
|
#!/usr/bin/env python# -*- coding:utf-8 -*- from sqlalchemy import create_engine engine.execute( "INSERT INTO ts_test (a, b) VALUES (‘2‘, ‘v1‘)") engine.execute( "INSERT INTO ts_test (a, b) VALUES (%s, %s)", ((555, "v1"),(666, "v1"),))engine.execute( "INSERT INTO ts_test (a, b) VALUES (%(id)s, %(name)s)", id=999, name="v1") result = engine.execute(‘select * from ts_test‘)result.fetchall() |
步骤二:
使用 Schema Type/SQL Expression Language/Engine/ConnectionPooling/Dialect 进行数据库操作。Engine使用Schema Type创建一个特定的结构对象,之后通过SQL Expression Language将该对象转换成SQL语句,然后通过 ConnectionPooling 连接数据库,再然后通过 Dialect 执行SQL,并获取结果。
|
1
2
3
4
5
6
7
8
9
10
11
12
13
14
15
16
17
18
19
|
#!/usr/bin/env python# -*- coding:utf-8 -*-from sqlalchemy import create_engine, Table, Column, Integer, String, MetaData, ForeignKeymetadata = MetaData()user = Table(‘user‘, metadata, Column(‘id‘, Integer, primary_key=True), Column(‘name‘, String(20)),)color = Table(‘color‘, metadata, Column(‘id‘, Integer, primary_key=True), Column(‘name‘, String(20)),)metadata.create_all(engine) |
增删改查
一个简单的完整例子
|
1
2
3
4
5
6
7
8
9
10
11
12
13
14
15
16
17
18
19
20
21
22
23
24
25
26
27
28
29
30
31
32
33
|
from sqlalchemy import create_enginefrom sqlalchemy.ext.declarative import declarative_basefrom sqlalchemy import Column, Integer, Stringfrom sqlalchemy.orm import sessionmakerBase = declarative_base() #生成一个SqlORM 基类class Host(Base): __tablename__ = ‘hosts‘ id = Column(Integer,primary_key=True,autoincrement=True) hostname = Column(String(64),unique=True,nullable=False) ip_addr = Column(String(128),unique=True,nullable=False) port = Column(Integer,default=22)Base.metadata.create_all(engine) #创建所有表结构if __name__ == ‘__main__‘: SessionCls = sessionmaker(bind=engine) #创建与数据库的会话session class ,注意,这里返回给session的是个class,不是实例 session = SessionCls() #h1 = Host(hostname=‘localhost‘,ip_addr=‘127.0.0.1‘) #h2 = Host(hostname=‘ubuntu‘,ip_addr=‘192.168.2.243‘,port=20000) #h3 = Host(hostname=‘ubuntu2‘,ip_addr=‘192.168.2.244‘,port=20000) #session.add(h3) #session.add_all( [h1,h2]) #h2.hostname = ‘ubuntu_test‘ #只要没提交,此时修改也没问题 #session.rollback() #session.commit() #提交 res = session.query(Host).filter(Host.hostname.in_([‘ubuntu2‘,‘localhost‘])).all() print(res) |
更多内容详见:
http://www.jianshu.com/p/e6bba189fcbd
http://docs.sqlalchemy.org/en/latest/core/expression_api.html
注:SQLAlchemy无法修改表结构,如果需要可以使用SQLAlchemy开发者开源的另外一个软件Alembic来完成。
步骤三:
使用 ORM/Schema Type/SQL Expression Language/Engine/ConnectionPooling/Dialect 所有组件对数据进行操作。根据类创建对象,对象转换成SQL,执行SQL。
|
1
2
3
4
5
6
7
8
9
10
11
12
13
14
15
16
17
18
19
20
21
22
23
24
25
26
27
28
29
30
31
32
33
34
35
36
37
38
39
40
41
42
43
44
45
46
47
48
49
50
51
52
53
54
55
56
57
58
59
|
#!/usr/bin/env python# -*- coding:utf-8 -*- from sqlalchemy.ext.declarative import declarative_basefrom sqlalchemy import Column, Integer, Stringfrom sqlalchemy.orm import sessionmakerfrom sqlalchemy import create_engine Base = declarative_base() class User(Base): __tablename__ = ‘users‘ id = Column(Integer, primary_key=True) name = Column(String(50)) # 寻找Base的所有子类,按照子类的结构在数据库中生成对应的数据表信息# Base.metadata.create_all(engine) Session = sessionmaker(bind=engine)session = Session() # ########## 增 ########### u = User(id=2, name=‘sb‘)# session.add(u)# session.add_all([# User(id=3, name=‘sb‘),# User(id=4, name=‘sb‘)# ])# session.commit() # ########## 删除 ########### session.query(User).filter(User.id > 2).delete()# session.commit() # ########## 修改 ########### session.query(User).filter(User.id > 2).update({‘cluster_id‘ : 0})# session.commit()# ########## 查 ########### ret = session.query(User).filter_by(name=‘sb‘).first() # ret = session.query(User).filter_by(name=‘sb‘).all()# print ret # ret = session.query(User).filter(User.name.in_([‘sb‘,‘bb‘])).all()# print ret # ret = session.query(User.name.label(‘name_label‘)).all()# print ret,type(ret) # ret = session.query(User).order_by(User.id).all()# print ret # ret = session.query(User).order_by(User.id)[1:3]# print ret# session.commit() |
A one to many relationship places a foreign key on the child table referencing the parent.relationship() is then specified on the parent, as referencing a collection of items represented by the child
from sqlalchemy import Table, Column, Integer, ForeignKey
from sqlalchemy.orm import relationship
from sqlalchemy.ext.declarative import declarative_base

Base = declarative_base()
|
1
2
3
4
5
6
7
8
9
|
<br>class Parent(Base): __tablename__ = ‘parent‘ id = Column(Integer, primary_key=True) children = relationship("Child")class Child(Base): __tablename__ = ‘child‘ id = Column(Integer, primary_key=True) parent_id = Column(Integer, ForeignKey(‘parent.id‘)) |
To establish a bidirectional relationship in one-to-many, where the “reverse” side is a many to one, specify an additional relationship() and connect the two using therelationship.back_populates parameter:
|
1
2
3
4
5
6
7
8
9
10
|
class Parent(Base): __tablename__ = ‘parent‘ id = Column(Integer, primary_key=True) children = relationship("Child", back_populates="parent")class Child(Base): __tablename__ = ‘child‘ id = Column(Integer, primary_key=True) parent_id = Column(Integer, ForeignKey(‘parent.id‘)) parent = relationship("Parent", back_populates="children") |
Child will get a parent attribute with many-to-one semantics.
Alternatively, the backref option may be used on a single relationship() instead of usingback_populates:
|
1
2
3
4
|
class Parent(Base): __tablename__ = ‘parent‘ id = Column(Integer, primary_key=True) children = relationship("Child", backref="parent") |
附,原生sql join查询
几个Join的区别 http://stackoverflow.com/questions/38549/difference-between-inner-and-outer-joins
|
1
|
select host.id,hostname,ip_addr,port,host_group.name from host right join host_group on host.id = host_group.host_id |
in SQLAchemy
|
1
|
session.query(Host).join(Host.host_groups).filter(HostGroup.name==‘t1‘).group_by("Host").all() |
group by 查询
|
1
|
select name,count(host.id) as NumberOfHosts from host right join host_group on host.id= host_group.host_id group by name; |
in SQLAchemy
|
1
2
3
4
5
6
|
from sqlalchemy import funcsession.query(HostGroup, func.count(HostGroup.name )).group_by(HostGroup.name).all()#another examplesession.query(func.count(User.name), User.name).group_by(User.name).all() SELECT count(users.name) AS count_1, users.name AS users_nameFROM users GROUP BY users.name |


Python学习路程day11
标签:
原文地址:http://www.cnblogs.com/luolingfeng/p/5389314.html