标签:
1、今天我们来分析Service中的一个小技巧:前台服务(Forground Service)
----------------------------------------------------------------------------------------------------------------------------------------
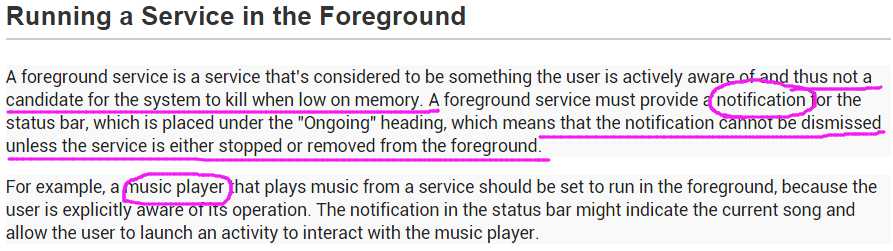
【问题】:我们都知道服务是运行在后台的,如果系统出现内存不足的情况,那么此时,系统就可能回收后代的服务,那么我们如何保证服务可以一直运行?
【解决】:在服务中,有一个前台服务的概念,调用startForground()方法。
我们看看官网对前台服务及startForeground()的描述:

看了官方的解释后,我们再来看看如何使用,上代码:

public class MyService extends Service{

  ......

  @Override
  public void onCreate() {
    super.onCreate();
    Intent intent = new Intent(getBaseContext(), MainActivity.class);
    PendingIntent pi = PendingIntent.getActivity(getBaseContext(), 0 , intent, PendingIntent.FLAG_CANCEL_CURRENT);
    Notification no = new Notification.Builder(getBaseContext())                // 启动服务后,在前台添加一个Notification
        .setWhen(System.currentTimeMillis())
        .setSmallIcon(R.mipmap.ic_launcher)
        .setTicker("Create a front desk Service!")
        .setContentTitle("This is a front desk service")
        .setContentText("A service skill!!!")
        .setContentIntent(pi)
        .setAutoCancel(true)
        .setDefaults(Notification.DEFAULT_ALL)
        .build();
    startForeground(1, no);
    Log.d(TAG, "onCreate executed");
  }
}
我们再看一下官方文档:
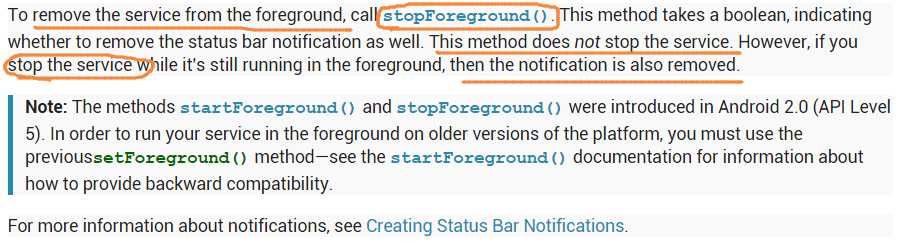
以上的代码是在Service的创建中添加了一个Notification,调用startForground()就可以保证:只要服务一直存在,那么在前台就会一直显示这个Notification。
如果我们在onDestroy()中调用stopForground()方法,会销毁这个Notification,但是Service还是存活的,此时Service就会面临被System干掉的风险。
如果直接STOP SERVICE,那么Notification和Service都会销毁。
----------------------------------------------------------------------------------------------------------------------------------------
2、接下来,我们再来看一个Service的另外一个小技巧:IntentService
【问题】:我们知道服务的代码逻辑是在主线程中执行的,如果我们在主线程中需要执行一些耗时的操作,那么很有可能出现ANR(程序暂无响应)的状况。
这个时候,我们可以采用Android的多线程编程(小编在之前的 AsyncTask 贴中讲解过多线程,可以回顾)的方式,我们来看一段代码:
public class MyService extends Service{
  @Nullable
  @Override
  public IBinder onBind(Intent intent) {
    return null;
  }
  @Override
  public int onStartCommand(Intent intent, int flags, int startId) {
    new Thread(new Runnable() {
      @Override
      public void run() {
        // 处理具体的逻辑                     // 开启一个线程处理耗时操作
      }
    }).start();
    return super.onStartCommand(intent, flags, startId);
  }
}
现在,服务可以启动起来了,但是如果不调用StopService()或stopSelf()方法,服务会一直运行,现在我们修改一下代码:
public class MyService extends Service{
  @Nullable
  @Override
  public IBinder onBind(Intent intent) {
    return null;
  }
  @Override
  public int onStartCommand(Intent intent, int flags, int startId) {
    new Thread(new Runnable() {
      @Override
      public void run() {
        // 处理具体的逻辑                     // 开启一个线程处理耗时操作
        stopSelf();                         // 让服务执行完逻辑后自行停止
      }
    }).start();
    return super.onStartCommand(intent, flags, startId);
  }
}
上面的代码就是一个标准的Service的书写形式,主要包含两个知识点:Thread子线程的创建和stopSelf()方法的调用。
其实,在一般的使用过程中,一部分程序员很容易忘记以上两个要点,存在遗忘,那么有没有更好的办法能够实现上面两个需求呢?
【解决】:在Android中,专门提供了一个IntentService类(android.app.IntentService),这个类就能很好的满足我们的需求!我们直接通过代码来看:
(1)新建一个MyIntentService类继承自IntentService,代码:
public class MyIntentService extends IntentService{

  public MyIntentService() {
    super("MyIntentService");
  }

  @Override
  protected void onHandleIntent(Intent intent) {
    Log.d("MyIntentService", "MyIntentServiceThread id is " + Thread.currentThread().getId());
  }

  @Override
  public void onDestroy() {
    super.onDestroy();
    Log.d("MyIntentService", "onDestroy executed");
  }
}
以上代码做了几件事:
1、提供了一个无参的构造方法,并且调用了父类的有参构造函数(这个就不需要我说为什么了吧);
2、子类实现父类的onHandleIntent()抽象方法,这个方法好就好在,它是一个已经运行在子线程中的方法。也就是说,服务调用了它,那么执行的逻辑就如同Thread子线程。
onHandleIntent = Thread().start() + stopSelf()
3、onHandleIntent()执行完后会销毁服务?会selfStop()?接着往下看代码。
----------------------------------------------------------------------------------------------------------------------------------------
(2)在xml文件中,创建一个MyIntentService服务按钮:
<Button
  android:id="@+id/start_intent_service"
  android:layout_width="match_parent"
  android:layout_height="wrap_content"
  android:text="@string/intent_service"/>
(3)接下来,修改MainActivity中的代码:
public class MainActivity extends Activity {

  @Override
  protected void onCreate(Bundle savedInstanceState) {

    super.onCreate(savedInstanceState);
    setContentView(R.layout.activity_main);
    Button startIntentService = (Button) super.findViewById(R.id.start_intent_service);
    startIntentService.setOnClickListener(new View.OnClickListener() {

      @Override
      public void onClick(View v) {
        Log.d("MyIntentService", "MainActivity Thread id is " + Thread.currentThread().getId());            // 查看主线程的id
        Intent intentService = new Intent(getBaseContext(), MyIntentService.class);
        startService(intentService);
      }
    });
  }
}
(4)最后,在AndroidMainfest中注册服务:
<service android:name=".MyIntentService" />
【结果】:直接看一下代码执行的效果。

从打出的LOG可以看出:
(1)MyIntentService和MainActivity所在进程的id是不一样的;
(2)onHandleIntent()方法在执行完逻辑后确实销毁了服务,效果等同于stopSelf()。
从上面的分析可以看出onHandleIntent()方法确实相当的好用!
Android_实用技术(3)—— Service简析(Ⅲ)
标签:
原文地址:http://www.cnblogs.com/pepsimaxin/p/5435958.html