标签:

  1 package hello.entity.jiexi_xml;
  2
  3 import org.jdom.Document;
  4 import org.jdom.Element;
  5 import org.jdom.JDOMException;
  6 import org.jdom.Namespace;
  7 import org.jdom.input.SAXBuilder;
  8
  9 import java.io.FileInputStream;
 10 import java.io.IOException;
 11 import java.io.InputStream;
 12 import java.sql.*;
 13 import java.util.List;
 14 public class DB {
 15
 16 //数据库的连接
 17     private static String URL = "jdbc:mysql://localhost:3306/test";
 18     private static String USERNAME = "root";
 19     private static String PASSWORD = "root";
 20
 21
 22     public static Connection getConn(){
 23         Connection conn = null;
 24         try {
 25         Class.forName("com.mysql.jdbc.Driver");
 26         conn = DriverManager.getConnection(URL,USERNAME,PASSWORD);
 27         } catch (Exception e) {
 28             e.printStackTrace();
 29             }   return conn;
 30             }
 31
 32     public static Statement createStmt(Connection conn){
 33         Statement stmt = null;
 34         try {
 35             stmt = conn.createStatement();
 36         } catch (SQLException e) {
 37             e.printStackTrace();
 38         }
 39         return stmt;
 40     }
 41
 42     public static ResultSet executeQuery(Statement stmt,String sql){
 43         ResultSet rs = null;
 44         try {
 45             rs = stmt.executeQuery(sql);
 46         } catch (SQLException e) {
 47             e.printStackTrace();
 48         }
 49         return rs;
 50     }
 51
 52     public static PreparedStatement prepareStmt(Connection conn,String sql){
 53         PreparedStatement pStmt = null;
 54         try {
 55             pStmt = conn.prepareStatement(sql);
 56         } catch (SQLException e) {
 57             e.printStackTrace();
 58         }
 59         return pStmt;
 60     }
 61
 62
 63
 64     public static void main(String[] args) {
 65         try {
 66             XmlParse();
 67         } catch (JDOMException e) {
 68             e.printStackTrace();
 69         } catch (IOException e) {
 70             e.printStackTrace();
 71         }
 72         }
 73
 74
 75      public static void XmlParse() throws JDOMException, IOException {
 76          SAXBuilder builder = new SAXBuilder();
 77          InputStream file = new FileInputStream("ceshi.xml");          //测试文件的路径
 78
 79           {
 80           Document document = builder.build(file);//加载文件
 81           Element root = document.getRootElement();//设置根节点
 82
 83           Namespace ns = root.getNamespace("gml");
 84           List<Element> list = root.getChildren("a",ns);
 85           for(Element e1:list){
 86               Namespace ns2 = e1.getNamespace("esri");
 87               Element e2 = e1.getChild("x",ns2);
 88               String ID = e2.getAttributeValue("fid");
 89               System.out.println("ID =" + ID);
 90
 91               Namespace ns3 = e2.getNamespace("esri");
 92               Element e3 = e2.getChild("OBJECTID",ns3);
 93
 94               Namespace ns4 = e2.getNamespace("gml");
 95               Element e4 = e2.getChild("b",ns4);
 96
 97               Namespace ns5 = e4.getNamespace("gml");
 98               Element e5 = e4.getChild("c",ns5);
 99
100               Namespace ns6 = e5.getNamespace("gml");
101               Element e6 = e5.getChild("d",ns6);
102
103               Namespace ns7 = e6.getNamespace("gml");
104               Element e7 = e6.getChild("e",ns7);
105
106               Namespace ns8 = e7.getNamespace("gml");
107               Element e8 = e7.getChild("f",ns8);
108
109               Namespace ns9 = e8.getNamespace("gml");
110               Element e9 = e8.getChild("g",ns9);
111
112               Namespace ns10 = e9.getNamespace("gml");
113               Element e10 = e9.getChild("coordinates",ns10);
114               String POINT1 = e10.getTextTrim();
115               System.out.println("POINT1 =" + POINT1);
116
117               Namespace ns11 = e2.getNamespace("gml");
118               Element e11 = e2.getChild("envelope",ns11);
119               String POINT2 = e11.getTextTrim();
120               System.out.println("POINT2 =" + POINT2);
121
122               Namespace ns12 = e2.getNamespace("esri");
123               Element e12 = e2.getChild("a",ns12);
124               String NAME = e12.getTextTrim();
125               System.out.println("NAME =" + NAME);
126
127               Connection conn = DB.getConn();
128                 String sql = "insert into CESHI(ID,NAME,POINT1,POINT2) values (?,?,?,?)";
129                 PreparedStatement pStmt = DB.prepareStmt(conn,sql);
130                 try {
131
132                     pStmt.setString(1,ID);
133                     pStmt.setString(2,NAME);
134                     pStmt.setString(3,POINT1);
135                     pStmt.setString(4,POINT2);
136                     pStmt.executeUpdate();
137                 } catch (SQLException e) {
138                     e.printStackTrace();
139                 }
140           }
141           }
142      }
143     public static void close(Connection con,Statement sm,ResultSet rs){
144         try {
145             if(con!=null){
146                 con.close();
147                 }
148             if(sm!=null){
149                 sm.close();
150                 }
151             if(rs != null){
152                 rs.close();
153                 }
154             } catch (SQLException e) {
155                 e.printStackTrace();
156                 }
157             }
158     }
159
160
代码逻辑很清楚,只说一点,我这个项目用到的xml文件要放在项目根目录下,位置注意!
ceshi.xml:

 1 <?xml version="1.0" encoding="gbk"?>
 2 <wfs:FeatureCollection xmlns:esri="http://www.esri.com/esri" xmlns:gml="http://www.opengis.net/gml" xmlns:wfs="http://www.opengis.net/wfs" xmlns:ogc="http://www.opengis.net/ogc">
 3     <gml:a>
 4         <esri:x fid="111">
 5             <esri:OBJECTID>14</esri:OBJECTID>
 6             <gml:b>
 7                 <gml:c srsName="1111">
 8                     <gml:d>
 9                         <gml:e>
10                             <gml:f>
11                                 <gml:g>
12                                     <gml:coordinates>111</gml:coordinates>
13                                 </gml:g>
14                             </gml:f>
15                         </gml:e>
16                     </gml:d>
17                 </gml:c>
18             </gml:b>
19             <gml:envelope>222</gml:envelope>
20             <esri:a>aaa</esri:a>
21             <esri:b/>
22             <esri:c>20121213</esri:c>
23             <esri:d>20121213</esri:d>
24             <esri:e>123456</esri:e>
25             <esri:LEN>78910</esri:LEN>
26         </esri:x>
27     </gml:a>
28          <gml:a>
29         <esri:x fid="112">
30             <esri:OBJECTID>14</esri:OBJECTID>
31             <gml:b>
32                 <gml:c srsName="1111">
33                     <gml:d>
34                         <gml:e>
35                             <gml:f>
36                                 <gml:g>
37                                     <gml:coordinates>112</gml:coordinates></gml:g>
38                             </gml:f>
39                         </gml:e>
40                     </gml:d>
41                 </gml:c>
42             </gml:b>
43             <gml:envelope>222</gml:envelope>
44             <esri:a>aaa</esri:a>
45             <esri:b/>
46             <esri:c>20121213</esri:c>
47             <esri:d>20121213</esri:d>
48             <esri:e>123456</esri:e>
49             <esri:LEN>78910</esri:LEN>
50         </esri:x>
51     </gml:a>
52 </wfs:FeatureCollection>
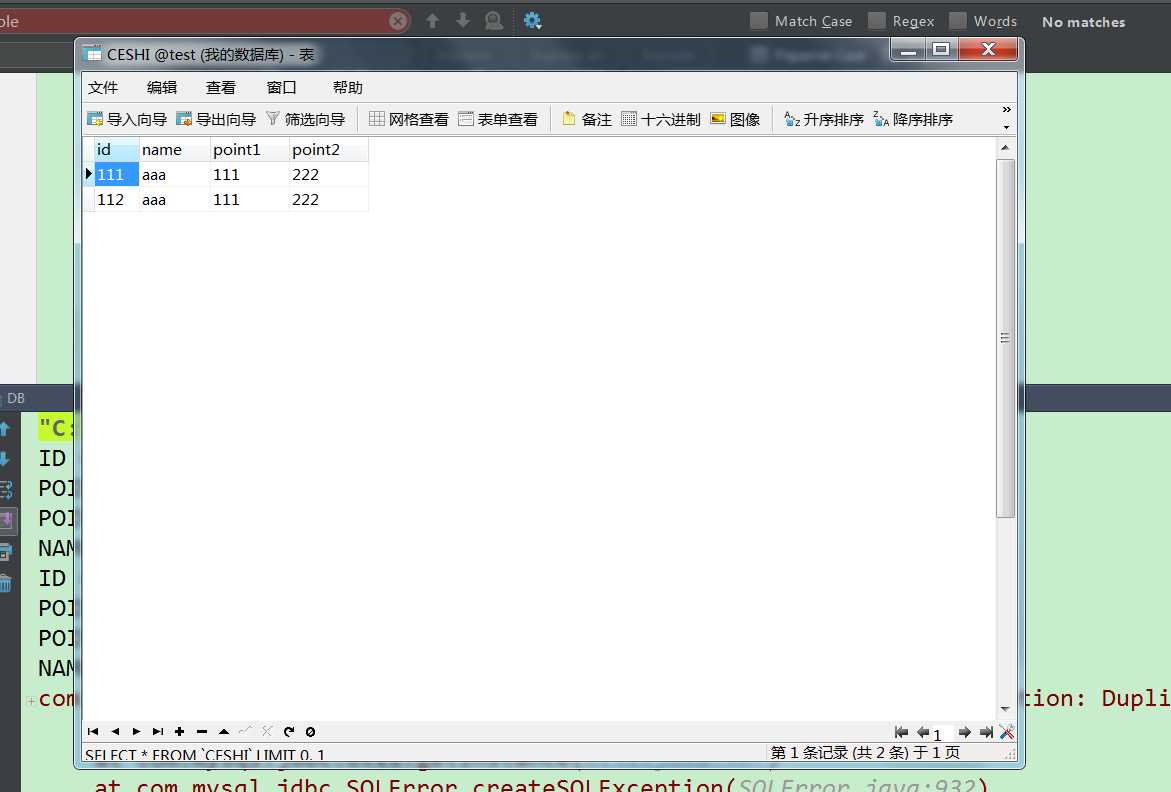
然后现在test数据库里新建一个CESHI表,建好后跑一下java文件,
表示已经在mysql中生成了数据,所以才提示primary key 111和112重复,不用管。
现在打开mysql工具,发现CESHI表里是不是已经多了几行数据?

ok,现在大功告成!
标签:
原文地址:http://www.cnblogs.com/hangaozu/p/5438134.html