标签:
在上一篇博客中,我们介绍了Retrofit的文件上传,文件下载以及进度监听,这篇博客我们来了解下批量上传以及上传进度的监听。
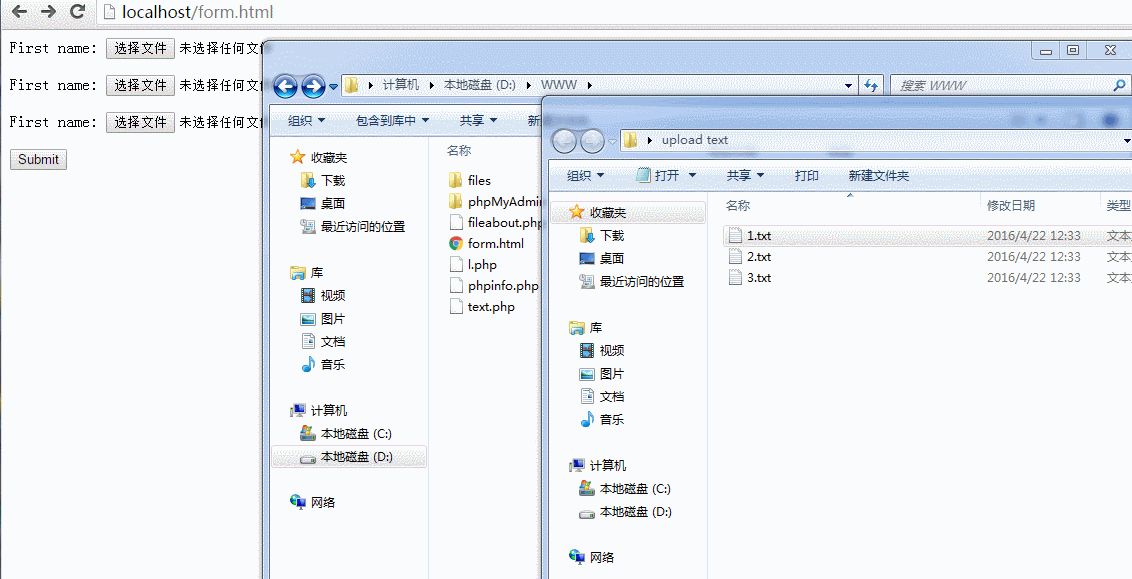
要想实现批量上传,我们要考虑下HTML中实现批量上传的方法,借助Form表单,所以,我们也可以通过借助Form表单来实现批量上传。
<html>
<body>

<form action="http://localhost/fileabout.php" enctype="multipart/form-data" method="post">
  <p>First name: <input type="file" name="file[]" id="name1" /></p>
  <p>First name: <input type="file" name="file[]" id="name2" /></p>
  <p>First name: <input type="file" name="file[]" id="name3" /></p>
  <input type="submit" value="Submit" />
</form>

</body>
</html><?php
header(‘Content-Type:text/html;charset=utf-8‘);
$fileArray = $_FILES[‘file‘];//获取多个文件的信息,注意:这里的键名不包含[]
$upload_dir = "D:\WWW"."\\"; //保存上传文件的目录
foreach ( $fileArray[‘error‘] as $key => $error) {
if ( $error == UPLOAD_ERR_OK ) { //PHP常量UPLOAD_ERR_OK=0,表示上传没有出错
$temp_name = $fileArray[‘tmp_name‘][$key];
$file_name = $fileArray[‘name‘][$key];
move_uploaded_file($temp_name, $upload_dir.$file_name);
echo ‘上传[文件‘.$file_name.‘]成功!<br/>‘;
}else {
echo ‘上传[文件‘.$key.‘]失败!<br/>‘;
}
} array(1) {
["file"]=> array(5) {
["name"]=> array(3) {
[0]=> string(5) "1.txt"
[1]=> string(5) "2.txt"
[2]=> string(5) "3.txt" }
["type"]=> array(3) {
[0]=> string(10) "text/plain"
[1]=> string(10) "text/plain"
[2]=> string(10) "text/plain" }
["tmp_name"]=> array(3) {
[0]=> string(27) "C:\Windows\Temp\phpB829.tmp"
[1]=> string(27) "C:\Windows\Temp\phpB82A.tmp"
[2]=> string(27) "C:\Windows\Temp\phpB82B.tmp" }
["error"]=> array(3) {
[0]=> int(0)
[1]=> int(0)
[2]=> int(0) }
["size"]=> array(3) {
[0]=> int(11)
[1]=> int(13)
[2]=> int(13) }
}* 由于我php只会点皮毛中的皮毛,所以上面有的内容可能描述的不清楚或者不正确,请指出 *
* 由于我php只会点皮毛中的皮毛,所以上面有的内容可能描述的不清楚或者不正确,请指出 *
* 由于我php只会点皮毛中的皮毛,所以上面有的内容可能描述的不清楚或者不正确,请指出 *
```
@Multipart
@POST("/fileabout.php")
Call<String> upload_2(@Part("filedes") String des,@Part("file[]\"; filename=\"1.txt") RequestBody imgs,@Part("file[]\"; filename=\"2.txt") RequestBody imgs_2,@Part("file[]\"; filename=\"3.txt") RequestBody imgs_3);File file = new File(Environment.getExternalStorageDirectory() + "/" + "1.txt");
File file2 = new File(Environment.getExternalStorageDirectory() + "/" + "2.txt");
File file3 = new File(Environment.getExternalStorageDirectory() + "/" + "3.txt");
final RequestBody requestBody =
RequestBody.create(MediaType.parse("multipart/form-data"),file);
final RequestBody requestBody2 =
RequestBody.create(MediaType.parse("multipart/form-data"),file2);
final RequestBody requestBody3 =
RequestBody.create(MediaType.parse("multipart/form-data"),file3);
Call<String> model = service.upload_2("this is txt",requestBody,requestBody2,requestBody3);上面的这种办法没有灵活性科研,所以是不具有使用价值的,那么,我们需要用下面这种办法。
相应的api接口变成了这个样子
@Multipart
@POST("/fileabout.php")
Call<String> upload_3(@Part("filedes") String des,@PartMap Map<String,RequestBody> params);那么,客户端就可以通过下面这种方法进行配置了,
Map<String,RequestBody> params = new HashMap<String, RequestBody>();
params.put("file[]\"; filename=\""+file.getName()+"", requestBody);
params.put("file[]\"; filename=\""+file2.getName()+"", requestBody2);
params.put("file[]\"; filename=\""+file3.getName()+"", requestBody3);
Call<String> model = service.upload_3("hello",params);
灵活性是不是有所提升?这样才像form表单,可以随意配置了。

博客看不到?点我看图
到这里,我们的批量上传就结束了,如果各位朋友有什么更好的办法,请教教我。。。
当想到这个问题的时候,完全没有思路,那就尴尬了。仔细想想,好吧,还是没有思路,那么,咱们去看看github上官方给出的几个类,。就看这个类 就看这个类
恩,我给出2张图,大家自己观察下
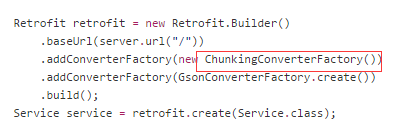
博客看不到?点我看图
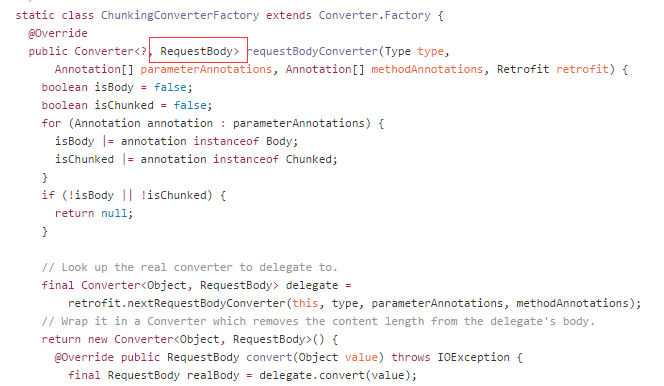
博客看不到?点我看图
发现没?转化器中出现了RequestBody,这让我瞬间有了想法,没错,我们模仿下载的办法,同样的,将这个类改造下。
首先,我们抛弃里面的RequestBody,我们手动往里传,也就是,去掉下面这行代码。
final RequestBody realBody = delegate.convert(value)第二步,我们发现,在return new RequestBody()相关代码中,没有长度信息。,所以添加一下代码。
@Override
public long contentLength() throws IOException {
    return requestBody.contentLength();
}
第三部 模仿下载的过程,写上传的过程,代码如下
@Override
public void writeTo(BufferedSink sink) throws IOException{
//                        realBody.writeTo(sink);
    if (bufferedSink == null) {
         //包装
         bufferedSink = Okio.buffer(sink(sink));
     }
     //写入
     requestBody.writeTo(bufferedSink);
     //必须调用flush,否则最后一部分数据可能不会被写入
     bufferedSink.flush();

}

private Sink sink(Sink sink) {
    return new ForwardingSink(sink) {
          //当前写入字节数
          long bytesWritten = 0L;
          //总字节长度,避免多次调用contentLength()方法
          long contentLength = 0L;

          @Override
          public void write(Buffer source, long byteCount) throws IOException {
               super.write(source, byteCount);
               if (contentLength == 0) {
                    //获得contentLength的值,后续不再调用
                    contentLength = contentLength();
                }
                //增加当前写入的字节数
                bytesWritten += byteCount;
                //回调
                listener.onProgress(bytesWritten, contentLength, bytesWritten == contentLength);
              }
         };
}最后,这个类变成了这个样子。大家也可以去我github上将这个类下载来下。链接地址
public class ChunkingConverterFactory extends Converter.Factory {

    @Target(PARAMETER)
    @Retention(RUNTIME)
    @interface Chunked {

    }

    private BufferedSink bufferedSink;
    private final RequestBody requestBody;

    private final ProgressListener listener;

    public ChunkingConverterFactory(RequestBody requestBody,ProgressListener listener){
        this.requestBody = requestBody;
        this.listener = listener ;
    }

    @Override
    public Converter<?, RequestBody> requestBodyConverter(Type type, Annotation[] parameterAnnotations, Annotation[] methodAnnotations, Retrofit retrofit) {

        boolean isBody = false;
        boolean isChunked = false;

        for (Annotation annotation : parameterAnnotations){
            isBody |= annotation instanceof Body;
            isChunked |= annotation instanceof Chunked;
        }

        final Converter<Object,RequestBody> delegate = retrofit
                .nextRequestBodyConverter(this,type,parameterAnnotations,methodAnnotations);

        return new Converter<Object, RequestBody>() {
            @Override
            public RequestBody convert(Object value) throws IOException {


                return new RequestBody() {
                    @Override
                    public MediaType contentType() {
                        return requestBody.contentType();
                    }


                    @Override
                    public long contentLength() throws IOException {
                        return requestBody.contentLength();
                    }

                    @Override
                    public void writeTo(BufferedSink sink) throws IOException {
//                        realBody.writeTo(sink);
                        if (bufferedSink == null) {
                            //包装
                            bufferedSink = Okio.buffer(sink(sink));
                        }
                        //写入
                        requestBody.writeTo(bufferedSink);
                        //必须调用flush,否则最后一部分数据可能不会被写入
                        bufferedSink.flush();

                    }

                    private Sink sink(Sink sink) {
                        return new ForwardingSink(sink) {
                            //当前写入字节数
                            long bytesWritten = 0L;
                            //总字节长度,避免多次调用contentLength()方法
                            long contentLength = 0L;

                            @Override
                            public void write(Buffer source, long byteCount) throws IOException {
                                super.write(source, byteCount);
                                if (contentLength == 0) {
                                    //获得contentLength的值,后续不再调用
                                    contentLength = contentLength();
                                }
                                //增加当前写入的字节数
                                bytesWritten += byteCount;
                                //回调
                                listener.onProgress(bytesWritten, contentLength, bytesWritten == contentLength);
                            }
                        };
                    }
                };
            }
        };
    }


}像下载一下,我们还是通过builder去build对象,当然 也可以使用普通的方法,但是得RequestBody 写在前面,这样看起来有点怪怪的。整个代码如下
private void uploadProgress(){
        Retrofit.Builder builder = new Retrofit.Builder()
                .baseUrl("http://192.168.56.1");
        File file = new File(Environment.getExternalStorageDirectory() + "/" + "text_img.png");
        final RequestBody requestBody =
                RequestBody.create(MediaType.parse("multipart/form-data"),file);
        uploadfileApi api = builder.addConverterFactory(new ChunkingConverterFactory(requestBody, new ProgressListener() {
            @Override
            public void onProgress(long progress, long total, boolean done) {
                Log.e(TAG, "onProgress: 这是上传的 " + progress + "total ---->"  + total );
                Log.e(TAG, "onProgress: " + Looper.myLooper());
            }
        })).addConverterFactory(GsonConverterFactory.create()).build().create(uploadfileApi.class);
        Call<String> model = api.upload("hh",requestBody);
        model.enqueue(new Callback<String>() {
            @Override
            public void onResponse(Call<String> call, Response<String> response) {

            }

            @Override
            public void onFailure(Call<String> call, Throwable t) {

            }
        });
}我们知道了如何监听单个文件的上传进度,多个文件,恩,就不说了啊,(添加多个转换器喽)。
Retrofit很强大 很强大,有的同学想让我配合上Rxjava写,哎,朋友,给个面子啊,好歹把我第一篇基础用法看看哪。还剩下许多许多的功能没介绍,看朋友们有什么需求了,可以给我留言,完了一起研究啊。
Android网络开源库-Retrofit(三) 批量上传及上传进度监听
标签:
原文地址:http://blog.csdn.net/qq_21430549/article/details/51227379