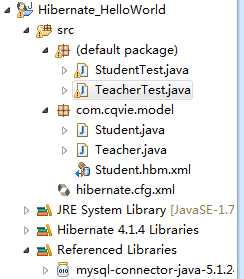
标签:
注:Hibernate:可实现不使用Sql语句就能实现对数据库的增删查改。即是JPA的具体实现
1.创建Java Project:Hibernate_HelloWorld并点击项目右键--->myeclipse.....引入Hibernate库

3.建立数据库test和表Teacher、Student


4.创建实体类,测试类
4.1 Student类(属性 stuID、stuName、stuAge,对应的getset方法)
package com.cqvie.model;
public class Student {
private String stuName;
private Integer stuID;
private Integer stuAge;
public String getStuName() {
return stuName;
}
public void setStuName(String stuName) {
this.stuName = stuName;
}
public Integer getStuID() {
return stuID;
}
public void setStuID(Integer stuID) {
this.stuID = stuID;
}
public Integer getStuAge() {
return stuAge;
}
public void setStuAge(Integer stuAge) {
this.stuAge = stuAge;
}
}
4.2 Teacher类(属性 id、name、title及对应是getset方法)
package com.cqvie.model;
import javax.persistence.Entity;
import javax.persistence.Id;
@Entity
public class Teacher {
private String name;
private Integer id;
private String title;
public String getName() {
return name;
}
public void setName(String name) {
this.name = name;
}
@Id
public Integer getId() {
return id;
}
public void setId(Integer id) {
this.id = id;
}
public String getTitle() {
return title;
}
public void setTitle(String title) {
this.title = title;
}
}
4.3 StudentTest类
import org.hibernate.Session;
import org.hibernate.SessionFactory;
import org.hibernate.cfg.AnnotationConfiguration;
import org.hibernate.cfg.Configuration;
import com.cqvie.model.Student;
public class StudentTest {
public static void main(String[] args) {
// TODO Auto-generated method stub
Student stu = new Student();
stu.setStuID(004);
stu.setStuName("Anna");
stu.setStuAge(10);
Configuration cfg = new Configuration();
SessionFactory sf=cfg.configure().buildSessionFactory();//读文件
Session session =sf.openSession();//打开一个新的Session
session.beginTransaction();//放在事物里面
session.save(stu);
//session.delete(stu);//删除该条记录
//session.update(stu);//修改这条记录
session.getTransaction().commit();
session.close();
sf.close();
}
}
由结果可看此时的记录已经插入到表中

再看后台已经打印出来一条信息

4.4 TeacherTest类添加一条记录
import org.hibernate.Session;
import org.hibernate.SessionFactory;
import org.hibernate.cfg.AnnotationConfiguration;
import org.hibernate.cfg.Configuration;
import com.cqvie.model.Teacher;
public class TeacherTest {
public static void main(String[] args) {
// TODO Auto-generated method stub
Teacher t = new Teacher();
t.setId(1);
t.setName("Chongqing");
t.setTitle("Hello");
@SuppressWarnings("deprecation")
Configuration cfg = new AnnotationConfiguration();
@SuppressWarnings("deprecation")
SessionFactory sf=cfg.configure().buildSessionFactory();//读文件
Session session =sf.openSession();//打开一个新的Session
session.beginTransaction();//放在事物里面
session.save(t);
session.getTransaction().commit();//提交事物
session.close();
sf.close();
}
}
t.setId(1);
t.setName("Chongqing");
t.setTitle("Hello");
设置的三个字段已经插入到表中。


5.修改hibernate.cfg.xml文件:修改对应的数据库名test,连接数据库的用户名(root)和密码(空);对应的mapping路径也要修改,注意格式。
<?xml version=‘1.0‘ encoding=‘UTF-8‘?>
<!DOCTYPE hibernate-configuration PUBLIC
"-//Hibernate/Hibernate Configuration DTD 3.0//EN"
"http://www.hibernate.org/dtd/hibernate-configuration-3.0.dtd">
<!-- Generated by MyEclipse Hibernate Tools. -->
<hibernate-configuration>
<session-factory>
<!-- Database connection settings -->
<property name="connection.driver_class">com.mysql.jdbc.Driver</property>
<property name="connection.url">jdbc:mysql://localhost/test</property>
<property name="connection.username">root</property>
<property name="connection.password"></property>
<!-- JDBC connection pool (use the built-in) -->
<property name="connection.pool_size">1</property>
<!-- SQL dialect -->
<property name="dialect">org.hibernate.dialect.MySQLDialect</property>
<!-- Enable Hibernate‘s automatic session context management -->
<property name="current_session_context_class">thread</property>
<!-- Disable the second-level cache -->
<property name="cache.provider_class">org.hibernate.cache.NoCacheProvider</property>
<!-- Echo all executed SQL to stdout -->
<property name="show_sql">true</property>
<!-- Drop and re-create the database schema on startup -->
<property name="hbm2ddl.auto">update</property>
<mapping resource="com/cqvie/model/Student.hbm.xml"/>
<mapping class="com.cqvie.model.Teacher"/>
</session-factory>
</hibernate-configuration>
实体类Student对应的映射文件Student.hbm.xml(注意书写的格式,不然将找不到对应的文件。)
<?xml version="1.0"?>
<!DOCTYPE hibernate-mapping PUBLIC
"-//Hibernate/Hibernate Mapping DTD 3.0//EN"
"http://hibernate.sourceforge.net/hibernate-mapping-3.0.dtd">
<hibernate-mapping package="com.cqvie.model">
<class name="Student" >
<id name="stuID"></id>
<property name="stuName"></property>
<property name="stuAge"></property>
</class>
</hibernate-mapping>
6.引入MySql驱动(新建libs文件夹,将/Hibernate_HelloWorld/mysql-connector-java-5.1.24-
bin.jar 放入里面记住一定要把它加入到 bulid path里面,否则没办法加载驱动mysql)
7.总结、教训
7.1 hibername通过实体类就可以生成数据表,只需要运行程序就可以生成数据库表
7.2 按理说应先写好实体类,再建表(面向对象);但是现实生活中,更多的是先建表再生成实体类,因为表有部分必要的索引,需要优化,先建表可以使效率提高。
7.3 hbm2ddl.auto:4种情况分析
<property name="hbm2ddl.auto">create</property>:用create可以实现只要创建了实体类并配置了
hbm文件即可创建对应的数据库表。
<property name="hbm2ddl.auto">create-drop</property>:意为会将数据库中存在的数据库表删除(
包括表的字段和记录)
<property name="hbm2ddl.auto">validate</property>:意为在一切操作数据库表之前,hibernate将会
进行查询数据库中是否存在相应的数据库表。
<property name="hbm2ddl.auto">update</property>:相当于更新一条全新的记录,主键也不一样,当
主键一致时,它不执行任何操作,还会报错
标签:
原文地址:http://www.cnblogs.com/LindaBlog/p/5441810.html