标签:
XMLHttpRequest:$http是angularjs的一个核心服务,用于读取远程服务器的数据。
$http.get(url) 是用于读取服务器数据的函数。
举例:
<div ng-app="myApp" ng-controller="customersCtrl">
<ul>
<li ng-repeat="x in names">
{{ x.Name + ‘, ‘ + x.Country }}
</li>
</ul>
</div>
<script>
var app = angular.module(‘myApp‘, []);
app.controller(‘customersCtrl‘, function($scope, $http) {
$http.get("http://localhost:8080/web/test.jsp")
.success(function(response) {$scope.names = response.records;});
});
</script>
JSON格式字符串:
{
"records":
[
{
"Name" : "Alfreds Futterkiste",
"City" : "Berlin",
"Country" : "Germany"
},
{
"Name" : "Berglunds snabbköp",
"City" : "Luleå",
"Country" : "Sweden"
}
]
}
通过设置Access-Control-Allow-Origin来实现跨域。
例如:客户端的域名是client.runoob.com,而请求的域名是server.runoob.com。
如果直接使用ajax访问,会有以下错误:
XMLHttpRequest cannot load http://server.runoob.com/server.php.
No ‘Access-Control-Allow-Origin‘ header is present on the requested resource.Origin ‘http://client.runoob.com‘ is therefore not allowed access.
1、允许单个域名访问
指定某域名(http://client.runoob.com)跨域访问,则只需在http://server.runoob.com/server.php文件头部添加如下代码:
header(‘Access-Control-Allow-Origin:http://client.runoob.com‘);
2、允许多个域名访问
指定多个域名(http://client1.runoob.com、http://client2.runoob.com等)跨域访问,则只需在http://server.runoob.com/server.php文件头部添加如下代码:
$origin = isset($_SERVER[‘HTTP_ORIGIN‘])? $_SERVER[‘HTTP_ORIGIN‘] : ‘‘;
$allow_origin = array(
‘http://client1.runoob.com‘,
‘http://client2.runoob.com‘
);
if(in_array($origin, $allow_origin)){
header(‘Access-Control-Allow-Origin:‘.$origin);
}
3、允许所有域名访问
允许所有域名访问则只需在http://server.runoob.com/server.php文件头部添加如下代码:
header(‘Access-Control-Allow-Origin:*‘);
<!DOCTYPE html>
<html>
<head>
<meta charset="utf-8">
<script src="http://apps.bdimg.com/libs/angular.js/1.4.6/angular.min.js">
</script>
</head>
<body ng-app="myApp" ng-controller="myCtrl">
<div>
<select ng-model="name" ng-options="x for x in names">{{x}}</select>
</div>
<script>
angular.module(‘myApp‘,[]).controller(‘myCtrl‘,function($scope){
$scope.name = ‘google‘;
$scope.names = [‘google‘,‘baidu‘,‘360‘];
});
</script>
</body>
</html>
<div ng-app="myApp" ng-controller="customersCtrl">
<table>
<tr ng-repeat="x in names">
<td>{{ x.Name }}</td>
<td>{{ x.Country }}</td>
</tr>
</table>
</div>
<script>
var app = angular.module(‘myApp‘, []);
app.controller(‘customersCtrl‘, function($scope, $http) {
$http.get("http://localhost:8080/web/test.jsp")
.success(function (response) {$scope.names = response.records;});
});
</script>
1:添加序号
<table>
<tr ng-repeat="x in names">
<td>{{ $index + 1 }}</td>
<td>{{ x.Name }}</td>
<td>{{ x.Country }}</td>
</tr>
</table>
2:ng-disabled禁用指令
当ng-disabled为true时,则控件将被禁用;
为false时,控件可用。
举例:
<div ng-app="myApp">
<p>
<button ng-disabled="switch">点击</button>
</p>
<p>
<input type="checkbox" ng-model="switch"/>
</p>
<p>
{{switch}}
</p>
</div>
3:ng-show,显示或者隐藏一个html元素
ng-show="true"时,显示元素,为false时,隐藏元素。
<div ng-app="myApp" ng-init="switch=true">
举例:
<p>
<button type="button" ng-show="switch">点击</button>
</p>
<p>
<input type="checkbox" ng-model="switch"/>
</p>
<p>
{{switch}}
</p>
</div>
4:ng-hide,显示或者隐藏一个html元素
ng-hide的值为true时,隐藏元素,ng-hide的值为false时,显示元素
ng-hide的值可以为一个直接量,也可以是一个表达式。
举例:
<!DOCTYPE html>
<html>
<head>
<meta charset="utf-8">
<script src="http://apps.bdimg.com/libs/angular.js/1.4.6/angular.min.js"></script>
</head>
<body>
<div ng-app="myApp" ng-controller="myCtrl">
<button ng-click="toggle()">点击</button>
<div ng-hide="myVar">
<p>名:<input type="text" ng-model="firstname"/></p>
<p>姓:<input type="text" ng-model="lastname"/></p>
</div>
<div>{{firstname+" "+lastname}}</div>
</div>
<script>
var app = angular.module(‘myApp‘, []);
app.controller(‘myCtrl‘, function($scope) {
$scope.firstname = "Tom";
$scope.lastname = "Son";
$scope.myVar = false;
$scope.toggle = function(){
$scope.myVar = !$scope.myVar;
};
});
</script>
</body>
</html>
ng-click:点击事件,点击然后触发事件。
<div ng-app="">
<p>
<button ng-click="count=count+1">点击</button>
</p>
<p>
{{count}}
</p>
</div>
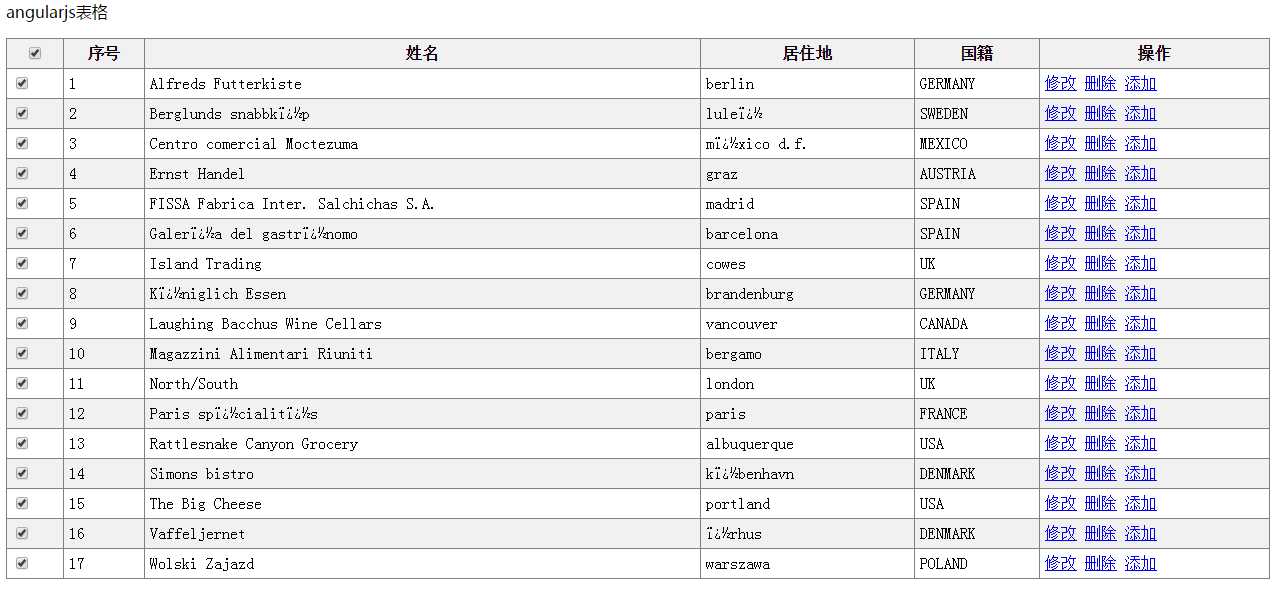
七:人员信息汇总表

css样式部分:
<style>
table{
width: 100%; //实现页面宽度全部展开
height: 100%;
}
table,th,td {
border: 1px solid grey;
border-collapse: collapse;
padding: 5px;
}
table tr:nth-child(odd) {
background-color: #f1f1f1;
}
table tr:nth-child(even) {
background-color: #ffffff;
}
</style>
js部分:
<script>
var app = angular.module(‘myApp‘, []);
app.controller(‘myCtrl‘, function($scope, $http) {
//全部勾选/全部不选
$scope.checkAll = function() {
var el = document.getElementsByTagName(‘input‘);
//如果已经是勾选状态
if (el[0].checked == false) {
for (var i = 1; i <= $scope.names.length; i++) {
if ((el[i].type == "checkbox")
&& (el[i].name == "check")) {
el[i].checked = false;
}
}
;
} else {
for (var i = 1; i <= $scope.names.length; i++) {
if ((el[i].type == "checkbox")
&& (el[i].name == "check")) {
el[i].checked = true;
}
}
;
}
};
$http.get(‘http://localhost:8080/web/test.jsp‘).success(
function(response) {
$scope.names = response.records;
});
});
</script>
视图html部分:
<body ng-app="myApp" ng-controller="myCtrl">
<div>
<p style="font-family: ‘微软雅黑‘; font-size: ‘20px‘">angularjs表格</p>
<table>
<tr>
<th><input type="checkbox" ng-click="checkAll();" /></th>
<th>序号</th>
<th>姓名</th>
<th>居住地</th>
<th>国籍</th>
<th>操作</th>
</tr>
<tr ng-repeat="x in names | orderBy:‘country‘">
<td><input id="checkboxes" type="checkbox" name="check" /></td>
<td>{{$index+1}}</td>
<td>{{x.Name}}</td>
<td>{{x.City|lowercase}}</td>
<td>{{x.Country| uppercase }}</td>
<td><a href="#">修改</a> <a href="#">删除</a> <a href="#">添加</a></td>
</tr>
</table>
</div>
</body>
angualrjs学习总结三(http、select、表格、指令以及事件)
标签:
原文地址:http://www.cnblogs.com/warrior4236/p/5485933.html