标签:des style blog http 使用 os io 数据
本节主要涉及到 Windows phone 8 手机支持的各类设备,包括相机、设备状态,振动装置等。还有各类感应器,包括磁力计、加速度器和陀螺仪。通过设备状态可以获取内存、硬件、电源、键盘等状态;通过相机捕获照片和视频;各类感应器帮助我们获取设备的运动状态等。
快速导航:
一、设备状态
二、相机
三、罗盘传感器
四、加速度计
五、陀螺仪
六、如何振动手机
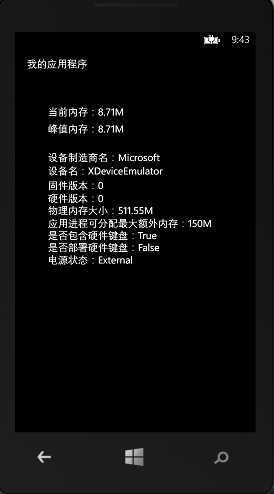
通过DeviceStatus 类我们可以确定设备的相关状态信息,比如内存大小啊,固件版本啊,还有是否部署了物理键盘等信息,以及与电源的相关信息,当前是电池还是外部电源等。
我们通过下面的代码展示如何获取这些信息。
[C#]
protected override void OnNavigatedTo(System.Windows.Navigation.NavigationEventArgs e)
{
var timer = new DispatcherTimer();
timer.Interval = new TimeSpan(0, 0, 10);
timer.Tick += new EventHandler((a, b) =>
{
//当前内存使用了多少字节
var x = Microsoft.Phone.Info.DeviceStatus.ApplicationCurrentMemoryUsage;
textblock1.Text = "当前内存:" + convert(x);
//高峰时内存使用了多少字节
var y = Microsoft.Phone.Info.DeviceStatus.ApplicationPeakMemoryUsage;
textblock2.Text = "峰值内存:" + convert(y);
});
timer.Start();
textblock3.Text = "设备制造商名:"+ DeviceStatus.DeviceManufacturer;
textblock4.Text = "设备名:" + DeviceStatus.DeviceName;
textblock5.Text = "固件版本:"+ DeviceStatus.DeviceFirmwareVersion;
textblock6.Text = "硬件版本:"+ DeviceStatus.DeviceHardwareVersion;
textblock7.Text = "物理内存大小:"+convert( DeviceStatus.DeviceTotalMemory);
textblock8.Text = "应用进程可分配最大额外内存:" + convert(DeviceStatus.ApplicationMemoryUsageLimit);
textblock9.Text ="是否包含硬件键盘:"+ DeviceStatus.IsKeyboardPresent.ToString();
textblock10.Text = "是否部署硬件键盘:" + DeviceStatus.IsKeyboardDeployed.ToString();
textblock11.Text = "电源状态:" + DeviceStatus.PowerSource.ToString();
//关闭或部署键盘时
DeviceStatus.KeyboardDeployedChanged += new EventHandler((a, b) => {
textblock9.Text = "键盘变更,是否包含硬件键盘:" + DeviceStatus.IsKeyboardPresent.ToString();
});
//设备电源变更时
DeviceStatus.PowerSourceChanged += new EventHandler((a, b) =>
{
textblock11.Text = "电源状态变更:" + DeviceStatus.PowerSource.ToString();
});
base.OnNavigatedTo(e);
}
private string convert(long x)
{
return Math.Round(x / (1024.0 * 1024.0), 2) + "M";
}

有两个类可以调用相机,分别是PhotoCamera和PhotoCaptureDevice,一般如果要支持WP7以及对相机基本调用则使用前者,后者用于相机的高级捕获。
我们首先通过PhotoCamera来访问相机,我们可以实现一个具备拍照功能的基本相机,包含自动对焦、闪光灯、分辨率调整等功能,下面代码演示了如何使用。
[XAML]
    <Grid x:Name="LayoutRoot" Background="Transparent">
        <Canvas x:Name="canvas1" Margin="0,0,0,0" Tap="canvas1_Tap" Width="800" Height="480">
            <Canvas.Background>
                <VideoBrush x:Name="viewfinderBrush" />
            </Canvas.Background>
            <TextBlock x:Name="focusBrackets" Text="[   ]" FontSize="40" Visibility="Collapsed"/>
        </Canvas>

        <ListBox x:Name="listbox1" Margin="95,394,538,59" SelectionChanged="listbox1_SelectionChanged">
            <ListBox.ItemTemplate>
                <DataTemplate>
                    <TextBlock Text="{Binding}"></TextBlock>
                </DataTemplate>
            </ListBox.ItemTemplate>
            <ListBox.ItemContainerStyle>
                <Style TargetType="ListBoxItem">
                    <Setter Property="Margin" Value="0,0,10,0" />
                </Style>
            </ListBox.ItemContainerStyle>
            <ListBox.ItemsPanel>
                <ItemsPanelTemplate>
                    <StackPanel Orientation="Horizontal"></StackPanel>
                </ItemsPanelTemplate>
            </ListBox.ItemsPanel>
        </ListBox>
        <TextBlock x:Name="textblock1" Foreground="Red" HorizontalAlignment="Left" Margin="584,22,0,0" TextWrapping="Wrap" VerticalAlignment="Top"/>
        <TextBlock HorizontalAlignment="Left" Margin="10,394,0,0" TextWrapping="Wrap" Text="闪光灯:" VerticalAlignment="Top"/>
        <TextBlock HorizontalAlignment="Left" Margin="273,394,0,0" TextWrapping="Wrap" Text="分辨率:" VerticalAlignment="Top"/>
        <ListBox x:Name="listbox2" Margin="350,394,10,59" SelectionChanged="listbox2_SelectionChanged">
            <ListBox.ItemTemplate>
                <DataTemplate>
                    <TextBlock Text="{Binding}"/>
                </DataTemplate>
            </ListBox.ItemTemplate>
            <ListBox.ItemContainerStyle>
                <Style TargetType="ListBoxItem">
                    <Setter Property="Margin" Value="0,0,10,0" />
                </Style>
            </ListBox.ItemContainerStyle>
            <ListBox.ItemsPanel>
                <ItemsPanelTemplate>
                    <StackPanel Orientation="Horizontal"/>
                </ItemsPanelTemplate>
            </ListBox.ItemsPanel>
        </ListBox>
        <Button Content="对焦" HorizontalAlignment="Left" Margin="517,410,0,0" VerticalAlignment="Top" Click="Button_Click_1"/>
        <Button Content="拍照" HorizontalAlignment="Left" Margin="623,410,0,0" VerticalAlignment="Top" Click="Button_Click_2"/>
        <TextBlock Width="500" x:Name="textblock2" HorizontalAlignment="Left" Margin="10,434,0,0" TextWrapping="Wrap" VerticalAlignment="Top"/>
    </Grid>
[C#]
    public partial class MainPage : PhoneApplicationPage
    {
        // 构造函数
        public MainPage()
        {
            InitializeComponent();
        }

        PhotoCamera photoCamera;
        MediaLibrary library = new MediaLibrary();

        protected override void OnNavigatedTo(System.Windows.Navigation.NavigationEventArgs e)
        {
            //判断是否支持相机
            if (PhotoCamera.IsCameraTypeSupported(CameraType.Primary))
            {
                textblock1.Text = "当前取景:后置摄像头";
                photoCamera = new PhotoCamera(CameraType.Primary);
            }
            else if (PhotoCamera.IsCameraTypeSupported(CameraType.FrontFacing))
            {
                textblock1.Text = "当前取景:前置摄像头";
                photoCamera = new PhotoCamera(CameraType.FrontFacing);
            }
            else
            {
                textblock1.Text = "设备不支持相机";
                return;
            }
            textblock2.Text = "相机正在初始化中.";
            viewfinderBrush.SetSource(photoCamera);
            //相机初始化完成时
            photoCamera.Initialized += (a, b) =>
            {
                if (b.Succeeded)
                {
                    this.Dispatcher.BeginInvoke(() =>
                    {
                        SupportedFlashModesInit();
                        AvailableResolutionsInit();
                        textblock2.Text = "相机初始化完成.";
                    });
                }
            };

            //有图像可用时(拍摄完成)
            photoCamera.CaptureImageAvailable += (a, b) =>
            {
                this.Dispatcher.BeginInvoke(() => { textblock2.Text = "正在保存照片."; });
                library.SavePictureToCameraRoll(Guid.NewGuid().ToString() + ".jpg", b.ImageStream);
                this.Dispatcher.BeginInvoke(() => { textblock2.Text = "照片保存成功."; });
            };

            //对焦完成时
            photoCamera.AutoFocusCompleted += (a, b) =>
            {
                this.Dispatcher.BeginInvoke(() =>
                {
                    textblock2.Text = "自动对焦完成.";
                    focusBrackets.Visibility = Visibility.Collapsed;
                });
            };

            base.OnNavigatedTo(e);
        }

        /// <summary>
        /// 显示支持的闪光模式
        /// </summary>
        private void SupportedFlashModesInit()
        {
            List<string> flashModes = new List<string>() { "关" };
            if (photoCamera.IsFlashModeSupported(FlashMode.On)) flashModes.Add("开");
            if (photoCamera.IsFlashModeSupported(FlashMode.Auto)) flashModes.Add("自动");
            if (photoCamera.IsFlashModeSupported(FlashMode.RedEyeReduction)) flashModes.Add("红眼");
            listbox1.ItemsSource = flashModes;
        }

        /// <summary>
        /// 显示支持的分辨率
        /// </summary>
        private void AvailableResolutionsInit()
        {
            listbox2.ItemsSource = photoCamera.AvailableResolutions;
        }

        //对焦
        private void Button_Click_1(object sender, RoutedEventArgs e)
        {
            //是否支持自动对焦
            if (photoCamera.IsFocusSupported == true)
            {
                try
                {
                    photoCamera.Focus();
                }
                catch(Exception ex)
                {
                    this.Dispatcher.BeginInvoke(() => { textblock2.Text = "对焦错误:" + ex.Message; });
                }
            }
            else
            {
                this.Dispatcher.BeginInvoke(() => { textblock2.Text = "相机不支持自动对焦."; });
            }
        }

        //拍照
        private void Button_Click_2(object sender, RoutedEventArgs e)
        {
            if (photoCamera != null)
            {
                try
                {
                    photoCamera.CaptureImage();
                }
                catch (Exception ex)
                {
                    this.Dispatcher.BeginInvoke(() => { textblock2.Text = "拍照错误:" + ex.Message; });
                }
            }
        }

        //特定点对焦
        private void canvas1_Tap(object sender, GestureEventArgs e)
        {
            if (photoCamera == null) return;
            if (!photoCamera.IsFocusAtPointSupported)
            {

                textblock2.Text = "不支持特定点对焦";
                return;
            }

            try
            {
                Point tapLocation = e.GetPosition(canvas1);

                focusBrackets.SetValue(Canvas.LeftProperty, tapLocation.X - 30);
                focusBrackets.SetValue(Canvas.TopProperty, tapLocation.Y - 28);

                double focusXPercentage = tapLocation.X / canvas1.Width;
                double focusYPercentage = tapLocation.Y / canvas1.Height;

                focusBrackets.Visibility = Visibility.Visible;
                photoCamera.FocusAtPoint(focusXPercentage, focusYPercentage);

                this.Dispatcher.BeginInvoke(delegate()
                {
                    textblock2.Text = String.Format("针对位置 [{0:N2} , {1:N2}] 开始对焦", focusXPercentage, focusYPercentage);
                });
            }
            catch (Exception focusError)
            {

                this.Dispatcher.BeginInvoke(delegate()
                {
                    textblock2.Text ="对焦错误:"+ focusError.Message;
                    focusBrackets.Visibility = Visibility.Collapsed;
                });
            }

        }

        //切换闪光灯模式
        private void listbox1_SelectionChanged(object sender, SelectionChangedEventArgs e)
        {
            if (e.AddedItems.Count == 0) return;
            switch (e.AddedItems[0].ToString())
            {
                case "关":
                    photoCamera.FlashMode = FlashMode.Off;
                    break;
                case "自动":
                    photoCamera.FlashMode = FlashMode.Auto;
                    break;
                case "红眼":
                    photoCamera.FlashMode = FlashMode.RedEyeReduction;
                    break;
                case "开":
                    photoCamera.FlashMode = FlashMode.On;
                    break;
            }
            textblock2.Text = "已将闪光模式设置为:" + e.AddedItems[0].ToString();
        }
        //切换分辨率
        private void listbox2_SelectionChanged(object sender, SelectionChangedEventArgs e)
        {
            if (e.AddedItems.Count == 0) return;
            photoCamera.Resolution = (Size)e.AddedItems[0];
            textblock2.Text = "已将分辨率设置为:" + photoCamera.Resolution.ToString();
        }

    }
PhotoCaptureDevice对相机的高级捕获很多都是用于支持后续版本的,下面我们简单演示下通过PhotoCaptureDevice捕获照片并显示出来的方法。
[XAML]
    <Grid x:Name="LayoutRoot" Background="Transparent">
        <Canvas x:Name="canvas1" Margin="0,0,0,0" Width="800" Height="480">
            <Canvas.Background>
                <VideoBrush x:Name="viewfinderBrush" />
            </Canvas.Background>
           <Button Content="拍照" Canvas.Left="653" Canvas.Top="383" Click="Button_Click_1"/>
            <Image x:Name="img1" Height="231" Canvas.Left="508" Canvas.Top="87" Width="220"/>
        </Canvas>
 </Grid>
[C#]
    public partial class MainPage : PhoneApplicationPage
    {
        // 构造函数
        public MainPage()
        {
            InitializeComponent();

        }
        PhotoCaptureDevice photoCaptureDevice;
        CameraCaptureSequence cameraCaptureSequence;
        MemoryStream captureStream = new MemoryStream();
        protected async override void OnNavigatedTo(NavigationEventArgs e)
        {
            if (PhotoCaptureDevice.AvailableSensorLocations.Contains(CameraSensorLocation.Back))
            {
                var SupportedResolutions = PhotoCaptureDevice.GetAvailableCaptureResolutions(CameraSensorLocation.Back);
                photoCaptureDevice = await PhotoCaptureDevice.OpenAsync(CameraSensorLocation.Back, SupportedResolutions[0]);
            }
            else if (PhotoCaptureDevice.AvailableSensorLocations.Contains(CameraSensorLocation.Front))
            {
                var SupportedResolutions = PhotoCaptureDevice.GetAvailableCaptureResolutions(CameraSensorLocation.Front);
                photoCaptureDevice = await PhotoCaptureDevice.OpenAsync(CameraSensorLocation.Front, SupportedResolutions[0]);
            }
            else
            {
                return;
            }
            viewfinderBrush.SetSource(photoCaptureDevice);


            cameraCaptureSequence = photoCaptureDevice.CreateCaptureSequence(1);

            // Set camera properties.
            photoCaptureDevice.SetProperty(KnownCameraPhotoProperties.FlashMode, FlashState.On);
            photoCaptureDevice.SetProperty(KnownCameraGeneralProperties.PlayShutterSoundOnCapture, true);
            photoCaptureDevice.SetProperty(KnownCameraGeneralProperties.AutoFocusRange, AutoFocusRange.Infinity);

            cameraCaptureSequence.Frames[0].DesiredProperties[KnownCameraPhotoProperties.SceneMode] = CameraSceneMode.Portrait;

            cameraCaptureSequence.Frames[0].CaptureStream = captureStream.AsOutputStream();
            await photoCaptureDevice.PrepareCaptureSequenceAsync(cameraCaptureSequence);
            base.OnNavigatedTo(e);
        }

        public async void Capture()
        {
            await cameraCaptureSequence.StartCaptureAsync();
            var b = new BitmapImage();
            b.SetSource(captureStream);
            img1.Source = b;

        }

        private void Button_Click_1(object sender, RoutedEventArgs e)
        {
            Capture();
        }

    }
罗盘传感器用于感知地球磁场,功能主要是用于确定方向,有了它,我们可以开发类似指南针的应用。
不是每个设备都必须支持罗盘传感器的,所以我们需要在使用前判断设备是否支持。
[C#]
 if (!Compass.IsSupported)
 {
     MessageBox.Show("设备不支持罗盘");
     return;
 }
如果设备支持,我们还需要判断罗盘的精度,如果精度不高,需要提醒用户校对精度。当罗盘获取数据时,通过CurrentValueChanged事件处理获取的数据。
[XAML]
<Canvas x:Name="canvas1" Background="Black" Visibility="Collapsed">
    <Image x:Name="image3" Canvas.Top="12" Canvas.Left="70" Source="Image/3.png"/>
    <TextBlock TextWrapping="Wrap" Width="450" Canvas.Top="240" Text="  您的罗盘需要校验,请按照上图所示的方式移动您的手机,系统将自动完成校验过程。" />
    <Button Content="完成校验" Canvas.Left="154" Canvas.Top="596" Click="Button_Click_1"/>
</Canvas>
[C#]
compass = new Compass();
//指定数据更新时间间隔.
compass.TimeBetweenUpdates = TimeSpan.FromMilliseconds(20);
//从罗盘传感器获取数据时发生
compass.CurrentValueChanged += new EventHandler<SensorReadingEventArgs<CompassReading>>(compass_CurrentValueChanged);
//罗盘需要校验时发生
compass.Calibrate += new EventHandler<CalibrationEventArgs>(compass_Calibrate);
compass.Start();

//从传感器获取新数据时发生
void compass_CurrentValueChanged(object sender, SensorReadingEventArgs<CompassReading> e)
{
    //获取到地球地理北极顺时值偏移角度
    trueHeading = e.SensorReading.TrueHeading;
}

//罗盘需要校验时发生
void compass_Calibrate(object sender, CalibrationEventArgs e)
{
    Dispatcher.BeginInvoke(() =>
    {
        //罗盘需要校验,canvas1指示用户校验
        canvas1.Visibility = Visibility.Visible;
    });
}
加速度计用于测试某个时刻设备在空间中的姿态。它与重力相关。它的取值在分为x、y、z三个方向取值,下面我们理解下这些取值含义。我们假设设备正面向上平躺在水平桌面为参照标准:
x:设备左倾的趋势越大,值越小,左倾90度时,值为-1;相反,右倾时值越大,最大为1。
y:设备后倾的趋势越大,值越小,后倾90度时,值为-1;相反,前倾时值越大,最大为1。
z:设备下倾的趋势越大,值越大,下倾180度(翻面了)时,值为1;正面朝上(不动)时,最为-1。
总的说来,x控制左右,y控制前后,z控制上下。下面我们在看看如何使用。
[C#]
//校验设备是否支持
if (!Accelerometer.IsSupported)
{
    MessageBox.Show("设备不支持重力感应");
}

var accelerometer = new Accelerometer();
accelerometer.TimeBetweenUpdates = TimeSpan.FromMilliseconds(20);
//从加速度传感器获取数据时发生
accelerometer.CurrentValueChanged += new EventHandler<SensorReadingEventArgs<AccelerometerReading>>(accelerometer_CurrentValueChanged);
accelerometer.Start();

//从加速度传感器获取数据时发生
void accelerometer_CurrentValueChanged(object sender, SensorReadingEventArgs<AccelerometerReading> e)
{
    //获取到设备加速度矢量
    vector3 = e.SensorReading.Acceleration;
}
陀螺仪用于检测设备在空间中的旋转趋势。它的三个取值即为设备绕三个坐标轴的旋转速度。
x:水平左右向轴的旋转速度。
y:水平前后向轴的旋转速度。
z:垂直上下向轴的旋转速度。
然后我们看看如何调用陀螺仪。
[C#]
//判断设备是否支持陀螺仪
if (!Gyroscope.IsSupported)
{
    MessageBox.Show("设备不支持陀螺仪");
}

gyroscope = new Gyroscope();
gyroscope.TimeBetweenUpdates = TimeSpan.FromMilliseconds(20);
//从陀螺仪获取数据时发生
gyroscope.CurrentValueChanged += new EventHandler<SensorReadingEventArgs<GyroscopeReading>>(gyroscope_CurrentValueChanged);

//启动陀螺仪,实际使用可能启动失败需要捕获异常
gyroscope.Start();

//从陀螺仪获取数据是发生
void gyroscope_CurrentValueChanged(object sender, SensorReadingEventArgs<GyroscopeReading> e)
{
    //获取设备绕每个轴的旋转速度
    var rotationRate = e.SensorReading.RotationRate;
}
手机的振动可以通过一句简单的API完成,在某些情况下可能还需要设置振动的世界,以及提前结束振动。下面代码演示了如何操作。
[C#]
            VibrateController testVibrateController = VibrateController.Default;
            //定义振动时间
            testVibrateController.Start(TimeSpan.FromSeconds(3));
            //在振动时间达到前停止振动
            testVibrateController.Stop();
Windows phone 8 学习笔记(7) 设备(转),布布扣,bubuko.com
标签:des style blog http 使用 os io 数据
原文地址:http://www.cnblogs.com/jx270/p/3886406.html