标签:
行级元素之间的空白距离
如下图所示:(看似是一张图,实际上是三张图分别放在<a>标签中实现,如果没有经过特殊的处理,那么图与图之间就会留有空隙,影响页面布局的效果)

示例代码如下:
 1 <!DOCTYPE html>
 2 <html>
 3 <head>
 4 <meta http-equiv="Content-Type" content="text/html; charset=utf-8"/>
 5     <title>行级元素之间的空白距离</title>
 6     <meta charset="utf-8" />
 7     <style type="text/css">
 8         a {
 9             text-decoration:none;
10         }
11     </style>
12     <!--<link rel="stylesheet" type="text/css" href="公共和个性化样式.html" />-->
13 </head>
14 <body>
15     <div id="deceng">
16         <a href="#">
17             <img src="../img/ch1.jpg"/>
18         </a>
19         <a href="#">
20             <img src="../img/ch2.jpg" />
21         </a>
22         <a href="#">
23             <img src="../img/ch3.jpg" />
24         </a>
25     </div>
26 </body>
27 </html>
运行结果:

此时需要把html文档中行级标签之间的距离都去掉,即将所有的<a>标签写在同一行中且之间没有距离即可。如下所示:
1 <body>
2     <div id="deceng">
3         <a href="#"><img src="../img/ch1.jpg"/></a><a href="#"><img src="../img/ch2.jpg" /></a><a href="#"><img src="../img/ch3.jpg" /></a>
4     </div>
5 </body>
之后三个图片之间的距离就没有了!这特么是在逗我玩啊……感觉这个笔记再更新下去的话我就要变成段子手了……
设定行级元素的尺寸
默认情况下,行级元素的宽度和高度都是自动的,那么有需要修改高度和宽度时应该怎么办?
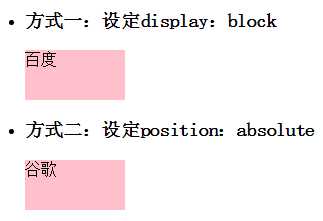
有两种方式:1.使用display:block,变成块级元素;2.使用position:absolute绝对定位,设置绝对定位后默认的宽度和高度都是0,需要设定高度和宽度具体的值。一般情况下,设置行级元素width:100%和height:100%都没有效果,但是使用绝对定位后会有效果。
示例代码如下:
 1 <!DOCTYPE html>
 2 <html>
 3 <head>
 4 <meta http-equiv="Content-Type" content="text/html; charset=utf-8"/>
 5     <title>设定行级元素的尺寸</title>
 6     <meta charset="utf-8" />
 7     <style type="text/css">
 8         #baidu {
 9             text-decoration:none;
10             width:100px;
11             height:50px;
12             display:block;
13             background-color:pink;
14             color:black;
15         }
16         #guge {
17             text-decoration:none;
18             width:100px;
19             height:50px;
20             background-color:pink;
21             color:black;
22             position:absolute ;
23         }
24     </style>
25 </head>
26 <body>
27     <ul>
28         <li>
29             <h3>方式一:设定display:block</h3>
30             <a id="baidu" href="#">百度</a>
31         </li>
32         <li>
33             <h3>方式二:设定position:absolute</h3>
34             <a id="guge" href="#">谷歌</a>
35         </li>
36     </ul>
37
38 </body>
39 </html>
运行结果:
重点重点重点:position的定位
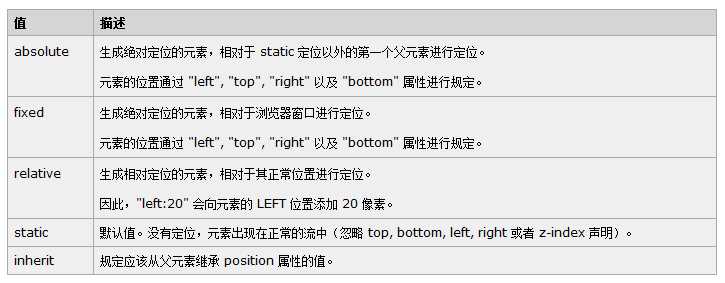
position:absolute 绝对定位(不设置left、top、right、bottom属性值时,以下规则没用,都是以父容器为参考进行绝对定位)
父容器为static布局:绝对定位以最近的非static父容器可视范围作为参照(如窗体的可视区作为参照)
父容器为非static布局:绝对定位以父容器作为参照
注意<html>也是盒子模型。
父容器是static布局,子元素是absolute布局的情况,示例代码如下:
 1 <!DOCTYPE html>
 2 <html>
 3 <head>
 4 <meta http-equiv="Content-Type" content="text/html; charset=utf-8"/>
 5     <title>position的进一步研究</title>
 6     <meta charset="utf-8" />
 7     <style type="text/css">
 8         html {
 9             border:2px solid blue;
10             margin:20px 0 0 30px;
11             /*默认是static定位*/
12         }
13         body {
14             height:300px;
15             border:2px solid red;
16             /*默认是static定位*/
17         }
18         #abs1 {
19             position:absolute;
20             left:0;
21             bottom:0;
22             width:100px;
23             height:100px;
24             background-color:pink;
25         }
26     </style>
27 </head>
28 <body>
29     <div id="abs1">
30
31     </div>
32 </body>
33 </html>
运行结果:
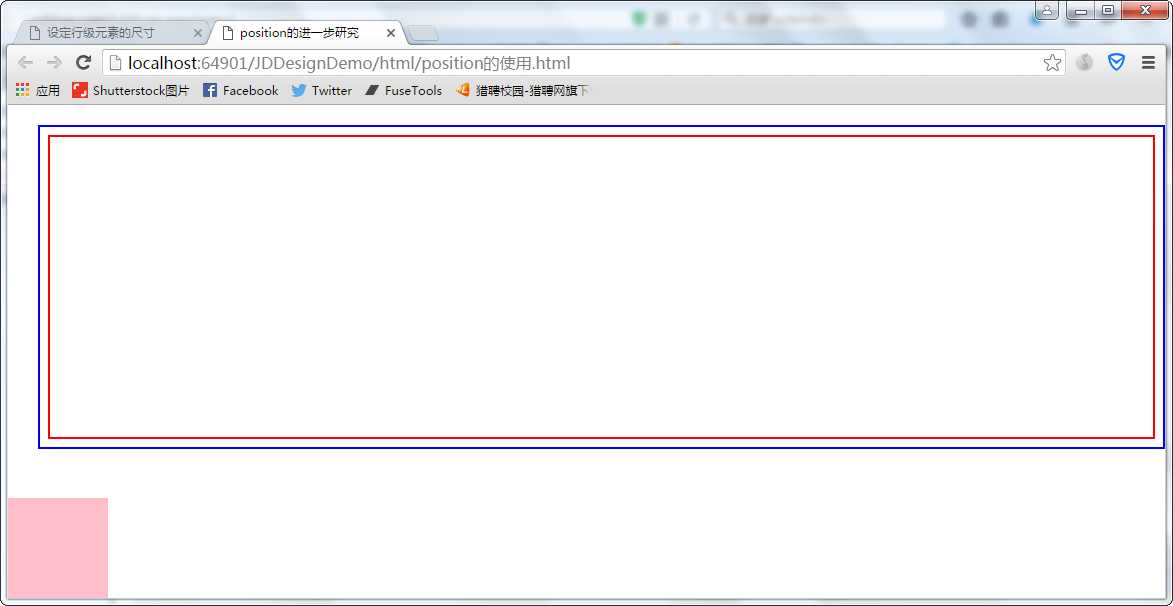
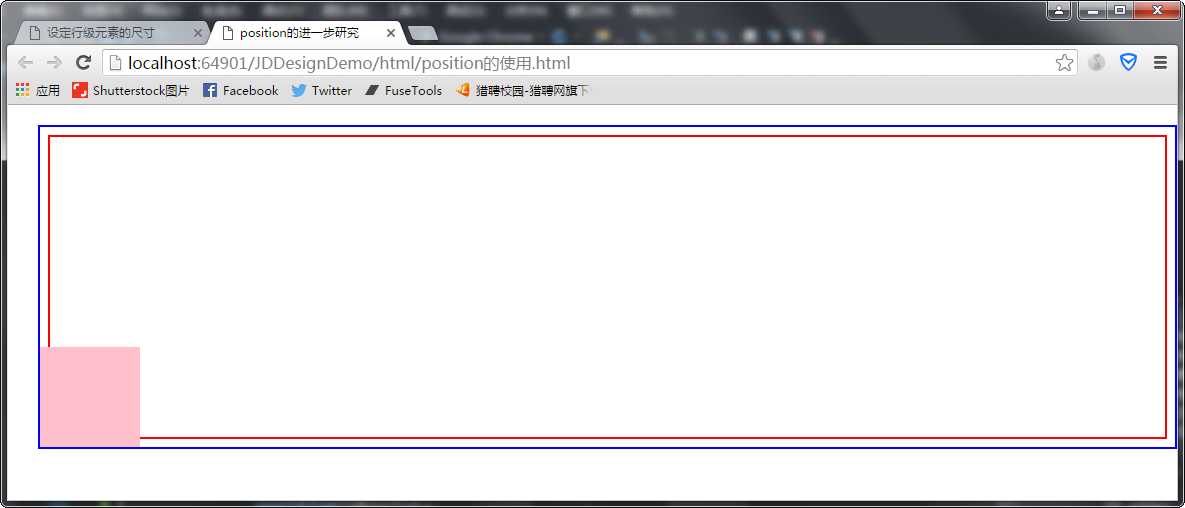
在此例中,div使用的是absolute定位,它的父容器body使用了static定位,而它的祖父元素html也使用了static定位,此时div将会以最近的非static容器(窗体)为参照进行绝对定位,于是出现上图所示的效果。
如果把该例中的html的定位方式设置为position:relative(非static方式),此时div就将会以最近的非static容器(html)为参照进行绝对定位,效果如下图所示:
父容器是非static布局(这里用relative),子元素是absolute布局的情况,示例代码如下:
 1 <!DOCTYPE html>
 2 <html>
 3 <head>
 4 <meta http-equiv="Content-Type" content="text/html; charset=utf-8"/>
 5     <title>position的进一步研究</title>
 6     <meta charset="utf-8" />
 7     <style type="text/css">
 8         html {
 9             border:2px solid blue;
10             margin:20px 0 0 30px;
11             /*默认是static定位*/
12             /*position:relative;*/
13         }
14         body {
15             height:300px;
16             border:2px solid red;
17             /*默认是static定位*/
18             position:relative;
19         }
20         #abs1 {
21             position:absolute;
22             left:0;
23             bottom:0;
24             width:100px;
25             height:100px;
26             background-color:pink;
27         }
28     </style>
29 </head>
30 <body>
31     <div id="abs1">
32
33     </div>
34 </body>
35 </html>
运行结果:
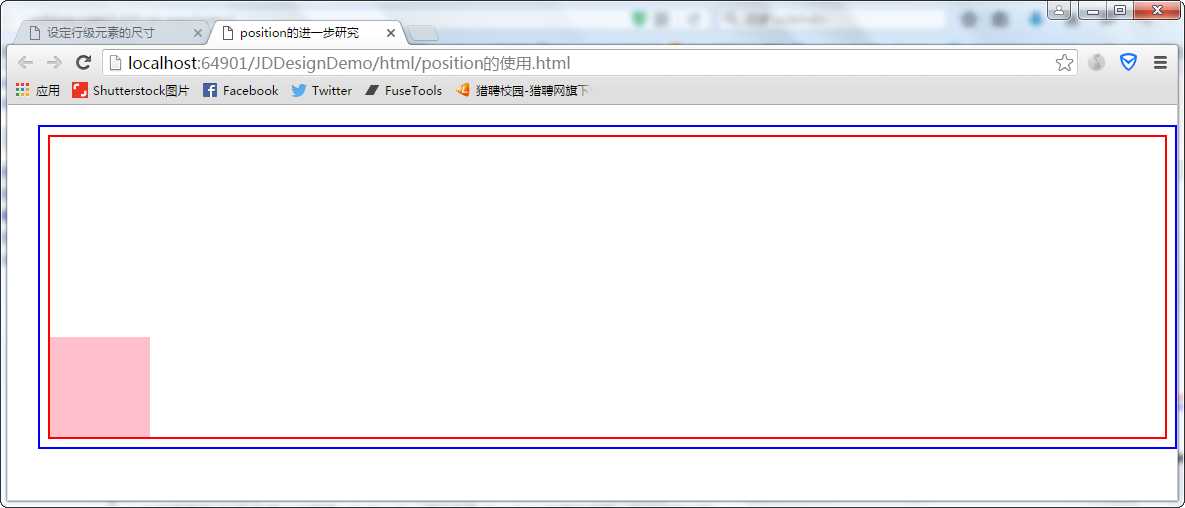
以上几个例子就说明了为什么在网页设计中父元素常常使用relative定位方式。
如果不设置left、top、right、bottom,元素脱离文档流并不会占位。(默认的文档流为:从左到右,从上到下)
作用:z-index可起到作用,width和height也起到作用。
示例代码如下:
 1 <!DOCTYPE html>
 2 <html>
 3 <head>
 4 <meta http-equiv="Content-Type" content="text/html; charset=utf-8"/>
 5     <title>position的进一步研究</title>
 6     <meta charset="utf-8" />
 7     <style type="text/css">
 8         html {
 9             border:2px solid blue;
10             margin:20px 0 0 30px;
11             /*默认是static定位*/
12             /*position:relative;*/
13         }
14         body {
15             height:300px;
16             border:2px solid red;
17             /*默认是static定位*/
18         }
19         #abs1 {
20             position:absolute;
21             /*left:0;
22             bottom:0;*/
23             width:100%;
24             height:100px;
25             background-color:pink;
26             margin-left:20px;
27         }
28     </style>
29 </head>
30 <body>
31     <div id="abs1">
32
33     </div>
34     <div style="height:200px;background:green;z-index:2;">
35
36     </div>
37 </body>
38 </html>
运行结果为:

可以看到,绿色块起点与粉红色块起点一样都是在左上角,说明粉红色块并没有占位。
position:relative 总是以父容器作为参考点。
left和top值有效,right和bottom值无效。
不会脱离文档流,依然会占位。不管怎么移动,将元素移动到哪,该元素都始终占有高度指定的那一块区域。示例代码如下:
 1 <!DOCTYPE html>
 2 <html>
 3 <head>
 4 <meta http-equiv="Content-Type" content="text/html; charset=utf-8"/>
 5     <title>position的进一步研究</title>
 6     <meta charset="utf-8" />
 7     <style type="text/css">
 8         html {
 9             border:2px solid blue;
10             margin:20px 0 0 30px;
11             /*默认是static定位*/
12             position:relative;
13         }
14         body {
15             height:300px;
16             border:2px solid red;
17             /*默认是static定位*/
18         }
19         #abs1 {
20             position:relative;
21             /*left:0;
22             bottom:0;*/
23             width:100px;
24             height:100px;
25             background-color:pink;
26             left:50px;
27             top:50px;
28         }
29         #second {
30             background-color:black;
31             height:60px;
32         }
33     </style>
34 </head>
35 <body>
36     <div id="abs1">
37
38     </div>
39     <div id="second">
40
41     </div>
42 </body>
43 </html>
运行结果如下:

【面试题】position设置后元素会不会脱离文档流?
分情况说明。
position:absolute绝对定位时,如果不设置left、top、right、bottom属性值的话,元素将会脱离文档流并不会占位。
position:relative相对定位时,无论设置还是不设置left、top、right、bottom属性值,元素都不会脱离文档流,都会占位。
选项卡的设计与制作
例如:(京东首页,选中的部分顶部有红色条显示,动态控制样式需要使用js)
![]()
高能预警,我又要画图了……用画图板,还要写字呢!!!好害怕……所以啊,谁教教我ps吧(笑哭)
设计结构如下:a标签使用绝对定位,顶边框粗一点,底部没有,背景颜色是白色,a标签向覆盖div的红色边框。其他部分……看!!!!!图!!!!!/(ㄒoㄒ)/~~

我自己看着都想笑……
是不是感觉自己又能上天了!
我猜是的。
示例代码如下:
 1 <!DOCTYPE html>
 2 <html>
 3 <head>
 4 <meta http-equiv="Content-Type" content="text/html; charset=utf-8"/>
 5     <title>选项卡的设计与制作</title>
 6     <meta charset="utf-8" />
 7     <style type="text/css">
 8         ul, li {
 9             margin:0;
10             padding:0;
11             list-style:none;
12         }
13         a {
14             text-decoration:none;
15             font:400 12px/12px 宋体;
16             color:black;
17         }
18         #xuanxiangka {
19             border-bottom:1px solid #c81623;
20             height:35px;
21         }
22         #xuanxiangka .title li {
23             float:left;/*浮动会导致父容器ul和div高度为0,需要给父容器设定高度才可以显示出border-bottom的效果*/
24             width:85px;
25             height:35px;
26             line-height:35px;
27             text-align:center;
28             position:relative;
29             z-index:3;
30         }
31             /*分割线的设计*/
32             #xuanxiangka .title li span {
33                 width:1px;
34                 background-color:gray;
35                 overflow:hidden;
36                 display:block;/*因为span是行级标签,要使设置的width属性有效,需要使其变为块级标签显示*/
37                 position:absolute;
38                 right:0;
39                 top:10px;
40                 height:18px;
41             }
42             /*ul边框的设计*/
43             #xuanxiangka .title {
44                 border:1px solid gray;
45                 height:35px;
46                 border-bottom:none;
47                 margin-left:500px;
48             }
49                 /*选中的a标签样式的设计*/
50                 #xuanxiangka .title .title-selected a {
51                     border:1px solid #c81623;
52                     display:block;/*将行级元素变成块级元素才能设定它的宽度和高度*/
53                     width:86px;
54                     height:33px;
55                     line-height:35px;
56                     text-align:center;
57                     border-top:3px solid #c81623;
58                     z-index:5;/*li标签赋值为3,为了覆盖掉下面的红色线条*/
59                     position:absolute;
60                     top:-1px;
61                     left:-1px;/*向左移动1px,覆盖掉左边边框*/
62                     background-color:white;
63                     border-bottom:none;/*底部边框超出红色底线1px,去掉底部边框,设置背景色为白色,就把原来的红色线条覆盖了*/
64                 }
65     </style>
66 </head>
67 <body>
68     <div id="xuanxiangka">
69         <ul class="title">
70             <li class="title-item title-selected"><a href="javascript:void(0)">大牌</a><span>a</span></li>
71             <li class="title-item"><a href="javascript:void(0)">男装</a><span>a</span></li>
72             <li class="title-item"><a href="javascript:void(0)">女装</a><span>a</span></li>
73             <li class="title-item"><a href="javascript:void(0)">鞋靴</a><span>a</span></li>
74             <li class="title-item"><a href="javascript:void(0)">箱包</a><span>a</span></li>
75             <li class="title-item title-selected"><a href="javascript:void(0)">内衣配饰</a><span>a</span></li>
76             <li class="title-item"><a href="javascript:void(0)">珠宝首饰</a><span>a</span></li>
77             <li class="title-item"><a href="javascript:void(0)">奢品礼品</a><span>a</span></li>
78             <li class="title-item"><a href="javascript:void(0)">奢华腕表</a><span>a</span></li>
79         </ul>
80     </div>
81 </body>
82 </html>
运行结果:
![]()
使用伪类样式实现动态效果
:hovers 鼠标悬浮,改变背景颜色
示例代码如下:
 1 <!DOCTYPE html>
 2 <html>
 3 <head>
 4 <meta http-equiv="Content-Type" content="text/html; charset=utf-8"/>
 5     <title>hover鼠标悬浮样式的设置</title>
 6     <meta charset="utf-8" />
 7     <style type="text/css">
 8         ul {
 9             list-style:none;
10         }
11         li {
12             height:28px;
13             line-height:28px;
14         }
15         li:hover {
16             background-color:orange;
17             color:white;
18             display:block;
19             height:50px;
20             line-height:50px;
21             cursor:pointer;
22         }
23     </style>
24 </head>
25 <body>
26     <ul>
27         <li>标题一</li>
28         <li>标题二</li>
29         <li>标题三</li>
30         <li>标题四</li>
31     </ul>
32 </body>
33 </html>
运行结果:

transform与transition搭配使用 (去看文档!!!)
transform 过渡转换的过程(即以什么样的方式进行转换,比如说旋转,翻转,上下移动这种样式)。
transition 过渡效果(比如说从一个ppt页到另一页的过渡方式的选择,嗯,就是这个意思……)
向下移动的效果-示例代码如下:
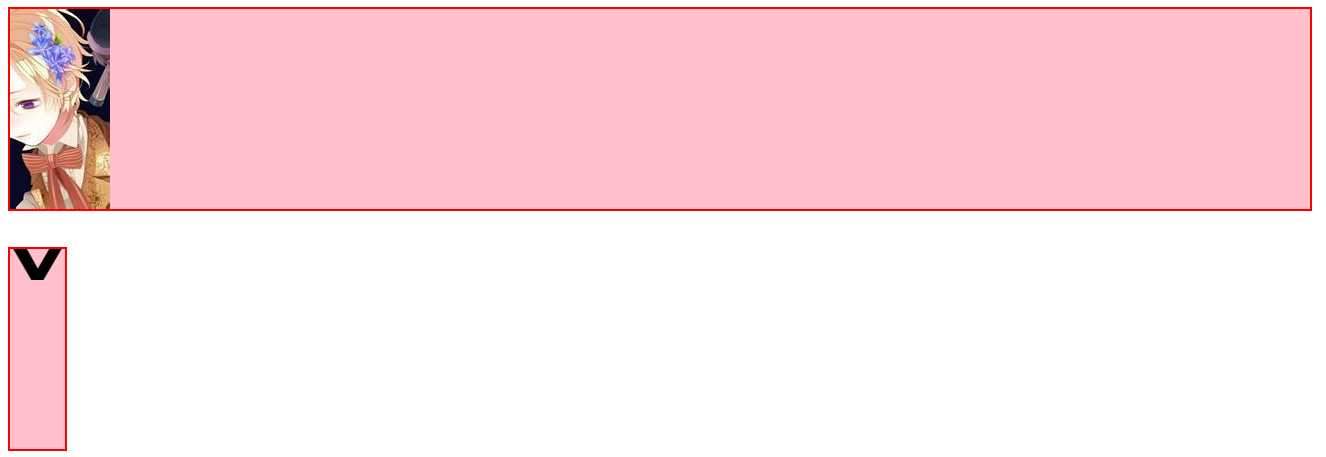
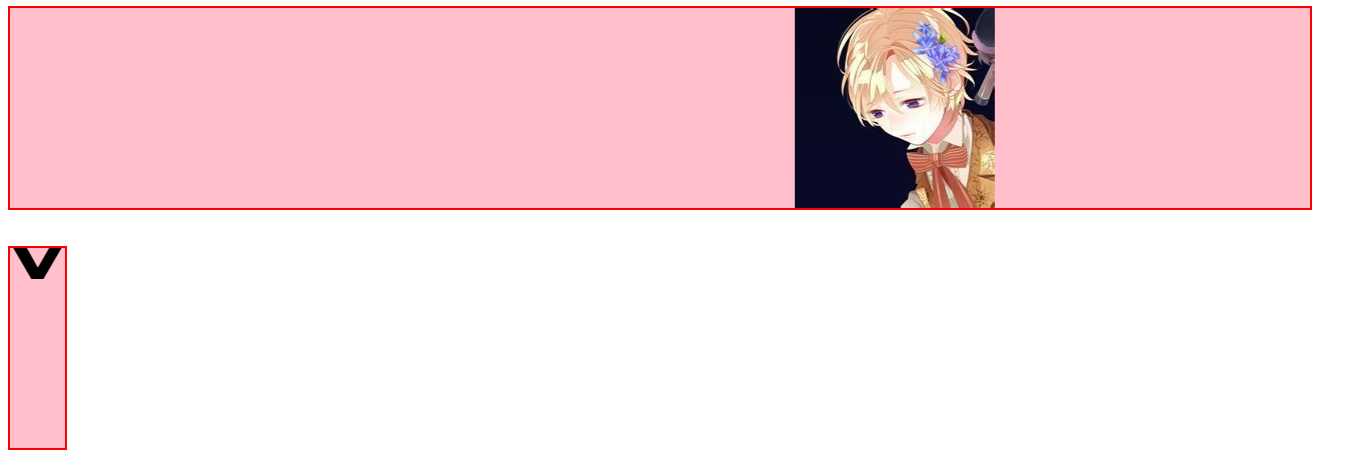
1 <!DOCTYPE html> 2 <html> 3 <head> 4 <meta http-equiv="Content-Type" content="text/html; charset=utf-8" /> 5 <title>移动的测试</title> 6 <meta charset="utf-8" /> 7 <style type="text/css"> 8 #d1 { 9 background-color: pink; 10 height: 200px; 11 width: 1300px; 12 position: relative; 13 border: 2px solid red; 14 overflow: hidden; 15 } 16 #d1 #img { 17 position: absolute; 18 left: -100px; 19 /*第一个参数是要过渡的样式 20 第二个参数是要过渡的时间 21 第三个参数是过渡的方式(线性的,平滑的还有各种的) 22 第四个参数是开始这种过渡的时间*/ 23 transition:transform 5s linear 0s; 24 } 25 #d1:hover #img { 26 transform:translateX(1200px);/*延x轴移动1200px,只是有了移动的样式,并不能看见移动的过程,想要看见移动的过程需要配合transition一起使用*/ 27 } 28 29 30 #d2 { 31 background-color: pink; 32 border: 2px solid red; 33 width: 55px; 34 height: 200px; 35 position: relative; 36 overflow: hidden; 37 } 38 #d2 #loz { 39 font-style: normal; 40 font: 600 100px/100px Consolas; 41 position: absolute; 42 top: -52px; 43 transition:transform 1s ease 0s; 44 } 45 /*鼠标悬浮在d2层上时做效果,对loz菱形做效果*/ 46 #d2:hover #loz { 47 /*还可以选取其他的效果*/ 48 transform: translateY(190px);/*延y轴移动190px,只是有了移动的样式,并不能看见移动的过程,想要看见移动的过程需要配合transition一起使用*/ 49 } 50 </style> 51 </head> 52 <body> 53 <div id="d1"> 54 <i id="img"> 55 <img src="../img/boy1.jpg" /> 56 </i> 57 </div> 58 <br /> 59 <br /> 60 <div id="d2"> 61 <i id="loz">◊</i> 62 </div> 63 </body> 64 </html>
运行结果:
初始时(移动前)
移动过程中的样子(我不能做一个gif或者小视频放上来a,但是效果还是hin炫酷的!帅哥在移动,关键是鼠标移出后,他还会自己回去!哈哈哈哈哈,有做男朋友的潜质!!!)
鼓掌!我要开始学JS啦!!!认真起来我自己都害怕哈哈哈!!!!!
Web前端学习第十三天·fighting_HTML页面设计技巧总结(二)
标签:
原文地址:http://www.cnblogs.com/Candy1029/p/5537001.html