标签:
用注解来向Spring容器注册Bean。需要在applicationContext.xml中注册<context:component-scan base-package=”pagkage1[,pagkage2,…,pagkageN]”/>。
如:在base-package指明一个包
1 <context:component-scan base-package="cn.gacl.java"/>
表明cn.gacl.java包及其子包中,如果某个类的头上带有特定的注解【@Component/@Repository/@Service/@Controller】,就会将这个对象作为Bean注册进Spring容器。也可以在<context:component-scan base-package=” ”/>中指定多个包,如:
1 <context:component-scan base-package="cn.gacl.dao.impl,cn.gacl.service.impl,cn.gacl.action"/>
多个包逗号隔开。
@Component
是所有受Spring 管理组件的通用形式,@Component注解可以放在类的头上,@Component不推荐使用。
@Controller对应表现层的Bean,也就是Action,例如:
1 @Controller
2 @Scope("prototype")
3 public class UserAction extends BaseAction<User>{
4 ……
5 }
使用@Controller注解标识UserAction之后,就表示要把UserAction交给Spring容器管理,在Spring容器中会存在一个名字为"userAction"的action,这个名字是根据UserAction类名来取的。注意:如果@Controller不指定其value【@Controller】,则默认的bean名字为这个类的类名首字母小写,如果指定value【@Controller(value="UserAction")】或者【@Controller("UserAction")】,则使用value作为bean的名字。
这里的UserAction还使用了@Scope注解,@Scope("prototype")表示将Action的范围声明为原型,可以利用容器的scope="prototype"来保证每一个请求有一个单独的Action来处理,避免struts中Action的线程安全问题。spring 默认scope 是单例模式(scope="singleton"),这样只会创建一个Action对象,每次访问都是同一Action对象,数据不安全,struts2 是要求每次次访问都对应不同的Action,scope="prototype" 可以保证当有请求的时候都创建一个Action对象
@Service对应的是业务层Bean,例如:
1 @Service("userService")
2 public class UserServiceImpl implements UserService {
3 ………
4 }
@Service("userService")注解是告诉Spring,当Spring要创建UserServiceImpl的的实例时,bean的名字必须叫做"userService",这样当Action需要使用UserServiceImpl的的实例时,就可以由Spring创建好的"userService",然后注入给Action:在Action只需要声明一个名字叫“userService”的变量来接收由Spring注入的"userService"即可,具体代码如下:
1 // 注入userService
2 @Resource(name = "userService")
3 private UserService userService;
注意:在Action声明的“userService”变量的类型必须是“UserServiceImpl”或者是其父类“UserService”,否则由于类型不一致而无法注入,由于Action中的声明的“userService”变量使用了@Resource注解去标注,并且指明了其name = "userService",这就等于告诉Spring,说我Action要实例化一个“userService”,你Spring快点帮我实例化好,然后给我,当Spring看到userService变量上的@Resource的注解时,根据其指明的name属性可以知道,Action中需要用到一个UserServiceImpl的实例,此时Spring就会把自己创建好的名字叫做"userService"的UserServiceImpl的实例注入给Action中的“userService”变量,帮助Action完成userService的实例化,这样在Action中就不用通过“UserService userService = new UserServiceImpl();”这种最原始的方式去实例化userService了。如果没有Spring,那么当Action需要使用UserServiceImpl时,必须通过“UserService userService = new UserServiceImpl();”主动去创建实例对象,但使用了Spring之后,Action要使用UserServiceImpl时,就不用主动去创建UserServiceImpl的实例了,创建UserServiceImpl实例已经交给Spring来做了,Spring把创建好的UserServiceImpl实例给Action,Action拿到就可以直接用了。Action由原来的主动创建UserServiceImpl实例后就可以马上使用,变成了被动等待由Spring创建好UserServiceImpl实例之后再注入给Action,Action才能够使用。这说明Action对“UserServiceImpl”类的“控制权”已经被“反转”了,原来主动权在自己手上,自己要使用“UserServiceImpl”类的实例,自己主动去new一个出来马上就可以使用了,但现在自己不能主动去new“UserServiceImpl”类的实例,new“UserServiceImpl”类的实例的权力已经被Spring拿走了,只有Spring才能够new“UserServiceImpl”类的实例,而Action只能等Spring创建好“UserServiceImpl”类的实例后,再“恳求”Spring把创建好的“UserServiceImpl”类的实例给他,这样他才能够使用“UserServiceImpl”,这就是Spring核心思想“控制反转”,也叫“依赖注入”,“依赖注入”也很好理解,Action需要使用UserServiceImpl干活,那么就是对UserServiceImpl产生了依赖,Spring把Acion需要依赖的UserServiceImpl注入(也就是“给”)给Action,这就是所谓的“依赖注入”。对Action而言,Action依赖什么东西,就请求Spring注入给他,对Spring而言,Action需要什么,Spring就主动注入给他。
@Repository对应数据访问层Bean ,例如:
1 @Repository(value="userDao")
2 public class UserDaoImpl extends BaseDaoImpl<User> {
3 ………
4 }
@Repository(value="userDao")注解是告诉Spring,让Spring创建一个名字叫“userDao”的UserDaoImpl实例。
当Service需要使用Spring创建的名字叫“userDao”的UserDaoImpl实例时,就可以使用@Resource(name = "userDao")注解告诉Spring,Spring把创建好的userDao注入给Service即可。
1 // 注入userDao,从数据库中根据用户Id取出指定用户时需要用到
2 @Resource(name = "userDao")
3 private BaseDao<User> userDao;
加上注解的类会被Spring容器管理
@Component
标注于通用实体类
@Controller
标注于Controller/Action
@Service
标注于Service
@Respository
标注于RespositoryImpl/DaoImlp
@Autowired
依据类型自动装配
@Qualifier
指定自动装载的bean的name
1、创建如下oracle数据库脚本userinfo.sql

 1 SQL> create table userinfo
 2 (id number(4),
 3 name varchar2(50),
 4 password varchar2(20
 5 telephone varchar2(15),
 6 isadmin varchar2(5));
 7
 8 SQL> --4.2 用户表序列
 9 SQL> create sequence seq_userinfo;
10
11 SQL> alter table userinfo add constraint pk_userinfo_id primary key(id);
12
13 SQL> insert into userinfo values(seq_userinfo.nextval,‘holly‘,‘123‘,‘134518024
14 ‘,‘是‘);
15
16 SQL> commit;
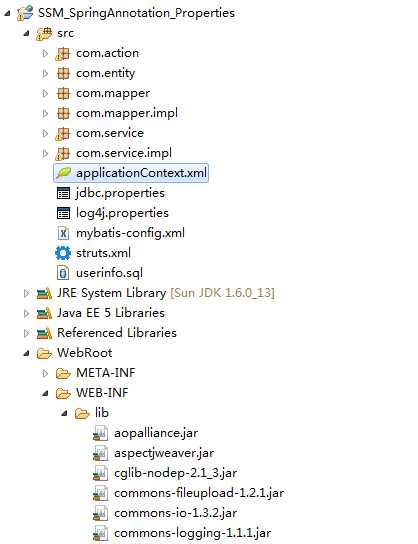
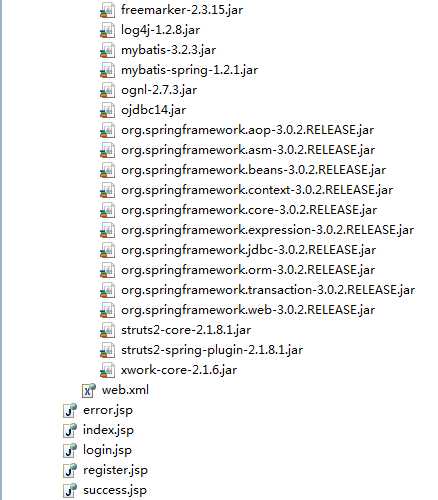
2、创建如下所示项目结构
3、在src下的com.entity包下创建UserInfo.java
 1 package com.entity;
 2
 3 import java.io.Serializable;
 4
 5 /**
 6  * 用户信息表
 7  * @author Holly老师
 8  *
 9  */
10 public class UserInfo implements Serializable {
11     private static final long serialVersionUID = 1L;
12     private Integer id; //编号
13     private String name; //姓名
14     private String password; //密码
15     private String telephone; //电话
16     private String isadmin; //是否是管理员
17
18     public UserInfo() {
19     }
20
21     public UserInfo(Integer id, String name, String password, String telephone,
22             String isadmin) {
23         this.id = id;
24         this.name = name;
25         this.password = password;
26         this.telephone = telephone;
27         this.isadmin = isadmin;
28     }
29
30     public Integer getId() {
31         return id;
32     }
33
34     public void setId(Integer id) {
35         this.id = id;
36     }
37
38     public String getName() {
39         return name;
40     }
41
42     public void setName(String name) {
43         this.name = name;
44     }
45
46     public String getPassword() {
47         return password;
48     }
49
50     public void setPassword(String password) {
51         this.password = password;
52     }
53
54     public String getTelephone() {
55         return telephone;
56     }
57
58     public void setTelephone(String telephone) {
59         this.telephone = telephone;
60     }
61
62     public String getIsadmin() {
63         return isadmin;
64     }
65
66     public void setIsadmin(String isadmin) {
67         this.isadmin = isadmin;
68     }
69
70
71
72
73 }
4、在src下的com.mapper包下创建UserInfoMapper.java
 1 package com.mapper;
 2
 3 import java.util.List;
 4
 5 import com.entity.UserInfo;
 6 /**
 7  * 数据访问层接口
 8  * @author Holly老师
 9  *
10  */
11 public interface UserInfoMapper {
12     /**
13      * 1.根据用户信息查询某个用户
14      * @param userinfo
15      * @return
16      */
17     UserInfo findNamePwd(UserInfo userinfo);
18
19     /**
20      * 2.添加用户信息
21      * @param userinfo
22      */
23     void addUserInfo(UserInfo userinfo);
24
25     /**
26      * 3.查询所有
27      * @return
28      */
29     List<UserInfo> findAll();
30
31     /**
32      * 4.删除
33      * @param id
34      */
35     void deleteUser(int id);
36     /**
37      * 5.修改
38      * @param userinfo
39      */
40     void updateUser(UserInfo userinfo);
41
42     /**
43      * 5.根据id查询
44      */
45     UserInfo findId(int id);
46 }
5、在src下的com.mapper包下创建UserInfoMapper.xml
 1 <?xml version="1.0" encoding="UTF-8"?>
 2 <!DOCTYPE mapper PUBLIC "-//mybatis.org//DTD Mapper 3.0//EN" "http://mybatis.org/dtd/mybatis-3-mapper.dtd" >
 3 <mapper namespace="com.mapper.UserInfoMapper">
 4   <!-- 根据用户查询用户 -->
 5   <select id="findNamePwd" parameterType="userinfo" resultType="userinfo">
 6     select * from userinfo where name=#{name} and password=#{password}
 7   </select>
 8
 9   <!-- 插入用户信息 -->
10   <insert id="addUserInfo" parameterType="userinfo">
11      insert into userinfo values(seq_userinfo.nextval,#{name},#{password},#{telephone},#{isadmin})
12   </insert>
13
14   <!-- 查询所有 -->
15   <select id="findAll" resultType="userinfo">
16     select * from userinfo
17   </select>
18
19    <!-- 删除 -->
20    <delete id="deleteUser" parameterType="int">
21      delete from userinfo where id=#{id}
22    </delete>
23
24    <!-- 修改 -->
25    <update id="updateUser" parameterType="userinfo">
26      update userinfo set name=#{name},password=#{password},telephone=#{telephone},isadmin=#{isadmin} where id=#{id}
27    </update>
28
29    <!-- 根据id查询 -->
30    <select id="findId" parameterType="int" resultType="userinfo">
31     select * from userinfo where id=#{id}
32    </select>
33
34 </mapper>
6、在src下创建mybatis-config.xml
 1 <?xml version="1.0" encoding="UTF-8"?>
 2 <!DOCTYPE configuration PUBLIC "-//mybatis.org//DTD Config 3.0//EN" "http://mybatis.org/dtd/mybatis-3-config.dtd" >
 3 <configuration>
 4  <!-- 定义别名 -->
 5  <typeAliases>
 6    <typeAlias type="com.entity.UserInfo" alias="userinfo"/>
 7  </typeAliases>
 8  <!-- 注册xml -->
 9  <mappers>
10    <mapper resource="com/mapper/UserInfoMapper.xml"/>
11  </mappers>
12 </configuration>
7、在src下的com.mapper.impl包下创建UserInfoMapperImpl.java
  1 package com.mapper.impl;
  2
  3 import java.util.List;
  4
  5 import org.mybatis.spring.SqlSessionTemplate;
  6 import org.springframework.beans.factory.annotation.Autowired;
  7 import org.springframework.stereotype.Repository;
  8
  9 import com.entity.UserInfo;
 10 import com.mapper.UserInfoMapper;
 11 /**
 12  * 数据访问层实现类
 13  * @author Holly老师
 14  */
 15 /*@Repository表示标注dao类,相当于dao的bean
 16  * 或者写@Component(dao)等同于<bean id="dao" class="com.dao.impl.UserInfoDaoImpl"/>
 17  */
 18 @Repository
 19 public class UserInfoMapperImpl implements UserInfoMapper {
 20     /*采用注解方式注入sqlSessionTemplate对象
 21      * Autowired表示按类型自动装配方式*/
 22      @Autowired
 23     SqlSessionTemplate sqlSessionTemplate;
 24
 25     public SqlSessionTemplate getSqlSessionTemplate() {
 26         return sqlSessionTemplate;
 27     }
 28     public void setSqlSessionTemplate(SqlSessionTemplate sqlSessionTemplate) {
 29         this.sqlSessionTemplate = sqlSessionTemplate;
 30     }
 31
 32     /**
 33      * 1.根据用户信息查询用户
 34      * 用代理方式
 35      */
 36     public UserInfo findNamePwd(UserInfo userinfo) {
 37
 38         //2.通过反射生成动态代理对象
 39         UserInfoMapper dao=sqlSessionTemplate.getMapper(UserInfoMapper.class);
 40
 41         //3.代理对象调用接口里 的方法
 42         UserInfo user=dao.findNamePwd(userinfo);
 43
 44         //5.数据判断
 45         if(user!=null){
 46             System.out.println("登录成功");
 47             return user;
 48         }else{
 49             System.out.println("登录失败");
 50             return null;
 51         }
 52     }
 53     /**
 54      *2. 添加操作用无代理方式
 55      */
 56     public void addUserInfo(UserInfo userinfo) {
 57
 58         //2.session执行插入操作,第一个参数映射文件namespace+id.第二个参数,插入对象
 59         String key="com.mapper.UserInfoMapper.addUserInfo";
 60         int number=sqlSessionTemplate.insert(key, userinfo);
 61         if(number>0){
 62             System.out.println("注册成功");
 63         }else{
 64             System.out.println("注册失败");
 65         }
 66     }
 67     /**
 68      * 3.查询所有
 69      */
 70     public List<UserInfo> findAll() {
 71
 72         //2.session执行插入操作,第一个参数映射文件namespace+id.第二个参数,插入对象
 73         String key="com.mapper.UserInfoMapper.findAll";
 74         List<UserInfo> list =sqlSessionTemplate.selectList(key);
 75         if(list!=null){
 76             System.out.println("查询所有成功");
 77         }else{
 78             System.out.println("查询所有失败");
 79         }
 80         return list;
 81     }
 82     /**
 83      * 4.根据id删除
 84      */
 85     public void deleteUser(int id) {
 86         UserInfoMapper dao=sqlSessionTemplate.getMapper(UserInfoMapper.class);
 87         try {
 88             dao.deleteUser(id);
 89             System.out.println("删除成功");
 90         } catch (Exception e) {
 91             System.out.println("删除失败");
 92             e.printStackTrace();
 93         }
 94
 95     }
 96     /**
 97      * 5.根据id查询某个对象
 98      */
 99     public UserInfo findId(int id) {
100
101         //2.通过反射生成动态代理对象
102         UserInfoMapper dao=sqlSessionTemplate.getMapper(UserInfoMapper.class);
103
104         //3.代理对象调用接口里 的方法
105         UserInfo user=dao.findId(id);
106
107         //5.数据判断
108         if(user!=null){
109             System.out.println("登录成功");
110             return user;
111         }else{
112             System.out.println("登录失败");
113             return null;
114         }
115     }
116     /**
117      * 6.修改对象
118      */
119     public void updateUser(UserInfo userinfo) {
120         UserInfoMapper dao=sqlSessionTemplate.getMapper(UserInfoMapper.class);
121         try {
122             dao.updateUser(userinfo);
123             System.out.println("修改成功");
124         } catch (Exception e) {
125             System.out.println("修改失败");
126             e.printStackTrace();
127         }
128
129     }
130
131
132
133
134 }
8、在src下的com.servicel包下创建UserInfoService.java
 1 package com.service;
 2
 3 import java.util.List;
 4
 5 import com.entity.UserInfo;
 6 /**
 7  * 服务层接口
 8  * @author Holly老师
 9  *
10  */
11 public interface UserInfoService {
12     /**
13      *1. 登录
14      * @param userinfo
15      * @return
16      */
17     UserInfo loginUser(UserInfo userinfo);
18
19     /**
20      * 2.注册
21      */
22     void registerUser(UserInfo userinfo);
23
24     /**
25      * 3.查询所有
26      * @return
27      */
28     List<UserInfo> findAll();
29
30     /**
31      * 4.删除
32      */
33     void deleteOne(int id);
34     /**
35      * 5.修改
36      * @param userinfo
37      */
38     void updateOne(UserInfo userinfo);
39     /**
40      * 6.根据id查询
41      * @param id
42      * @return
43      */
44     UserInfo findId(int id);
45
46
47 }
9、在src下的com.service.impl包下创建UserInfoServiceImpl.java
 1 package com.service.impl;
 2
 3 import java.util.List;
 4
 5 import org.springframework.beans.factory.annotation.Autowired;
 6 import org.springframework.stereotype.Service;
 7 import org.springframework.transaction.annotation.Transactional;
 8
 9 import com.entity.UserInfo;
10 import com.mapper.UserInfoMapper;
11 import com.mapper.impl.UserInfoMapperImpl;
12 import com.service.UserInfoService;
13 /**
14  * 服务层接口的实现类
15  * @author Holly老师
16  *
17  */
18 /*
19  * @service表示标注业务逻辑类
20  * @Transactional 表示用注解来声明事务处理
21  * */
22 @Service
23 @Transactional
24 public class UserInfoServiceImpl implements UserInfoService {
25     /*引用数据访问层接口的对象
26      * @Autowired表示按类型自动装配
27      * @Qualifier(dao)表示按名称匹配*/
28     @Autowired
29     UserInfoMapperImpl mapper;
30
31
32     /**
33      * 登录
34      */
35     public UserInfo loginUser(UserInfo userinfo) {
36         return mapper.findNamePwd(userinfo);
37     }
38
39     /**
40      * 注册
41      */
42     public void registerUser(UserInfo userinfo) {
43         mapper.addUserInfo(userinfo);
44     }
45
46     /**
47      * 查询所有
48      */
49     public List<UserInfo> findAll() {
50         return mapper.findAll();
51     }
52     /**
53      * 根据id删除
54      */
55     public void deleteOne(int id) {
56         mapper.deleteUser(id);
57     }
58
59     /**
60      * 根据id查询
61      */
62     public UserInfo findId(int id) {
63         return mapper.findId(id);
64     }
65     /**
66      * 修改用户信息
67      */
68     public void updateOne(UserInfo userinfo) {
69         mapper.updateUser(userinfo);
70
71     }
72
73 }
10、在src下的com.action包下创建UserInfoAction.java
  1 package com.action;
  2
  3 import java.util.List;
  4
  5 import javax.servlet.http.HttpServletRequest;
  6
  7 import org.apache.struts2.ServletActionContext;
  8 import org.springframework.beans.factory.annotation.Autowired;
  9 import org.springframework.context.annotation.Scope;
 10 import org.springframework.stereotype.Controller;
 11
 12 import com.entity.UserInfo;
 13 import com.opensymphony.xwork2.ActionSupport;
 14 import com.service.UserInfoService;
 15 /**
 16  *
 17  * @author Holly老师
 18  * ActionSupport可以最数据校验
 19  */
 20 /*@Controller 表示标注控制器类注入
 21  * 使用@Controller注解标识UserInfoAction之后,
 22  * 就表示要把UserInfoAction交给Spring容器管理,
 23  * 在Spring容器中会存在一个名字为"userAction"的action,
 24  * 这个名字是根据UserInfoAction类名来取的。
 25  * 注意:如果@Controller不指定其value【@Controller】,
 26  * 则默认的bean名字为这个类的类名首字母小写,
 27  * 如果指定value【@Controller(value="UserInfoAction")】或者
 28  * 【@Controller("UserInfoAction")】,则使用value作为bean的名字。
 29  *
 30  * @Scope("prototype")表示将Action的范围声明为原型,
 31  * 可以利用容器的scope="prototype"来保证每一个请求有一个单独的Action来处理,
 32  * 避免struts中Action的线程安全问题。spring 默认scope 是单例模式(scope="singleton")
 33  * ,这样只会创建一个Action对象,每次访问都是同一Action对象,数据不安全,
 34  * struts2 是要求每次次访问都对应不同的Action,
 35  * scope="prototype" 可以保证当有请求的时候都创建一个Action对象*/
 36
 37 @Controller
 38 @Scope("prototype")
 39 public class UserInfoAction extends ActionSupport  {
 40
 41
 42     /**
 43      * 引用服务层对象
 44      * @Autowired  根据类型自动装配注入
 45      */
 46     @Autowired
 47     private UserInfoService service;
 48     /**
 49      * 对象用于接收请求中的值
 50      * 必须创建setter和getter方法,代理对象才能获取或设置
 51      */
 52     private UserInfo user;
 53
 54     public UserInfo getUser() {
 55         return user;
 56     }
 57
 58     public void setUser(UserInfo user) {
 59         this.user = user;
 60     }
 61
 62     /**
 63      * 登录
 64      * @return
 65      */
 66     public String login(){
 67
 68         if(user!=null){
 69             System.out.println("登录表单值接收到");
 70             UserInfo userinfo=service.loginUser(user);
 71             if(userinfo!=null){
 72                 System.out.println("登录陈宫");
 73 //                nextDispose="findAll";
 74                 return SUCCESS;
 75
 76             }else{
 77                 return ERROR;
 78             }
 79
 80
 81         }else{
 82             System.out.println("登录表单值没有接收到");
 83             return ERROR;
 84
 85         }
 86     }
 87
 88     /**
 89      * 注册
 90      * @return
 91      */
 92     public String register(){
 93       return SUCCESS;
 94     }
 95     /**
 96      * 查询所有
 97      * @return
 98      */
 99     public String findAll(){
100       List<UserInfo> list=service.findAll();
101         if(list!=null){
102             System.out.println("查询所有成功");
103             HttpServletRequest request=ServletActionContext.getRequest();
104             request.setAttribute("list", list);
105             return SUCCESS;
106         }else{
107             System.out.println("查询所有,失败");
108             return ERROR;
109         }
110     }
111
112     /**
113      * 删除
114      * @return
115      */
116     public String deleteOne(){
117         HttpServletRequest request=ServletActionContext.getRequest();
118         String id=request.getParameter("id");
119         int uid=0;
120         if(id!=null){
121             System.out.println("获取id成功");
122             System.out.println("id"+id);
123             uid=Integer.parseInt(id);
124             System.out.println("uid"+uid);
125             service.deleteOne(uid);
126             return SUCCESS;
127         }else{
128             System.out.println("获取id失败");
129             return ERROR;
130
131         }
132
133     }
134
135
136
137
138 }
11、在src下创建log4j.properties日志记录文件,可以将mybatis的sql打印在控制台,可以方便调试
 1 log4j.rootLogger=DEBUG, Console
 2
 3 #Console
 4 log4j.appender.Console=org.apache.log4j.ConsoleAppender
 5 log4j.appender.Console.layout=org.apache.log4j.PatternLayout
 6 log4j.appender.Console.layout.ConversionPattern=%d [%t] %-5p [%c] - %m%n
 7
 8 log4j.logger.java.sql.ResultSet=INFO
 9 log4j.logger.org.apache=INFO
10 log4j.logger.java.sql.Connection=DEBUG
11 log4j.logger.java.sql.Statement=DEBUG
12 log4j.logger.java.sql.PreparedStatement=DEBUG
12、在src下创建jdbc.properties属性文件
1 jdbc.driver=oracle.jdbc.driver.OracleDriver
2 jdbc.url=jdbc:oracle:thin:@127.0.0.1:1521:orcl
3 jdbc.username=scott
4 jdbc.password=tiger
13、在src下创建applicationContext.xml文件
 1 <?xml version="1.0" encoding="UTF-8"?>
 2 <beans xmlns="http://www.springframework.org/schema/beans"
 3 xmlns:context="http://www.springframework.org/schema/context"
 4 xmlns:tx="http://www.springframework.org/schema/tx"
 5 xmlns:xsi="http://www.w3.org/2001/XMLSchema-instance"
 6 xsi:schemaLocation="http://www.springframework.org/schema/beans
 7 http://www.springframework.org/schema/beans/spring-beans.xsd
 8 http://www.springframework.org/schema/context
 9 http://www.springframework.org/schema/context/spring-context.xsd
10 http://www.springframework.org/schema/tx
11 http://www.springframework.org/schema/tx/spring-tx.xsd
12  ">
13   <!-- 采用注释的方式配置bean -->
14     <context:annotation-config />
15
16     <!-- 配置要扫描的包 -->
17     <context:component-scan base-package="com"></context:component-scan>
18
19
20     <!-- 数据库属性文件位置 -->
21     <context:property-placeholder location="classpath:jdbc.properties"/>
22
23      <!-- 2.数据源配置 -->
24   <bean id="dataSource" class="org.springframework.jdbc.datasource.DriverManagerDataSource">
25         <property name="driverClassName" value="${jdbc.driver}"/>
26         <property name="url" value="${jdbc.url}"/>
27         <property name="username" value="${jdbc.username}"/>
28         <property name="password" value="${jdbc.password}"/>
29   </bean>
30
31     <!-- 配置mybitasSqlSessionFactoryBean -->
32     <bean id="sqlSessionFactory" class="org.mybatis.spring.SqlSessionFactoryBean">
33         <property name="dataSource" ref="dataSource" />
34         <property name="configLocation" value="classpath:mybatis-config.xml"></property>
35     </bean>
36
37     <!-- 配置SqlSessionTemplate -->
38     <bean id="sqlSessionTemplate" class="org.mybatis.spring.SqlSessionTemplate">
39         <constructor-arg index="0" ref="sqlSessionFactory" />
40     </bean>
41
42     <!-- 事务配置 -->
43     <bean id="transactionManager" class="org.springframework.jdbc.datasource.DataSourceTransactionManager">
44         <property name="dataSource" ref="dataSource" />
45     </bean>
46
47     <!-- 使用annotation注解方式配置事务 -->
48     <tx:annotation-driven transaction-manager="transactionManager"/>
49 </beans>
14、在src下创建struts.xml文件
 1 <?xml version="1.0" encoding="UTF-8"?>
 2 <!DOCTYPE struts PUBLIC "-//Apache Software Foundation//DTD Struts Configuration 2.1//EN" "struts-2.1.dtd" >
 3 <struts>
 4   <!-- 中文乱码处理 -->
 5     <constant name="struts.i18n.encoding" value="UTF-8"/>
 6     <package name="default" namespace="/" extends="struts-default">
 7     <!-- 全局结果配置
 8        <global-results>
 9          <result name="error" type="redirect">error.jsp</result>
10        </global-results>
11        -->
12        <!-- 首启项配置 -->
13      <!-- <default-action-ref name="findAll"/>-->
14
15
16        <!-- method是对应action类的有返回值的方法名 -->
17         <!-- 登录 -->
18         <action name="login" class="userInfoAction" method="login">
19           <result type="redirectAction">findAll</result>
20           <result name="error">error.jsp</result>
21         </action>
22
23         <!-- 查询所有action -->
24         <action name="findAll" class="userInfoAction" method="findAll">
25           <result name="success">success.jsp</result>
26         </action>
27         <!-- 根据id删除的action -->
28         <action name="deleteOne" class="userInfoAction" method="deleteOne">
29           <result type="redirectAction">findAll</result>
30         </action>
31
32
33     </package>
34 </struts>
15、编辑WebRoot下WEB-INF下的web.xml文件
 1 <?xml version="1.0" encoding="UTF-8"?>
 2 <web-app id="WebApp_9" version="2.4" xmlns="http://java.sun.com/xml/ns/j2ee" xmlns:xsi="http://www.w3.org/2001/XMLSchema-instance" xsi:schemaLocation="http://java.sun.com/xml/ns/j2ee http://java.sun.com/xml/ns/j2ee/web-app_2_4.xsd">
 3     <context-param>
 4      <param-name>contextConfigLocation</param-name>
 5      <param-value>classpath:applicationContext.xml</param-value>
 6     </context-param>
 7     <filter>
 8         <filter-name>struts2</filter-name>
 9         <filter-class>org.apache.struts2.dispatcher.ng.filter.StrutsPrepareAndExecuteFilter</filter-class>
10     </filter>
11
12     <filter-mapping>
13         <filter-name>struts2</filter-name>
14         <url-pattern>/*</url-pattern>
15     </filter-mapping>
16
17    <!-- 加载spring的配置文件 -->
18     <listener>
19         <listener-class>org.springframework.web.context.ContextLoaderListener</listener-class>
20     </listener>
21
22
23     <welcome-file-list>
24         <welcome-file>login.jsp</welcome-file>
25     </welcome-file-list>
26
27 </web-app>
16、在WebRoot下创建login.jsp文件
<%@ page language="java" import="java.util.*" pageEncoding="UTF-8"%>
<%
String path = request.getContextPath();
String basePath = request.getScheme()+"://"+request.getServerName()+":"+request.getServerPort()+path+"/";
%>

<!DOCTYPE HTML PUBLIC "-//W3C//DTD HTML 4.01 Transitional//EN">
<html>
  <head>
    <base href="<%=basePath%>">

    <title>My JSP ‘index.jsp‘ starting page</title>
    <meta http-equiv="pragma" content="no-cache">
    <meta http-equiv="cache-control" content="no-cache">
    <meta http-equiv="expires" content="0">
    <meta http-equiv="keywords" content="keyword1,keyword2,keyword3">
    <meta http-equiv="description" content="This is my page">
    <!--
    <link rel="stylesheet" type="text/css" href="styles.css">
    -->
  </head>

  <body>
    <center>
      <fieldset style="width:400px;">
        <legend>登录</legend>
        <form action="login.action" method="post">
            <table>
              <tr>
                  <td>用户名:</td>
                  <td><input type="text" name="user.name"/></td>
              </tr>
              <tr>
                   <td>密码:</td>
                   <td><input type="password" name="user.password"/></td>
               </tr>
              <tr>
                   <td><input type="submit" value="提交"/></td>
                   <td><input type="reset" value="重置"/></td>
               </tr>
            </table>

        </form>
      </fieldset>
    </center>
  </body>
</html>
17、在WebRoot下创建success.jsp文件
 1 <%@ page language="java" import="java.util.*" pageEncoding="UTF-8"%>
 2 <%@ taglib uri="http://java.sun.com/jsp/jstl/core" prefix="c" %>
 3 <%
 4 String path = request.getContextPath();
 5 String basePath = request.getScheme()+"://"+request.getServerName()+":"+request.getServerPort()+path+"/";
 6 %>
 7
 8 <!DOCTYPE HTML PUBLIC "-//W3C//DTD HTML 4.01 Transitional//EN">
 9 <html>
10   <head>
11     <base href="<%=basePath%>">
12
13     <title>My JSP ‘index.jsp‘ starting page</title>
14     <meta http-equiv="pragma" content="no-cache">
15     <meta http-equiv="cache-control" content="no-cache">
16     <meta http-equiv="expires" content="0">
17     <meta http-equiv="keywords" content="keyword1,keyword2,keyword3">
18     <meta http-equiv="description" content="This is my page">
19     <!--
20     <link rel="stylesheet" type="text/css" href="styles.css">
21     -->
22   </head>
23
24   <body>
25    <table border="1">
26      <tr><td>编号</td><td>用户名</td><td>密码</td><td>电话</td><td>是否是管理员</td>
27      <td>操作</td></tr>
28
29    <c:forEach items="${requestScope.list}" var="i">
30       <tr>
31      <td>${i.id}</td>
32      <td>${i.name}</td>
33      <td>${i.password}</td>
34      <td>${i.telephone}</td>
35      <td>${i.isadmin }</td>
36      <td><a href="deleteOne?id=${i.id}">删除</a></td>
37      </tr>
38
39
40    </c:forEach>
41
42     </table>
43   </body>
44 </html>
18、在WebRoot下创建error.jsp文件
 1 <%@ page language="java" import="java.util.*" pageEncoding="UTF-8"%>
 2 <%
 3 String path = request.getContextPath();
 4 String basePath = request.getScheme()+"://"+request.getServerName()+":"+request.getServerPort()+path+"/";
 5 %>
 6
 7 <!DOCTYPE HTML PUBLIC "-//W3C//DTD HTML 4.01 Transitional//EN">
 8 <html>
 9   <head>
10     <base href="<%=basePath%>">
11
12     <title>My JSP ‘index.jsp‘ starting page</title>
13     <meta http-equiv="pragma" content="no-cache">
14     <meta http-equiv="cache-control" content="no-cache">
15     <meta http-equiv="expires" content="0">
16     <meta http-equiv="keywords" content="keyword1,keyword2,keyword3">
17     <meta http-equiv="description" content="This is my page">
18     <!--
19     <link rel="stylesheet" type="text/css" href="styles.css">
20     -->
21   </head>
22
23   <body>
24       操作失败!
25   </body>
26 </html>
19、在WebRoot下创建register.jsp文件
 1 <%@ page language="java" import="java.util.*" pageEncoding="UTF-8"%>
 2 <%
 3 String path = request.getContextPath();
 4 String basePath = request.getScheme()+"://"+request.getServerName()+":"+request.getServerPort()+path+"/";
 5 %>
 6
 7 <!DOCTYPE HTML PUBLIC "-//W3C//DTD HTML 4.01 Transitional//EN">
 8 <html>
 9   <head>
10     <base href="<%=basePath%>">
11
12     <title>My JSP ‘index.jsp‘ starting page</title>
13     <meta http-equiv="pragma" content="no-cache">
14     <meta http-equiv="cache-control" content="no-cache">
15     <meta http-equiv="expires" content="0">
16     <meta http-equiv="keywords" content="keyword1,keyword2,keyword3">
17     <meta http-equiv="description" content="This is my page">
18     <!--
19     <link rel="stylesheet" type="text/css" href="styles.css">
20     -->
21   </head>
22
23   <body>
24     <center>
25       <fieldset style="width:400px;">
26         <legend>注册</legend>
27         <form action="register.action" method="post">
28             <table>
29               <tr>
30                   <td>用户名:</td>
31                   <td><input type="text" name="user.name"/></td>
32               </tr>
33               <tr>
34                    <td>密码:</td>
35                    <td><input type="password" name="user.password"/></td>
36                </tr>
37               <tr>
38                    <td>电话号码:</td>
39                    <td><input type="text" name="user.telephone"/></td>
40                </tr>
41               <tr>
42                    <td>是否是管理员:</td>
43                    <td>
44                    <input type="radio" name="user.isadmin" value="是">
45                    <input type="radio" name="user.isadmin" value="否" checked="checked"/>
46                    </td>
47                </tr>
48               <tr>
49                    <td><input type="submit" value="提交"/></td>
50                    <td><input type="reset" value="重置"/></td>
51                </tr>
52             </table>
53
54         </form>
55       </fieldset>
56     </center>
57   </body>
58 </html>
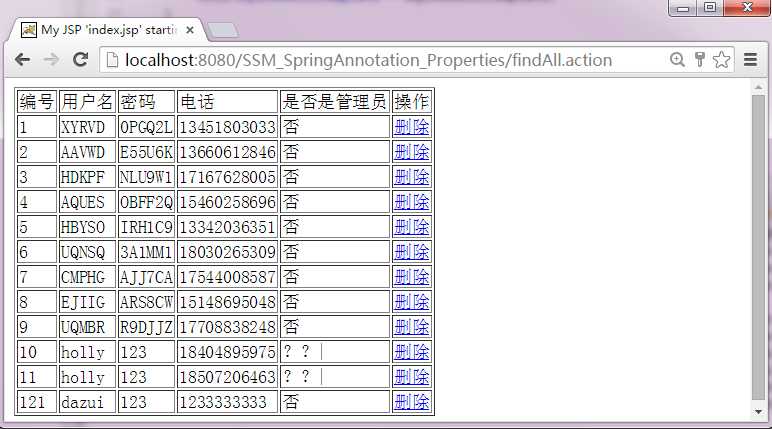
20、运行如下

也许本人写的代码有缺陷或还有需要改进的地方,希望各位路过的大神,不吝赐教!
8、Spring+Struts2+MyBaits(Spring注解+jdbc属性文件+log4j属性文件)
标签:
原文地址:http://www.cnblogs.com/holly8/p/5543936.html
