通过前一篇<死磕Spring AOP系列1:编程式实现AOP>,学习了Spring对代理的底层支持,认识了ProxyFactory对象,及从类设计层面认识了PointCut&Advisor&Advice&Interceptor,还认识了AdvisorChainFactory对象,知道了底层Advisor的底层链式结构。但是,上篇我们仅仅是通过Spring编程式实现的"AOP"效果,这种方式,实际开发时,如果这样用就太LOW了。今天,主要认识一个生成代理相关的BeanPostProcessor,它是一个相对比较简单的和代理相关的BeanPostProcessor之一,对研究Spring 容器生成代理对象逻辑,容易上手,达到深入浅出的目的。
本篇文章的主要内容
使用BeanNameAutoProxyCreator,做一个简单的代码演示
剖析BeanNameAutoProxyCreator设计
理解InstantiationAwareBeanPostProcessor
分析一些关键点方法
1.BeanNameAutoProxyCreator实现“AOP”效果
代码片段
/**
 *模拟业务接口
 */
public interface UserService {
    public void updateUser();
}

/**
 *模拟具体业务
 */
public class UserServiceImpl implements UserService{

    @Override
    public void updateUser() {
        System.out.println("$$$$$$执行业务逻辑$$$$$");
    }
}

/**
 * 模拟切面1
 */
public class SecurityInterceptor implements MethodInterceptor {
    @Override
    public Object invoke(MethodInvocation methodInvocation) throws Throwable {
        System.out.println("==========执行安全校验====================");
        return methodInvocation.proceed();
    }
}

/**
 * 模拟切面2
 */
public class LoggerBeforeAdvice implements MethodBeforeAdvice {
    @Override
    public void before(Method method, Object[] args, Object target) throws Throwable {
        System.out.println("=======保存更新日志=========");
    }
}
XML(proxy_test.xml)
<?xml version="1.0" encoding="UTF-8"?>
<!DOCTYPE beans PUBLIC "-//SPRING//DTD BEAN 2.0//EN" "http://www.springframework.org/dtd/spring-beans-2.0.dtd">

<beans>
   <bean class="org.springaop.chap01.UserServiceImpl" id="userService"></bean>
   <bean class="org.springaop.chap01.LoggerBeforeAdvice" id="loggerBeforeAdvice"></bean>

   <bean class="org.springframework.aop.framework.autoproxy.BeanNameAutoProxyCreator">
      <property name="beanNames">
         <list>
            <value>userService</value>
         </list>

      </property>
      <property name="interceptorNames">
         <list>
            <value>loggerBeforeAdvice</value>
         </list>
      </property>
   </bean>
</beans>
Main
public class ContextMain {
    public static void main(String[] args) {
        ApplicationContext ctx = new ClassPathXmlApplicationContext("org/springaop/chap02/proxy_test.xml");
        UserService userService =(UserService) ctx.getBean("userService");
        userService.updateUser();
    }
}
=======保存更新日志=========
$$$$$$执行业务逻辑$$$$$
代码很简单,不需要解释。
2.剖析BeanNameAutoProxyCreator设计
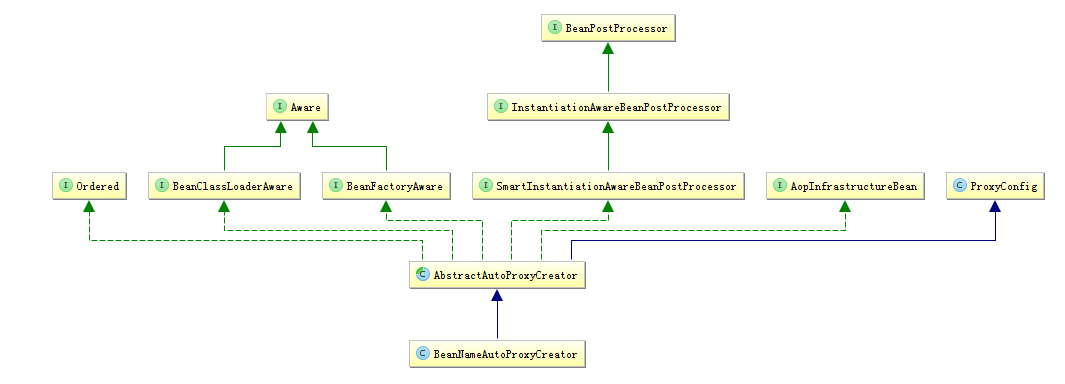
类层次结构图

下面,简单概要描述下每个接口的作用
| 类&接口 | 作用 |
| Ordered | 定义顺序的,影响Processor的执行顺序,默认为“LOWEST_PRECEDENCE”,可以自己指定 |
| Aware*类 | 感知接口,与Spring容器沟通的手段 |
| *BeanPostProcessor | 影响spring Bean的生命周期,在对应生命周期中调用,是生成代理对象的入口 |
| AopInfrastructureBean | 表示该类是Spring AOP支持对象,仅仅是个标识 |
| ProxyConfig | 是一个类,保存了代理配置元信息,影响代理生成行为 |
类图
结合上一篇 死磕Spring AOP系列1:编程式实现AOP 的讲解,我们知道了Spring生成代理时,需要2个重要的信息,一个是源对象targetSource,一个是Advisor列表。
抛出2个假设问题
Spring应该是从Spring容器中,根据咱们声明的beanNames属性,当成源对象,然后代理包装。
Advisor列表,也是从Spring容器中获取,和interceptorNames相关。
3.剖析BeanNameAutoProxyCreator实现
3.1Spring怎么完成BeanName的匹配的。
/**
 *1.通过分析注释,我们知道了beanNames 支持模糊匹配,比如"*", e.g. "myBean,tx*"。
 *2.支持FactoryBean(包含 factory-bean prefix "&": 比如: "&myFactoryBean".
 *
 */
public void setBeanNames(String[] beanNames) {
   Assert.notEmpty(beanNames, "‘beanNames‘ must not be empty");
   this.beanNames = new ArrayList<String>(beanNames.length);
   for (String mappedName : beanNames) {
      this.beanNames.add(StringUtils.trimWhitespace(mappedName));
   }
}
beanNames是如何被使用的呢
public abstract class AbstractAutoProxyCreator extends ProxyConfig
      implements SmartInstantiationAwareBeanPostProcessor, BeanClassLoaderAware, BeanFactoryAware,
      Ordered, AopInfrastructureBean {
      //抽象方法,不同的AbstractAutoProxyCreator 实现类,根据策略分别实现。
      //提供实现:AbstractAdvisorAutoProxyCreator OR BeanNameAutoProxyCreator
      // 被BeanPostProcessor 生命周期回调方法中调用
    protected abstract Object[] getAdvicesAndAdvisorsForBean(
         Class<?> beanClass, String beanName, TargetSource customTargetSource) throws BeansException;

}

protected Object[] getAdvicesAndAdvisorsForBean(Class beanClass, String beanName, TargetSource targetSource) {
   if (this.beanNames != null) {
       //循环遍历beanNames
      for (String mappedName : this.beanNames) {
         if (FactoryBean.class.isAssignableFrom(beanClass)) {
            if (!mappedName.startsWith(BeanFactory.FACTORY_BEAN_PREFIX)) {
               continue;
            }
            mappedName = mappedName.substring(BeanFactory.FACTORY_BEAN_PREFIX.length());
         }
         //逐个匹配
         if (isMatch(beanName, mappedName)) {
            return PROXY_WITHOUT_ADDITIONAL_INTERCEPTORS;
         }
         BeanFactory beanFactory = getBeanFactory();
         if (beanFactory != null) {
            String[] aliases = beanFactory.getAliases(beanName);
            //匹配aliases
            for (String alias : aliases) {
               if (isMatch(alias, mappedName)) {
                  return PROXY_WITHOUT_ADDITIONAL_INTERCEPTORS;
               }
            }
         }
      }
   }
   return DO_NOT_PROXY;
}
//
protected boolean isMatch(String beanName, String mappedName) {
   return PatternMatchUtils.simpleMatch(mappedName, beanName);
}
3.2Advisor列表初始化
//1
public Object postProcessBeforeInstantiation(Class<?> beanClass, String beanName) throws BeansException {
...
   // Create proxy here if we have a custom TargetSource.
   // Suppresses unnecessary default instantiation of the target bean:
   // The TargetSource will handle target instances in a custom fashion.
   if (beanName != null) {
      TargetSource targetSource = getCustomTargetSource(beanClass, beanName);
      if (targetSource != null) {
         this.targetSourcedBeans.put(beanName, Boolean.TRUE);
         Object[] specificInterceptors = getAdvicesAndAdvisorsForBean(beanClass, beanName, targetSource);
         Object proxy = createProxy(beanClass, beanName, specificInterceptors, targetSource);
         this.proxyTypes.put(cacheKey, proxy.getClass());
         return proxy;
      }
   }

   return null;
}

//2
protected Object createProxy(
      Class<?> beanClass, String beanName, Object[] specificInterceptors, TargetSource targetSource) {

   ProxyFactory proxyFactory = new ProxyFactory();
...

   Advisor[] advisors = buildAdvisors(beanName, specificInterceptors);
   for (Advisor advisor : advisors) {
      proxyFactory.addAdvisor(advisor);
   }
...
   return proxyFactory.getProxy(this.proxyClassLoader);
}

//3
protected Advisor[] buildAdvisors(String beanName, Object[] specificInterceptors) {
   // Handle prototypes correctly...
   Advisor[] commonInterceptors = resolveInterceptorNames();

   List<Object> allInterceptors = new ArrayList<Object>();
   if (specificInterceptors != null) {
      allInterceptors.addAll(Arrays.asList(specificInterceptors));
      if (commonInterceptors != null) {
         if (this.applyCommonInterceptorsFirst) {//分支
            allInterceptors.addAll(0, Arrays.asList(commonInterceptors));
         }
         else {
            allInterceptors.addAll(Arrays.asList(commonInterceptors));
         }
      }
   }

   Advisor[] advisors = new Advisor[allInterceptors.size()];
   for (int i = 0; i < allInterceptors.size(); i++) {
      advisors[i] = this.advisorAdapterRegistry.wrap(allInterceptors.get(i));
   }
   return advisors;
}

//4
//完成到interceptorNames到Advisor的转换
private Advisor[] resolveInterceptorNames() {
   ConfigurableBeanFactory cbf = (this.beanFactory instanceof ConfigurableBeanFactory) ?
         (ConfigurableBeanFactory) this.beanFactory : null;
   List<Advisor> advisors = new ArrayList<Advisor>();
   for (String beanName : this.interceptorNames) {
      if (cbf == null || !cbf.isCurrentlyInCreation(beanName)) {
         Object next = this.beanFactory.getBean(beanName);
         advisors.add(this.advisorAdapterRegistry.wrap(next));
      }
   }
   return advisors.toArray(new Advisor[advisors.size()]);
}
需要提的是advisorAdapterRegistry,看图说话,Spring抽象了一层将advisor和interceptor很好的做了分离,各得其所。
死磕到这儿,应该明白了Spring容器是如何完成如何完成代理工作的,应该非常清楚了。还有一个问题需要解决,Spring容器的生成代理的入口在那儿?。如果对SpringIOC底层机制和Spring 对象生命周期非常熟悉的话,非常自然的联想到BeanPostProcessor.
4.BeanPostProcessor回顾
理解BeanPostProcessor,最要结合bean的生命周期一同观看
通过对比,我们可以知道在spring bean的构造过程中,spring容器会调用对应的BeanPostProcessor。一般调用时机包括:初始化,实例化等。
那么接下来,咱们就继续剖析BeanNameAutoProxyCreator,只不过要把它当成一个普通的BeanPostProcessor。
//没有逻辑,不需要关注
public Object postProcessBeforeInitialization(Object bean, String beanName) {
   return bean;
}

/**
 * Create a proxy with the configured interceptors if the bean is
 * identified as one to proxy by the subclass.
 * @see #getAdvicesAndAdvisorsForBean
 * 通过注释,我们可以知道创建代理,就在这儿。生成入口已经找到了
 */
public Object postProcessAfterInitialization(Object bean, String beanName) throws BeansException {
   if (bean != null) {
      Object cacheKey = getCacheKey(bean.getClass(), beanName);
      if (!this.earlyProxyReferences.containsKey(cacheKey)) {
         return wrapIfNecessary(bean, beanName, cacheKey);
      }
   }
   return bean;
}
/**
* 包装,完成代理对象生成
*/
protected Object wrapIfNecessary(Object bean, String beanName, Object cacheKey) {
   if (beanName != null && this.targetSourcedBeans.containsKey(beanName)) {
      return bean;
   }
   if (Boolean.FALSE.equals(this.advisedBeans.get(cacheKey))) {
      return bean;
   }
   if (isInfrastructureClass(bean.getClass()) || shouldSkip(bean.getClass(), beanName)) {
      this.advisedBeans.put(cacheKey, Boolean.FALSE);
      return bean;
   }

   // Create proxy if we have advice.
   Object[] specificInterceptors = getAdvicesAndAdvisorsForBean(bean.getClass(), beanName, null);
   if (specificInterceptors != DO_NOT_PROXY) {
      this.advisedBeans.put(cacheKey, Boolean.TRUE);
      Object proxy = createProxy(bean.getClass(), beanName, specificInterceptors, new SingletonTargetSource(bean));
      this.proxyTypes.put(cacheKey, proxy.getClass());
      return proxy;
   }

   this.advisedBeans.put(cacheKey, Boolean.FALSE);
   return bean;
}
总结:虽然BeanNameAutoProxyCreator是个很简单的BeanPostProcessor,功能LOW的很少有人问津,但对我们研究Spring AOP容器的底层实现非常有必要,麻雀虽小五脏俱全。通过分析,我们可以关注几个概念。1.Interceptors,Advisor,advisorAdapterRegistry。其实PointCut对象,如果你DUBUG的时候,也能看到,只不过咱们没有讲。因为咱们没有配置,但Spring已经给我们默认生成了一个:TruePointcut。
到了这里,Spring AOP 基本流程也串的差不多了,但总有些遗憾。Spring非常强大的表达式支持没有看到,自动检索Bean没有看到,强大快捷的配置没有看到。现在看不到不要紧,以后随着死磕Spring AOP的深入,会看到的。
本文出自 “简单” 博客,请务必保留此出处http://dba10g.blog.51cto.com/764602/1786022
死磕Spring AOP系列2:剖析Bean处理器之BeanNameAutoProxyCreator
原文地址:http://dba10g.blog.51cto.com/764602/1786022