标签:
本来想先瞎扯些什么,然后又不知道讲什么的好,那就直接进入正题吧。
参考资料:
Using CSS gradients (以及该页面内的大部分链接页面的资料)
首先区分下,平常给的纯色background,指的是background-color属性,而渐变色所指向的是background-image属性,是作为背景图像处理的。
从渐变的形式分为2种:线性渐变(直线扩散)和径向渐变(从圆心扩散)。
线性渐变: linear-gradient | repeating-linear-gradient
径向渐变: radial-gradient | repeating-radial-gradient
线性渐变
语法格式:
linear-gradient(  [ <angle/*角度*/> | to <side-or-corner>/*方向*/ ,]? <color-stop/*渐变开始的颜色*/> [, <color-stop>]+/*渐变结束的颜色,开始-结束的区间内包含渐变涉及到的颜色列表*/ )
<side-or-corner> = [left | right] || [top | bottom]
<color-stop>     = <color> [ <percentage/*当前渐变色所占百分比*/> | <length/*当前渐变色起始位置,也代表上一个颜色渐变结束的位置*/> ]
使用代码及效果图
<div class="test"></div>
两种颜色的渐变
<style>
/*此例由黑色渐变至红色*/
  .test{
    width:300px;
    height: 100px;
    background-image: linear-gradient(black, red);                  /*默认是从上到下的渐变*/
    /*background-image: linear-gradient(to top, black, red);*/      /*从下到上的渐变*/
    /*background-image: linear-gradient(to right, black, red);*/    /*从左到右的渐变*/
    /*background-image: linear-gradient(to left, black, red);*/     /*从右到左的渐变*/
  }
</style>
效果图如下:
三种及多种颜色的渐变
<style>
/*此例由黑色渐变至红色再至黄色*/
  .test{
    width:300px;
    height: 100px;
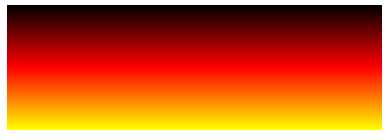
    background-image: linear-gradient(black, red, yellow);                  /*从上到下*/
    /*background-image: linear-gradient(to top, black, red, yellow);*/      /*从下到上*/
    /*background-image: linear-gradient(to right, black, red, yellow);*/    /*从左到右*/
    /*background-image: linear-gradient(to left, black, red, yellow);*/     /*从右到左*/
  }
  /*... 按此规则依次加颜色列表,实现多色渐变*/
</style>
效果图如下:
渐变距离的控制
<style>
  .test{
    width:300px;
    height: 100px;
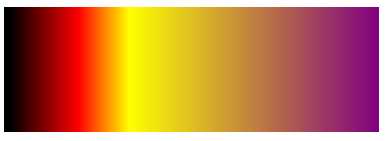
    background-image: linear-gradient(to right, black 5px, red 60px, yellow 100px, purple 300px);
  }
</style>
效果图如下:
给渐变色加了位置值所代表的含义:
1. div[class="test"]背景色执行从左到右的渐变
2. 0px-5px为黑色
3. 5px-60px为黑色向红色的渐变
4. 60px-100px为红色向黄色的渐变
5. 100px-300px为黄色向紫色的渐变
每两种颜色之间的渐变的距离为位置差。
如果后一个颜色的起始位置的值小于前一个颜色的起始位置的值,则这两种颜色的渐变距离为0,变成直接的颜色变化。
最后一个颜色可不设置起始位置的值,默认渐变至总长度(这里指div宽度)的末尾。如果最后一个颜色起始位置的值小于总长度的值,则从该值开始至总长度的末尾由该颜色值纯色填充。
使用百分比:
<style>
  .test{
    width:300px;
    height: 100px;
    background-image: linear-gradient(left, black 10%, red 30%, yellow 50%, purple 100%);
  }
</style>
解释同上。
不同角度的渐变
以上案例都是以<side-or-corner>决定渐变方向,使用<angle>便可以根据自己喜好定义方向了。
在webkit内核的deg
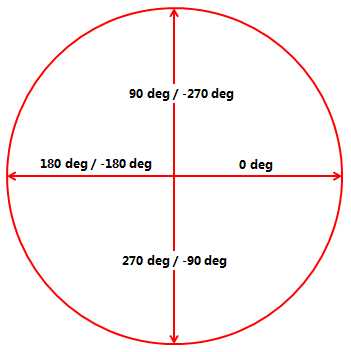
正常模式(指的是没规定浏览器内核的样式)deg
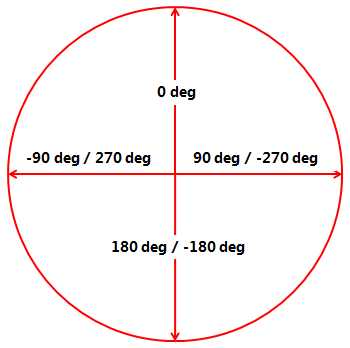
angle的角度值与上图的角度值所指方向一致。
<style>
/*这里以标准的为例*/
  .test{
    width:300px;
    height: 100px;
    background-image: linear-gradient(0deg, black, red);          /*从下至上*/
    /*background-image: linear-gradient(45deg, black, red);*/     /*从左下角至右上角*/
    /*background-image: linear-gradient(90deg, black, red);*/     /*从左至右*/
    /*background-image: linear-gradient(135deg, black, red);*/    /*从左上角至右下角*/
    /*background-image: linear-gradient(180deg, black, red);*/    /*从上至下*/
    /*background-image: linear-gradient(225deg, black, red);*/   /*从右上角至左下角*/
    /*background-image: linear-gradient(270deg, black, red);*/    /*从右至左*/
    /*background-image: linear-gradient(315deg, black, red);*/    /*从右下角至左上角*/
  }
</style>
径向渐变
语法格式:
radial-gradient( [ circle/*圆*/ || <length>/*半径大小*/ ] [ at <position>/*圆心所在位置*/ ]? ,
      | [ ellipse/*椭圆*/ || [<length> | <percentage> ]{2}]/*百分比*/ [ at <position>/*圆心所在位置*/ ]? ,
      | [ [ circle | ellipse ]/*圆or椭圆*/ || <extent-keyword>/*椭圆离(最近,最远)边或角的距离*/ ] [ at <position>/*圆心所在位置*/ ]? ,
      | at <position> ,
      <color-stop> [ , <color-stop> ]+/*渐变颜色列表及位置*/ )
<extent-keyword> = closest-corner | closest-side | farthest-corner | farthest-side
<color-stop> = <color> [ <percentage> | <length> ]
使用代码及效果图
<div class="test"></div>
圆
<style>
  .test{
    width: 300px;
    height: 100px;
    background-image: radial-gradient(50px at 50% 50% , white 0%, red 50%, purple 99%, transparent 99%);
  }
</style>
以上代码的圆心在元素的中心点(50% 50%),半径为50px,圆心白色,圆心至半径50%处由白色渐变至红色,又从半径50%处至99%处红色渐变至紫色,从半径长度的99%至99%由紫色渐变透明。
注意:transparent 99%(或0%-99%)是为圆规定在99%之后至100%的背景色为透明,如果除去这个设置,那剩余部分将会被前一个背景色填充,当然,现在这个值在这里是99%,在其他地方也可以是其他值,根据上一个颜色的相对圆心的距离确定范围。
椭圆
<style>
  .test{
    width: 300px;
    height: 100px;
    border: 1px solid black;
    background-image: radial-gradient( ellipse farthest-corner at 30% 30% , white 0%, red 20%, purple 30%, transparent 30%);
  }
</style>
首先,选择圆的类型是ellipse,然后选择extent-keyword来确定椭圆的规格(farthest-corner),然后at position确定圆心所在位置(30% 30%),之后日常的渐变颜色列表及渐变范围。
效果图如下: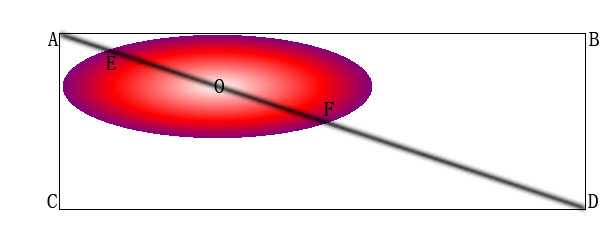
分析下extent-keyword:
closest-side: 以靠近圆心的最近的一条边为基准来规定椭圆的大小。
closest-corner:以靠近圆心的最近的一个角(椭圆所在元素的角)为基准来规定椭圆的大小。
farthest-side:以靠近圆心的最远的一条边为基准来规定椭圆的大小。
farthest-corner:以靠近圆心的最远的一个角(椭圆所在元素的角)为基准来规定椭圆的大小。
以上图为例,规定的是farthest-corner,这时候最远的角是div的点D所在的角(最近的角是点A所在位置的角,最近的边是AB边,最远的边是BD边),且椭圆为30%的规格,圆心是点O,OF:OD = 3:10,所谓的30%便是这么得来的(当然,也可以是像素规定)。
...其余规则以此类推...
渐变的repeat
线性repeat
语法格式:
repeating-linear-gradient(  [ <angle>/*角度*/ | to <side-or-corner>/*方向*/ ,]? <color-stop> [, <color-stop>]+/*渐变颜色列表*/ )
<side-or-corner> = [left | right] || [top | bottom]
<color-stop>     = <color> [ <percentage> | <length> ]
案例:
<style>
  .test{
    width: 300px;
    height: 100px;
    border: 1px solid black;
    background-image: repeating-linear-gradient(180deg, transparent, transparent 5px, black 5px, black 10px),repeating-linear-gradient(90deg, transparent, transparent 5px, black 5px, black 10px);
  }
</style>
效果图如下:
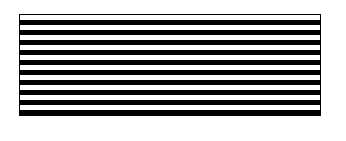
repeating-linear-gradient也可重复使用
<style>
  .test{
    width: 300px;
    height: 100px;
    border: 1px solid black;
    background-image: repeating-linear-gradient(180deg, transparent, transparent 5px, black 5px, black 6px),repeating-linear-gradient(90deg, transparent, transparent 5px, black 5px, black 6px);
  }
</style>
效果图如下: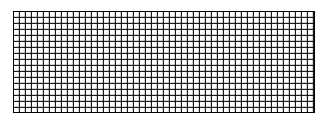
角度和方向可根据各自需求选择。
当然,有了线性的repeat,径向也不会示弱,来看看径向的repeat的吧。
语法格式:
repeating-radial-gradient( [[ circle/*圆*/  || <length>/*半径*/ ]                     [at <position>]?/*位置*/ , |
        [ ellipse/*椭圆*/ || [<length> | <percentage> ]{2}] [at <position>]? , |
        [[ circle | ellipse ] || <extent-keyword> ] [at <position>]? , |
         at <position>   ,    <color-stop> [ , <color-stop> ]+ )
<extent-keyword> = closest-corner | closest-side | farthest-corner | farthest-side
<color-stop> = <color> [ <percentage> | <length> ]
这个是圆的:
<style>
  .test{
    width: 300px;
    height: 100px;
    border: 1px solid black;
    background-image: repeating-radial-gradient(circle, black, black 5px, white 5px, white 10px);
  }
</style>
效果图如下: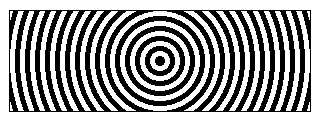
这个是椭圆的:
<style>
  .test{
    width: 300px;
    height: 100px;
    border: 1px solid black;
    background-image: repeating-radial-gradient(ellipse, black, black 5px, white 5px, white 10px);
  }
</style>
效果图如下: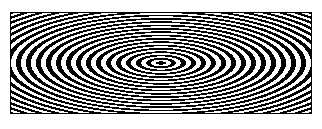
暂时就写这些吧,具体的运用看各自设计图给的是什么样的~ 也是懒得每个效果都切图...
同时,欢迎大家共同交流讨论各种技术问题~
标签:
原文地址:http://www.cnblogs.com/ys-ys/p/5574836.html