标签:
在伯乐在线上看到一个挺好玩的文章,自己也参考文章实现了一下。
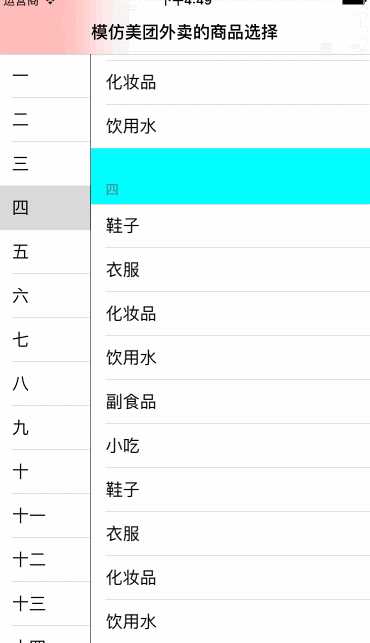
效果实现如图所示:

具体实现的内容可以参考原文,参考文章:《iOS 类似美团外卖 app 两个 tableView 联动效果实现》
首先,从界面上来看,很显然是两个UITableview上下滑动的效果。而这种滑动的效果核心是左边的tableView如何和右边的tableView进行关联,并且点击左边tableView之后右边的tableview也可以滑动到对应的section。
好了,分析完毕之后,我们应该清楚了我们的2个需求:
1.当点击左边TableViewCell时候,右边TableView会跟随着滑动到对应的section
2.当滑动右边TableView时候,左边TableView会根据右边UITableView的section滑动到对应的UITableViewCell位置
但是个人认为还有几个需要注意的点。
1.设置右边View的时候,这里把右边的view设置为控制器,巧妙的利用view的frame达到这种效果。但是一定记得在左边的控制器上添加子控制器(右边view所在的控制器),否则容易会使左边的view不能识别点击效果。分成连个控制器的好处就是避免了一个控制器中代码量过多,造成的混乱。
- (void)setupRightView
{
    self.productVC = [[DLProductController alloc] init];

    self.productVC.delegate = self;
    // 当前控制器一定添加产品的子控制器(否则会出现点击的view混乱)
    [self addChildViewController:self.productVC];

    [self.view addSubview:self.productVC.view];

}
2.在右边的控制器中写这个方法时注意
scrollToRowAtIndexPath:[NSIndexPath indexPathForRow:0 inSection:indexPath.row] atScrollPosition:UITableViewScrollPositionTop animated:YES

[NSIndexPath indexPathForRow:0 inSection:indexPath.row] 指的是哪一组的第几行(这里是第0行),indexPath是从DLCategoryController传递过来的,所以indexPath.row在本控制器中指的是哪一组
- (void)scrollToSelectedIndexPath:(NSIndexPath *)indexPath
{

//    [NSIndexPath indexPathForRow:0 inSection:indexPath.row] 指的是哪一组的第几行(这里是第0行),indexPath是从DLCategoryController传递过来的,所以indexPath.row在本控制器中指的是哪一组
    [self.tableView scrollToRowAtIndexPath:[NSIndexPath indexPathForRow:0 inSection:indexPath.row] atScrollPosition:UITableViewScrollPositionTop animated:YES];

}
3.注意右边的view向上滑和向下滑的情况。分别调用不同的代理。
标签:
原文地址:http://www.cnblogs.com/peaker-wu/p/5581261.html