标签:
这个类库提供一个UIImageView类别以支持加载来自网络的远程图片。具有缓存管理、异步下载、同一个URL下载次数控制和优化等特征。
地址:https://github.com/rs/SDWebImage
原理图:
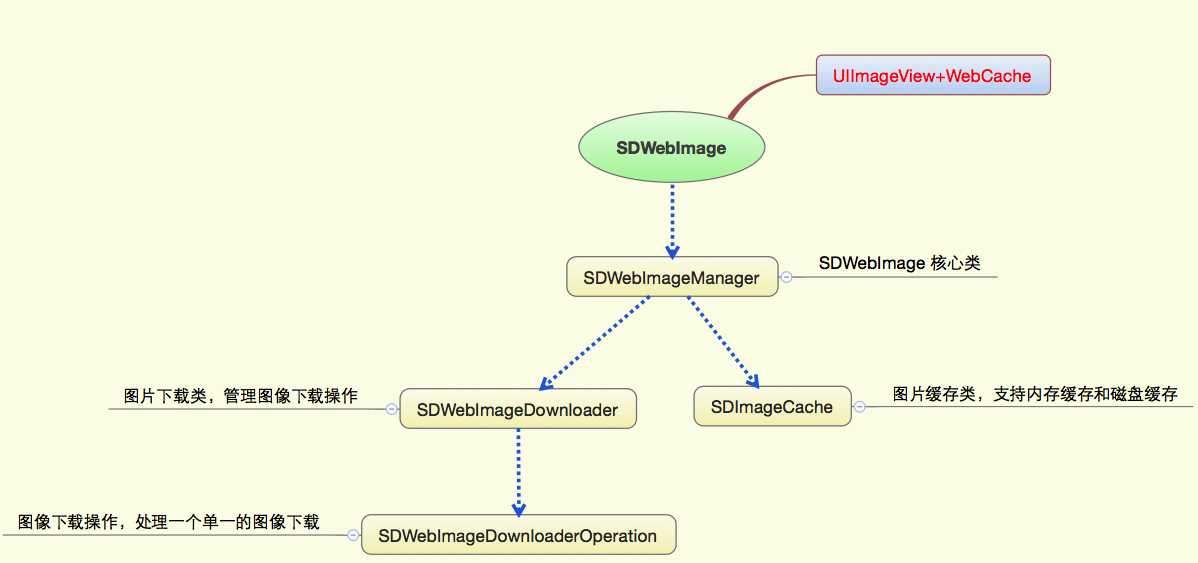
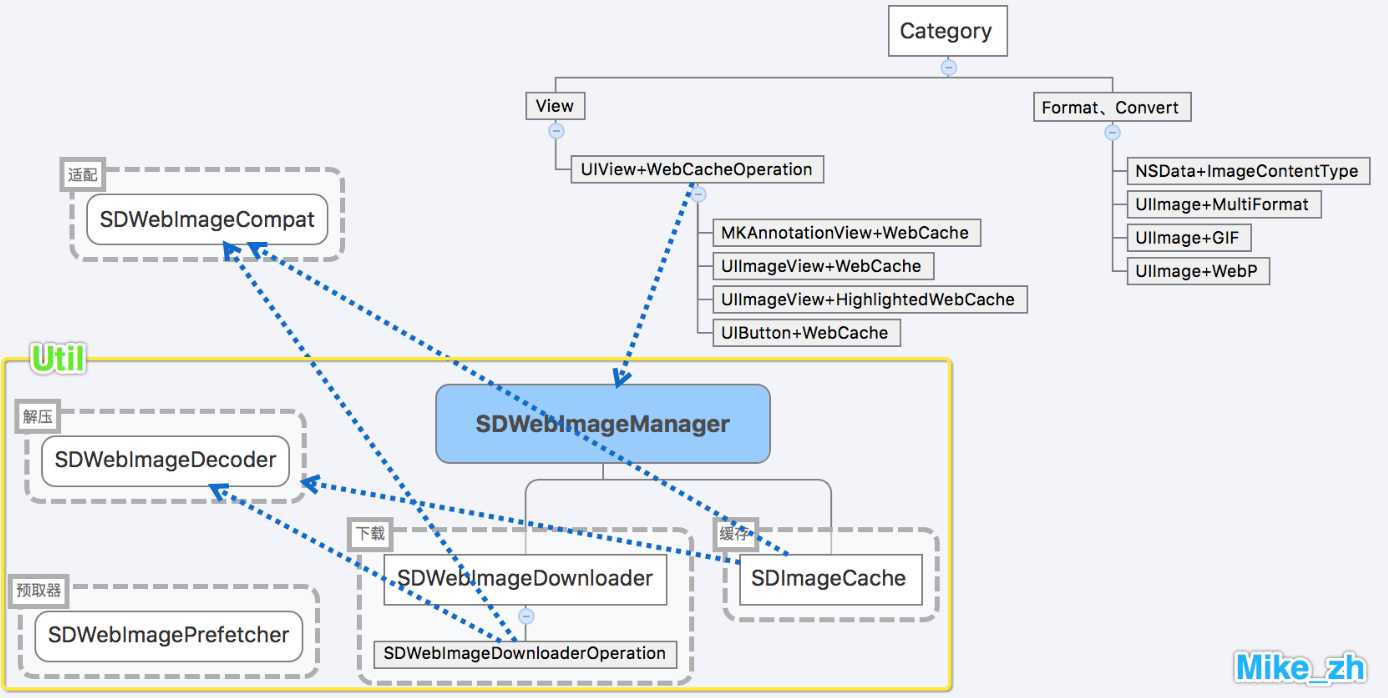
各个类的交互图:
一 插件的运用
针对这部分的理论知识可以查看文章《SDWebImage 图片下载缓存框架 常用方法及原理》,已经针对SDWebImage的相关知识点都有相应介绍;并且把相关的类都有注解,接下来将会简单介绍一些属性及小知识点:
1.1 设置存储路径
可以在项目AppDelegate设置存储路径,SDWebImage默认使用磁盘缓存,在 沙盒/Library/Cache中可以找到带WebImageCache字眼的目录,可以找到缓存的图片,下面这个可以设置一个只读的存储路径:
    NSString *bundledPath = [[[NSBundle mainBundle] resourcePath] stringByAppendingPathComponent:@"CustomPathImages"];
    [[SDImageCache sharedImageCache] addReadOnlyCachePath:bundledPath];
1.2 SDWebImage的最大并发数是多少
在类SDWebImageDownloader中,默认并发数为6(_downloadQueue.maxConcurrentOperationCount = 6);也可以修改maxConcurrentDownloads设置其下载并发数;
1.3 SDWebImage缓存周期
SDWebImage缓存周期为一周,可以在类SDImageCache里面有kDefaultCacheMaxCacheAge常量,定义的缓存时间;static const NSInteger kDefaultCacheMaxCacheAge = 60 * 60 * 24 * 7; // 1 week
1.4 SDWebImage 缓存图片命名规则
为了防止名称重复,对其进行 md5 运算;
1.5 默认下载的超时时长是多少?
默认为15秒,可以在类SDWebImageDownloader中设置downloadTimeout
1.6 SDWebImage用什么类型缓存图片?
NSCache,SDImageCache内处理内存警告,以通知的方式,clearMemory
1.7 cleanDisk的执行过程
i. 先遍历所有的缓存文件,记录过期的文件,计算缓存文件的总大小
ii. 删除过期的文件
iii. 判断maxCacheSize的值是否>0,如果大于0再判断缓存的文件总大小是否大于maxCacheSize
iv.如果缓存文件的总大小超过maxCacheSize,删除最早的文件
注意:.jpg、.gif等文件需要把扩展名填上,png不需要
1.8 SDWebImage获得缓存大小,并对它进行清除
        float tmpSize = [[SDImageCache sharedImageCache] getSize];
        NSString *clearCacheName =@"当前缓存已清理";
        if (tmpSize>0) {
            clearCacheName=tmpSize >= 1 ? [NSString stringWithFormat:@"成功清理缓存(%.2fM)",tmpSize] : [NSString stringWithFormat:@"成功清理缓存(%.2fK)",tmpSize * 1024];
        }
        [[SDImageCache sharedImageCache] clearDisk];
1.9 SDWebImages是如何识别图片
NSData+ImageContentType.m中,根据图片文件十六进制数据的第一个字节判断
+ (NSString *)sd_contentTypeForImageData:(NSData *)data {
    uint8_t c;
    [data getBytes:&c length:1];
    switch (c) {
        case 0xFF:
            return @"image/jpeg";
        case 0x89:
            return @"image/png";
        case 0x47:
            return @"image/gif";
        case 0x49:
        case 0x4D:
            return @"image/tiff";
        case 0x52:
            // R as RIFF for WEBP
            if ([data length] < 12) {
                return nil;
            }

            NSString *testString = [[NSString alloc] initWithData:[data subdataWithRange:NSMakeRange(0, 12)] encoding:NSASCIIStringEncoding];
            if ([testString hasPrefix:@"RIFF"] && [testString hasSuffix:@"WEBP"]) {
                return @"image/webp";
            }

            return nil;
    }
    return nil;
}
1.10 SDImageCacheType 缓存类型
SDImageCacheTypeNone 永不缓存,但是从网上下载
SDImageCacheTypeDisk 只缓存到磁盘上
SDImageCacheTypeMemory 只缓存到内存中
1.11 SDWebImageDownloaderProgressBlock 下载进度
typedef void(^SDWebImageDownloaderProgressBlock)(NSInteger receivedSize, NSInteger expectedSize);
progress 参数:
receivedSize 接收到的字节数
expectedSize 期望下载的字节数
//乘1.0是为了转换成float类型
float progress = receivedSize * 1.0 / expectedSize;
NSURL *url = [NSURL URLWithString:@"http://picview01.baomihua.com/photos/20120624/m_14_634761470842343750_15728444.jpg"];
[self.imageView sd_setImageWithURL:url placeholderImage:nil options:0 progress:^(NSInteger receivedSize, NSInteger expectedSize) {
//乘1.0是为了转换成float类型
float progress = receivedSize * 1.0 / expectedSize;
NSLog(@"下载进度 %f",progress);
} completed:^(UIImage *image, NSError *error, SDImageCacheType cacheType, NSURL *imageURL) {
NSLog(@"完成");
}];
1.12 SDWebImageOptions 属性
typedef NS_OPTIONS(NSUInteger, SDWebImageOptions) {
// 默认情况下,当URL下载失败时,URL会被列入黑名单,导致库不会再去重试,该标记用于禁用黑名单
SDWebImageRetryFailed = 1 << 0,
// 默认情况下,图片下载开始于UI交互,该标记禁用这一特性,这样下载延迟到UIScrollView减速时
SDWebImageLowPriority = 1 << 1,
// 该标记禁用磁盘缓存
SDWebImageCacheMemoryOnly = 1 << 2,
// 该标记启用渐进式下载,图片在下载过程中是渐渐显示的,如同浏览器一下。
// 默认情况下,图像在下载完成后一次性显示
SDWebImageProgressiveDownload = 1 << 3,
// 即使图片缓存了,也期望HTTP响应cache control,并在需要的情况下从远程刷新图片。
// 磁盘缓存将被NSURLCache处理而不是SDWebImage,因为SDWebImage会导致轻微的性能下载。
// 该标记帮助处理在相同请求URL后面改变的图片。如果缓存图片被刷新,则完成block会使用缓存图片调用一次
// 然后再用最终图片调用一次
SDWebImageRefreshCached = 1 << 4,
// 在iOS 4+系统中,当程序进入后台后继续下载图片。这将要求系统给予额外的时间让请求完成
// 如果后台任务超时,则操作被取消
SDWebImageContinueInBackground = 1 << 5,
// 通过设置NSMutableURLRequest.HTTPShouldHandleCookies = YES;来处理存储在NSHTTPCookieStore中的cookie
SDWebImageHandleCookies = 1 << 6,
// 允许不受信任的SSL认证
SDWebImageAllowInvalidSSLCertificates = 1 << 7,
// 默认情况下,图片下载按入队的顺序来执行。该标记将其移到队列的前面,
// 以便图片能立即下载而不是等到当前队列被加载
SDWebImageHighPriority = 1 << 8,
// 默认情况下,占位图片在加载图片的同时被加载。该标记延迟占位图片的加载直到图片已以被加载完成
SDWebImageDelayPlaceholder = 1 << 9,
// 通常我们不调用动画图片的transformDownloadedImage代理方法,因为大多数转换代码可以管理它。
// 使用这个票房则不任何情况下都进行转换。
SDWebImageTransformAnimatedImage = 1 << 10,
};
运用如下:
运用上面的两个

SDWebImageRetryFailed : 下载失败后,会自动重新下载
SDWebImageLowPriority : 当正在进行UI交互时,自动暂停内部的一些下载操作
SDWebImageRetryFailed | SDWebImageLowPriority : 拥有上面2个功能


- (UITableViewCell *)tableView:(UITableView *)tableView cellForRowAtIndexPath:(NSIndexPath *)indexPath
{
    static NSString *ID = @"app";
    UITableViewCell *cell = [tableView dequeueReusableCellWithIdentifier:ID];
    if (!cell) {
        cell = [[UITableViewCell alloc] initWithStyle:UITableViewCellStyleSubtitle reuseIdentifier:ID];
    }

    // 取出模型
    HMApp *app = self.apps[indexPath.row];

    // 设置基本信息
    cell.textLabel.text = app.name;
    cell.detailTextLabel.text = app.download;

    // 下载图片
    NSURL *url = [NSURL URLWithString:app.icon];
    UIImage *placeholder = [UIImage imageNamed:@"placeholder"];

    SDWebImageOptions options = SDWebImageRetryFailed | SDWebImageLowPriority;

    [cell.imageView sd_setImageWithURL:url placeholderImage:placeholder options:options progress:^(NSInteger receivedSize, NSInteger expectedSize) { // 这个block可能会被调用多次
        NSLog(@"下载进度:%f", (double)receivedSize / expectedSize);
    } completed:^(UIImage *image, NSError *error, SDImageCacheType cacheType, NSURL *imageURL) {
        NSLog(@"----图片加载完毕---%@", image);
    }];
    return cell;
}
1.1.3 下载顺序SDWebImageDownloaderExecutionOrder
typedef NS_ENUM(NSInteger, SDWebImageDownloaderExecutionOrder) {

    // 以队列的方式,按照先进先出的顺序下载。这是默认的下载顺序
    SDWebImageDownloaderFIFOExecutionOrder,

    // 以栈的方式,按照后进先出的顺序下载。
    SDWebImageDownloaderLIFOExecutionOrder
};
1.1.4 SDWebImageDecoder类异步对图像进行了一次解压
由于UIImage的imageWithData函数是每次画图的时候才将Data解压成ARGB的图像,所以在每次画图的时候,会有一个解压操作,这样效率很低,但是只有瞬时的内存需求。为了提高效率通过SDWebImageDecoder将包装在Data下的资源解压,然后画在另外一张图片上,这样这张新图片就不再需要重复解压了。这种做法是典型的空间换时间的做法。
1.1.5 SDImageCache是怎么做数据管理的
SDImageCache分两个部分,一个是内存层面的,一个是硬盘层面的。内存层面的相当是个缓存器,以Key-Value的形式存储图片。当内存不够的时候会清除所有缓存图片。用搜索文件系统的方式做管理,文件替换方式是以时间为单位,剔除时间大于一周的图片文件。当SDWebImageManager向SDImageCache要资源时,先搜索内存层面的数据,如果有直接返回,没有的话去访问磁盘,将图片从磁盘读取出来,然后调SDWebImageDecoder做Decoder,将图片对象放到内存层面做备份,再返回调用层。
1.1.6 SDWebImage内部实现过程
1. 入口 setImageWithURL:placeholderImage:options: 会先把 placeholderImage 显示,然后 SDWebImageManager 根据 URL 开始处理图片。?
2. 进入 SDWebImageManager-downloadWithURL:delegate:options:userInfo:,交给 SDImageCache 从缓存查找图片是否已经下载 queryDiskCacheForKey:delegate:userInfo:.?
3. 先从内存图片缓存查找是否有图片,如果内存中已经有图片缓存,SDImageCacheDelegate 回调 imageCache:didFindImage:forKey:userInfo: 到 SDWebImageManager。?
4. SDWebImageManagerDelegate 回调 webImageManager:didFinishWithImage: 到 UIImageView+WebCache 等前端展示图片。?
5. 如果内存缓存中没有,生成 NSInvocationOperation 添加到队列开始从硬盘查找图片是否已经缓存。?
6. 根据 URLKey 在硬盘缓存目录下尝试读取图片文件。这一步是在 NSOperation 进行的操作,所以回主线程进行结果回调 notifyDelegate:。?
7. 如果上一操作从硬盘读取到了图片,将图片添加到内存缓存中(如果空闲内存过小,会先清空内存缓存)。SDImageCacheDelegate 回调 imageCache:didFindImage:forKey:userInfo:。进而回调展示图片。?
8. 如果从硬盘缓存目录读取不到图片,说明所有缓存都不存在该图片,需要下载图片,回调 imageCache:didNotFindImageForKey:userInfo:。?
9. 共享或重新生成一个下载器 SDWebImageDownloader 开始下载图片。?
10. 图片下载由 NSURLConnection 来做,实现相关 delegate 来判断图片下载中、下载完成和下载失败。?
11. connection:didReceiveData: 中利用 ImageIO 做了按图片下载进度加载效果。?
12. connectionDidFinishLoading: 数据下载完成后交给 SDWebImageDecoder 做图片解码处理。?
13. 图片解码处理在一个 NSOperationQueue 完成,不会拖慢主线程 UI。如果有需要对下载的图片进行二次处理,最好也在这里完成,效率会好很多。?
14. 在主线程 notifyDelegateOnMainThreadWithInfo: 宣告解码完成,imageDecoder:didFinishDecodingImage:userInfo: 回调给 SDWebImageDownloader。?
15. imageDownloader:didFinishWithImage: 回调给 SDWebImageManager 告知图片下载完成。?
16. 通知所有的 downloadDelegates 下载完成,回调给需要的地方展示图片。?
17. 将图片保存到 SDImageCache 中,内存缓存和硬盘缓存同时保存。写文件到硬盘也在以单独 NSInvocationOperation 完成,避免拖慢主线程。?
18. SDImageCache 在初始化的时候会注册一些消息通知,在内存警告或退到后台的时候清理内存图片缓存,应用结束的时候清理过期图片。?
19. SDWI 也提供了 UIButton+WebCache 和 MKAnnotationView+WebCache,方便使用。?
20. SDWebImagePrefetcher 可以预先下载图片,方便后续使用。
二 知识点
2.1 typedef定义Block
这样定义方法时直接用typedef的类型,只要有引入此头文件,都可以使用到,在block里面进行主线程操作,这样就可以省得在调用时每个地方都写;
SDImageCache.h文件:

typedef void(^SDWebImageQueryCompletedBlock)(UIImage *image, SDImageCacheType cacheType);

@interface SDImageCache : NSObject

- (NSOperation *)queryDiskCacheForKey:(NSString *)key done:(SDWebImageQueryCompletedBlock)doneBlock;

@end


SDImageCache.m文件

- (NSOperation *)queryDiskCacheForKey:(NSString *)key done:(SDWebImageQueryCompletedBlock)doneBlock {
    if (!doneBlock) {
        return nil;
    }

    if (!key) {
        doneBlock(nil, SDImageCacheTypeNone);
        return nil;
    }

    // First check the in-memory cache...
    UIImage *image = [self imageFromMemoryCacheForKey:key];
    if (image) {
        doneBlock(image, SDImageCacheTypeMemory);
        return nil;
    }

    NSOperation *operation = [NSOperation new];
    dispatch_async(self.ioQueue, ^{
        if (operation.isCancelled) {
            return;
        }

        @autoreleasepool {
            UIImage *diskImage = [self diskImageForKey:key];
            if (diskImage && self.shouldCacheImagesInMemory) {
                NSUInteger cost = SDCacheCostForImage(diskImage);
                [self.memCache setObject:diskImage forKey:key cost:cost];
            }

            dispatch_async(dispatch_get_main_queue(), ^{
                doneBlock(diskImage, SDImageCacheTypeDisk);
            });
        }
    });

    return operation;
}
2.2 SDWebImage 有两个宏 来判断程序在主线程运行(sync同步 async异步)
#define dispatch_main_sync_safe(block)    if ([NSThread isMainThread]) {        block();    } else {        dispatch_sync(dispatch_get_main_queue(), block);    }

#define dispatch_main_async_safe(block)    if ([NSThread isMainThread]) {        block();    } else {        dispatch_async(dispatch_get_main_queue(), block);    }
运用如下:
if ([self showActivityIndicatorView]) {
            [self addActivityIndicator];
        }

        __weak __typeof(self)wself = self;
        id <SDWebImageOperation> operation = [SDWebImageManager.sharedManager downloadImageWithURL:url options:options progress:progressBlock completed:^(UIImage *image, NSError *error, SDImageCacheType cacheType, BOOL finished, NSURL *imageURL) {
            [wself removeActivityIndicator];
            if (!wself) return;
            dispatch_main_sync_safe(^{
                if (!wself) return;
                if (image && (options & SDWebImageAvoidAutoSetImage) && completedBlock)
                {
                    completedBlock(image, error, cacheType, url);
                    return;
                }
                else if (image) {
                    wself.image = image;
                    [wself setNeedsLayout];
                } else {
                    if ((options & SDWebImageDelayPlaceholder)) {
                        wself.image = placeholder;
                        [wself setNeedsLayout];
                    }
                }
                if (completedBlock && finished) {
                    completedBlock(image, error, cacheType, url);
                }
            });
        }];
        [self sd_setImageLoadOperation:operation forKey:@"UIImageViewImageLoad"];
2.3 三元?:符号的运用
[self sd_setImageWithURL:url placeholderImage:lastPreviousCachedImage ?: placeholder options:options progress:progressBlock completed:completedBlock];
若?后面的值 lastPreviousCachedImage则可以这么简单写
2.4 SDWebImage 部分清除缓存的原理
部分清理则是根据我们设定的一些参数值来移除一些文件,这里主要有两个指标:文件的缓存有效期及最大缓存空间大小。文件的缓存有效期可以通过maxCacheAge属性来设置,默认是1周的时间。如果文件的缓存时间超过这个时间值,则将其移除。而最大缓存空间大小是通过maxCacheSize属性来设置的,如果所有缓存文件的总大小超过这一大小,则会按照文件最后修改时间的逆序,以每次一半的递归来移除那些过早的文件,直到缓存的实际大小小于我们设置的最大使用空间。清理的操作在-cleanDiskWithCompletionBlock:方法中,其实现如下:
- (void)cleanDiskWithCompletionBlock:(SDWebImageNoParamsBlock)completionBlock {
    dispatch_async(self.ioQueue, ^{
        NSURL *diskCacheURL = [NSURL fileURLWithPath:self.diskCachePath isDirectory:YES];
        NSArray *resourceKeys = @[NSURLIsDirectoryKey, NSURLContentModificationDateKey, NSURLTotalFileAllocatedSizeKey];

        // 1. 该枚举器预先获取缓存文件的有用的属性
        NSDirectoryEnumerator *fileEnumerator = [_fileManager enumeratorAtURL:diskCacheURL
                                                   includingPropertiesForKeys:resourceKeys
                                                                      options:NSDirectoryEnumerationSkipsHiddenFiles
                                                                 errorHandler:NULL];

        NSDate *expirationDate = [NSDate dateWithTimeIntervalSinceNow:-self.maxCacheAge];
        NSMutableDictionary *cacheFiles = [NSMutableDictionary dictionary];
        NSUInteger currentCacheSize = 0;

        // 2. 枚举缓存文件夹中所有文件,该迭代有两个目的:移除比过期日期更老的文件;存储文件属性以备后面执行基于缓存大小的清理操作
        NSMutableArray *urlsToDelete = [[NSMutableArray alloc] init];
        for (NSURL *fileURL in fileEnumerator) {
            NSDictionary *resourceValues = [fileURL resourceValuesForKeys:resourceKeys error:NULL];

            // 3. 跳过文件夹
            if ([resourceValues[NSURLIsDirectoryKey] boolValue]) {
                continue;
            }

            // 4. 移除早于有效期的老文件
            NSDate *modificationDate = resourceValues[NSURLContentModificationDateKey];
            if ([[modificationDate laterDate:expirationDate] isEqualToDate:expirationDate]) {
                [urlsToDelete addObject:fileURL];
                continue;
            }

            // 5. 存储文件的引用并计算所有文件的总大小,以备后用
            NSNumber *totalAllocatedSize = resourceValues[NSURLTotalFileAllocatedSizeKey];
            currentCacheSize += [totalAllocatedSize unsignedIntegerValue];
            [cacheFiles setObject:resourceValues forKey:fileURL];
        }

        for (NSURL *fileURL in urlsToDelete) {
            [_fileManager removeItemAtURL:fileURL error:nil];
        }

        // 6.如果磁盘缓存的大小大于我们配置的最大大小,则执行基于文件大小的清理,我们首先删除最老的文件
        if (self.maxCacheSize > 0 && currentCacheSize > self.maxCacheSize) {
            // 7. 以设置的最大缓存大小的一半作为清理目标
            const NSUInteger desiredCacheSize = self.maxCacheSize / 2;

            // 8. 按照最后修改时间来排序剩下的缓存文件
            NSArray *sortedFiles = [cacheFiles keysSortedByValueWithOptions:NSSortConcurrent
                                                            usingComparator:^NSComparisonResult(id obj1, id obj2) {
                                                                return [obj1[NSURLContentModificationDateKey] compare:obj2[NSURLContentModificationDateKey]];
                                                            }];

            // 9. 删除文件,直到缓存总大小降到我们期望的大小
            for (NSURL *fileURL in sortedFiles) {
                if ([_fileManager removeItemAtURL:fileURL error:nil]) {
                    NSDictionary *resourceValues = cacheFiles[fileURL];
                    NSNumber *totalAllocatedSize = resourceValues[NSURLTotalFileAllocatedSizeKey];
                    currentCacheSize -= [totalAllocatedSize unsignedIntegerValue];

                    if (currentCacheSize < desiredCacheSize) {
                        break;
                    }
                }
            }
        }
                              if (completionBlock) {
            dispatch_async(dispatch_get_main_queue(), ^{
                completionBlock();
            });
        }
    });
}
2.5 查看IOS沙盒中文件的属性(修改日期,创建日期,大小等)
 NSString *strPath =[[NSBundle mainBundle] pathForResource:@"lomo.jpg" ofType:nil];
    NSLog(@"path:%@", strPath);
    NSFileManager *fileManager = [NSFileManager defaultManager];
    NSString *path = strPath;//@"/tmp/List";
    NSError *error = nil;
    NSDictionary *fileAttributes = [fileManager attributesOfItemAtPath:path error:&error];

    if (fileAttributes != nil) {
        NSNumber *fileSize = [fileAttributes objectForKey:NSFileSize];
        NSString *fileOwner = [fileAttributes objectForKey:NSFileOwnerAccountName];
        NSDate *fileModDate = [fileAttributes objectForKey:NSFileModificationDate];
        NSDate *fileCreateDate = [fileAttributes objectForKey:NSFileCreationDate];
        if (fileSize) {
            NSLog(@"File size: %qi\n", [fileSize unsignedLongLongValue]);
        }
        if (fileOwner) {
            NSLog(@"Owner: %@\n", fileOwner);
        }
        if (fileModDate) {
            NSLog(@"Modification date: %@\n", fileModDate);
        }
        if (fileCreateDate) {
            NSLog(@"create date:%@\n", fileModDate);
        }
    }
    else {
        NSLog(@"Path (%@) is invalid.", path);
    }
2.6 遍历文件NSDirectoryEnumerator
需要获得目录的内容列表,使用enumeratorAtPath:方法或者directoryC ontentsAtPath:方法,可以完成枚举过程。如果使用第一种enumeratorAtPath:方法,一次可以枚举指定目录中的每个文件。默认情况下,如果其中一个文件为目录,那么也会递归枚举它的内容。在这个过程中,通过向枚举对象发送一条skipDescendants消息,可以动态地阻止递归过程,从而不再枚举目录中的内容。对于directoryContentsAtPath:方法,使用这个方法,可以枚举指定目录的内容,并在一个数组中返回文件列表。如果这个目录中的任何文件本身是个目录,这个方法并不递归枚举它的内容。
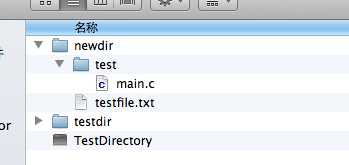
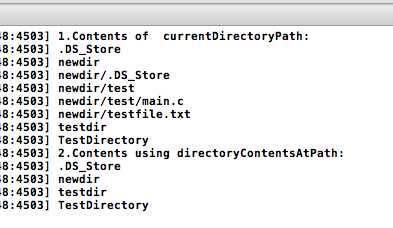
        NSString *path;
        NSFileManager *fm;
        NSDirectoryEnumerator *dirEnum;
        NSArray *dirArray;

        fm = [NSFileManager defaultManager];

        //获取当前的工作目录的路径
        path = [fm currentDirectoryPath];

        //遍历这个目录的第一种方法:(深度遍历,会递归枚举它的内容)
        dirEnum = [fm enumeratorAtPath:path];

        NSLog(@"1.Contents of %@:",path);
        while ((path = [dirEnum nextObject]) != nil)
        {
            NSLog(@"%@",path);
        }

        //遍历目录的另一种方法:(不递归枚举文件夹种的内容)
        dirArray = [fm directoryContentsAtPath:[fm currentDirectoryPath]];
        NSLog(@"2.Contents using directoryContentsAtPath:");

        for(path in dirArray)
            NSLog(@"%@",path);
通过以上程序变例如下文件路径:
如果对上述代码while循环做如下修改,可以阻止任何子目录中的枚举
while ((path = [dirEnum nextObject]) != nil)
{

    NSLog(@"%@",path);

    BOOL flag;
    [fm fileExistsAtPath:path isDirectory:&flag];
    if(flag == YES)
        [dirEnum skipDescendants];
}
这里flag是一个BOOL类型的变量。如果指定的路径是目录,则fileExistsAtPath:在flag中存储YES,否则存储NO。
2.7 SDImageCache 后台运行通知注册
先说说iOS 应用程序5个状态;
停止运行-应用程序已经终止,或者还未启动。
不活动-应用程序处于前台但不再接收事件(例如,用户在app处于活动时锁住了设备)。
活动-app处于“使用中”的状态。
后台-app不再屏幕上显示,但它仍然执行代码。
挂起-app仍然驻留内存但不再执行代码。
按下Home键时,app从活动状态转入后台,绝大部分app通常在几秒内就从后台变成了挂起。从 iOS 4 开始,应用就可以在退到后台后,继续运行一小段时间(10 分钟);iOS 7 需要注意的区别:iOS 7 以前,应用进入后台继续运行时,如果用户锁屏了,那么 iOS 会等待应用运行完,才进入睡眠状态。而在 iOS 7 上,系统会很快进入睡眠状态,那些后台应用也就暂停了。如果收到事件被唤醒(例如定时事件、推送、位置更新等),后台应用才能继续运行一会。因为处理过程变成了断断续续的。更多关于后台运行的知识可以查看这文章或这文章;
a:如果是在程序的AppDelegate里面,就可以直接在这个方法里面处理;
// 当应用程序掉到后台时,执行该方法
- (void)applicationDidEnterBackground:(UIApplication *)application
{

}
b:如果是自个的类或控制器要处理,比如进入后台当前页或类的一些信息要进行保存;那么就要注册系统的通知;下面SDImageCache 里面的实现代码进行讲解;
- (id)initWithNamespace:(NSString *)ns diskCacheDirectory:(NSString *)directory {
    if ((self = [super init])) {

        [[NSNotificationCenter defaultCenter] addObserver:self
                                                 selector:@selector(backgroundCleanDisk)
                                                     name:UIApplicationDidEnterBackgroundNotification
                                                   object:nil];
    }

    return self;
}


- (void)backgroundCleanDisk {
    Class UIApplicationClass = NSClassFromString(@"UIApplication");
    if(!UIApplicationClass || ![UIApplicationClass respondsToSelector:@selector(sharedApplication)]) {
        return;
    }
    UIApplication *application = [UIApplication performSelector:@selector(sharedApplication)];
    __block UIBackgroundTaskIdentifier bgTask = [application beginBackgroundTaskWithExpirationHandler:^{
       //完成后,要告诉iOS,任务完成,提交完成申请“好借好还”
       //标记指定的后台任务完成
       [application endBackgroundTask:bgTask];
        //销毁后台任务标识符
        bgTask = UIBackgroundTaskInvalid;
    }];

    // 调用本地的方法,在完成后再进行进入挂起,完成后,要告诉iOS,任务完成,提交完成申请“好借好还”
    [self cleanDiskWithCompletionBlock:^{
        [application endBackgroundTask:bgTask];
        bgTask = UIBackgroundTaskInvalid;
    }];
}

//记得删除通知
- (void)dealloc {
    [[NSNotificationCenter defaultCenter] removeObserver:self];
}
注意:UIApplication这边是通过运行时获取;UIBackgroundTaskIdentifier知识点可以看介绍;当一个 iOS 应用被送到后台,它的主线程会被暂停。你用 NSThread 的 detachNewThreadSelector:toTar get:withObject:类方法创建的线程也被挂起了。如果你想在后台完成一个长期任务,就必须调用 UIApplication 的beginBackgroundTaskWithExpirationHandler:实例方法,来向 iOS 借点时间。默认情况下,如果在这个期限内,长期任务没有被完成,iOS 将终止程序。怎么办?可以使用 beginBackgroundTaskWithExpirationHandler:实例方法,来向 iOS 再借点时间。借和换必须成双成对!程序提前完成了,也可以提前结束(当然上面还是要用application):
[[UIApplication sharedApplication] endBackgroundTask:self.backgroundTaskIdentifier];
            self.backgroundTaskIdentifier = UIBackgroundTaskInvalid;
标签:
原文地址:http://www.cnblogs.com/wujy/p/5578893.html