标签:
在此之前,我们已经创建了一个通过简单的表视图应用程序并显示预定义的图像。在本教程中,我们将继续努力,使应用程序变得更好,:
>不同的行显示不同的图像 - 上个教程,我们的所有行显示相同的缩略图。那么不同的食物显示不同的图片不是更好么?
>自定义视图单元-我们将展示我们自己的视图来替代默认表单元格样式
在我们更改代码之前,让我们回顾显示缩略图的代码。

最后,我们增加了一个行代码指示UITableView每一行显示“creme_brelee.jpg”这张图片。显然,为了显示不同的图像,我们需要改变这行代码。正如之前解释的那样,IOS在显示一条表单元格时自动调用“cellForRowAtIndexPath”方法
|
1
|
- (UITableViewCell *)tableView:(UITableView *)tableView
cellForRowAtIndexPath:(NSIndexPath *)indexPath
|
看看该方法的参数,每次调用时通过“indexPath”来传递表单元格信息。indexPath参数包含的表单元格的行数(以及节号)。您可以简单地使用“indexPath.row”属性,找出当前指向哪一行。和数组一样,表行的计数从零开始。换言之,对于第一行“indexPath.row”返回0。
因此,为了显示不同的缩略图,我们将添加一个新的数组(即缩略图),存储文件名的缩略图:
|
1
2 3 4 5 6 7 8 9 10 11 12 13 14 15 |
@implementation SimpleTableViewController
{ NSArray *tableData; NSArray *thumbnails; } - (void)viewDidLoad { [super viewDidLoad]; // Initialize table data tableData = [NSArray arrayWithObjects:@"Egg Benedict", @"Mushroom Risotto", @"Full Breakfast", @"Hamburger", @"Ham and Egg Sandwich", @"Creme Brelee", @"White Chocolate Donut", @"Starbucks Coffee", @"Vegetable Curry", @"Instant Noodle with Egg", @"Noodle with BBQ Pork", @"Japanese Noodle with Pork", @"Green Tea", @"Thai Shrimp Cake", @"Angry Birds Cake", @"Ham and Cheese Panini", nil]; // Initialize thumbnails thumbnails = [NSArray arrayWithObjects:@"egg_benedict.jpg", @"mushroom_risotto.jpg", @"full_breakfast.jpg", @"hamburger.jpg", @"ham_and_egg_sandwich.jpg", @"creme_brelee.jpg", @"white_chocolate_donut.jpg", @"starbucks_coffee.jpg", @"vegetable_curry.jpg", @"instant_noodle_with_egg.jpg", @"noodle_with_bbq_pork.jpg", @"japanese_noodle_with_pork.jpg", @"green_tea.jpg", @"thai_shrimp_cake.jpg", @"angry_birds_cake.jpg", @"ham_and_cheese_panini.jpg", nil]; } |
正如你可以从上面的代码中看到的,我们用图像文件名列表初始化了的缩略图数组。图像的顺序排列与“tableData”对齐。
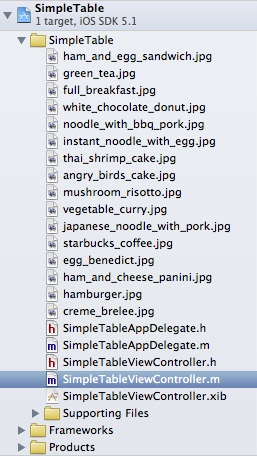
为了您的方便,您可以下载该图像包,并把它们添加到您的项目,确保“Copy items into destination group’s folder”已勾选当然你也可以用自己的图片。
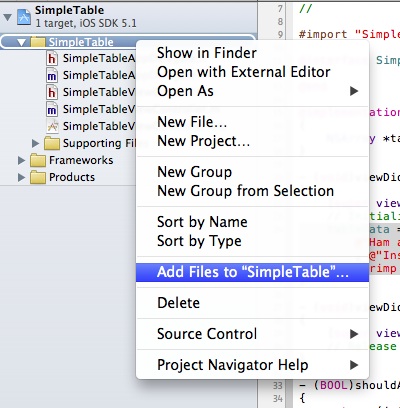
添加的图像文件后,你应该会在Project Navigator中发现他们,如下面的屏幕:
最后,更改在cellForRowAtIndexPath“方法的代码:
|
1
|
cell.imageView.image = [ UIImage的imageNamed :[缩略图objectAtIndex : indexPath.row ] ] ;
|
这行代码获取特定行的图像名字。就是说,indexPath.row属性对于第一行返回0,我们使用“objectAtIndex”的方法选取图像数组的第一个(即egg_benedict.jpg)。
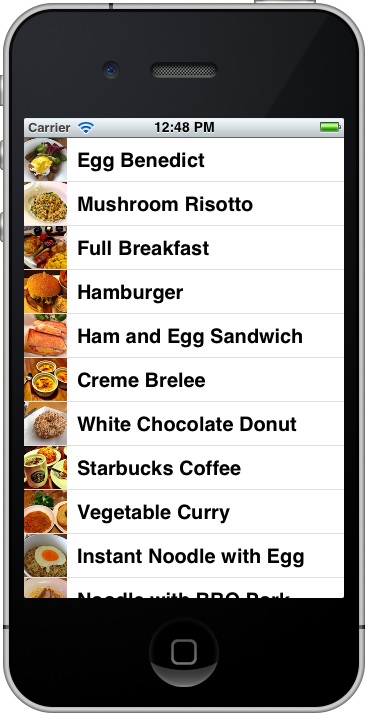
保存所有的更改后,再次尝试运行您的应用程序。现在应该不同的表中单元格显示缩略图:
应用程序是否可以更好看?我们将通过自定义表格单元格使其更好看。到目前为止,我们使用的默认样式显示表单元格,而且缩略图的位置和大小是固定的。如果你想就像下面的屏幕显示的那样使缩略图更大并附上每个菜的准备时间,怎么办?
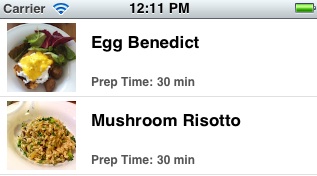
不同风格的自定义表格视图单元格
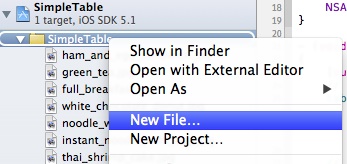
在这种情况下,你必须创建和设计自己的表格单元格。返回到Xcode。在项目浏览器中,右键单击“SimpleTable”文件夹并选择“New File ...”。
为了设计我们自己的表格单元格,我们要创建一个新的表格单元格界面生成器。在这种情况下,我们只需要启动一个“空”的用户界面。点击“下一步”继续。
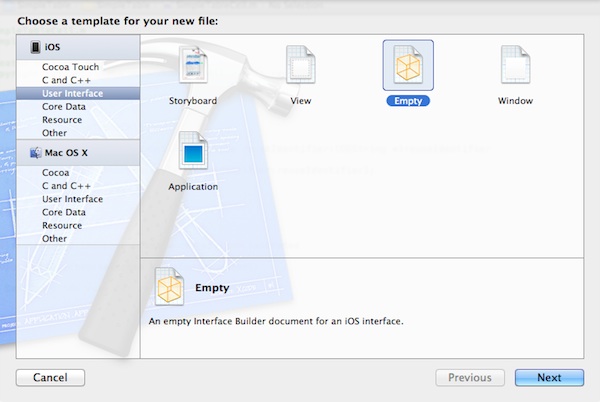
选择一个空的Interface Builder文档
当提示选择设备系列时,选择“iPhone”,然后单击“下一步”继续。保存的文件为“SimpleTableCell”。
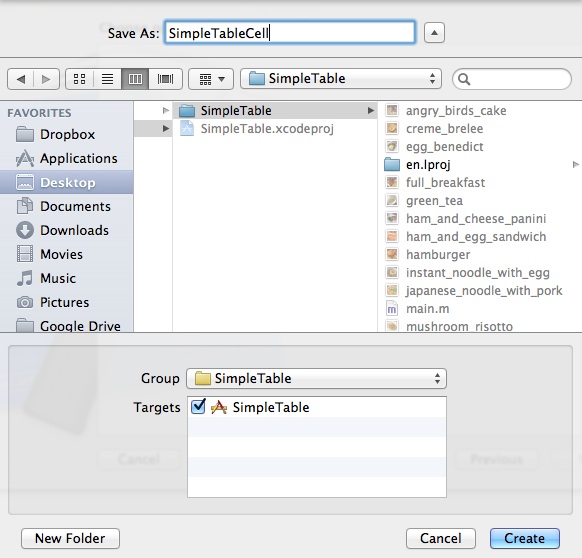
一旦该文件被创建时,你就能在Project Navigator中找到它。选择“SimpleTableCell.xib”切换到界面生成器。我们要设计的自定义表格单元格的外观。
在对象库中,选择“Table View Cell(表格视图单元格)”,将其拖动到界面生成器的设计区域。
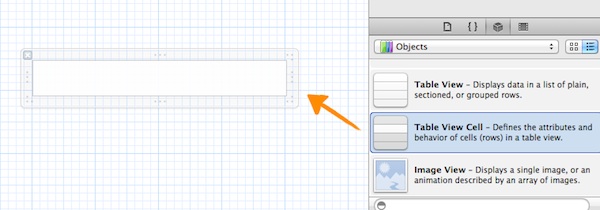
为了容纳更大的缩略图,我们要改变单元格的高度。只要按住下/上侧的单元格边缘并缩放到高度78。
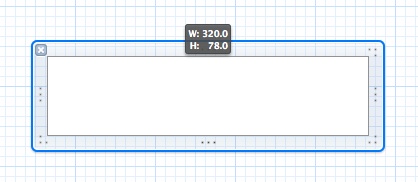
或者,您也可以使用“Size Inspector”改变高度。
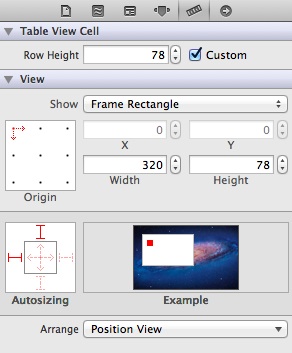
表查看单元格的尺寸督察
下一步,选择“Attributes Inspector(属性检查器)“的上半部分的通用区域来为自定义单元格“SimpleTableCell”设置“Identifier(标识符)”。这个标识符将在后面的代码中使用。
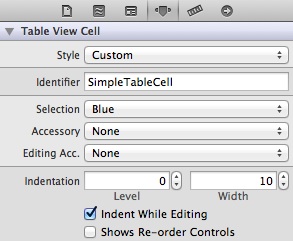
表格单元格视图配置好之后,我们将往他里面放其他元素。选择“Image View”,并把它拖到表视图单元格。
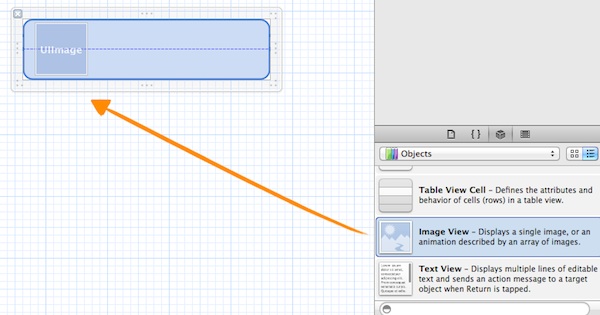
image view用于显示缩略图。您可以调整其大小,使其适合单元格。参考数值,我设置的高度和宽度为69像素。
接下来,我们将添加三个标签:Name(姓名),Prep Time(准备时间)和Time(时间)。“Name”标签将用于显示配方的名称。“Prep Time”是一个静态的标签,只显示“准备时间”。最后,“Time”的标签是一个动态的标签被用于显示实际的具体菜肴的准备时间。
要添加一个标签,在Object library(对象库)中选择“标签”,将其拖动到单元格中。您可以双击标签以更改其名称。

和上面所显示的做比较,您可能会发现您的字体大小和样式是不同的。要更改字体样式,只需选择标签并选择“Attribute Inspector(属性检查器)”。从这里,你可以改变“字体”和最小字体大小的设置。您也可以通过检查更改文本颜色和对齐方式。
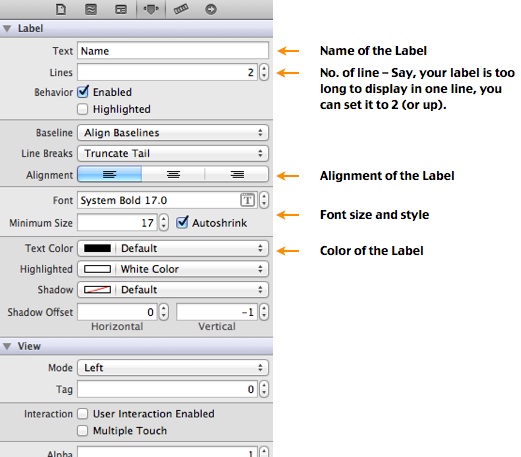
您的最终设计应该类似于这样:
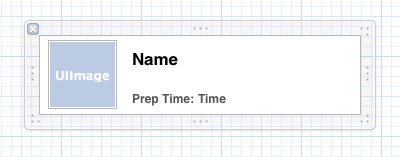
到目前为止,我们已经设计了表格单元格。但如何才能改变自定义单元格的标签值吗?我们要为自定义表视图单元格创建一个新的类。这个类代表了自定义单元格的底层数据模型。
就像以前一样,右键单击“SimpleTable的项目浏览器”文件夹中,然后选择“新建文件”。
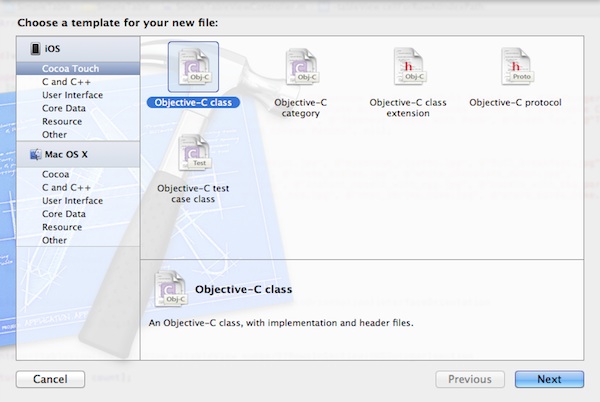
选择一个新的文件模板
选择该选项后,Xcode会提示你选择一个模板。我们要创建一个新的自定义表格视图单元格类,选择“Objective-C类”下的“Cocoa Touch”,然后单击“下一步”。
为您的项目创建新的文件
类名填写“SimpleTableCell”,选中"Subclass of "里的“UITableViewCell”。
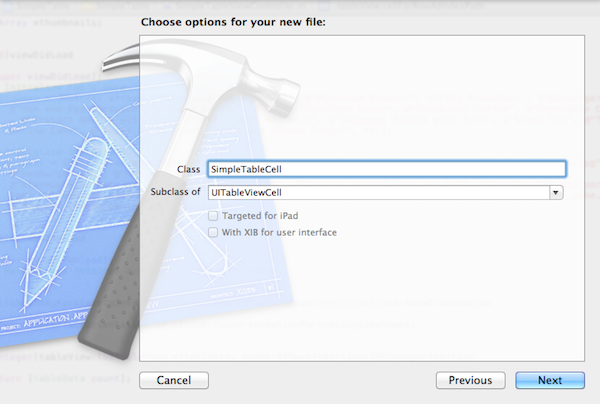
单击“下一步”,保存的文件在SimpleTable项目文件夹,并单击“创建”继续。Xcode将在Project Navigator中创建两个名为“SimpleTableCell.h”文件和“SimpleTableCell.m”。
正如前面提到的中,SimpleTableCell类作为自定义单元格的数据模型。在单元格中,我们有三个值是可变的:thumbnail image view(缩略图图像视图),name label(名称标签)和time label(时间标签)。在这个类里,我们将添加三个属性来表示这些动态值。
打开“SimpleTableCell.h”和之前的“@end”行中添加以下属性:
|
1
2 3 |
@property (nonatomic, weak) IBOutlet
UILabel *nameLabel;
@property (nonatomic, weak) IBOutlet UILabel *prepTimeLabel; @property (nonatomic, weak) IBOutlet UIImageView *thumbnailImageView; |
@property (attributes) type name;
参考上面的代码,weak和nonatomic是attributes。UILabel和UIImageView是type,而“nameLabel”,“prepTimeLabel”和“thumbnailImageView”是name。
那么,IBOutlet是什么?你可以把IBOutlet想成一个指令。为了与表视图单元格(即SimpleTableCell.xib)中的元素相关联,我们使用关键字“IBOutlet”让Interface Builder中知道,他们被允许连接。后来,你会看到如何使这些outlets和在Interface Builder中的对象之间的连接。
现在,打开“SimpleTableCell.m”,以下“@implementation SimpleTableCell”下面添加以下代码:
|
1
2 3 |
@synthesize nameLabel = _nameLabel;
@synthesize prepTimeLabel = _prepTimeLabel; @synthesize thumbnailImageView = _thumbnailImageView; |
保存更改并选择“SimpleTableCell.xib”回到Interface Builder中。现在我们可以在类的属性和Label/ ImageView之间创建连接。
首先,选择单元格,在“Identity Inspector”中把类改为“SimpleTableCell”,这样就可以在单元格视图和我们之前创建的类之间建立联系。
现在,我们要建立的连接的属性。右键单击"Objects"下的“SimpleTableCell”,以显示“Outlets”查询器。单击并按住“nameLabel”旁边的圆圈,并将其拖动到Label – Name”对象。Xcode会自动建立连接。
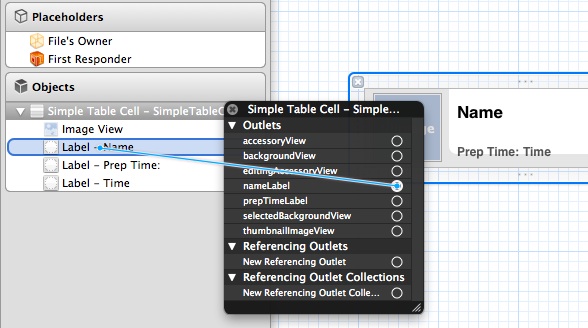
为“prepTimeLabel”和“thumbnailImageView”重复上述操作:
View”:
当你建立所有的连接后,它看起来应该是这样的:
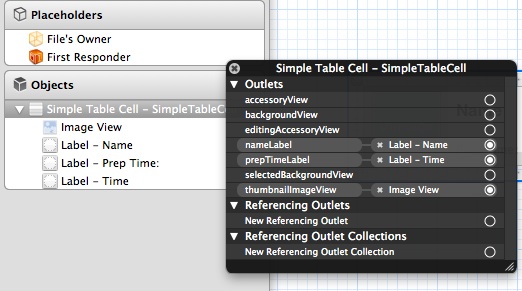
我们已经完成了自定义表格单元格的设计和编码。最后,我们来到最后修改的部分 - 确认自定义单元格放在SimpleTableViewController中。
让我们重温在“SimpleTableView.m”的代码:
|
1
2 3 4 5 6 7 8 9 10 11 12 13 14 15 |
- (UITableViewCell *)tableView:(UITableView *)tableView
cellForRowAtIndexPath:(NSIndexPath *)indexPath
{ static NSString *simpleTableIdentifier = @"SimpleTableItem"; UITableViewCell *cell = [tableView dequeueReusableCellWithIdentifier:simpleTableIdentifier]; if (cell == nil) { cell = [[UITableViewCell alloc] initWithStyle:UITableViewCellStyleDefault reuseIdentifier:simpleTableIdentifier]; } cell.textLabel.text = [tableData objectAtIndex:indexPath.row]; cell.imageView.image = [UIImage imageNamed:[thumbnails objectAtIndex:indexPath.row]]; return cell; } |
我们先前使用默认的表视图单元格(即UITableViewCell)显示的表项。为了使用我们的自定义表格单元格,我们必须改变在“SimpleTableView.m”代码:
|
1
2 3 4 5 6 7 8 9 10 11 12 13 14 15 16 17 |
- (UITableViewCell *)tableView:(UITableView *)tableView
cellForRowAtIndexPath:(NSIndexPath *)indexPath
{ static NSString *simpleTableIdentifier = @"SimpleTableCell"; SimpleTableCell *cell = (SimpleTableCell *)[tableView dequeueReusableCellWithIdentifier:simpleTableIdentifier]; if (cell == nil) { NSArray *nib = [[NSBundle mainBundle] loadNibNamed:@"SimpleTableCell" owner:self options:nil]; cell = [nib objectAtIndex:0]; } cell.nameLabel.text = [tableData objectAtIndex:indexPath.row]; cell.thumbnailImageView.image = [UIImage imageNamed:[thumbnails objectAtIndex:indexPath.row]]; cell.prepTimeLabel.text = [prepTime objectAtIndex:indexPath.row]; return cell; } |
然而,当你你更新代码后,,Xcode检测会有一些错误在源代码编辑器。

源代码的错误指示由Xcode
有什么问题吗?我们刚刚修改的代码告诉“SimpleTableViewController”去使用“SimpleTableCell”类的表格单元格。然而,“SimpleTableViewController”不知道“SimpleTableCell”类。这就是为什么Xcode会显示错误。
正如在第一个教程说的,一个头文件中声明一个类的接口。对于“SimpleTableViewController”要认识“SimpleTableCell”,我们必须在“SimpleTableViewController.m”导入“SimpleTableCell.h”。

导入SimpleTableCell.h
通过导入“SimpleTableCell.h”,“SimpleTableViewController”知道"SimpleTableCell是什么并可以利用它。
最后,由于表格单元格的高度改为78,在“@end”前面添加下面的代码。
|
1
2 3 4 |
- (CGFloat)tableView:(UITableView *)tableView
heightForRowAtIndexPath:(NSIndexPath *)indexPath
{ return 78; } |
现在,点击“Run”按钮和您的SimpleTable的应用程序看起来应该象下面这样:
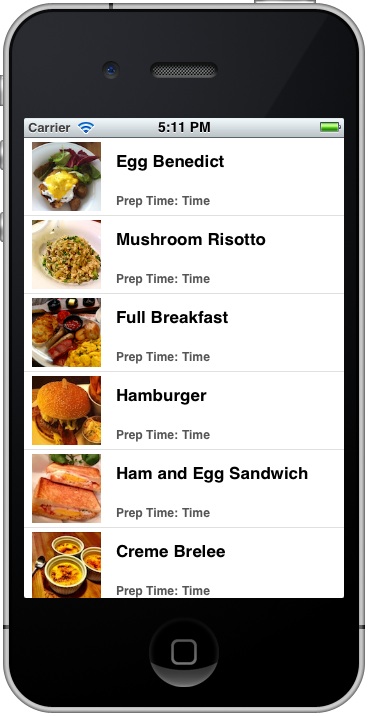
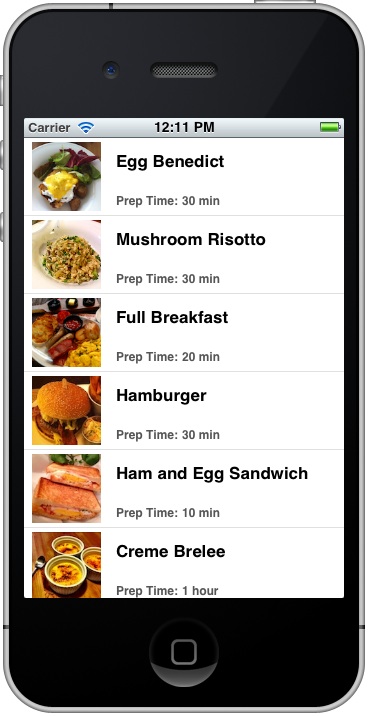
您可能会注意到应用程序没有显示具体时间。我故意把这个给你。尝试在你的代码做一些修改来更新准备时间。你最终的应用程序看起来非常类似下面的:
AutoLayout
StoryBoard
Automatic Adaptation Height
AutoLayout 是一种基于约束的描述性布局系统,一般来说,如果采用auto layout布局UI,代码里可以不用再出现setFame方法。描述性布局UI与生活更和谐,不是吗:】。更具体的在WWDC官方解释202 – Introduction to Auto Layout for iOS and OS X, 228 – Best Practices for Mastering Auto Layout, 232 – Auto Layout by Example。
由于现在手机应用大统一的趋势,所以了解新的布局系统是很有必要的。但是在实践过程中由于不够细心而经常受挫,也放弃过自动布局,特别是在项目中经常出现的TableViewCell自适应高度,死嗑几天终于解开心中最大疑惑:】
代码下载
intrinsic size 固有高宽
不是每个视图都有固有高宽。UILabel对比UIView在XIB中拖放布局时会有一个很好的感知,具有固有高宽的视图UILabel,不设置宽高时也不会出现miss constrainst红点,系统会根据要显示的字体确定一个首选高度,根据内容而确定一个首选宽度。详细说明可参照
H:|-(177)-[Click Me] V:[Click Me]-(48)-| VFL语言标注,感觉更有描述性 : ]
Compression Resistance Priority / Content Hugging Priority
这两个优先级隐性的存在每一个视图中,compression resistance 可认为视图不想被压缩,content Hugging 是不想被拉伸,它们都含有H/V两个方向。当设置高度或宽度优先级低于或等于隐性优先级时,视图就会首选intrinsic size进行布局[可参照]
[Click Me(130@500)]
场景:我们需要3个UILabel,title,subTitle都是多行文本,设置numberOfLines = 0;price为单行文本,但是宽度可由价格数目伸展,所以将会导致title,subTitle被压缩
这里注意两点
- 由于高度自适应,所以在V方向依靠compress/hug,而不应该出现优先级更高的手动设置Height
- 由于价格宽度变动原因,所以在H方向也应该能够compress/hug,而不应该全部设置Width
当采用默认优先级布局完之后,会发现3个Label在H方向出现Misplaced Views警告提示,告知我们布局与我们想要的不一致,点击price label如图提示
price label 在与其他2个label同优先级的情况下H方向被拉伸,按照我们思路price需要压缩,此时H方向的compress优先级降1,即749;其他2个label需要拉伸,此时H方向的hugging优先级降1,即250。此时再看警告没了。
如果还不够理解,试想想手写代码思路,首先先精确price的宽度,即压缩;然后计算其他2个label可拉伸的宽度
对于多行文本,我们还要显示选择title label,subtitle label 的首选宽度(Preferred Width)
当然在此要解决上面提到的第一个问题了,精确布局。按要求笑脸与父视图上下右边距10个像素,点击笑脸图,按住Option+光标移到父视图,确实边距是10个像素,注意了如果拖动创建约束,默认参照带Margin的父边沿,右键把Relative to margin勾选去掉,再设置constant
为10


或者用右下角pin创建约束,把constrain
to margin勾选去掉
好了,到此解决心中第一个大疑问,精确布局边距:】
由于autolayout是基于约束的布局,所以只有约束正确,才能精确算出高度,在此我们主要使用
除此以外还涉及到更新约束布局过程
视图显示要依赖布局,布局要依赖约束,所以当你改成autoLayout布局UI时就决定了凡事都先考虑约束constrainst,改变之前先考虑frame的习惯,以上这些在WWDC中都有提及,也可以参照[objc中国]。
一般情况下,通过约束计算视图高度使用方法systemLayoutSizeFittingSize,如示例返回tableviewcell的高度方法中写的:
直接调用systemLayoutSizeFittingSize不就行了吗?
当numberOfLines ==0时,preferredMaxLayoutWidth影响UILabel的Size;想要在不同屏幕大小的时候都能精准获取UILabel的高度,由于preferredMaxLayoutWidth不会自动更新,所以在cell的重写layoutSubviews中手动更新
注意:在重写layoutSubviews中必须先调用父视图[super layoutSubviews],[self.contentView layoutSubviews]以获取子视图的frame,如果我们有做任何改动影响到约束时,得在最后加上[super
layoutSubviews]用来更新约束,但是这里我们没有影响到约束,所以就没必要做这一步动作
为什么还要更改cell的bounds?
实际更新cell的bounds是要在返回- (UITableViewCell *)tableView:(UITableView *)tableView cellForRowAtIndexPath:(NSIndexPath *)indexPath 之后,所以在返回高度的代理里面就需要手动设置,这样才会获取精确高度,而且要在
[cell layoutIfNeeded]之前
为什么说systemLayoutSizeFittingSize只适合一般情况?
比如UITextView就是一个例外,它是继承于UIScrollView,看官方一句话先吧
The size of the content inside of a scroll view is determined by the constraints of its descendants.
至于什么是descendants constraints,可以认为是内容约束,textview里面的内容根本无法做约束嘛,当[textView systemLayoutSizeFittingSize:UILayoutFittingCompressedSize]自然返回0了。更准确的感知就是自己点击tableviewcell的contentview约束看看吧
可以使用sizeThatFits:计算textview高度,或boundingRectWithSize...计算textview.text的高度。
...estimatedHeightForRowAtIndexPath...代理方法返回估计高度值是官方推荐使用的,通常作法是返回一个常数,但是如果你所返回的高度与实际显示高度差到数量级别时,显示就会出现跳帧现象,特别是对于动态高度显示,这个返回值应该分情况以if...else方式提供比较精确的高度常量比较好。//UserTableViewCell.h这里定义第一种Cell #import <UIKit/UIKit.h> @interface UserTableViewCell : UITableViewCell @property (weak, nonatomic) IBOutlet UIImageView *userviewcellicon; @property (weak, nonatomic) IBOutlet UILabel *userviewcellname; @end
//UserTableViewCell2.h这里定义第二种Cell,
#import <UIKit/UIKit.h>
@interface UserTableViewCell2 : UITableViewCell
@property (weak, nonatomic) IBOutlet UILabel *name;
@property (weak, nonatomic) IBOutlet UIImageView *userviewcell2image;
@end
故事板里的TableView和Cell的class和Cell的Identifier就不说了
例:

2、设计好了这些东西后,开始进TableViewController里了:
//UserTableViewController.h
#import <UIKit/UIKit.h>

@interface UserTableViewController : UITableViewController


@property(nonatomic,strong) NSDictionary *UserViewCellDic;
@property (nonatomic, strong) NSArray *listGroupname;
@end
//UserTableViewController.m
#import "UserTableViewController.h"
#import "UserTableViewCell.h"
#import "UserTableViewCell2.h"
@interface UserTableViewController ()

@end

@implementation UserTableViewController

- (void)viewDidLoad
{
    [super viewDidLoad];
    self.tableView.separatorStyle = UITableViewCellAccessoryNone;//去除分割线
    NSBundle *bundle = [NSBundle mainBundle];
    NSString *plistpath = [bundle pathForResource:@"UserViewCell" ofType:@"plist"];
    self.UserViewCellDic = [[NSDictionary alloc]initWithContentsOfFile:plistpath];
    self.listGroupname = [self.UserViewCellDic allKeys];

    self.listGroupname = [self.listGroupname sortedArrayUsingSelector:@selector(compare:)];//排序
}


- (NSInteger)numberOfSectionsInTableView:(UITableView *)tableView//返回有几个Section
{

    return [self.listGroupname count];
}

- (NSString *)tableView:(UITableView *)tableView titleForHeaderInSection:(NSInteger)section//Section头名字设为空
{

    NSString *groupName = @" ";
    return groupName;
}


- (NSInteger)tableView:(UITableView *)tableView numberOfRowsInSection:(NSInteger)section//每个section的行数
{

    NSString *groupName = [self.listGroupname objectAtIndex:section];
    NSArray *listitem = [self.UserViewCellDic objectForKey:groupName];
    return [listitem count];

}
#pragma mark - TableViewDataSource

- (UITableViewCell *)tableView:(UITableView *)tableView cellForRowAtIndexPath:(NSIndexPath *)indexPath
{

    static NSString *UserViewCellIdentifier = @"UserTableViewCell";
    static NSString *UserViewCellIdentifier2 = @"UserTableViewCell2";
    NSUInteger section = [indexPath section];
    NSUInteger row = [indexPath row];
    NSString *groupName = [self.listGroupname objectAtIndex:section];
    NSArray *listitem = [self.UserViewCellDic objectForKey:groupName];
    NSDictionary *rowDict = [listitem objectAtIndex:row];

    if (0 == section) {
        UserTableViewCell2 *cell = [tableView dequeueReusableCellWithIdentifier:UserViewCellIdentifier2];
        cell.name.text = [rowDict objectForKey:@"name"];
        NSString *imagePath = [rowDict objectForKey:@"image"];
        imagePath = [imagePath stringByAppendingString:@".png"];
        cell.userviewcell2image.image = [UIImage imageNamed:imagePath];
        cell.accessoryType = UITableViewCellAccessoryDisclosureIndicator;//最后的箭头
        //画线
        UIView *view = [[UIView alloc]initWithFrame:CGRectMake(0, 79, 320, 1)];
        UIView *leftview = [[UIView alloc]initWithFrame:CGRectMake(0, 0, 3, 80)];
        UIView *rightview = [[UIView alloc]initWithFrame:CGRectMake(317, 0, 3, 80)];
        view.backgroundColor = [UIColor colorWithRed:43/255.0f green:43/255.0f blue:233/255.0f alpha:1];
        leftview.backgroundColor = [UIColor colorWithRed:43/255.0f green:43/255.0f blue:233/255.0f alpha:1];
        rightview.backgroundColor = [UIColor colorWithRed:43/255.0f green:43/255.0f blue:233/255.0f alpha:1];
        [cell.contentView addSubview:view];
        [cell.contentView addSubview:leftview];
        [cell.contentView addSubview:rightview];

        return cell;
    }else{
        UserTableViewCell *cell = [tableView dequeueReusableCellWithIdentifier:UserViewCellIdentifier];
        cell.userviewcellname.text = [rowDict objectForKey:@"name"];
        NSString *imagePath = [rowDict objectForKey:@"image"];
        imagePath = [imagePath stringByAppendingString:@".png"];
        cell.userviewcellicon.image = [UIImage imageNamed:imagePath];
        cell.accessoryType = UITableViewCellAccessoryDisclosureIndicator;//最后的箭头
        //画线
        UIView *view = [[UIView alloc]initWithFrame:CGRectMake(0, 39, 320, 1)];
        UIView *leftview = [[UIView alloc]initWithFrame:CGRectMake(0, 0, 3, 40)];
        UIView *rightview = [[UIView alloc]initWithFrame:CGRectMake(317, 0, 3, 40)];
        view.backgroundColor = [UIColor colorWithRed:43/255.0f green:43/255.0f blue:233/255.0f alpha:1];
        //alpha是透明度
        leftview.backgroundColor = [UIColor colorWithRed:43/255.0f green:43/255.0f blue:233/255.0f alpha:0.3];
        rightview.backgroundColor = [UIColor colorWithRed:43/255.0f green:43/255.0f blue:233/255.0f alpha:1];
        [cell.contentView addSubview:view];
        [cell.contentView addSubview:leftview];
        [cell.contentView addSubview:rightview];

         return cell;
    }


}

-(CGFloat)tableView:(UITableView *)tableView heightForRowAtIndexPath:(NSIndexPath *)indexPath//Cell的高度
{
    NSUInteger section = [indexPath section];
    if (0 == section) {
        return 80;
    }else{
        return 40;
    }

}
这里附上Plist文件:

3、运行效果:

写的不是特别的详细,如果有什么不明白的或者需要源码留邮箱!
关于自定义cell的问题,有两种方法,一种是用nib文件来实现,一种是直接在代码里面写控件。
可以看看这个,讲的比较细
blog.csdn.net/...790487
cell上的行中有按钮,那么可以在didSelect。。方法中写事件,当点击的时候显示button就好。
需要自定义三个UITableViewCell .
第一个是第一行那个带按钮的cell
@interface buttonCell :UITableViewCell @property (nonatomic,retain) IBOutlet UIButton *btn;@end第二个是第二行右侧带textfield的cell
@interface textfieldCell: UITableViewCell @property (nonatomic,retain) IBOutlet UITextField *textfield;@end第三个是从第三行开始到结束的cell
@interface selectCell:UITableViewCell @property (nonatomic,retain) IBOutlet UILabel *lblTitle;@property (nonatomic,retain) IBOutlet UILabel *lblselectedText;@end
今天说的是在TabBar嵌套Nav时,进行Push的时候隐藏TabBar的问题。
之前项目也需要这么做,那时候iOS7还没出,也是各种搜罗,后来的解决方法是当push操作的时候自己隐藏Tabbar,push过去视图拉伸适应屏幕,再pop回来的时候接再显示Tabbar,过程复杂还需要自己写动画,最终效果也不是很理想。
前两天公司APP上架,当时没有适配iOS7,在XCode4.6上开发编译并发布,居然在iOS7下跑起来没有太大的问题,只是一个Nav的文字错位,有闪退,不过勉强还能用,其中有自定义Tabbar,有很多动画,后来在一篇介绍iOS7适配的文章中看到这么一句话:
在Xcode 4.6上使用iOS 6 SDK进行编译的app在iOS
7上运行时是采用一种特殊的模拟模式,它试图保存app原来的样子。但是一旦你升级到了Xcode 5,在iOS
7SDK上编译,你的app就会开始出现状况了。
已经写的很清楚了,于是我再到Xcode5中编译运行原来的项目,就破漏百出了,开始完全崩溃,各种问题浮现。
好了,回到今天说的正题,先和大家说说hidesBottomBarWhenPushed,从这个属性名也能知道它的意思了,官方的解释是这样:
If YES, then when this view controller is pushed into a controller hierarchy with a bottom bar (like a tab bar), the bottom bar will slide out. Default is NO.
大致意思是如果为YES,当这个控制器push的时候,底部的Bar,比如Tabbar会滑走,也就是不会在push后的视图上显示出来,默认值为NO。
我讲的场景大概为这个样子:
最外面是一个TabBarController,套了两个NavgationController,当其中一个VC push下去的时候,一般情况是这样:
当隐藏Tabbar的时候再push,效果是这样:
怎么样,是不是有时候确实会遇到这样的情况?其实苹果真的考虑的很周全,为我们创造了hidesBottomBarWhenPushed这个属性,为了解决这个问题。代码非常简单,一句或者两句话即可,这里得分几种Push的情况。
Case1:xib加载或者Storyboard用identifier获取Controller
UIViewController *v2 = [self.storyboard instantiateViewControllerWithIdentifier:@"v2"];
v2.hidesBottomBarWhenPushed = YES;
[self.navigationController pushViewController:v2 animated:YES];
Case2:拉线,也就是Storyboard用performSegue
self.hidesBottomBarWhenPushed = YES;
[self performSegueWithIdentifier:@"tov2" sender:nil];
self.hidesBottomBarWhenPushed = NO;
Tip:经测试证明,此种方式只会对后面的一级生效,继续往后Push还会出现TabBar,要继续往后push也隐藏Tabbar还得使用Case3的方法,也建议如此!
Case3:拉线,在prepareForSegue函数里
-(void)prepareForSegue:(UIStoryboardSegue *)segue sender:(id)sender
{
    [segue.destinationViewController setHidesBottomBarWhenPushed:YES];
}
更方便的做法:如果用 Storyboard,可以在 ViewController 的设置面板中把 Hide
Bottom Bar on Push 属性勾选上,效果和上文代码一样。
暂时就用到这几点,我之前的做法,自己手动隐藏,拉伸view,显示不但麻烦,兼容性也不好,移到iOS7上问题多多,不过用这个属性可以非常方便的实现此需求,并且在iOS6上也完美兼容哦。
注意:还有个问题,这个属性只支持非自定义的Tabbar,也就是只支持原生Tabbar,如果是自定义的Tabbar会产生你意想不到的效果,我之前就遇到过,因为使用hidesBottomBarWhenPushed后,系统内部会处理TabbarController上Tabbar这个View,我之前自定义的Tabbar做法是吧原生Tabbar这个View隐藏掉,然后添加到自己绘制的Tabbar
View上去,缺点就是这样你的自定义的TabBarview接收不到系统应有的一些响应,于是我尝试着把自定义的TabBar
View添加到原来的TabBar View上,也就是不隐藏原生的TabBar,而是覆盖在上面,看不出任何区别,效果也能达到上面图片的效果!
IOS开发系列--TableView、多个TableViewCell、自定义Cell、Cell上画画(故事板+代码方式),ios7tableview索引
标签:
原文地址:http://blog.csdn.net/yuleidnf/article/details/51724565