标签:
转载请注明本文出自maplejaw的博客(http://blog.csdn.net/maplejaw_)
Android中有两个比较重要的矩阵,ColorMatrix和Matrix。ColorMatrix用来改变bitmap的颜色和透明度,Matrix用来对bitmap平移、缩放、错切。
Android中Bitmap色彩用了一个[R, G, B, A],4*1的矩阵来保存。
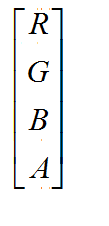
如果想改变一个Bitmap的色彩该怎么办?现在来了解下ColorMatrix的相关知识。ColorMatrix 是一个4*5的矩阵。
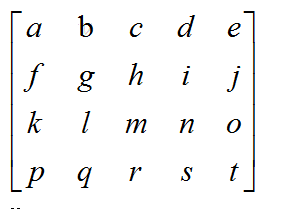
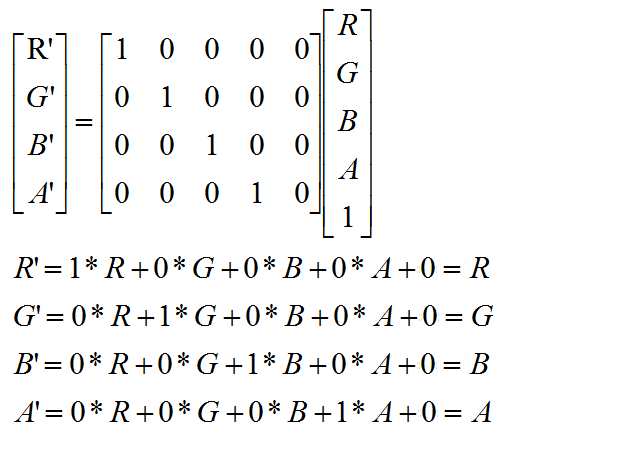
我们用[R’, G’, B’, A’]来保存新的bitmap色彩,4*5必须和5*1矩阵相乘才能得到4*1矩阵,于是运算关系如下:
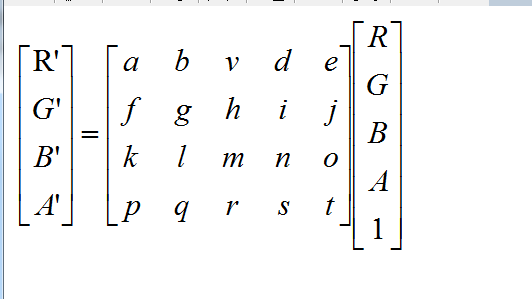
根据矩阵乘法通过如下运算,便能如下求出一个新的色彩矩阵了。

为什么要使用4*5矩阵而不是4*4矩阵?。因为只有4*5矩阵可以单独改变一种颜色值。比如你改变e,只会影响R’。
ColorMatrix的默认矩阵如下图所示
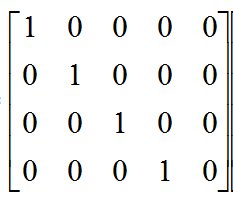
可以看出,进行色彩变换运算后色彩值仍然不变。
知道ColorMatrix的运算原理后,我们就可以做很多事情了。
黑白图片的去色原理:只要把RGB三通道的色彩信息设置成一样;即:R=G=B,那么图像就变成了灰色,并且,为了保证图像亮度不变,同一个通道中的R+G+B应该接近1。
在matlab中按照 0.2989 R,0.5870 G 和 0.1140 B 的比例构成像素灰度值。
在OpenCV中按照 0.299 R, 0.587 G 和 0.114 B 的比例构成像素灰度值。
在Android中按照0.213 R,0.715 G 和 0.072 B 的比例构成像素灰度值。
这些比例主要是根据人眼中三种不同的感光细胞的感光强度比例分配的,因此并没有一个确切值,不同工具调试出来的效果也不尽相同。
知道了RGB相关配色后,相关核心代码如下。
    private Bitmap handleColorMatrix(){
        Canvas canvas = new Canvas(mTempBmp); // 创建一个画布
        Paint paint = new Paint(); // 新建paint
        paint.setAntiAlias(true); //抗锯齿
        //黑白
       ColorMatrix colorMatrix = new ColorMatrix(new float[]{
        0.213f, 0.715f, 0.072f, 0, 0,
        0.213f, 0.715f, 0.072f, 0, 0,
        0.213f, 0.715f, 0.072f, 0, 0,
        0,       0,    0, 1, 0,
});
        paint.setColorFilter(new ColorMatrixColorFilter(colorMatrix));// 设置颜色变换效果
        canvas.drawBitmap(mOriginBmp, 0, 0, paint);
        return mTempBmp;
    }
运行测试效果如下。

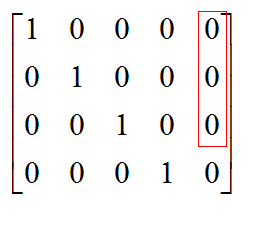
我们可以通过增加最后一列的值来相应增加或减少某种颜色的值。
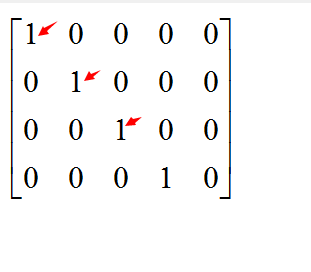
也可以通过改变对角线上的比例来进行色彩缩放。
比如给红色增加20.
    ColorMatrix colorMatrix = new ColorMatrix(new float[]{
            1, 0, 0, 0, 20,
            0, 1, 0, 0, 0,
            0, 0, 1, 0, 0,
            0, 0, 0, 1, 0,
    });
给绿色扩大到1.2倍。
    ColorMatrix colorMatrix = new ColorMatrix(new float[]{
            1, 0, 0, 0, 0,
            0, 1.2f, 0, 0, 0,
            0, 0, 1, 0, 0,
            0, 0, 0, 1, 0,
    });
此外ColorMatrix提供了一个setScale来进行色彩缩放。
       /**
     * Set this colormatrix to scale by the specified values.
     */
    public void setScale(float rScale, float gScale, float bScale,
                         float aScale) {
        final float[] a = mArray;

        for (int i = 19; i > 0; --i) {
            a[i] = 0;
        }
        a[0] = rScale;
        a[6] = gScale;
        a[12] = bScale;
        a[18] = aScale;
}ColorMatrix提供了一个setSaturation通过改变对角线上的比例来改变饱和度。
    /**
     * Set the matrix to affect the saturation of colors.
     *
     * @param sat  饱和度的值,取值0,1
     */
    public void setSaturation(float sat) {
        reset();
        float[] m = mArray;

        final float invSat = 1 - sat;
        final float R = 0.213f * invSat;
        final float G = 0.715f * invSat;
        final float B = 0.072f * invSat;

        m[0] = R + sat; m[1] = G;       m[2] = B;
        m[5] = R;       m[6] = G + sat; m[7] = B;
        m[10] = R;      m[11] = G;      m[12] = B + sat;
    }
可以看出,当sat取值为0时,即是黑白图片。
看到旋转一词,可能有点蒙,何为色彩旋转?我们可以将RGB看做是一个坐标系(r,g,b)。
那么坐标系如下。
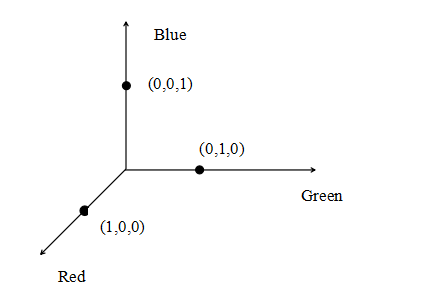
所以,我们可以把一个色彩值看成三维空间里的一个点,色彩值的三个分量可以看成该点的坐标(三维坐标)。假如,我们现在需要围绕蓝色轴进行旋转,我们对着蓝色箭头观察由红色和绿色构造的平面。然后顺时针旋转α度。
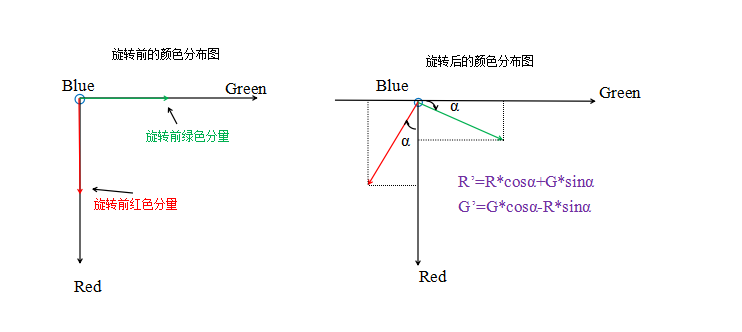
在图中,我们可以看到,在旋转后,原R在R轴的分量变为:R*cosα,且原G分量在旋转后在R轴上也有了分量,所以我们要加上这部分分量,因此最终的结果为R’=R*cosα+G*sinα,同理,在计算G’时,因为R的分量落在了负轴上,所以我们要减去这部分,故G’=G*cosα-R*sinα;
于是,我们可以求出矩阵如下。
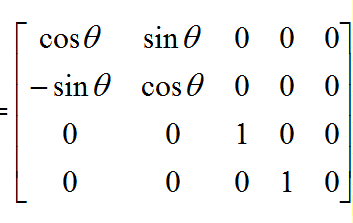
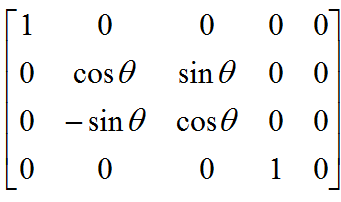
同理,围绕红色轴旋转的矩阵如下。
围绕绿色轴旋转的矩阵如下。
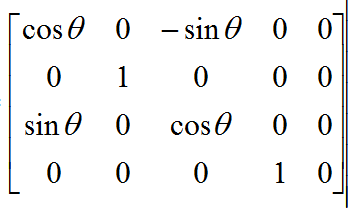
同样,ColorMatrix提供了一个setRotate(int axis, float degrees)来进行色彩旋转。
    public void setRotate(int axis, float degrees) {
        reset();
        double radians = degrees * Math.PI / 180d;
        float cosine = (float) Math.cos(radians);
        float sine = (float) Math.sin(radians);
        switch (axis) {

        case 0:  // 围绕红色轴旋转
            mArray[6] = mArray[12] = cosine;
            mArray[7] = sine;
            mArray[11] = -sine;
            break;

        case 1:   // 围绕绿色轴旋转
            mArray[0] = mArray[12] = cosine;
            mArray[2] = -sine;
            mArray[10] = sine;
            break;

        case 2:  // 围绕蓝色色轴旋转
            mArray[0] = mArray[6] = cosine;
            mArray[1] = sine;
            mArray[5] = -sine;
            break;
        default:
            throw new RuntimeException();
        }
}介绍完ColorMatrix,现在来看看Matrix。Android中Bitmap的每一个像素点用x,y坐标表示。同样,在经过平移旋转等运算后,我们需要用一个新坐标x’,y’来表示。Matrix是一个3*3的矩阵。至于为什么是3*3,同样,需要单独进行偏移。于是运算关系如下。

关于Matrix的内容,http://www.cnblogs.com/qiengo/archive/2012/06/30/2570874.html这篇介绍的非常详细,原理和ColorMatrix基本差不多,这类知识关键在于矩阵的计算上,这里就不赘述了,下面例举出常用api。
setTranslate//设置平移矩阵
setScale //设置缩放矩阵
setRotate //设置旋转矩阵。
setSkew //设置错切矩阵
...

preTranslate(float dx, float dy) //先乘平移矩阵,M‘ = M * T(dx, dy)
preScale(float sx, float sy) //先乘缩放矩阵,M‘ = M * S(sx, sy)
preRotate(float degrees, float px, float py)//先乘旋转矩阵,M‘ = M * R(degrees, px, py)
preSkew(float kx, float ky)//先乘错切矩阵,M‘ = M * K(kx, ky)
...


postTranslate(float dx, float dy) //后乘平移矩阵,M‘ = T(dx, dy) * M
postScale(float sx, float sy) //后乘缩放矩阵,M‘ = S(sx, sy) * M
postRotate(float degrees, float px, float py)//后乘旋转矩阵,M‘ = R(degrees, px, py) * M
postSkew(float kx, float ky)//后乘错切矩阵,M‘ = K(kx, ky) * M
...
由于矩阵的乘法运算不满足交换律,所以Matrix先乘和后乘是有区别的,先乘就是矩阵运算中的右乘,后乘就是矩阵运算中的左乘。即M‘ = M * T(dx, dy)和M‘ = T(dx, dy) * M的区别。
关于Matrix的应用,下篇分析图片缩放预览库PhotoView源码时再进行详细介绍。
转载请注明本文出自maplejaw的博客(http://blog.csdn.net/maplejaw_)
标签:
原文地址:http://blog.csdn.net/maplejaw_/article/details/51728818