标签:
在上一篇jsf环境搭建的基础上 , 加入spring框架 , 先看下目录结构
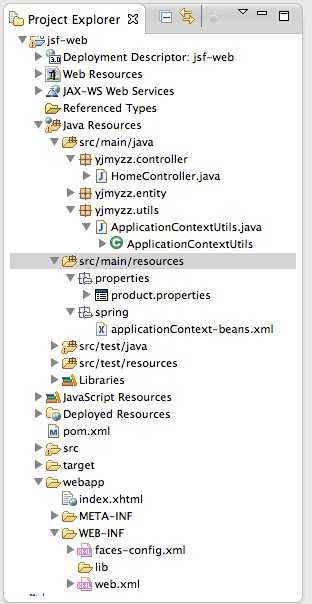
src/main/resources 这个source folder 放置web项目所需的主要配置,打包时,会自动打包到WEB-INF下
首先看下pom.xml,需要引入一些依赖项:
 pom.xml
1. 自动加载配置文件
在web项目中,可以让spring自动加载配置文件(即上图中的src/main/resouces/spring下的xml文件),WEB-INF/web.xml中参考以下设置:
web.xml解释一下: classpath*:spring/applicationContext-*.xml 这里表示将加载classpath路径下 spring目录下的所有以applicationContext-开头的xml文件 , 通常为了保持配置文件的清爽 , 我们会把配置分成多份 : 比如 applicationContext-db.xml 用来配置DataSource , applicationContext-cache.xml用来配置缓存...等等.
2.代码中如何取得ApplicationContext实例
ApplicationContextUtils有了这个工具类 , 就可以方便的取得注入的Bean
3. 使用properties文件注入
为了演示注入效果,先定义一个基本的Entity类
ProductEntity然后在applicationContext-beans.xml中配置以下内容:
spring配置文件注:classpath:properties/*.properties表示运行时 , spring容器会自动加载classpath\properties目录下的所有以.properties后缀结尾的文件 , 我们在src/main/resources/properties/下放置一个product.properties属性文件 , 内容如下:
product.properties该文件被spring自动加载后 , 就可以用里面定义的属性值 , 为Bean做setter属性注入 , 即配置文件中的<property name="productId" value="${product.id}" />
4.验证注入是否成功
在HomeController里 , 向Spring容器要一个Bean , 显示下它的属性:
HomeControllerindex.xhtml里仍然跟上篇相同:
index.xhtml
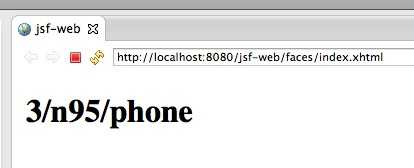
最后部署到jboss上 , 运行截图如下:
标签:
原文地址:http://www.cnblogs.com/w-wfy/p/5618201.html