标签:
最近找申请到了一个不错的接口 , 非常适合拿来写一个资讯类的app.
现在着手写,随写随更.也算是抛砖引玉.烂尾请勿喷.╭(╯^╰)╮
android 资讯阅读器
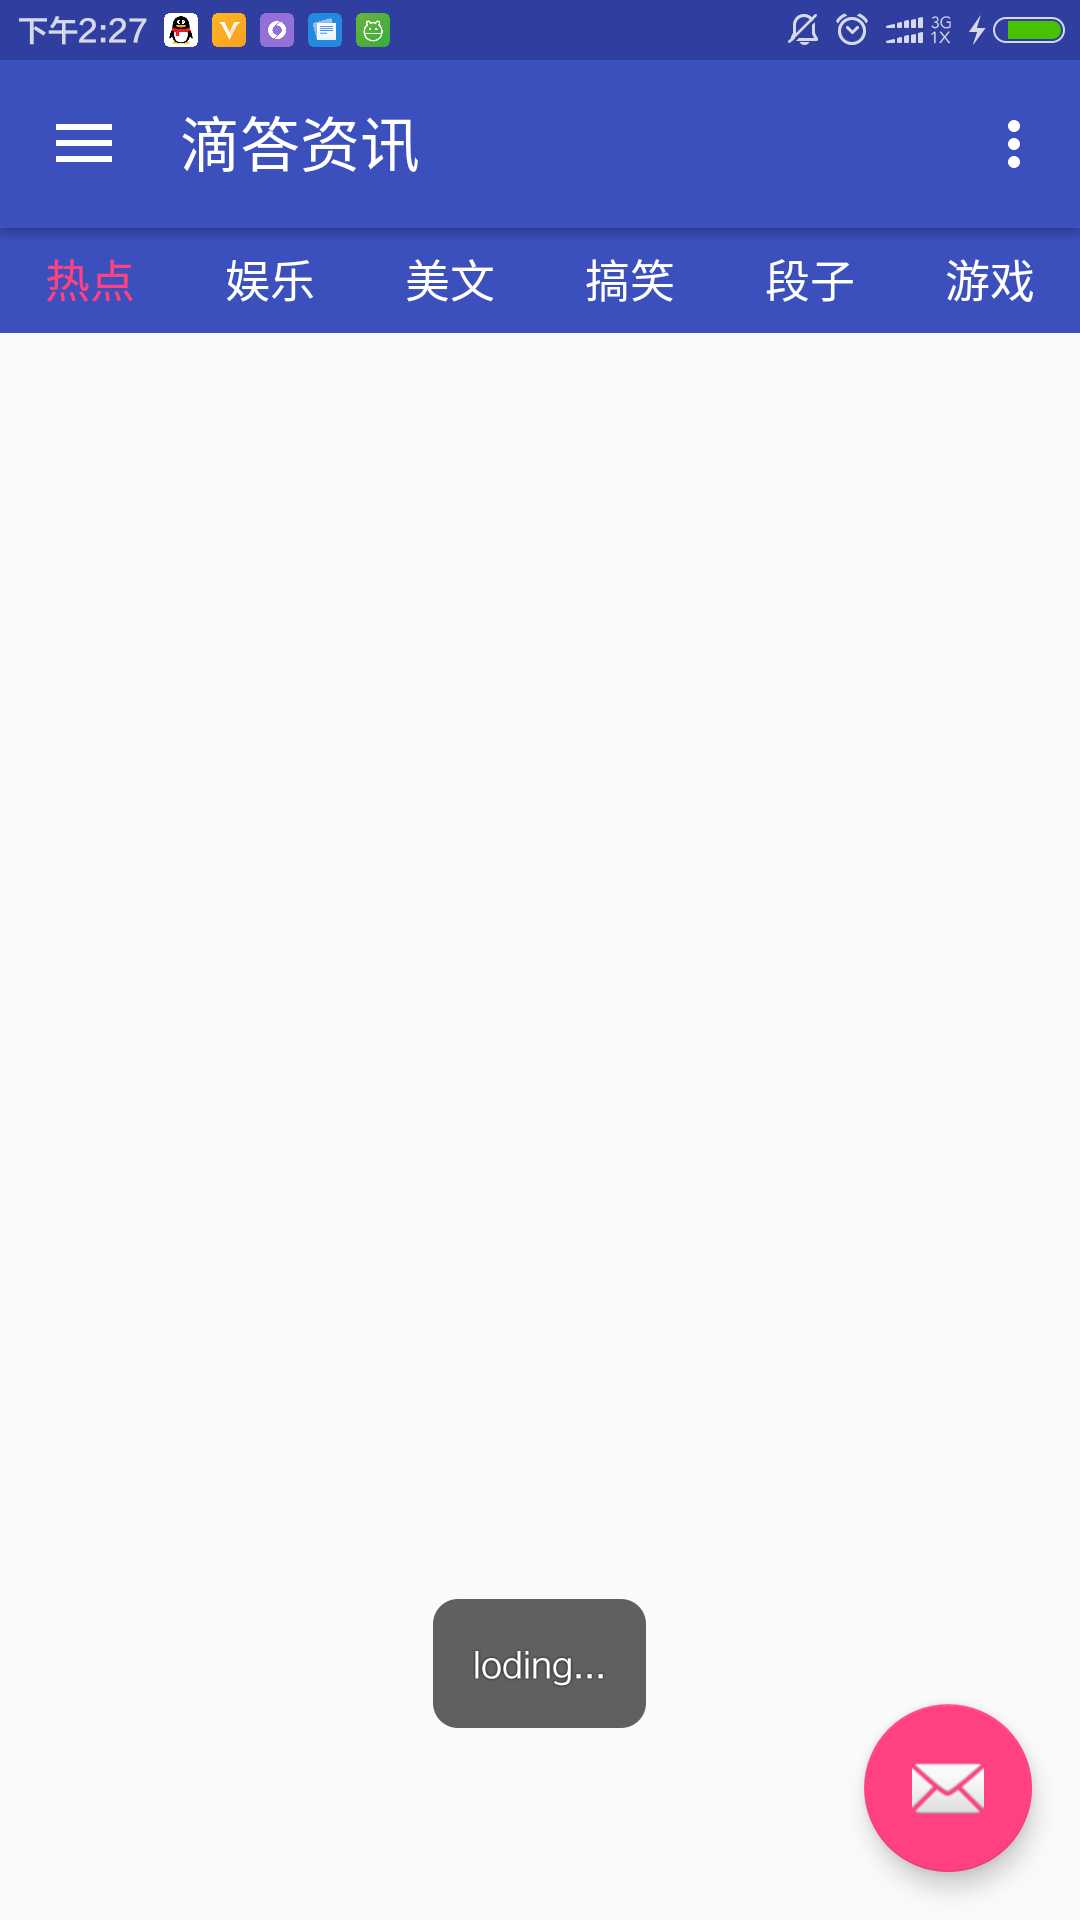
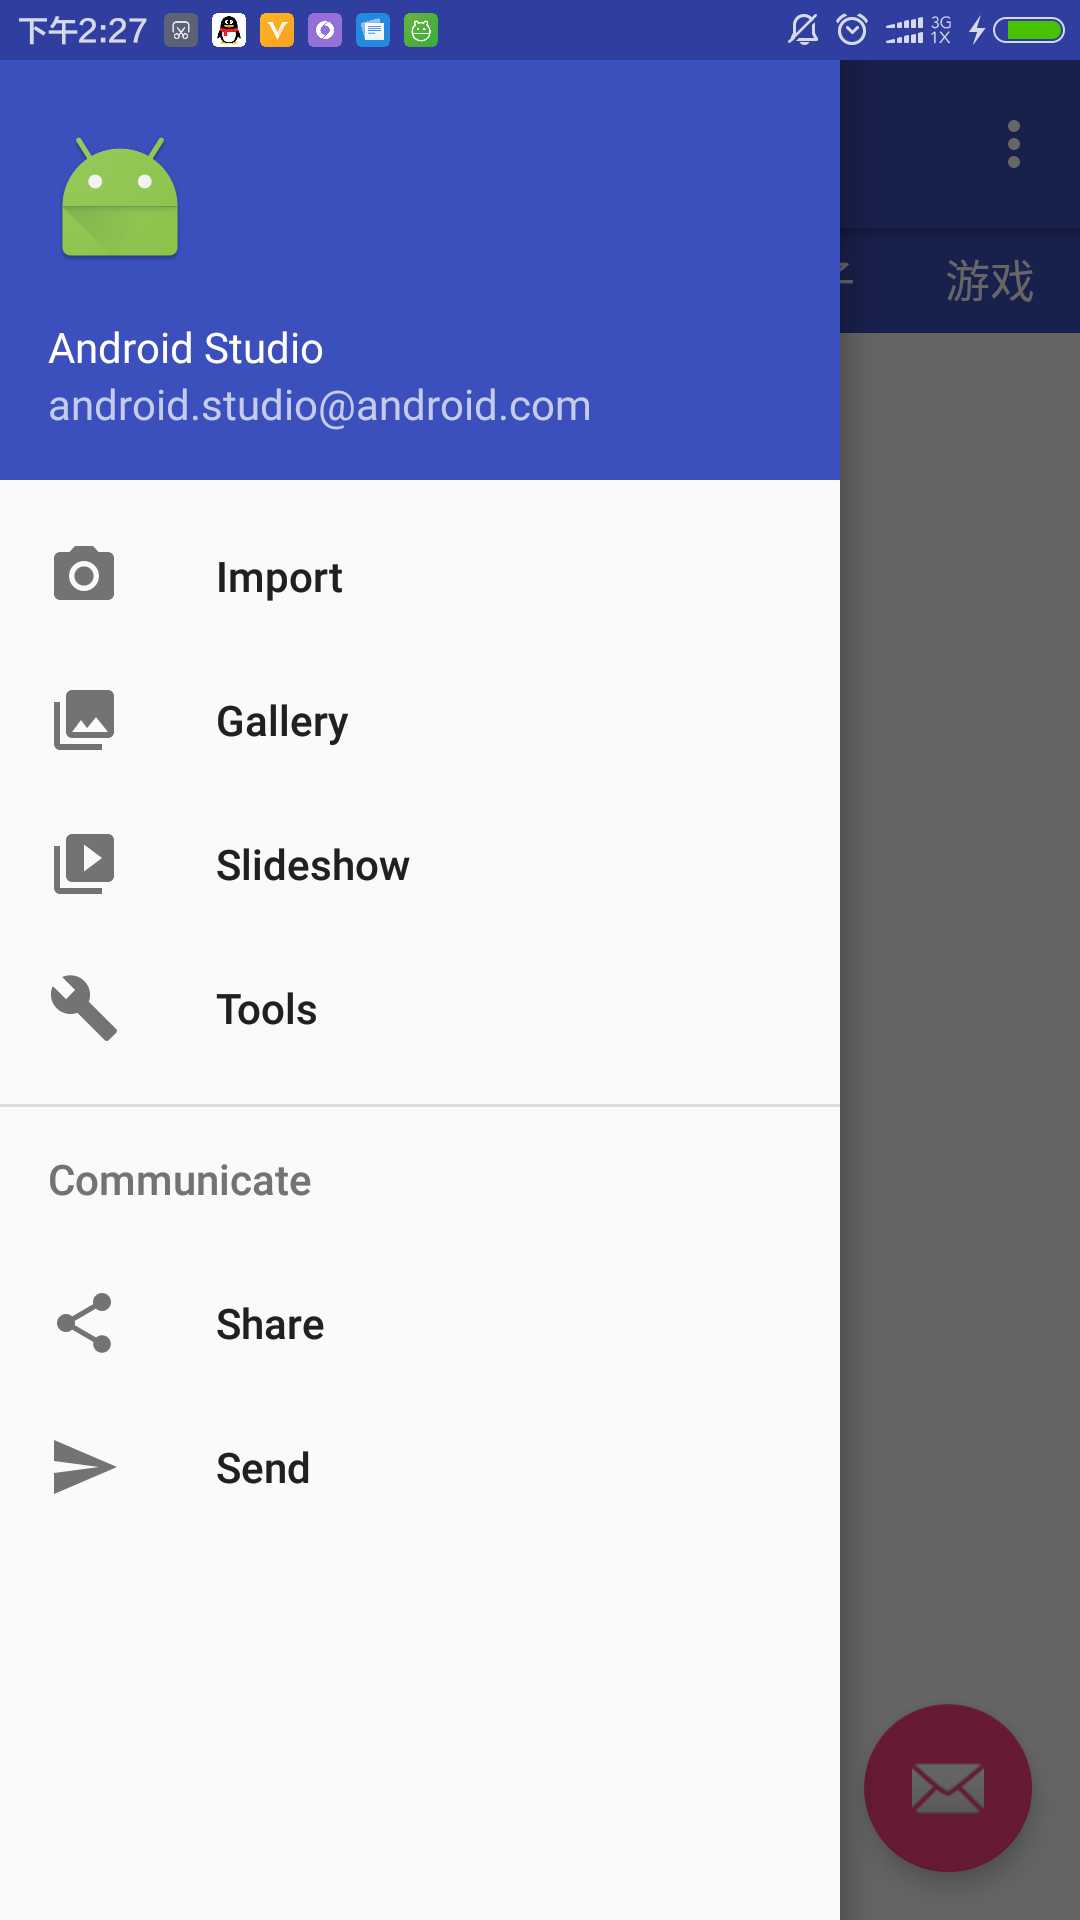
第一阶段目标样式(滑动切换标签 , 侧滑菜单):


图1 图2
首先我使用的ide 是android studio 2.0 已经集成了侧滑菜单的module
新建的时候选一下就好了.过程就不细说了.这个很简单.
下面就是实现滑动切换tab的效果啦.其实我这个写的并不是很好看,网上还有很多开源的滑动切寒tab的案例
盆友们可以自己去集成下.下面说下我的tab的实现效果(参考自:http://www.imooc.com/learn/264 大神鸿洋的慕课)
实现方法是viewpage+Fragment (单单用fragment并没有实现滑动效果).
如果你跟我一样用的是 图2 的模板 那么就要在content_main.xml下做如下修改
content_main.xml :
<?xml version="1.0" encoding="utf-8"?>
<LinearLayout xmlns:android="http://schemas.android.com/apk/res/android"
    xmlns:app="http://schemas.android.com/apk/res-auto"
    xmlns:tools="http://schemas.android.com/tools"
    android:layout_width="match_parent"
    android:layout_height="match_parent"
    app:layout_behavior="@string/appbar_scrolling_view_behavior"
    tools:context="com.zfls.didainf.MainActivity"
    tools:showIn="@layout/app_bar_main"
    android:orientation="vertical">

   <include layout="@layout/topbar"/>

   <android.support.v4.view.ViewPager
       android:id="@+id/id_viewpager"
       android:layout_width="match_parent"
       android:layout_height="0dp"
       android:layout_weight="1" >
   </android.support.v4.view.ViewPager>

</LinearLayout>
使用的viewpage千万不要引入错咯.
topbar.xml :
<?xml version="1.0" encoding="utf-8"?>
<LinearLayout xmlns:android="http://schemas.android.com/apk/res/android"
    android:layout_width="match_parent"
    android:layout_height="wrap_content"
    android:background="?attr/colorPrimary"
    android:orientation="horizontal">

    <LinearLayout
        android:id="@+id/topical"
        android:layout_width="0dp"
        android:layout_height="35dp"
        android:layout_weight="1">

        <TextView
            android:id="@+id/topical_text_bg"
            android:layout_width="0dp"
            android:layout_height="35dp"
            android:layout_weight="1"
            android:gravity="center"
            android:text="热点"
            android:textColor="#fff"
            android:textSize="15dp" />
    </LinearLayout>

    <LinearLayout
        android:id="@+id/entertainment"
        android:layout_width="0dp"
        android:layout_height="35dp"
        android:layout_weight="1">

        <TextView
            android:id="@+id/entertainment_text_bg"
            android:layout_width="0dp"
            android:layout_height="35dp"
            android:layout_weight="1"
            android:gravity="center"
            android:text="娱乐"
            android:textColor="#fff"
            android:textSize="15dp" />
    </LinearLayout>


    <LinearLayout
        android:id="@+id/lettres"
        android:layout_width="0dp"
        android:layout_height="35dp"
        android:layout_weight="1">

        <TextView
            android:id="@+id/lettres_text_bg"
            android:layout_width="0dp"
            android:layout_height="35dp"
            android:layout_weight="1"
            android:gravity="center"
            android:text="美文"
            android:textColor="#fff"
            android:textSize="15dp" />
    </LinearLayout>


    <LinearLayout
        android:id="@+id/funny"
        android:layout_width="0dp"
        android:layout_height="35dp"
        android:layout_weight="1">

        <TextView
            android:id="@+id/funny_text_bg"
            android:layout_width="0dp"
            android:layout_height="35dp"
            android:layout_weight="1"
            android:gravity="center"
            android:text="搞笑"
            android:textColor="#fff"
            android:textSize="15dp" />
    </LinearLayout>


    <LinearLayout
        android:id="@+id/jokes"
        android:layout_width="0dp"
        android:layout_height="35dp"
        android:layout_weight="1">

        <TextView
            android:id="@+id/jokes_text_bg"
            android:layout_width="0dp"
            android:layout_height="35dp"
            android:layout_weight="1"
            android:gravity="center"
            android:text="段子"
            android:textColor="#fff"
            android:textSize="15dp" />
    </LinearLayout>

    <LinearLayout
        android:id="@+id/games"
        android:layout_width="0dp"
        android:layout_height="35dp"
        android:layout_weight="1">

        <TextView
            android:id="@+id/games_text_bg"
            android:layout_width="0dp"
            android:layout_height="35dp"
            android:layout_weight="1"
            android:gravity="center"
            android:text="游戏"
            android:textColor="#fff"
            android:textSize="15dp" />
    </LinearLayout>


</LinearLayout>
很好理解, topbar 就是做一个顶部的布局,然后放到整体的布局中去.
效果如下(还不错 O(∩_∩)O哈!):

放进整体布局后就如 图1 的样子.
下面再创建一个布局文件用来做每个模块的容器
tab_topcial.xml :
<?xml version="1.0" encoding="utf-8"?>
<LinearLayout xmlns:android="http://schemas.android.com/apk/res/android"
    android:layout_width="match_parent"
    android:layout_height="match_parent"
    android:orientation="vertical">

    <android.support.v4.widget.SwipeRefreshLayout
        android:id="@+id/swiperefreshlayout"
        android:layout_width="match_parent"
        android:layout_height="match_parent">

        <ListView
            android:id="@+id/tab_topical_list"
            android:layout_width="match_parent"
            android:layout_height="wrap_content" />

    </android.support.v4.widget.SwipeRefreshLayout>
</LinearLayout>
这里说明下:
 <android.support.v4.widget.SwipeRefreshLayout
        android:id="@+id/swiperefreshlayout"
        android:layout_width="match_parent"
        android:layout_height="match_parent">

       ...

    </android.support.v4.widget.SwipeRefreshLayout>
SwipeRefreshLayout 是谷歌提供的下拉刷新模块.用它包裹listview 可以实现下拉刷新的效果(具体用法可以自行百度一下,或者等我再发一篇博客 嘿嘿)
下面是java代码了.
MainActivity.java :
package com.zfls.didainf;

import android.support.v4.app.Fragment;
import android.os.Bundle;
import android.support.design.widget.FloatingActionButton;
import android.support.design.widget.Snackbar;
import android.support.v4.app.FragmentPagerAdapter;
import android.support.v4.content.ContextCompat;
import android.support.v4.view.ViewPager;
import android.view.View;
import android.support.design.widget.NavigationView;
import android.support.v4.view.GravityCompat;
import android.support.v4.widget.DrawerLayout;
import android.support.v7.app.ActionBarDrawerToggle;
import android.support.v7.app.AppCompatActivity;
import android.support.v7.widget.Toolbar;
import android.view.Menu;
import android.view.MenuItem;
import android.widget.LinearLayout;
import android.widget.TextView;

import java.util.ArrayList;
import java.util.List;

public class MainActivity extends AppCompatActivity
        implements NavigationView.OnNavigationItemSelectedListener,View.OnClickListener {

    private ViewPager mViewPager;
    private FragmentPagerAdapter mAdapter;
    private List<Fragment> mFragments;

    //tab
    private LinearLayout topical;
    private LinearLayout entertainment;
    private LinearLayout lettres;
    private LinearLayout funny;
    private LinearLayout jokes;
    private LinearLayout games;

    private TextView topical_t;
    private TextView entertainment_t;
    private TextView lettres_t;
    private TextView funny_t;
    private TextView jokes_t;
    private TextView games_t;

    @Override
    protected void onCreate(Bundle savedInstanceState) {
        super.onCreate(savedInstanceState);
        setContentView(R.layout.activity_main);

        initside();

        initView();

        initWork();

        setSelect(0);
    }

   //统一监听
    private void initWork() {

        topical.setOnClickListener(this);
        entertainment.setOnClickListener(this);
        lettres.setOnClickListener(this);
        funny.setOnClickListener(this);
        jokes.setOnClickListener(this);
        games.setOnClickListener(this);

    }
   //声明相关控件
    private void initView() {
        mViewPager = (ViewPager) findViewById(R.id.id_viewpager);

        topical = (LinearLayout) findViewById(R.id.topical);
        entertainment = (LinearLayout) findViewById(R.id.entertainment);
        lettres = (LinearLayout) findViewById(R.id.lettres);
        funny = (LinearLayout) findViewById(R.id.funny);
        jokes = (LinearLayout) findViewById(R.id.jokes);
        games = (LinearLayout) findViewById(R.id.games);

        topical_t = (TextView) findViewById(R.id.topical_text_bg);
        entertainment_t = (TextView) findViewById(R.id.entertainment_text_bg);
        lettres_t = (TextView) findViewById(R.id.lettres_text_bg);
        funny_t = (TextView) findViewById(R.id.funny_text_bg);
        jokes_t = (TextView) findViewById(R.id.jokes_text_bg);
        games_t = (TextView) findViewById(R.id.games_text_bg);

        mFragments = new ArrayList<Fragment>();
        Fragment mTab01 = new TopicalFragment();
        Fragment mTab02 = new EntertainmentFragment();
        Fragment mTab03 = new LetteresFragment();
        Fragment mTab04 = new FunnyFragment();
        Fragment mTab05 = new JokesFragment();
        Fragment mTab06 = new GamesFragment();
        mFragments.add(mTab01);
        mFragments.add(mTab02);
        mFragments.add(mTab03);
        mFragments.add(mTab04);
        mFragments.add(mTab05);
        mFragments.add(mTab06);

        mAdapter = new FragmentPagerAdapter(getSupportFragmentManager()) {

            @Override
            public android.support.v4.app.Fragment getItem(int position) {
                return mFragments.get(position);
            }

            @Override
            public int getCount() {
                return mFragments.size();
            }
        };
        mViewPager.setAdapter(mAdapter);

        mViewPager.setOnPageChangeListener(new ViewPager.OnPageChangeListener() {
            @Override
            public void onPageScrolled(int position, float positionOffset, int positionOffsetPixels) {

            }

            @Override
            public void onPageSelected(int position) {
                int currentItem = mViewPager.getCurrentItem();
                setTab(currentItem);
            }

            @Override
            public void onPageScrollStateChanged(int state) {

            }
        });

    }

    //侧滑
    private void initside() {
        Toolbar toolbar = (Toolbar) findViewById(R.id.toolbar);
        setSupportActionBar(toolbar);

        FloatingActionButton fab = (FloatingActionButton) findViewById(R.id.fab);
        fab.setOnClickListener(new View.OnClickListener() {
            @Override
            public void onClick(View view) {
                Snackbar.make(view, "Replace with your own action", Snackbar.LENGTH_LONG)
                        .setAction("Action", null).show();
            }
        });

        DrawerLayout drawer = (DrawerLayout) findViewById(R.id.drawer_layout);
        ActionBarDrawerToggle toggle = new ActionBarDrawerToggle(
                this, drawer, toolbar, R.string.navigation_drawer_open, R.string.navigation_drawer_close);
        drawer.setDrawerListener(toggle);
        toggle.syncState();

        NavigationView navigationView = (NavigationView) findViewById(R.id.nav_view);
        navigationView.setNavigationItemSelectedListener(this);
    }

    @Override
    public void onBackPressed() {
        DrawerLayout drawer = (DrawerLayout) findViewById(R.id.drawer_layout);
        if (drawer.isDrawerOpen(GravityCompat.START)) {
            drawer.closeDrawer(GravityCompat.START);
        } else {
            super.onBackPressed();
        }
    }

    @Override
    public boolean onCreateOptionsMenu(Menu menu) {
        // Inflate the menu; this adds items to the action bar if it is present.
        getMenuInflater().inflate(R.menu.main, menu);
        return true;
    }

    @Override
    public boolean onOptionsItemSelected(MenuItem item) {
        // Handle action bar item clicks here. The action bar will
        // automatically handle clicks on the Home/Up button, so long
        // as you specify a parent activity in AndroidManifest.xml.
        int id = item.getItemId();

        //noinspection SimplifiableIfStatement
        if (id == R.id.action_settings) {
            return true;
        }

        return super.onOptionsItemSelected(item);
    }

    @SuppressWarnings("StatementWithEmptyBody")
    @Override
    public boolean onNavigationItemSelected(MenuItem item) {
        // Handle navigation view item clicks here.
        int id = item.getItemId();

        if (id == R.id.nav_camera) {
            // Handle the camera action
        } else if (id == R.id.nav_gallery) {

        } else if (id == R.id.nav_slideshow) {

        } else if (id == R.id.nav_manage) {

        } else if (id == R.id.nav_share) {

        } else if (id == R.id.nav_send) {

        }

        DrawerLayout drawer = (DrawerLayout) findViewById(R.id.drawer_layout);
        drawer.closeDrawer(GravityCompat.START);
        return true;
    }

    @Override
    public void onClick(View v) {
        switch (v.getId()){
            case R.id.topical:
                //热点
                setSelect(0);
                break;
            case R.id.entertainment:
                //娱乐
                setSelect(1);
                break;
            case R.id.lettres:
                //美文
                setSelect(2);
                break;
            case R.id.funny:
                //搞笑
                setSelect(3);
                break;
            case R.id.jokes:
                //段子
                setSelect(4);
                break;
            case R.id.games:
                //游戏
                setSelect(5);
                break;

            default:
                break;
        }
    }

    private void setSelect(int i) {
        setTab(i);
        mViewPager.setCurrentItem(i);
    }

   //修改被选中的tab 文字的背景颜色(R.color.color.colorAccent 在 res/value/colors.xml 下)
    private void setTab(int i) {

        changbg();
        switch (i){
            case 0:
                topical_t.setTextColor(ContextCompat.getColor(MainActivity.this , R.color.colorAccent));
                break;
            case 1:
                entertainment_t.setTextColor(ContextCompat.getColor(MainActivity.this , R.color.colorAccent));
                break;
            case 2:
                lettres_t.setTextColor(ContextCompat.getColor(MainActivity.this , R.color.colorAccent));
                break;
            case 3:
                funny_t.setTextColor(ContextCompat.getColor(MainActivity.this , R.color.colorAccent));
                break;
            case 4:
                jokes_t.setTextColor(ContextCompat.getColor(MainActivity.this , R.color.colorAccent));
                break;
            case 5:
                games_t.setTextColor(ContextCompat.getColor(MainActivity.this , R.color.colorAccent));
                break;
        }
    }
   //将所有文字背景色改成未选中状态
    private void changbg()
    {
        topical_t.setTextColor(ContextCompat.getColor(MainActivity.this , R.color.colorWrite));
        entertainment_t.setTextColor(ContextCompat.getColor(MainActivity.this , R.color.colorWrite));
        lettres_t.setTextColor(ContextCompat.getColor(MainActivity.this , R.color.colorWrite));
        funny_t.setTextColor(ContextCompat.getColor(MainActivity.this , R.color.colorWrite));
        jokes_t.setTextColor(ContextCompat.getColor(MainActivity.this , R.color.colorWrite));
        games_t.setTextColor(ContextCompat.getColor(MainActivity.this , R.color.colorWrite));
    }
}
看起来挺多挺吓人,其实还好不算太多.
附件里面有鸿洋大神的demo,可以拿来移植一下.嘿嘿嘿
百度云链接 : http://pan.baidu.com/s/1boHCUbt
提取码:nhn2
移植完了以后就可以在手机上看下效果了.
标签:
原文地址:http://www.cnblogs.com/wobeinianqing/p/5618707.html