标签:
1.RelativeLayout
在RelativeLayout中,组件可以根据父级边界进行定位,除了这样的定位,也可以相对其他控件进行定位。特点是,可以随意拖动空间,拖到哪里就停到哪里。
代码中添加子对象:
import android.support.v7.app.AppCompatActivity;
import android.os.Bundle;
import android.widget.RelativeLayout;
import android.widget.TextView;

public class Main2Activity extends AppCompatActivity {
    private RelativeLayout root;
    private TextView tv;
    @Override
    protected void onCreate(Bundle savedInstanceState) {
        super.onCreate(savedInstanceState);
        root = new RelativeLayout(this); //初始化一个relativelayout
        setContentView(root);//使该activity加载这个布局

        tv = new TextView(this);
        tv.setText("安卓入门进阶");

        RelativeLayout.LayoutParams lp = new RelativeLayout.LayoutParams(RelativeLayout.LayoutParams.WRAP_CONTENT,RelativeLayout.LayoutParams.WRAP_CONTENT);//创建布局参数对象

        lp.leftMargin = 200;//调整textView的位置
        lp.topMargin = 500;

        root.addView(tv,lp);//将textView添加到layout中
    }
}
2.FramLayout
framlayout特点为无论拖进去多少个控件对象,都可以重叠。并且只有九个位置可以放置。它的特点与功能在relativeLayout中都可以实现,但是framlayout更加轻量级,并且使用方便简洁。
举个例子,在一个framlayout中重叠放置两张图片,点击图片互相切换。
java源码:
import android.support.v4.app.Fragment;
import android.support.v7.app.AppCompatActivity;
import android.os.Bundle;
import android.view.View;
import android.widget.FrameLayout;
import android.widget.ImageView;

public class Main2Activity extends AppCompatActivity {

    private FrameLayout root;
    private ImageView iva;
    private ImageView ivb;
    @Override
    protected void onCreate(Bundle savedInstanceState) {
        super.onCreate(savedInstanceState);
        setContentView(R.layout.activity_main2);

        root = (FrameLayout) findViewById(R.id.root); //根据id获取到父容器framlayout
        iva = (ImageView) findViewById(R.id.iva);//获取组件
        ivb = (ImageView) findViewById(R.id.ivb);
        root.setOnClickListener(new View.OnClickListener() {
            @Override
            public void onClick(View view) {          //点击执行图片的切换
               if(iva.getVisibility()==View.VISIBLE){
                   showB();
               }else{
                   showA();
               }
            }
        });
    }
    private void showA() {   //显示A图片的方法
         iva.setVisibility(View.VISIBLE);
         ivb.setVisibility(View.INVISIBLE);
    }
    private void showB() {   //显示B图片的方法
        iva.setVisibility(View.INVISIBLE);
        ivb.setVisibility(View.VISIBLE);
    }
}
xml源码
<?xml version="1.0" encoding="utf-8"?>
<FrameLayout xmlns:android="http://schemas.android.com/apk/res/android"
    xmlns:tools="http://schemas.android.com/tools"
    android:layout_width="match_parent"
    android:layout_height="match_parent"
    android:paddingBottom="@dimen/activity_vertical_margin"
    android:paddingLeft="@dimen/activity_horizontal_margin"
    android:paddingRight="@dimen/activity_horizontal_margin"
    android:paddingTop="@dimen/activity_vertical_margin"
    android:id="@+id/root"
    tools:context="com.example.lzc.myapplication.Main2Activity">

    <ImageView
        android:layout_width="match_parent"
        android:layout_height="match_parent"
        android:src="@drawable/img1"
        android:id="@+id/iva"/>

    <ImageView
        android:layout_width="match_parent"
        android:layout_height="match_parent"
        android:src="@drawable/img1"
        android:id="@+id/ivb"/>

</FrameLayout>
3.LinearLayout
linerlayout是安卓中的线性布局。使其子对象水平方向或者垂直方向一字排开。其中的属性android:orientation可以控制排列的方向。android:orientation="vertical"为垂直排列。android:orientation="horizontal"为水平排列。在线性布局中有一个重要的属性为比重。也就是layout_weight,它规定了分割父级容器的比例。
如果两个控件,控件A有layout_weight,控件B没有,那么B的宽度就是它本身的宽度,剩下的空间全部给A。
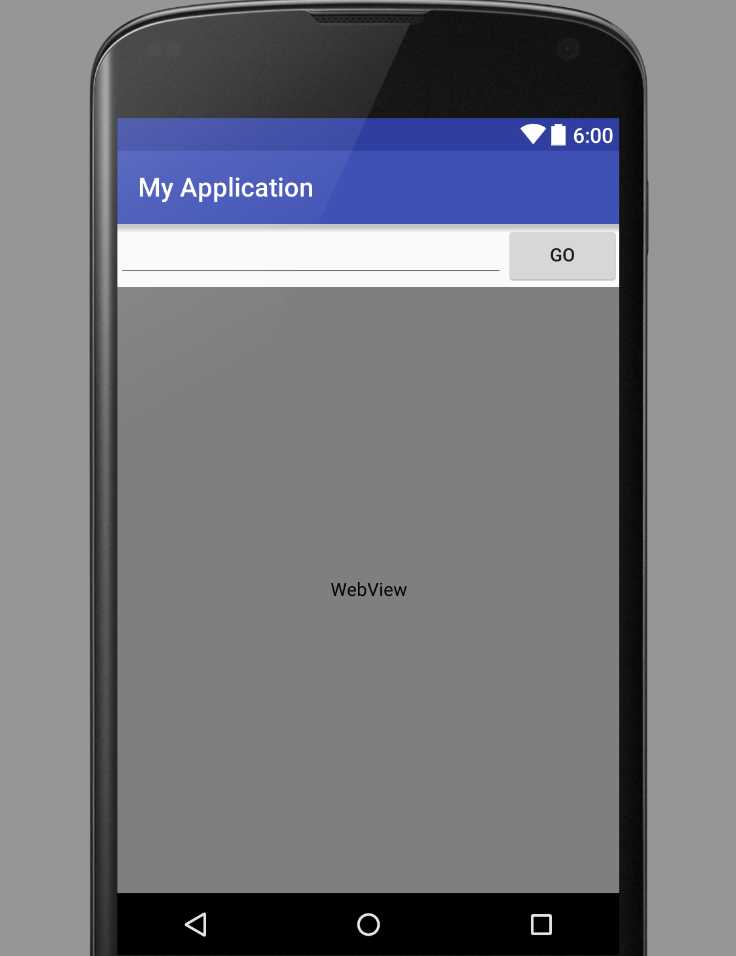
例子布局:
<?xml version="1.0" encoding="utf-8"?>
<LinearLayout xmlns:android="http://schemas.android.com/apk/res/android"
    android:layout_width="match_parent"
    android:layout_height="match_parent"
    android:orientation="vertical">

    <LinearLayout
        android:layout_width="match_parent"
        android:layout_height="wrap_content"
        android:orientation="horizontal">
        <EditText
            android:layout_width="wrap_content"
            android:layout_height="wrap_content"
            android:layout_weight="1"/>
        <Button
            android:layout_width="wrap_content"
            android:layout_height="wrap_content"
            android:text="go"/>

    </LinearLayout>
    <WebView
        android:layout_width="match_parent"
        android:layout_height="wrap_content"
        android:layout_weight="1"></WebView>
</LinearLayout>
效果图:

进阶篇-用户界面:3.android中的基本布局-layout
标签:
原文地址:http://www.cnblogs.com/androidNot/p/5625502.html