标签:
1. PopupWindow使用
PopupWindow这个类用来实现一个弹出框,可以使用任意布局的View作为其内容,这个弹出框是悬浮在当前activity之上的。
2. PopupWindow使用的案例:
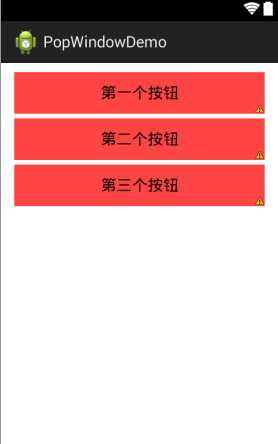
(1)首先是我们弹出框的布局设计,如下:
 1 <?xml version="1.0" encoding="utf-8"?>
 2 <LinearLayout xmlns:android="http://schemas.android.com/apk/res/android"
 3     android:layout_width="match_parent"
 4     android:layout_height="wrap_content"
 5     android:layout_margin="5dp"
 6     android:orientation="vertical" >
 7
 8     <!-- 这里的linearLayout加android:background=""这个属性要谨慎,如果加了后,popwindow是不能半透明了的 -->
 9
10     <Button
11         android:id="@+id/first"
12         android:layout_width="match_parent"
13         android:layout_height="wrap_content"
14         android:layout_marginBottom="5dp"
15         android:layout_marginLeft="10dp"
16         android:layout_marginRight="10dp"
17         android:layout_marginTop="5dp"
18         android:background="@android:color/holo_red_light"
19         android:text="第一个按钮" />
20
21     <Button
22         android:id="@+id/second"
23         android:layout_width="match_parent"
24         android:layout_height="wrap_content"
25         android:layout_marginBottom="5dp"
26         android:layout_marginLeft="10dp"
27         android:layout_marginRight="10dp"
28         android:background="@android:color/holo_red_light"
29         android:text="第二个按钮" />
30
31     <Button
32         android:id="@+id/third"
33         android:layout_width="match_parent"
34         android:layout_height="wrap_content"
35         android:layout_marginBottom="5dp"
36         android:layout_marginLeft="10dp"
37         android:layout_marginRight="10dp"
38         android:background="@android:color/holo_red_light"
39         android:text="第三个按钮" />
40
41 </LinearLayout>
布局效果图,如下:
(2)主布局activity_main.xml只有一个按钮,如下:
 1 <?xml version="1.0" encoding="utf-8"?>
 2 <LinearLayout xmlns:android="http://schemas.android.com/apk/res/android"
 3   android:layout_width="match_parent"
 4   android:layout_height="wrap_content"
 5   android:layout_margin="5dp"
 6   android:orientation="vertical" >
 7
 8  <Button
 9      android:layout_width="match_parent"
10      android:layout_height="wrap_content"
11      android:id="@+id/start"
12      android:text="@string/click"/>
13
14 </LinearLayout>
(3)首先当我们进入MainActivity(承载着activity_main.xml),当我们点击按钮,PopupWindow会从下往上弹出显示;PopupWindow弹出来之后,当我们点击PopupWindow之外的地方的时候,PopupWindow就会从上往下收缩隐藏。
这里需要定义PopupWindow弹出和隐藏的两个动画,如下:
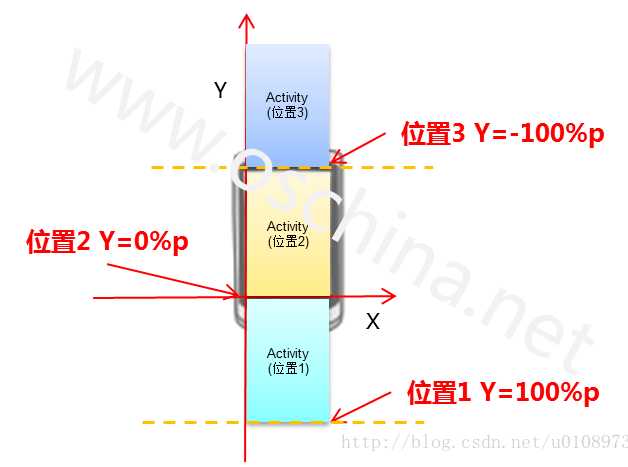
在res / 下新建一个文件夹anim,进而anim下新建两个xml文件,如图所示:
其中,pophidden_anim.xml,如下:
<?xml version="1.0" encoding="utf-8"?>

<!-- android<set>标签代表一系列的帧动画,可以在里面添加动画效果 -->
<set xmlns:android="http://schemas.android.com/apk/res/android" >

    <translate
        android:duration="2000"
        android:fromYDelta="0"
        android:toYDelta="50%p" />

    <alpha
        android:duration="2000"
        android:fromAlpha="1.0"
        android:toAlpha="0.0" />

</set>
popshow_anim的代码如下:
<?xml version="1.0" encoding="utf-8"?>

<!--android<set>标签代表一系列的帧动画,可以在里面添加动画效果  -->
<set xmlns:android="http://schemas.android.com/apk/res/android" >

    <translate
        android:duration="2000"
        android:fromYDelta="100%p"
        android:toYDelta="0" />

    <alpha
        android:duration="2000"
        android:fromAlpha="0.0"
        android:toAlpha="1.0" />

</set>
备注:
android:fromYDelta --- 表示Y的起始值
android:toYDelta --- 表示Y的结束值
在这些属性里面还可以加上%和p,例如:
android:toXDelta="100%",表示自身的100%,也就是从View自己的位置开始。
android:toXDelta="80%p",表示父层View的80%,是以它父层View为参照的。
另外,如下:
android:fromXDelta="0" android:toXDelta="-100%p" 往左邊消失
android:fromXDelta="-100%p" android:toXDelta="0" 從左邊進
android:fromXDelta="0" android:toXDelta="100%p" 往右邊消失
android:fromXDelta="100%p" android:toXDelta="0" 從右邊進
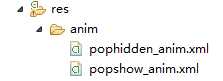
经查阅资料才发现动画的启始位置虽然是在控件的左下角,但是相对位置却不是我们平时想的那样.
在实现左右动画的时候,其相对位置应该为(位置2为起始位置):
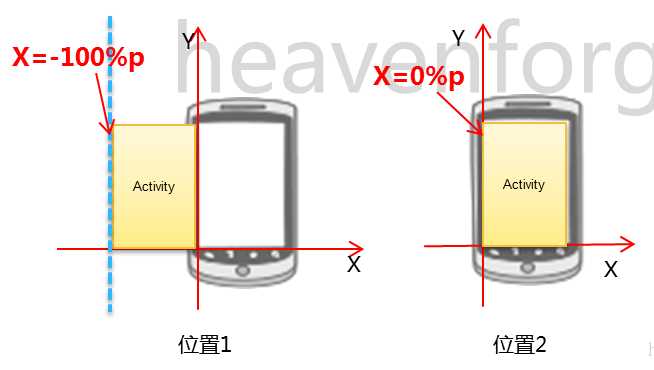
在实现上下动画的时候,其相对位置应该为(位置2为起始位置):
上面弹出 和 隐藏两种动画,我们在res / values / styles中定义动画,如下:
 1 <resources>
 2
 3     <!--
 4     Base application theme, dependent on API level. This theme is replaced
 5     by AppBaseTheme from res/values-vXX/styles.xml on newer devices.
 6
 7     -->
 8     <style name="AppBaseTheme" parent="android:Theme.Light">
 9         <!--
10       Theme customizations available in newer API levels can go in
11       res/values-vXX/styles.xml, while customizations related to
12       backward-compatibility can go here.
13
14         -->
15     </style>
16
17     <!-- Application theme. -->
18     <style name="AppTheme" parent="AppBaseTheme">
19         <!-- All customizations that are NOT specific to a particular API-level can go here. -->
20     </style>
21
22     <!-- 这个是加入的代码 -->
23     <style name="mypopwindow_anim_style">
24
25         <!-- 指定显示的动画xml -->
26         <item name="android:windowEnterAnimation">@anim/popshow_anim</item>
27
28         <!-- 指定消失的动画xml -->
29         <item name="android:windowExitAnimation">@anim/pophidden_anim</item>
30     </style>
31
32 </resources>
(4)来到MainActivity之中,如下:
 1 package com.himi.popwindowdemo;
 2
 3 import android.app.Activity;
 4 import android.content.Context;
 5 import android.graphics.drawable.ColorDrawable;
 6 import android.os.Bundle;
 7 import android.view.Gravity;
 8 import android.view.LayoutInflater;
 9 import android.view.View;
10 import android.view.View.OnClickListener;
11 import android.view.WindowManager;
12 import android.widget.Button;
13 import android.widget.PopupWindow;
14 import android.widget.PopupWindow.OnDismissListener;
15
16 public class MainActivity extends Activity {
17
18     @Override
19     protected void onCreate(Bundle savedInstanceState) {
20         super.onCreate(savedInstanceState);
21         setContentView(R.layout.activity_main);
22         Button start = (Button) findViewById(R.id.start);
23         start.setOnClickListener(new OnClickListener() {
24
25             @Override
26             public void onClick(View v) {
27                 showPopwindow();
28             }
29
30         });
31     }
32
33     /**
34      * 显示popupWindow
35      */
36     private void showPopwindow() {
37         // 利用layoutInflater获得View
38         LayoutInflater inflater = (LayoutInflater) getSystemService(Context.LAYOUT_INFLATER_SERVICE);
39         View view = inflater.inflate(R.layout.popwindowlayout, null);
40
41         // 下面是两种方法得到宽度和高度 getWindow().getDecorView().getWidth()
42
43         PopupWindow window = new PopupWindow(view, WindowManager.LayoutParams.MATCH_PARENT,
44                 WindowManager.LayoutParams.WRAP_CONTENT);
45
46         // 设置popWindow弹出窗体可点击,这句话必须添加,并且是true
47         window.setFocusable(true);
48
49         // 实例化一个ColorDrawable颜色为半透明
50         ColorDrawable dw = new ColorDrawable(0xb0000000);
51         window.setBackgroundDrawable(dw);
52
53         // 设置popWindow的显示和消失动画
54         window.setAnimationStyle(R.style.mypopwindow_anim_style);
55         // 在底部显示
56         window.showAtLocation(MainActivity.this.findViewById(R.id.start), Gravity.BOTTOM, 0, 0);
57
58         // 这里检验popWindow里的button是否可以点击
59         Button first = (Button) view.findViewById(R.id.first);
60         first.setOnClickListener(new OnClickListener() {
61
62             @Override
63             public void onClick(View v) {
64
65                 System.out.println("第一个按钮被点击了");
66             }
67         });
68
69         // popWindow消失监听方法
70         window.setOnDismissListener(new OnDismissListener() {
71
72             @Override
73             public void onDismiss() {
74                 System.out.println("popWindow消失");
75             }
76         });
77
78     }
79 }
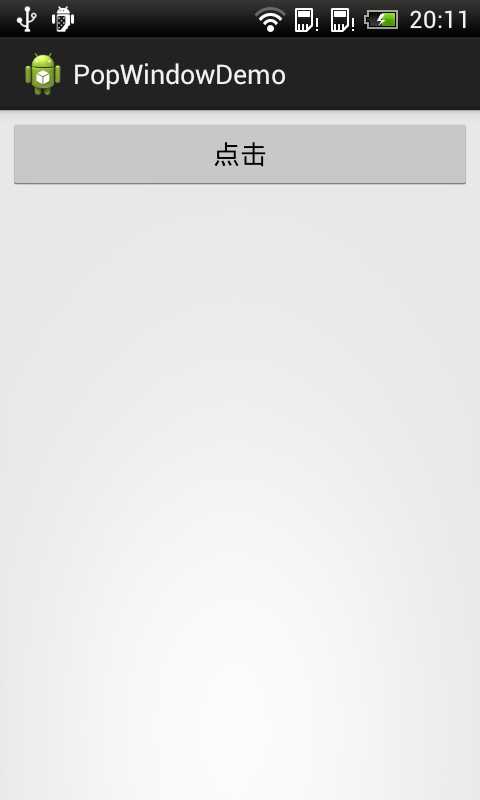
(5)部署程序到模拟器上,如下:
刚开始进入程序,效果如下:
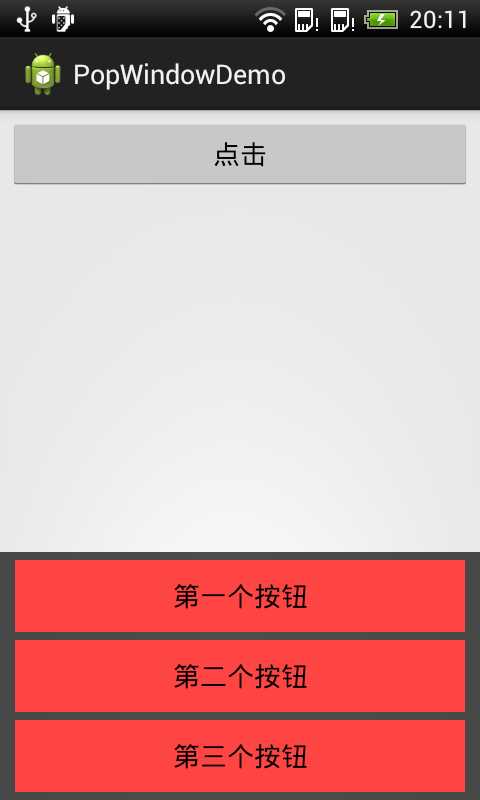
点击上面的按钮,效果如下,popupwindow 弹出显示:
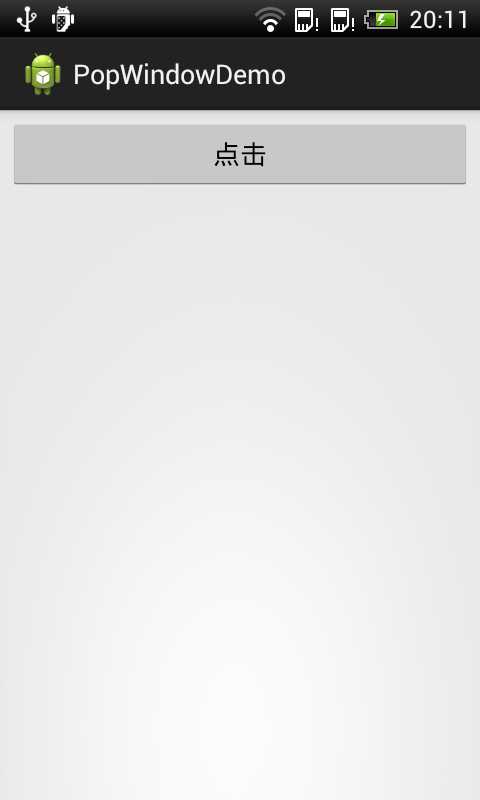
点击popupwindow之外的地方,效果如下,popupwindow 收缩隐藏:
3. PopupWindow 在指定位置上的显示(重点):
(转载:http://www.cnblogs.com/zhwl/archive/2013/10/17/3373531.html)
这里主要介绍PopupWindow 在控件的各个方向上的显示(上、下、左、右),主要用到popupWindow 的showAtLocation()方法。
注意参数Gravity.NO_GRAVITY:用来标明没有设定对齐方向
(1)在控件的上方:
 1 private void showPopUp(View v) {
 2         LinearLayout layout = new LinearLayout(this);
 3         layout.setBackgroundColor(Color.GRAY);
 4
 5         TextView tv = new TextView(this);
 6         tv.setLayoutParams(new LayoutParams(LayoutParams.WRAP_CONTENT, LayoutParams.WRAP_CONTENT));
 7         tv.setText("I‘m a pop !");
 8         tv.setTextColor(Color.WHITE);
 9
10         layout.addView(tv);
11
12         popupWindow = new PopupWindow(layout,120,120);
13         popupWindow.setFocusable(true);
14         popupWindow.setOutsideTouchable(true);
15         popupWindow.setBackgroundDrawable(new BitmapDrawable());
16
17         int[] location = new int[2];
18         v.getLocationOnScreen(location);
19
20         popupWindow.showAtLocation(v, Gravity.NO_GRAVITY, location[0], location[1]-popupWindow.getHeight());
21     }
(2)在控件的下方:
在控件的其他方向上显示只需修改最后一行代码即可,如:
1 popupWindow.showAsDropDown(v);
(3)在控件的左边:
1 popupWindow.showAtLocation(v, Gravity.NO_GRAVITY, location[0]-popupWindow.getWidth(), location[1]);
(4)在控件的右边:
1 popupWindow.showAtLocation(v, Gravity.NO_GRAVITY, location[0]+v.getWidth(), location[1]);
Android 高级UI设计笔记19:PopupWindow使用详解
标签:
原文地址:http://www.cnblogs.com/hebao0514/p/5641635.html