标签:
本文犯了一个错误,就是:需要把 id=xx换成id=”xx“,由于不想再贴一遍代码,故在此说明,更正一下;
再加一个内容:<style></style>中不可以加注释?
只定义子div的高和宽时,父div会被”撑大“;
一、浮动布局,写于<style> ~ </style>标签中:
语法: float:left;
float:right;
二、清除浮动布局,在需要完全显示的那个div的在<style> </style>控制标签中写:
clear:left;
clear:right;
clear:both;
若float div定义在普通的div的前面,则显示时float会将普通的覆盖掉,若要显示出普通的那个div,只需在<style> </style>标签中写clear:left;或者clear:right;或者clear:both;即可。
例1,普通div定义在float div的前面时效果:
1.当前面有一个普通div时,后面的无论是普通div还是float div,都会自动换行显示。若要实现div的并排显示,则需要使用到float div);
2.float div的“left”、“right”指的是相对浏览器的左右,并非div之间的相对位置,即若要实现两个float div并排挨着显示时,需将其都定义为left,或者都为right;
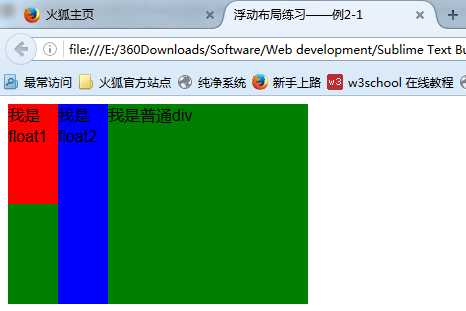
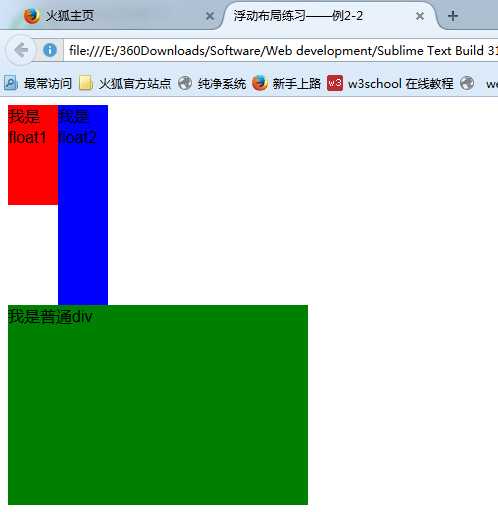
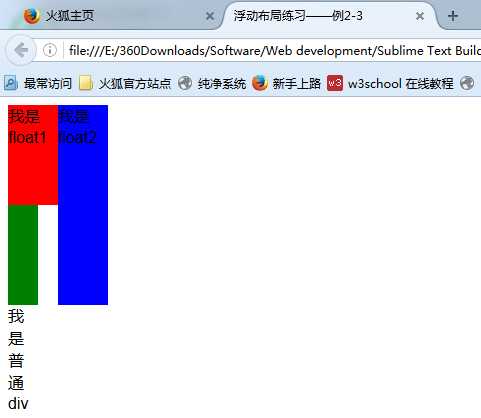
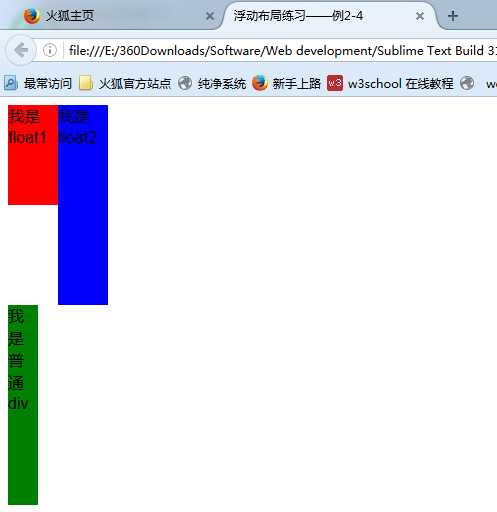
例2,当普通div定义在float div后面效果:
2-1是普通div较float div大时,float div就悬浮在普通div的上方;
2-2是在2-1的基础上,为普通div加上清除float效果,可以看到普通div跑到下面一行去了;
2-3是普通div较float diiv小时,(不明白里面的字为什么会跑出来?)
2-4是在2-3的基础上,为普通div加上清除float效果,可以看到普通div显示在下一行~
例3,利用float布局实现田字格:
 例1
例1
<!DOCTYPE html>
<html lang="en">
<head>
    <meta charset="UTF-8">
    <title>浮动布局练习——例1</title>
    <style type="text/css">
        #putong
        {
            width:200px;
            height:100px;
            background-color: green;
        }
        #float1
        {
            width:200px;
            height:100px;
            background-color: red;
            float:left;
        }
        #float2
        {
            width:300px;
            height:200px;
            background-color: blue;
            float:right;
        }

    </style>
</head>
<body>
    <div id=putong>
        我是普通div
    </div>
    <div id=float1>
        我是float1
    </div>
    <div id=float2>
        我是float2
    </div>

</body>
</html>

 例2-1
例2-1
 1 <!DOCTYPE html>
 2 <html lang="en">
 3 <head>
 4     <meta charset="UTF-8">
 5     <title>浮动布局练习——例2-1</title>
 6     <style type="text/css">
 7         #putong
 8         {
 9             width:300px;
10             height:200px;
11             background: green;
12         }
13         #float1
14         {
15             width:50px;
16             height:100px;
17             background: red;
18             float:left;
19         }
20         #float2
21         {
22             width:50px;
23             height:200px;
24             background-color: blue;
25             float:left;
26         }
27     </style>
28 </head>
29 <body>
30     <div id=float1>
31         我是float1
32     </div>
33     <div id=float2>
34         我是float2
35     </div>
36         <div id=putong>
37         我是普通div
38     </div>
39 </body>
40 </html>
 例2-2View Code
 例2-3View Code
 例2-4
例2-4
 1 <!DOCTYPE html>
 2 <html lang="en">
 3 <head>
 4     <meta charset="UTF-8">
 5     <title>浮动布局练习——例2-4</title>
 6     <style type="text/css">
 7         #putong
 8         {
 9             width:30px;
10             height:200px;
11             background: green;
12             clear:left;
13         }
14         #float1
15         {
16             width:50px;
17             height:100px;
18             background: red;
19             float:left;
20         }
21         #float2
22         {
23             width:50px;
24             height:200px;
25             background-color: blue;
26             float:left;
27         }
28     </style>
29 </head>
30 <body>
31     <div id=float1>
32         我是float1
33     </div>
34     <div id=float2>
35         我是float2
36     </div>
37         <div id=putong>
38         我是普通div
39     </div>
40 </body>
41 </html>
 例3
例3
 1 <!DOCTYPE html>
 2 <html>
 3 <head>
 4     <meta charset="utf-8">
 5     <meta http-equiv="X-UA-Compatible" content="IE=edge">
 6     <title>float实现田字格布局</title>
 7     <link rel="stylesheet" href="">
 8     <style type="text/css">
 9         #div1
10         {
11             width:650px;
12             height:250px;
13             background: yellow;
14             float:left;
15         }
16         #div2
17         {
18             width: 650px;
19             height:250px;
20             background: blue;
21             float: right;
22         }
23         #div3
24         {
25             width:650px;
26             height:300px;
27             background: red;
28             float:left;
29
30         }
31         #div31
32         {
33             width:650px;
34             height:50px;
35             background: white;
36         }
37         #div4
38         {
39             width:650px;
40             height:300px;
41             background:purple;
42             float:right;
43         }
44         #div41
45         {
46             width:650px;
47             height:50px;
48             background: white;
49         }
50
51     </style>
52 </head>
53 <body>
54     <div id="div1">
55         我是1
56     </div>
57     <div id="div2">
58         我是2
59     </div>
60     <div id="div3">
61         <div id="div31">
62             我是3-1
63         </div>
64         我是3
65     </div>
66     <div id ="div4">
67         <div id="div41">
68             我是4-1
69         </div>
70         我是4
71     </div>
72 </body>
73 </html>
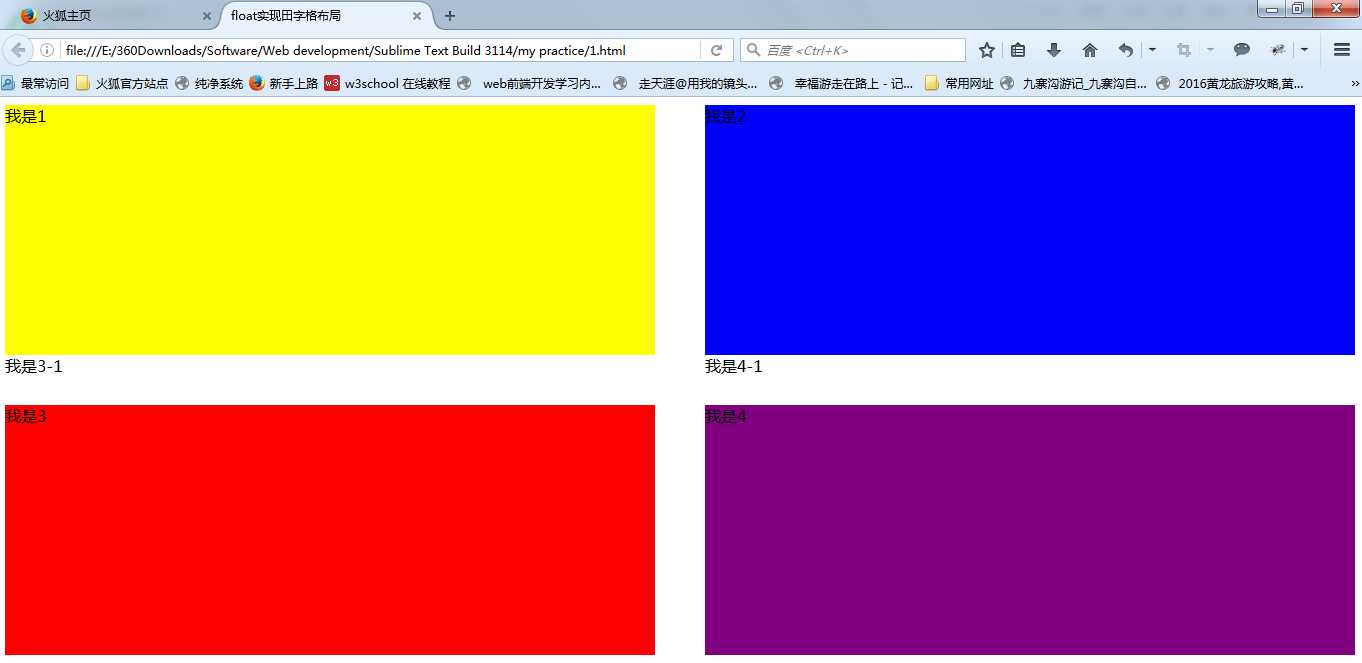
哇,终于写完了,在敲的过程中,收益良多啊!
恩,明天继续!
标签:
原文地址:http://www.cnblogs.com/Christeen/p/5648433.html