标签:
堡垒机,也称为跳板机,多用于系统运维环境中。指的是在一个特定的网络环境下,为了保障网络和数据不受来自外部和内部用户的入侵和破坏,而运用各种技术手段实时收集和监控网络环境中每一个组成部分的系统状态、安全事件、网络活动,以便集中报警、及时处理及审计定责。
从功能上分析,它综合了核心系统运维和安全审计管控两大主要功能;从技术实现上分析,它通过切断终端计算机对网络和服务器资源的直接访问,而采用协议代理的方式,接管了终端计算机对网络和服务器的访问。形象地说,终端计算机对目标的访问,均需要经过运维安全审计的翻译。打一个比方,运维安全审计扮演着看门者的工作,所有对网络设备和服务器的请求都要从这扇大门经过。因此运维安全审计能够拦截非法访问和恶意攻击,并对不合法命令进行命令阻断,过滤掉所有对目标设备的非法访问行为,并对内部人员误操作和非法操作进行审计监控,以便事后责任追踪。
产生堡垒机的最初原因是随着系统的不断发展,网络规模和设备数量迅速扩大,日趋复杂的业务系统与不同背景的运维人员的行为给系统安全带来较大风险:
为了解决上面的问题,开发出了堡垒机,作为用户和主机之间的一道“防火墙”。
简单的讲就是:以前去一座酒店,你想去哪个房间可以直接去,但现在不行了,得通过前台这么个“堡垒机”的允许和监控下才可以,想“做坏事”得小心了......
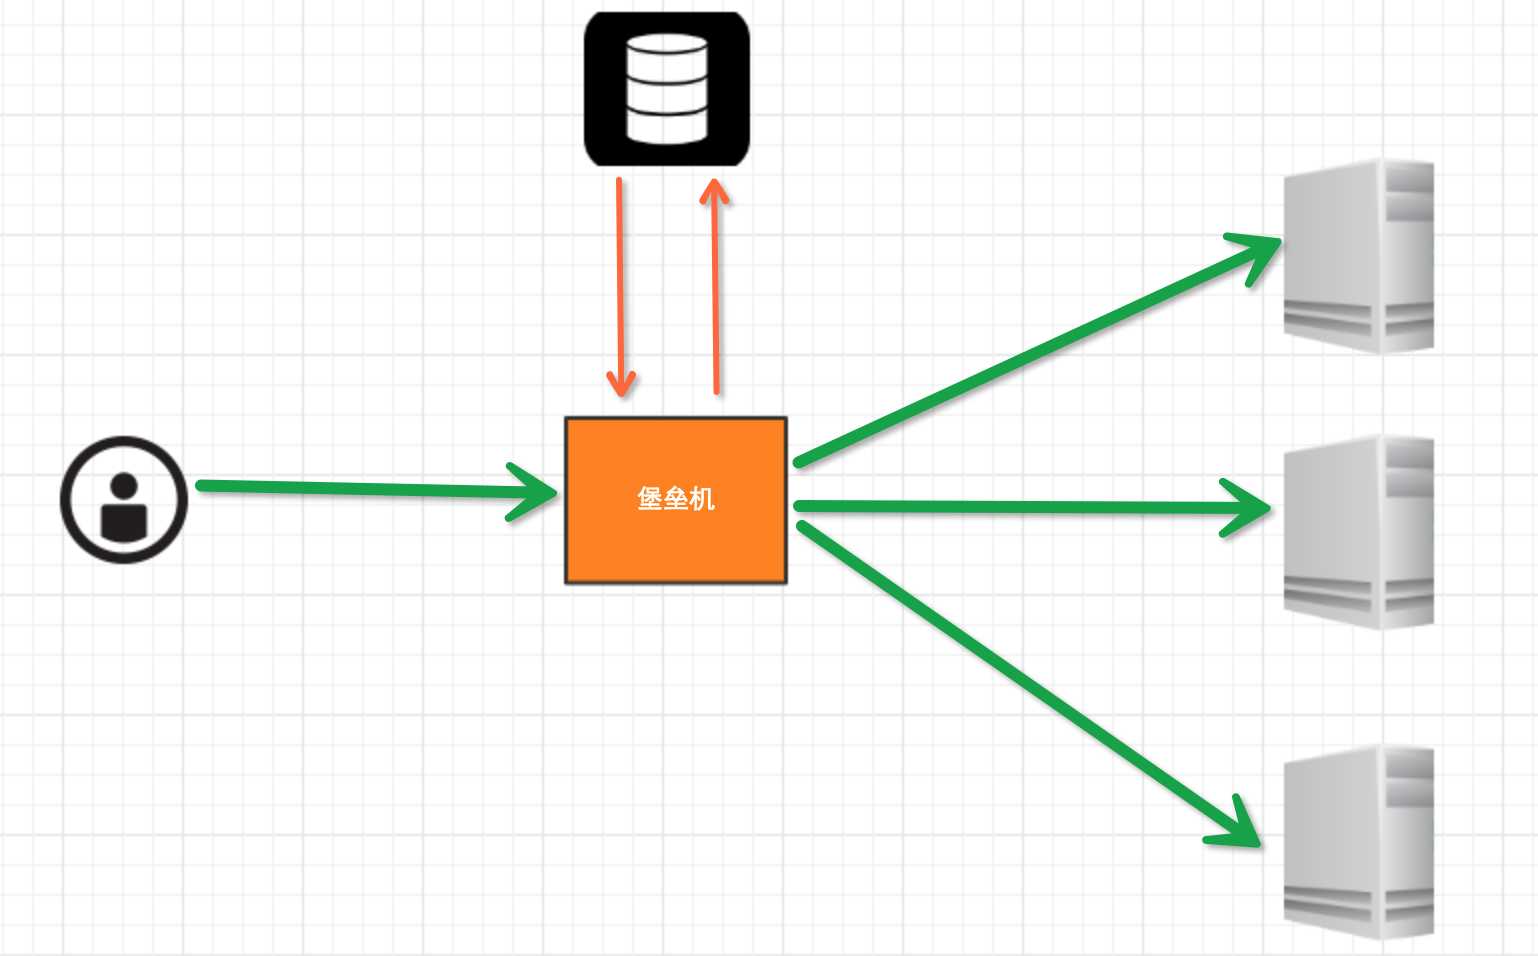
堡垒机的核心架构通常如下图所示:

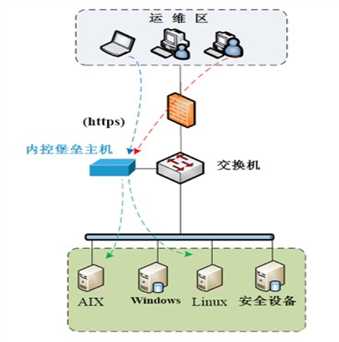
设备的连接方式如下图所示:

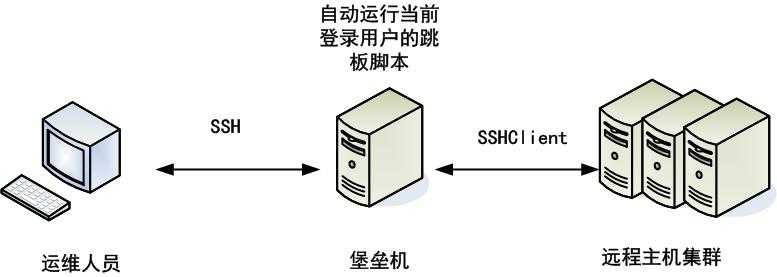
堡垒机的一般执行流程:
注:在linux中,通过配置用户的.brashrc文件,实现ssh登陆后自动执行脚本,如:/usr/bin/env python /home/jack/jump.py,完成业务操作后logout自动退出。
另外,想要正确可靠的发挥堡垒机的作用,只靠堡垒机本身是不够的, 还需要对用户进行安全上的限制,堡垒机部署后,要确保你的系统达到以下条件:
通过第三方模块paramiko,在python中可以很方便的实现堡垒机的基础功能,还可以通过django框架实现web管理和维护。
基本架构如下:

该版本较简单,只能输入一行命令,回车,然后接收主机返回的信息,并打印。
#!/usr/bin/env python
# -*- coding:utf-8 -*-

import paramiko
import sys
import os
import socket
import select
import getpass
from paramiko.py3compat import u  # python2.x中不需要这一行


default_username = getpass.getuser()
username = input(‘Username [%s]: ‘ % default_username)
if len(username) == 0:
    username = default_username


hostname = input(‘Hostname: ‘)
if len(hostname) == 0:
    print(‘*** Hostname required.‘)
    sys.exit(1)

tran = paramiko.Transport((hostname, 22,))
tran.start_client()

default_auth = "p"
auth = input(‘Auth by (p)assword or (r)sa key[%s] ‘ % default_auth)
if len(auth) == 0:
    auth = default_auth

if auth == ‘r‘:
    default_path = os.path.join(os.environ[‘HOME‘], ‘.ssh‘, ‘id_rsa‘)
    path = input(‘RSA key [%s]: ‘ % default_path)
    if len(path) == 0:
        path = default_path
    try:
        key = paramiko.RSAKey.from_private_key_file(path)
    except paramiko.PasswordRequiredException:
        password = getpass.getpass(‘RSA key password: ‘)
        key = paramiko.RSAKey.from_private_key_file(path, password)
    tran.auth_publickey(username, key)
else:
    pw = getpass.getpass(‘Password for %s@%s: ‘ % (username, hostname))
    tran.auth_password(username, pw)


# 打开一个通道
chan = tran.open_session()
# 获取一个终端
chan.get_pty()
# 激活器
chan.invoke_shell()

while True:
    # 监视用户输入和服务器返回数据
    # sys.stdin 处理用户输入
    # chan 是之前创建的通道,用于接收服务器返回信息
    # select模块是IO多路复用模块,功能强大,无处不在,你值得学习和记忆!
    readable, writeable, error = select.select([chan, sys.stdin, ],[],[],1)
    if chan in readable:
        try:
            x = u(chan.recv(1024))  # python2.x中直接接收就可以,不要u
            if len(x) == 0:
                print(‘\r\n*** EOF\r\n‘)
                break
            sys.stdout.write(x)
            sys.stdout.flush()
        except socket.timeout:
            pass
    if sys.stdin in readable:
        inp = sys.stdin.readline()    # 一行一行的读取用户在终端输入的命令
        chan.sendall(inp)

chan.close()
tran.close()
上面是一行一行的命令执行方式,下面这个是一个按键一个按键的读取并发送方式。
# 从chan.invoke_shell()这一句往上省略,和上面的例子相同

import termios  # 导入python的终端模块。注意,windows系统没有这个模块。


# 获取原tty属性,用于在退出时恢复原始状态
oldtty = termios.tcgetattr(sys.stdin)
try:
    # 为tty设置新属性
    # 默认当前tty设备属性:
    #   输入一行回车,执行
    #   CTRL+C 进程退出,遇到特殊字符,特殊处理。

    # 这是为原始模式,不认识所有特殊符号
    # 放置特殊字符应用在当前终端,如此设置,将所有的用户输入均发送到远程服务器
    tty.setraw(sys.stdin.fileno())
    chan.settimeout(0.0)

    while True:
        # 监视 用户输入 和 远程服务器返回数据(socket)
        # 阻塞,直到句柄可读
        r, w, e = select.select([chan, sys.stdin], [], [], 1)
        if chan in r:
            try:
                x = u(chan.recv(1024))
                if len(x) == 0:
                    print(‘\r\n*** EOF\r\n‘)
                    break
                sys.stdout.write(x)
                sys.stdout.flush()
            except socket.timeout:
                pass
        if sys.stdin in r:
            x = sys.stdin.read(1)  # 用户每在键盘上敲击一个按键,就读取一下,并发送到主机
            if len(x) == 0:
                break
            chan.send(x)

finally:
    # 重新设置终端属性为原状
    termios.tcsetattr(sys.stdin, termios.TCSADRAIN, oldtty)


chan.close()
tran.close()
在linux中有tab键补全功能,要实现它,需要按键读取的方式,接收主机返回的tab补齐信息,最后组合成完整的命令,并执行。另外由于windows操作系统没有termios模块,因此使用多线程的方式。
import paramiko
import sys
import os
import socket
import getpass

from paramiko.py3compat import u

# windows does not have termios...
try:
    import termios
    import tty
    has_termios = True
except ImportError:
    has_termios = False


def interactive_shell(chan):
    if has_termios:
        posix_shell(chan)
    else:
        windows_shell(chan)


def posix_shell(chan):
    import select

    oldtty = termios.tcgetattr(sys.stdin)
    try:
        tty.setraw(sys.stdin.fileno())
        tty.setcbreak(sys.stdin.fileno())
        chan.settimeout(0.0)
        log = open(‘handle.log‘, ‘a+‘, encoding=‘utf-8‘)
        flag = False
        temp_list = []
        while True:
            r, w, e = select.select([chan, sys.stdin], [], [])
            if chan in r:
                try:
                    x = u(chan.recv(1024))
                    if len(x) == 0:
                        sys.stdout.write(‘\r\n*** EOF\r\n‘)
                        break
                    if flag:
                        if x.startswith(‘\r\n‘):
                            pass
                        else:
                            temp_list.append(x)
                        flag = False
                    sys.stdout.write(x)
                    sys.stdout.flush()
                except socket.timeout:
                    pass
            if sys.stdin in r:
                x = sys.stdin.read(1)
                import json

                if len(x) == 0:
                    break

                if x == ‘\t‘:
                    flag = True
                else:
                    temp_list.append(x)
                if x == ‘\r‘:
                    log.write(‘‘.join(temp_list))
                    log.flush()
                    temp_list.clear()
                chan.send(x)

    finally:
        termios.tcsetattr(sys.stdin, termios.TCSADRAIN, oldtty)


def windows_shell(chan):
    import threading

    sys.stdout.write("Line-buffered terminal emulation. Press F6 or ^Z to send EOF.\r\n\r\n")

    def writeall(sock):
        while True:
            data = sock.recv(256)
            if not data:
                sys.stdout.write(‘\r\n*** EOF ***\r\n\r\n‘)
                sys.stdout.flush()
                break
            sys.stdout.write(data)
            sys.stdout.flush()

    writer = threading.Thread(target=writeall, args=(chan,))
    writer.start()

    try:
        while True:
            d = sys.stdin.read(1)
            if not d:
                break
            chan.send(d)
    except EOFError:
        # user hit ^Z or F6
        pass


def run():
    default_username = getpass.getuser()
    username = input(‘Username [%s]: ‘ % default_username)
    if len(username) == 0:
        username = default_username


    hostname = input(‘Hostname: ‘)
    if len(hostname) == 0:
        print(‘*** Hostname required.‘)
        sys.exit(1)

    tran = paramiko.Transport((hostname, 22,))
    tran.start_client()

    default_auth = "p"
    auth = input(‘Auth by (p)assword or (r)sa key[%s] ‘ % default_auth)
    if len(auth) == 0:
        auth = default_auth

    if auth == ‘r‘:
        default_path = os.path.join(os.environ[‘HOME‘], ‘.ssh‘, ‘id_rsa‘)
        path = input(‘RSA key [%s]: ‘ % default_path)
        if len(path) == 0:
            path = default_path
        try:
            key = paramiko.RSAKey.from_private_key_file(path)
        except paramiko.PasswordRequiredException:
            password = getpass.getpass(‘RSA key password: ‘)
            key = paramiko.RSAKey.from_private_key_file(path, password)
        tran.auth_publickey(username, key)
    else:
        pw = getpass.getpass(‘Password for %s@%s: ‘ % (username, hostname))
        tran.auth_password(username, pw)

    # 打开一个通道
    chan = tran.open_session()
    # 获取一个终端
    chan.get_pty()
    # 激活器
    chan.invoke_shell()

    interactive_shell(chan)

    chan.close()
    tran.close()


if __name__ == ‘__main__‘:
    run()
下面这个例子的堡垒机模式有点不同,它实现的是这么个架构的SCP功能:

#!/usr/bin/env python
import paramiko
import os,sys,time

hostname="192.168.1.111"   # 远程主机
username="root"                    # 远程主机的用户名
password="SKJh935yft#"

blip="192.168.1.1"              # 堡垒机
bluser="root"                        #堡垒机用户名
blpasswd="SKJh935yft#"

tmpdir="/tmp"                   #  客户机源文件路径、堡垒机临时路劲和远程主机目标文件路径
remotedir="/data"
localpath="/home/nginx_access.tar.gz"
tmppath=tmpdir+"/nginx_access.tar.gz"
remotepath=remotedir+"/nginx_access_hd.tar.gz"

port=22
passinfo=‘\‘s password: ‘                     # 这是密码信息
paramiko.util.log_to_file(‘syslogin.log‘)   # paramiko自带的日志功能

t = paramiko.Transport((blip, port))           # 创建连接对象
t.connect(username=bluser, password=blpasswd)   #建立连接
sftp =paramiko.SFTPClient.from_transport(t)  # 创建SFTP连接
sftp.put(localpath, tmppath)    # 利用put方法上传文件

sftp.close()          # 关闭sftp连接

ssh=paramiko.SSHClient()
ssh.set_missing_host_key_policy(paramiko.AutoAddPolicy())
ssh.connect(hostname=blip,username=bluser,password=blpasswd)

#创建一个新的会话
channel=ssh.invoke_shell()
channel.settimeout(10)

buff = ‘‘
resp = ‘‘
# 利用linux原生的scp功能将堡垒机上的临时文件传送到远程主机上面
channel.send(‘scp ‘+tmppath+‘ ‘+username+‘@‘+hostname+‘:‘+remotepath+‘\n‘)

while not buff.endswith(passinfo):
    try:
        resp = channel.recv(9999)
    except Exception,e:
        print ‘Error info:%s connection time.‘ % (str(e))
        channel.close()
        ssh.close()
        sys.exit()
    buff += resp
    if not buff.find(‘yes/no‘)==-1:
        channel.send(‘yes\n‘)
	buff=‘‘

channel.send(password+‘\n‘)

buff=‘‘
while not buff.endswith(‘# ‘):
    resp = channel.recv(9999)
    if not resp.find(passinfo)==-1:
        print ‘Error info: Authentication failed.‘
        channel.close()
        ssh.close()
        sys.exit()
    buff += resp

print buff
channel.close()
ssh.close()
标签:
原文地址:http://www.cnblogs.com/feixuelove1009/p/5729643.html