标签:
网页中各个元素的布局,一般是根据文档流自上而下进行布置。如果想要实现一些独特的布局,则需要进行相应的CSS设置。(position , margin , padding ,float )
网络上流传的布局方案,一般都涉及 清除浮动 。 所以这又是什么含义,怎么实现呢?
|--Position--|
position: static | relative | absolute | sticky | fixed |
position主要有这些选项。
除了static 之外,其余的选项 都需要 附加相关属性。(top,right,left,bottom)
sticky:
      sticky 一般表现和relative 一致,当且仅当 实际属性 < 设置属性时 , 该属性就会 转为fixed。
statictop, right, bottom, left 和 z-index 属性无效。relativeabsolute
知道了属性的含义,那么flow呢?
flow:right|left|bottom|top
flow 可以使元素保有悬浮效果,不随窗口大小而改变其悬浮特性

那么为什么要 清除移动? 因为一个标签设置了移动,会影响相邻标签的位置,使之产生偏差。
清除移动指的是什么呢? 清除这种偏差的影响!

解决方案如下:引自http://stackoverflow.com/questions/211383/what-methods-of-clearfix-can-i-use
Depending upon the design being produced, each of the below clearfix CSS solutions has its own benefits.
Thierry Koblentz‘ of CSS Mojo wrote another article revisiting the clearfix, making a strong argument for dropping display: table in favor of display: block which has the advantage of not disabling margin-collapse between containers.
The latest micro-clearfix code is now:
.container::after {
    content:"";
    display:block;
    clear:both;
}
Thierry Koblentz‘ of CSS Mojo has pointed out that when targeting modern browsers, we can now drop the zoom and ::before property/values and simply use:
.container::after {
    content:"";
    display:table;
    clear:both;
}
This solution does not support for IE 6/7 …on purpose!
Thierry also offers: "A word of caution: if you start a new project from scratch, go for it, but don’t swap this technique with the one you have now, because even though you do not support oldIE, your existing rules prevent collapsing margins."
The most recent and globally adopted clearfix solution, the Micro Clearfix by Nicolas Gallagher.
.container::before, .container::after {
    content:"";
    display:table;
}
.container::after {
    clear:both;
}
.container {
    zoom:1; /* For IE 6/7 (trigger hasLayout) */
}
This basic method is preferred for the usual case, when positioned content will not show outside the bounds of the container.
http://www.quirksmode.org/css/clearing.html - explains how to resolve common issues related to this technique, namely, setting width: 100% on the container.
.container {
    overflow: hidden;
    display: inline-block; /* Necessary to trigger "hasLayout" in IE */
    display: block; /* Sets element back to block */
}
Rather than using the display property to set "hasLayout" for IE, other properties can be used for triggering "hasLayout" for an element.
.container {
    overflow: hidden; /* Clearfix! */
    zoom: 1;  /* Triggering "hasLayout" in IE */
    display: block; /* Element must be a block to wrap around contents. Unnecessary if only using block-level elements. */
}
Another way to clear floats using the overflow property is to use the underscore hack. IE will apply the values prefixed with the underscore, other browsers will not. The zoom property triggers hasLayout in IE:
.container {
    overflow: hidden;
    _overflow: visible; /* for IE */
    _zoom: 1; /* for IE */
}
While this works... it is not ideal to use hacks.
This older "Easy Clearing" method has the advantage of allowing positioned elements to hang outside the bounds of the container, at the expense of more tricky CSS.
http://www.positioniseverything.net/easyclearing.html
.container {
    display: inline-block;
}
.container::after {
    content: "";
    display: block;
    height: 0;
    clear: both;
    overflow: hidden;
    visibility: hidden;
}
.container {
    display: block;
}
Note that you should always use the double colon, ::, for before and after, unless you need to support IE8. A double colon is standard for pseudo-elements, and the single-colon implementation is deprecated and support could well be dropped in the future.
三栏式布局的实现


实现方法有两个:
1、两边position:absolute + top+right/left 做出margin的效果
  中间 设定好margin:auto 140px 20px 220px 即可
2、float:left/right 中间 清除float+ margin设定
【第一例】
<!DOCTYPE html>
<html lang="en">
<head>
    <meta charset="UTF-8">
    <title>Title</title>
</head>
<style type="text/css">
    .main{padding: 20px;background: #eee;border:#999;margin:20px;position:relative;}
    .left{position:absolute;top:20px;left:20px;background: white;width:200px;text-align: center}
    .right{position:absolute;top:20px;right:20px;background: white;width:120px;clear:left}
    .intro{margin:auto 140px 20px  220px ;height:500px;background: white;}
    .logo{height:80px;width:80px;background:#eee;margin:10px auto;}
</style>
<body>
<div class="main">
    <div class=" left" >
        <span>野鸡战队</span>
        <div class="logo"></div>
    </div>
    <div class="intro">根据周五(8月5日)的一项调查显示,英国劳动力市场在公投脱欧后呈现“直线下降,招聘企业上月招聘的固定岗位数目出现2009年5月以来最大降幅。英国招聘与就业联合会(REC)发布的月报显示,7月固定岗位起薪增幅为逾三年来最低。整体而言,这份调查进一步证明企业信心及活动在英国脱欧公投后大幅放缓。REC执行长Kevin Green指出,英国就业市场在7月遭遇急剧下落,固定岗位招聘数量降至2009年衰退以来最低水准。公投脱欧后的经济动荡无疑为根本原因所在。  </div>
    <div class="right">
        <div class="logo"></div>
        <div class="logo"></div>
        <div class="logo"></div>
        <div class="logo"></div>
    </div>

</div>
</body>
</html>
【第二例】
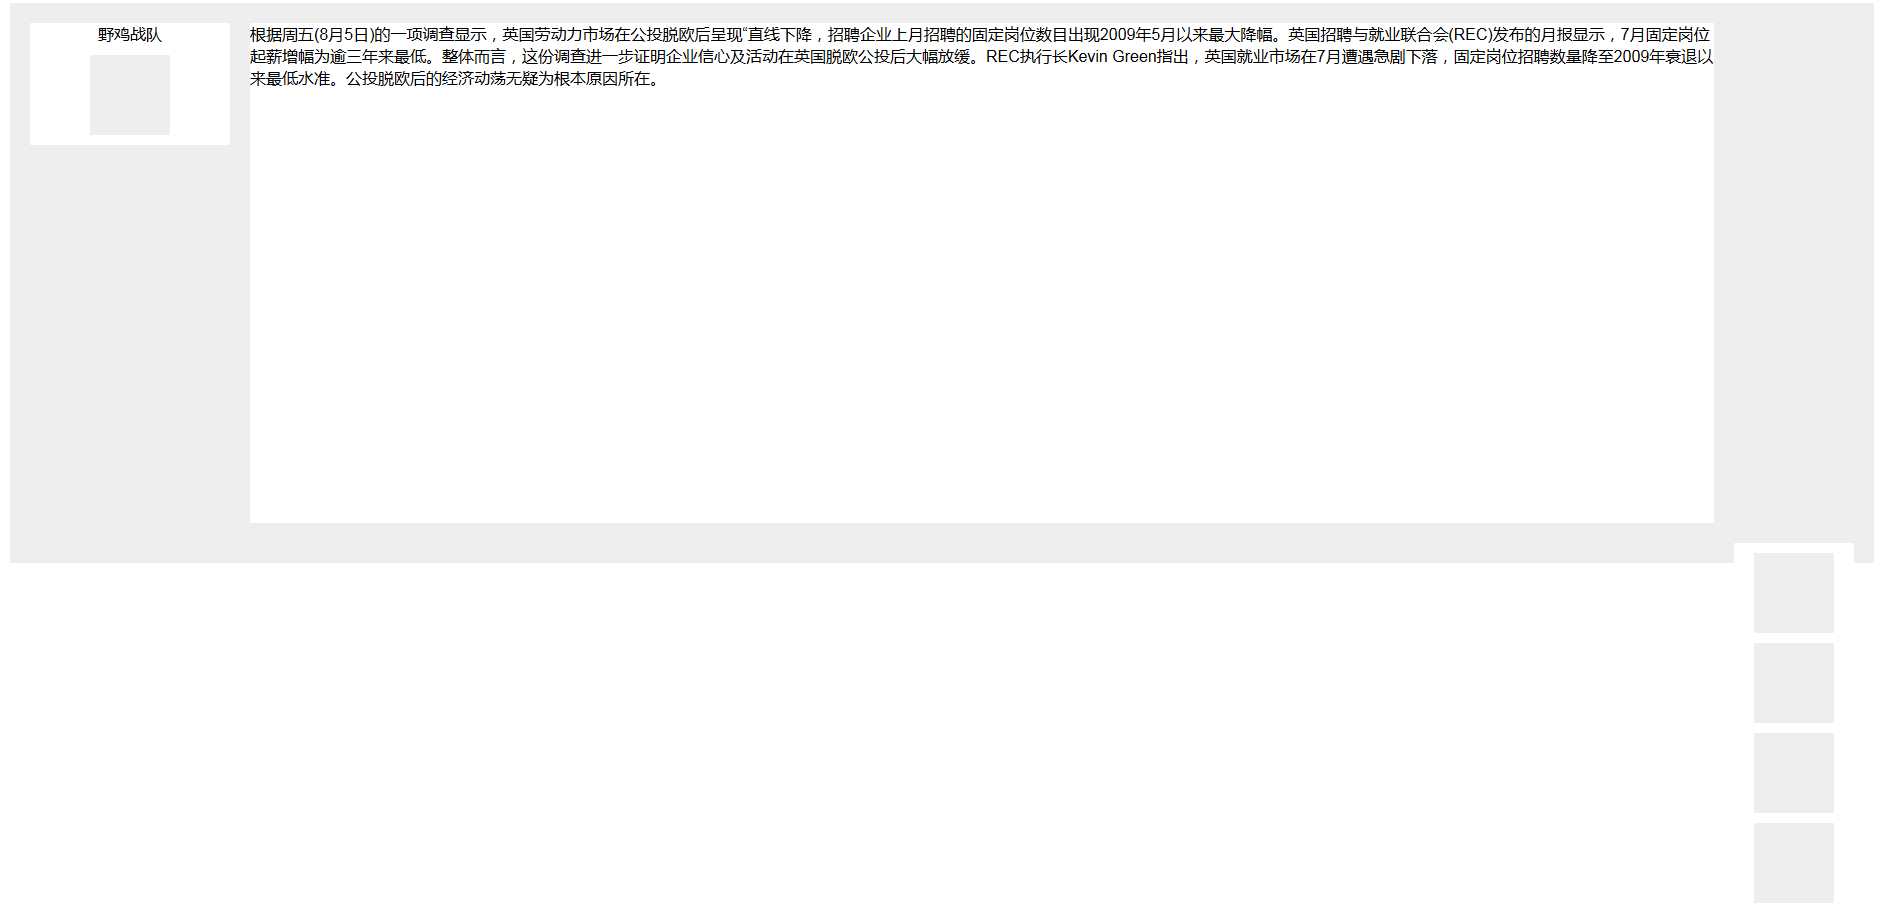
这里有个关键点:网页渲染是根据文档流的位置进行渲染的,所以渲染顺序,应该是left,right,middle.
否则的话就会,right 部分在右下方,这是因为,middle贴着left,然后就  往下输出下一个元素right(渲染规则,自上而下)
于是right,就在下方的右边。如图

所以,改动一下相关div的位置,问题就解决了
<!DOCTYPE html>
<html lang="en">
<head>
    <meta charset="UTF-8">
    <title>Title</title>
</head>
<style type="text/css">
    .main{padding: 20px;background: #eee;border:#999;margin:20px;position:relative;}
    .left{float:left;background: white;width:200px;text-align: center}
    .right{float:right;background: white;width:120px;}
    .intro{margin:auto 140px 20px  220px ;height:500px;background: white;overflow: auto}
    .logo{height:80px;width:80px;background:#eee;margin:10px auto;}
</style>
<body>
<div class="main">
    <div class=" left" >
        <span>野鸡战队</span>
        <div class="logo"></div>
    </div>
    <div class="right">
        <div class="logo"></div>
        <div class="logo"></div>
        <div class="logo"></div>
        <div class="logo"></div>
    </div>
    <div class="intro">根据周五(8月5日)的一项调查显示,英国劳动力市场在公投脱欧后呈现“直线下降,招聘企业上月招聘的固定岗位数目出现2009年5月以来最大降幅。英国招聘与就业联合会(REC)发布的月报显示,7月固定岗位起薪增幅为逾三年来最低。整体而言,这份调查进一步证明企业信心及活动在英国脱欧公投后大幅放缓。REC执行长Kevin Green指出,英国就业市场在7月遭遇急剧下落,固定岗位招聘数量降至2009年衰退以来最低水准。公投脱欧后的经济动荡无疑为根本原因所在。  </div>

</div>
</body>
</html>

效果如图

三栏式布局的实现&& position的应用&&清除移动的含义
标签:
原文地址:http://www.cnblogs.com/dongfangliu/p/5740825.html