标签:
test.html & example.js 文件说明了传统技术:document.write & innerHTML 的用法
test.html:
<!DOCTYPE html>
<html>
<head>
	<meta charset="utf-8" />
	<title> Test </title>
</head>
<body>
	<div id="testdiv">
		<p>This is <em>my</em> content.</p>
	</div>
<script src="example.js"></script>
<!--<script type="text/javascript">
	insertParagraph("This is inserted.")
</script>-->
<!-- if you want to use document.write(), you should code like upper. -->
</body>
</html>
example.js:
window.onload = function()
{	var testdiv = document.getElementById("testdiv");
	console.log(testdiv.innerHTML);


	/*function insertParagraph(text)
	{
		var str = "<p>";
		str += text;
		str += "</p>";
		document.write(str);
	}*/
}
test2.html & example2.js 文件说明用DOM方法添加单一节点的方法:
test2.html :
<!DOCTYPE html>
<html>
<head>
	<meta charset="utf-8" />
	<title>Test</title>
</head>
<body>
	<div id="testdiv">

	</div>
	<!-- If I want to invert a text into the element "testdiv", in DOM‘s opinion, it equals add a node <p> and make this node bacome a child node of element node <div>. (Remember there is already one child node which is an element property node,the value of it is "testdiv" for element node <div>.
	And we can put this task in two steps: [1] set up a new element;(use DOM function: createElement, and when you use this function, it is always a good idea to give it in a variable.) [2] invert this new element into node tree(use DOM function: appendChild).)
	-->
	<script type="text/javascript" src="example2.js"></script>
</body>
</html>
example2.js:
window.onload = function()
{
	var para = document.createElement("p");
	// we have already add a new element, but it is a document fragment which means it owns its own DOM properties(nodeType & nodeName, but can not show in browser.).
	// we can use follow method to check its nodeType & nodeName
	var info = "nodeName: ";
	info += para.nodeName;
	info += " nodeType: ";
	info += para.nodeType;
	console.log(info);

	// Then invert "p" into node tree
	var testdiv = document.getElementById("testdiv");
	testdiv.appendChild(para);

	// Third, we can put some text into "p" (use DOM function: createTextNode)
	var txt = document.createTextNode("Hello world"); // now, "txt" is also a document fragment
	para.appendChild(txt);
}
test3.html & example3.js 文件是多个节点的添加:

test3.html:
<!DOCTYPE html>
<html>
<head>
	<meta charset="utf-8" />
	<title>Test</title>
</head>
<body>
<div id="testdiv">
</div>
<script type="text/javascript" src="example3.js"></script>
</body>
</html>
example3.js:
window.onload = function()
{
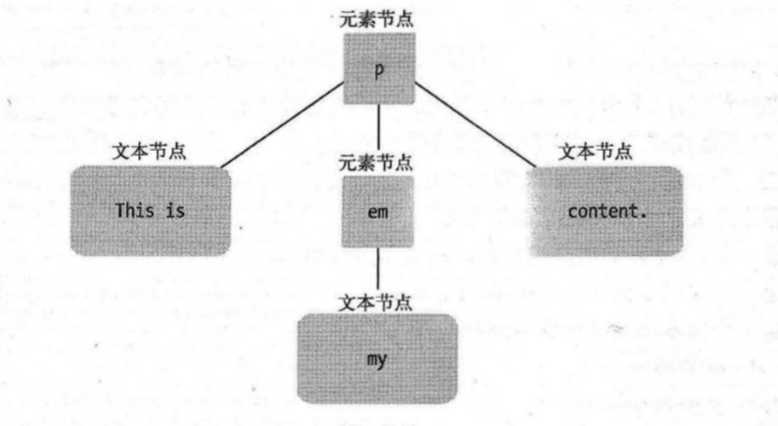
	var para = document.createElement("p");
	var txt1 = document.createTextNode("This is ");
	var emphasis = document.createElement("em");
	var txt2 = document.createTextNode("my ");
	var txt3 = document.createTextNode("content.");

	para.appendChild(txt1);
	para.appendChild(emphasis);
	emphasis.appendChild(txt2);
	para.appendChild(txt3);

	var testdiv = document.getElementById("testdiv");
	testdiv.appendChild(para);
}
最后,完善上次的 Images Gallery:
文件目录:

css 文件:

body {
  font-family: "Helvetica","Arial",serif;
  color: #333;
  background-color: #ccc;
  margin: 1em 10%;
}
h1 {
  color: #333;
  background-color: transparent;
}
a {
  color: #c60;
  background-color: transparent;
  font-weight: bold;
  text-decoration: none;
}
ul {
  padding: 0;
  height: auto;
}
li {
  float: left;
  padding: 1em;
  list-style: none;
}
#imagegallery {
  list-style: none;
}

#imagegallery li {
  display: inline;
}

#imagegallery li a img {
  border: 0;
}
scripts 文件:

function addLoadEvent(func) {
  var oldonload = window.onload;
  if (typeof window.onload != ‘function‘) {
    window.onload = func;
  } else {
    window.onload = function() {
      oldonload();
      func();
    }
  }
}

function insertAfter(newElement,targetElement) {
  var parent = targetElement.parentNode;
  if (parent.lastChild == targetElement) {
    parent.appendChild(newElement);
  } else {
    parent.insertBefore(newElement,targetElement.nextSibling);
  }
}

function preparePlaceholder() {
  if (!document.createElement) return false;
  if (!document.createTextNode) return false;
  if (!document.getElementById) return false;
  if (!document.getElementById("imagegallery")) return false;
  var placeholder = document.createElement("img");
  placeholder.setAttribute("id","placeholder");
  placeholder.setAttribute("src","images/placeholder.gif");
  placeholder.setAttribute("alt","my image gallery");
  placeholder.style.clear = "both";
  placeholder.style.display = "block"; // to let "img" become a block-level element
  var description = document.createElement("p");
  description.setAttribute("id","description");
  var desctext = document.createTextNode("Choose an image");
  description.appendChild(desctext);
  var gallery = document.getElementById("imagegallery");
  insertAfter(placeholder,gallery);
  insertAfter(description,placeholder);
}

function prepareGallery() {
  if (!document.getElementsByTagName) return false;
  if (!document.getElementById) return false;
  if (!document.getElementById("imagegallery")) return false;
  var gallery = document.getElementById("imagegallery");
  var links = gallery.getElementsByTagName("a");
  for ( var i=0; i < links.length; i++) {
    links[i].onclick = function() {
      return showPic(this);
    }
    links[i].onkeypress = links[i].onclick;
  }
}

function showPic(whichpic) {
  if (!document.getElementById("placeholder")) return true;
  var source = whichpic.getAttribute("href");
  var placeholder = document.getElementById("placeholder");
  placeholder.setAttribute("src",source);
  if (!document.getElementById("description")) return false;
  if (whichpic.getAttribute("title")) {
    var text = whichpic.getAttribute("title");
  } else {
    var text = "";
  }
  var description = document.getElementById("description");
  if (description.firstChild.nodeType == 3) {
    description.firstChild.nodeValue = text;
  }
  return false;
}

addLoadEvent(preparePlaceholder);
addLoadEvent(prepareGallery);
html 文件:

<!DOCTYPE html>
<html lang="en">
<head>
  <meta http-equiv="content-type" content="text/html; charset=utf-8" />
  <title>Image Gallery</title>
  <link rel="stylesheet" href="styles/layout.css" type="text/css" media="screen" />
</head>
<body>
  <h1>Snapshots</h1>
  <ul id="imagegallery">
    <li>
      <a href="images/fireworks.jpg" title="A fireworks display">
        <img src="images/thumbnail_fireworks.jpg" alt="Fireworks" />
      </a>
    </li>
    <li>
      <a href="images/coffee.jpg" title="A cup of black coffee" >
        <img src="images/thumbnail_coffee.jpg" alt="Coffee" />
      </a>
    </li>
    <li>
      <a href="images/rose.jpg" title="A red, red rose">
        <img src="images/thumbnail_rose.jpg" alt="Rose" />
      </a>
    </li>
    <li>
      <a href="images/bigben.jpg" title="The famous clock">
        <img src="images/thumbnail_bigben.jpg" alt="Big Ben" />
      </a>
    </li>
  </ul>
  <script type="text/javascript" src="scripts/showPic.js"></script>
</body>
</html>
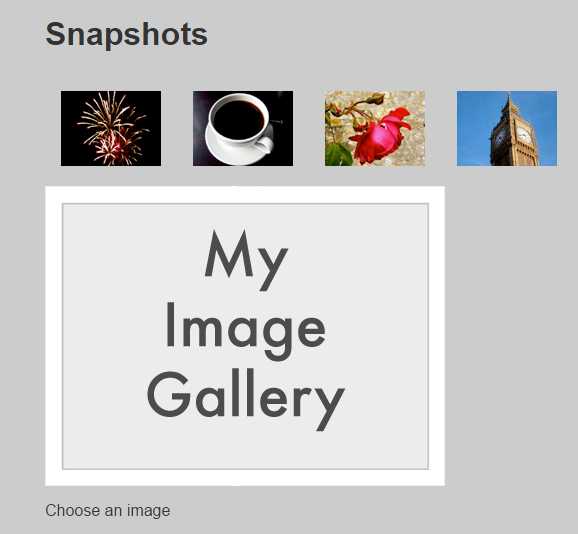
效果图:

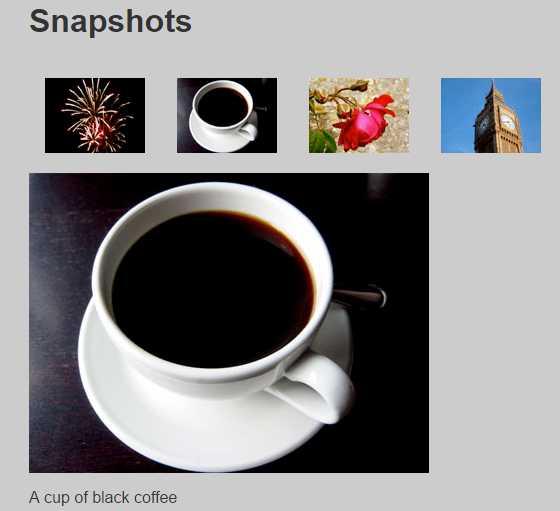
点击后:

这样子完善后的文件就安全许多,在禁用Javascript的情况下,用户依旧可以浏览图片O(∩_∩)O
最后,一个summary:
Summary:
traditional technology : document.write & innerHTML
DOM : createElement , createTextNode , appendChild , insertBefore


Thinking in DOM : DOM is the referance of document, the information contained in the DOM and
 in the document are one to one correspondence. You can use DOM to obtain or refresh
 document.If you change the DOM node tree, document in the browser‘s rendring will change
 too. Because what browser really shows is DOM node tree. In DOM‘s opinoin, one document is
 one node tree. If you want to add something to the node tree, you must insert new node.

insertBefore() : insert a new element into an existing element.
                 When you invoke this function, you must tell it three things:
                 [1] newElement : the one you want to insert;
                 [2] targetElement : the one you want to be inserted;
                 [3] parentElement : the parent element of targetElement.
                 Three is no need for us to figure out which is parentElement, because the
                 value of targetElement‘s parentNode is just the parentElement!
                 Remember : in DOM, the parentElement of an element node must be another element node.
                 Grammer : parentElement.insertBefore(newElement, targetElement);
                 Example : follow code will insert "placeholder" & "description" before "imagegallery"
                 var gallery = document.getElementById("imagegallery");
                 gallery.parentNode.insertBefore(placeholder, gallery);


insertAfter() : It‘s a shame that DOM doesn‘t provide function insertAfter(). However, we
                can compile one by ourselves.
                function insertAfter(newElement, targetElement){
                    var parent = targetElement.parentElement;
                    if(parent.lastChild == targetElement)
                    {
                        parent.appendChild(newElement);
                    }
                    else
                    {
                        parent.insertBefore(newElement,targetElement.nextSibling);
                    }
                }
                steps :
                [1] At the first, this function has 2 parameters : newElement & targetElement
                [2] put the value of targetElement‘s parentNode into variable parent
                [3] check whether targetParent is the last child element of parent or not
                [4] the rest of steps are easy to understand

Ajax : The main advantage of Ajax is that it can send request to the server via asynchronous
       mode. The server doesn‘s use the whole page to respond its request, it will process
       the request in the background, at the same time, the user can continue to browse the
       page and interact with the page. Your script can be on-demand load and create the
       page content, and won‘t interrupt the user‘s browsing experience.
       The core of Ajax is "XMLHttpRequest object":chu it works as a role between the script of
       browser(the Client) and the server.
o(* ̄▽ ̄*)o,感觉学到了好多以前没有注意到的东西!
Javascript 动态添加节点(thinking in DOM)
标签:
原文地址:http://www.cnblogs.com/yojiaku/p/5758973.html