标签:
最常用的授权就是给Controller或Action打上[Authorize]标签
没错这个就是MVC的授权过滤器
看下他的授权关键源码
protected virtual bool AuthorizeCore(HttpContextBase httpContext){if (httpContext == null){throw new ArgumentNullException("httpContext");}IPrincipal user = httpContext.User;return user.Identity.IsAuthenticated && (this._usersSplit.Length <= 0 || this._usersSplit.Contains(user.Identity.Name, StringComparer.OrdinalIgnoreCase)) && (this._rolesSplit.Length <= 0 || this._rolesSplit.Any(new Func<string, bool>(user.IsInRole)));}
我个人猜测关键大概就在最后一行user.Identity.IsAuthenticated,如果用户验证成功则为true,这是个只读属性,肯定会在某个地方设置为true才能授权成功.
就拿之前的登入案例的第一段代码说,授权的关键就在于
ClaimsIdentity ident = await UserManager.CreateIdentityAsync(user,DefaultAuthenticationTypes.ApplicationCookie);AuthManager.SignOut();AuthManager.SignIn(new AuthenticationProperties {IsPersistent = false}, ident);return Redirect(returnUrl);
创建用户标识(ClaimsIdentity),保存到user.Identity(通过方法AuthManager.SignIn),ClaimsIdentity实现IIdentity(它有个成员IsAuthenticated).
看下ClaimsIdentity源码
public virtual bool IsAuthenticated{get{return !string.IsNullOrEmpty(this.m_authenticationType);}}
代码中是判断授权类别字段是否存在,也就是当你创建了有授权类别的ClaimsIdentity就算是授权了
角色授权是更细粒度的授权,上面简单使用[Authorize]只区分了登入用户和未登入用户.
使用角色授权可以赋予用户角色,并限制角色的访问,最简单的方式是给Action添加[Authorize(Roles="Role1,Role2")]限制能访问该Action的用户必须是XXX角色.
角色的使用方法与用户很类似,都要用到IdentityRole和RoleManager
在MVC默认项目中并没有用到角色授权,但我也简单介绍一下,如果想详细学习请看Pro Asp.Net 5 platform Identity部分
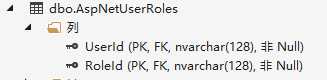
对应的表为AspNetRoles

用户与角色是多对多关心,所以还有一个AspNetUserRoles
public class ApplicationRole : IdentityRole{//可扩展字段}
IdnetityRole的默认成员
| 名称 | 描述 |
|---|---|
| Id | 定义角色的唯一标识符 |
| Name | 定义角色名称 |
| Users | 返回一个代表角色成员的IdentityUserRole对象集合 |
public class ApplicationRoleManager : RoleManager<ApplicationRole>, IDisposable{public ApplicationRoleManager(RoleStore<ApplicationRole> store) : base(store) { }//同样地,用于Owinpublic static ApplicationRoleManager Create(IdentityFactoryOptions<ApplicationRoleManager> options,IOwinContext context){return new ApplicationRoleManager(new RoleStore<ApplicationRole>(context.Get<ApplicationDbContext>()));}}
RoleManager常用成员
| 名称 | 描述 |
|---|---|
| CreateAsync(role) | 创建一个新角色 |
| DeleteAsync(role) | 删除指定角色 |
| FindByIdAsync(id) | 找到指定ID的角色 |
| FindByNameAsync(name) | 找到指定名称的角色 |
| RoleExistsAsync(name) | 如果存在指定名称的角色,返回true |
| UpdateAsync(role) | 将修改存储到指定角色 |
| Roles | 返回已被定义的角色枚举 |
注意
Discriminator,用于区分你的Role和IdentityRole.Discriminator,其实我也很疑惑,我初步的猜想是因为用的数据库上下文是ApplicationDbContext : IdentityDbContext<ApplicationUser>,手动指定了要用的用户类,这个IdentityDbContext还有个重载IdentityDbContext<TUser, TRole, TKey, TUserLogin, TUserRole, TUserClaim>,我尝试过IdentityDbContext<ApplicationUser, ApplicationRole, string, IdentityUserLogin, IdentityUserRole, IdentityUserClaim>(手动指定我的用户类和角色类,但最后还是报错,求指点)
public ActionResult Login(string returnUrl) {if (HttpContext.User.Identity.IsAuthenticated) {return View("Error", new string[] { "Access Denied" });}//省略
这部分我讲从较具体的层面(代码)解释声明,其实我是看不懂别人的抽象的说法.
虽然Claims翻译成声明但实际这个特性与声明一词好像没什么关系.因此下文我都尽量地使用Claims.
先亮一个定义
声明(Claims)是关于用户的一些信息片段
另外,我打算使用上面角色授权的例子来解释Claims,因为角色授权内部已经用到了Claims.
在开始解释之前先介绍几个比较重要的类/接口,前面有用户这些类/接口
这个安全上下文对象包含了上面的identity以及一些角色和组的信息,每一个线程都会关联一个Principal的对象,但是这个对象是属性进程或者AppDomain级别的。
在控制器中User,HttpContext.User,System.Web.HttpContext.Current.User,都是同一个对象IPrincipal(实际是System.Security.Claims.ClaimsPrincipal类型)
| 名称 | 描述 |
|---|---|
| Identity | 返回IIdentity接口的实现,它描述了与请求相关联的用户 |
| IsInRole(role) | 如果用户是指定角色的成员,则返回true。参见“以角色授权用户”小节,其中描述了以角色进行授权管理的细节 |
通过User.Identity能获取
| 名称 | 描述 |
|---|---|
| AuthenticationType | 返回一个字符串,描述了用于认证用户的机制(到现在为止都是用ApplicationCookie) |
| IsAuthenticated | 如果用户已被认证,返回true。 |
| Name | 返回当前用户的用户名 |
其实现类
| 名称 | 描述 |
|---|---|
| Claims | 返回表示用户声明(Claims)的Claim对象枚举 |
| AddClaim(claim) | 给用户添加一个声明(Claim) |
| AddClaims(claims) | 给用户添加Claim对象的枚举。 |
| HasClaim(predicate) | 如果用户含有与指定谓词匹配的声明(Claim)时,返回true。参见“运用声明(Claims)”中的示例谓词 |
| RemoveClaim(claim) | 删除用户的声明(Claim)。 |
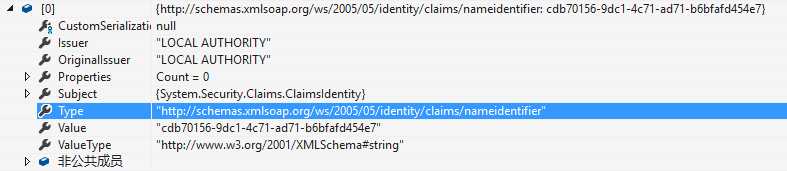
| 名称 | 描述 |
|---|---|
| Issuer | 返回提供声明(Claim)的系统名称 |
| Subject | 返回声明(Claim)所指用户的ClaimsIdentity对象 |
| Type | 返回声明(Claim)所表示的信息类型 |
| Value | 返回声明(Claim)所表示的信息片段 |
声明提供者不只有应用程序本身,也可以通过外部提供声明,比如第三方登入可以提供声明
下面就把上面的代码搬下来讲
ClaimsIdentity ident = await UserManager.CreateIdentityAsync(user,DefaultAuthenticationTypes.ApplicationCookie);AuthManager.SignOut();AuthManager.SignIn(new AuthenticationProperties {IsPersistent = false}, ident);return Redirect(returnUrl);
首先创建Identity
使用UserManager.CreateIdentityAsync=>内部调用ClaimsIdentityFactory.CreateAsyncIdentity关键的创建过程在这个方法内
 ClaimsIdentity claimsIdentity = new ClaimsIdentity(authenticationType, this.UserNameClaimType, this.RoleClaimType);

 claimsIdentity.AddClaim(new Claim(this.UserIdClaimType, this.ConvertIdToString(user.Id), "http://www.w3.org/2001/XMLSchema#string"));

 claimsIdentity.AddClaim(new Claim(this.UserNameClaimType, user.UserName, "http://www.w3.org/2001/XMLSchema#string"));

 claimsIdentity.AddClaim(new Claim("http://schemas.microsoft.com/accesscontrolservice/2010/07/claims/identityprovider", "ASP.NET Identity", "http://www.w3.org/2001/XMLSchema#string"));

 if (manager.SupportsUserSecurityStamp)

 {

     claimsIdentity.AddClaim(new Claim(this.SecurityStampClaimType, await manager.GetSecurityStampAsync(user.Id).WithCurrentCulture<string>()));

 }

//...
加了4个Claim,这四个Claim用来保存用户Id,用户名,identityprovider(不知道用来干嘛),SecurityStamp(不知道用来干嘛).
这样直接造成的影响是
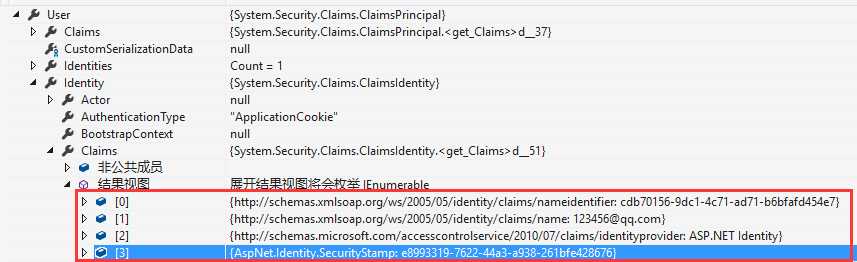
展开其中一个看看

到这里应该能理解声明(Claims)是关于用户的一些信息片段这句话吧.传统的做法会在登入后把用户信息保存到Session中(可能直接保存User类或者新创建一个UserInfo类保存之),在用户再访问网站时候能获取这个用户的信息.现在直接使用Claims来添加用户的信息片段,使用上更加的灵活,细腻,可扩展.
在使用Identity时候,可以使用这种方式限制访问的用户,实际上内部用到了Claims
[Authorize(Roles ="角色1,角色2",Users="用户1,用户2")]public ActionResult ActionName(){}
下面代码搬运自AuthorizeAttribute的AuthorizeCore最后一行代码,这是授权过滤器的核心
return user.Identity.IsAuthenticated && (this._usersSplit.Length <= 0 || this._usersSplit.Contains(user.Identity.Name, StringComparer.OrdinalIgnoreCase)) && (this._rolesSplit.Length <= 0 || this._rolesSplit.Any(new Func<string, bool>(user.IsInRole)));//_usersSplit,_rolesSplit是Users,Roles字符串用逗号切割生成的字符串数组
解释下这段代码
IsInRole
user.IsInRole是IPrincipal中的方法
public virtual bool IsInRole(string role){for (int i = 0; i < this.m_identities.Count; i++){//查看当前用户的Identity中是否有RoleClaimType声明,且这个声明的值为roleif (this.m_identities[i] != null && this.m_identities[i].HasClaim(this.m_identities[i].RoleClaimType, role)){return true;}}return false;}
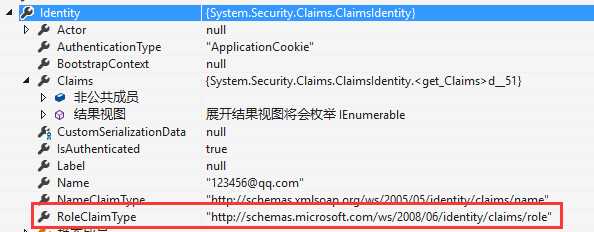
看下默认情况下的RoleClaimType
再看下HasClaim
public virtual bool HasClaim(string type, string value){if (type == null){throw new ArgumentNullException("type");}if (value == null){throw new ArgumentNullException("value");}//遍历当前Identity所有Claims,找到类型为type且值为value,如果找到了则返回trueforeach (Claim current in this.Claims){if (current != null && current != null && string.Equals(current.Type, type, StringComparison.OrdinalIgnoreCase) && string.Equals(current.Value, value, StringComparison.Ordinal)){return true;}}return false;}
由于授权内部是基于Claim的,所以可以在程序运行时动态地给用户添加角色User.Identity.Claims.Add(new Claim(ClaimTypes.Role, "Role")).
你甚至可以自定义Claim授权器
public class ClaimsAccessAttribute : AuthorizeAttribute {public string Issuer { get; set; }public string ClaimType { get; set; }public string Value { get; set; }protected override bool AuthorizeCore(HttpContextBase context) {return context.User.Identity.IsAuthenticated&& context.User.Identity is ClaimsIdentity&& ((ClaimsIdentity)context.User.Identity).HasClaim(x =>x.Issuer == Issuer && x.Type == ClaimType && x.Value == Value);}}[ClaimsAccess(Issuer="RemoteClaims", ClaimType=ClaimTypes.PostalCode,Value="DC 20500")]public string OtherAction() {return "This is the protected action";}
最后用Signin登入,内部实现我没研究大概会去影响Cookie
Claim类有个Type成员,他是字符串类型,通常都是用一个Url表示
你创建自己的Claim时候可以自定义Type,也可以用内置的一些字符串(保存在System.Security.Claims.ClaimTypes)
其实上面说的声明什么的都是集成在Asp.Net中的并不是Identity发明的
他们的命名空间大都是System.Security.Claims和System.Security.Principal
Identity包最多写了一些扩展方法而已
Asp.Net Identity学习笔记+MVC5默认项目解析_授权&Claim
标签:
原文地址:http://www.cnblogs.com/Recoding/p/5767048.html