标签:
HTML教程
一、HTML基础(人)
1、基础概念:
1.1、自动闭合标签和闭合标签(如出错html编写时不会报错)
自闭合:<mete />
闭合:<table>文字</table>
1.2、注释:<!-- 文字 -->
1.3、标签属性(name):
<table name="name"><table>
2、整体页面设置
Doctype:告诉浏览器使用什么html规范来解析html。现在使用<!Doctype html>.
Meta:提供有关页面的元信息,例:页面编码、刷新等.
      <meta http-equiv="Refresh" CONTENT="2">
       <!--刷新-->
     <meta http-equiv="Refresh" content="2 ;url=http://www.baidu.com"/>
        <!--跳转-->
      <meta charset="UTF-8">
        <!--设置编码-->
关键字和描述:
    <!--关键字(用于在百度中搜索关键字)-->
        < meta name="keywords" content="你好,博客园,飞机" >
     <!--描述-->
         < meta name="keywords" content="你好欢迎你,你也可以来博客园" >
2、HTML中头部(head)的应用
2.1网页名标签
Title:网页头部信息
<title>Title</title>
2.2引用标签:
Link:引用外部资源
  <link rel="stylesheet" type="text/css" href="css/com.css">
             <!--CSS-->
  <link rel="shortcut icon" href="i_name%20(1).jpg">
             <!--图片-->
2.3样式标签
Style:引用页面中的样式
<!DOCTYPE html>
<html lang="en">
<head>
    <meta charset="UTF-8">
    <title>我的样式</title>
    <style>
        .color{  background-color: black;
                  color: aliceblue;
    }
    </style>
</head>
<body>
<!--最常使用且可重复使用-->
<div  class="color">引用样式</div>
<div  class="color">不错</div>
<div  class="color">还是这个样式</div>
</body>
</html>
2.4脚本标签(后续更新)
3、HTML中主体(body)的应用
2.1标签分为2类(对写CSS样式有用):
块级标签:div、fieldset、h1、hr、p、ol、ul.
内联标签:a、img、lable、span、select、input.
内联标签和块级标签的区别:内联是根据内容有多少就占多少,快级标签是不管多少都会占一行。
2.2常用标签应用:
表单中的标签:form、input、select、lable、textarea
用于格式的标签:<br />、<hr /> 、<h1-6></h1-6>
列表标签:ul、li、ol、dl、dt、dd
表格标签:table(<thead>、<tbody>、<tr>、<td>、<th>)
布局标签:div、span
引用、跳转外部标签:a(文字跳转)、meta(页面跳转)、link(引用外部资源)
2.3各种符号:
网址查看:http://www.cnblogs.com/webd/archive/2010/04/16/1713298.html 例:<a >
2.4标签的应用(id可以在任何标签内且唯一):
1、Div:div用于布局
<body>
<div>
<div name="upper">
<div name="top"></div>
<div upper_nav></div>
</div>
<div name="middle"></div>
<div name="lower"></div>
</div>
</body>
2、a:引用和跳转
(1)、超链接
              <!--超链接-->
                           <a href="http://www.baidu.com">本页面跳转百度</a>
                           <a href="http://www.baidu.com" target="_blank">新页面跳转百度</a>
(2)、锚:定位到id的位置,id位置将会在页面的顶部。id不能重复,可以不写id。
                <!--锚-->
                                <a href="#i1">1章</a>
                                <a href="#i2">2章</a>

                                  <div id="i1" style="height: 500px">1章内容</div>
                                  <div id="i2" style="height: 500px">2章内容</div>
3、p:是段落标签,每一个p标签后都会被认为是段落。
  <!--p段落标签-->
                     <p>dddddddddddddddddd<br /></p>
                     <p>dddddddddddddddddd</p>
4、H:h1到h6是从大到小的的字号。
           <!--H标签-->
                      <h1>a</h1>
                       <h2>a</h2>
                       <h3>a</h3>
                       <h4>a</h4>
                       <h5>a</h5>
                       <h6>a</h6>
5、列表标签:
      <!--无序列表(没有排列限制可以随意加li):-->
             <ul>
                 <li>无序无序</li>
                 <li>无序无序</li>
             </ul>
       <!--有序列表(会按照你写的li前后依次排列):-->
              <ol>
                  <li>有序有序</li>
                  <li>有序有序</li>
              </ol>
       <!--定义列表(默认前后层级关系):-->
              <dl>
                  <dt>北京</dt>
                        <dd>海淀区</dd>
                        <dd>朝阳区</dd>
                  <dt>重庆</dt>
                        <dd>万州区</dd>
                        <dd>南岸区</dd>
              </dl>
6、Lable标签:用于鼠标点击文字后跳到文本框中
  <!--label标签-->
            <div>
                <label for="name2">
                    姓名:
                    <input type="text"id="name2"/>
                </label>
                <label for="hun">
                   婚否: <input type="checkbox"id="hun" />
                </label>
            </div>
7、表格:
7.1、新建表格:
表格由 <table> 标签来定义。每个表格均有若干行(由 <tr> 标签定义),每行被分割为若干单元格(由 <td> 标签定义)字母 td 指表格数据(table data,第一行标题行则通常用<th>来显示。即数据单元格的内容。数据单元格可以包含文本、图片、列表、段落、表单、水平线、表格等等。
   <!--新建表格:-->
       <table border="1">           <!--border为显示边框-->
              <thead>
                  <tr>
                         <th >第一列</th>
                         <th>第二列</th>
                         <th>第三列</th>
                  </tr>
              </thead>
              <tbody>
                   <tr>
                         <td>内容1</td>
                         <td>内容2</td>
                         <td>内容3</td>
                         <td>内容4</td>
                   </tr>
                   <tr>
                         <td>内容1</td>
                         <td>内容2</td>
                         <td>内容3</td>
                         <td>内容4</td>
                   </tr>
                   <tr>
                         <td>内容2</td>
                         <td>内容3</td>
                         <td>内容4</td>
                   </tr>
              </tbody>
        </table>
7.2、表格合并:
使用colspan(横向合并)和rowspan(纵向合并)合并表格
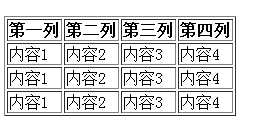
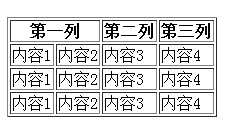
(1)横向合并
原图如下:

代码:
<table border="1">
              <thead>
                 <tr>
                         <th colspan="2">第一列</th>
                         <th>第二列</th>
                         <th>第三列</th>
                 </tr>
              </thead>
              <tbody>
                   <tr>
                         <td>内容1</td>
                         <td>内容2</td>
                         <td>内容3</td>
                         <td>内容4</td>
                   </tr>
                     <tr>
                         <td>内容1</td>
                         <td>内容2</td>
                         <td>内容3</td>
                         <td>内容4</td>
                   </tr>
                     <tr>
                         <td>内容1</td>
                         <td>内容2</td>
                         <td>内容3</td>
                         <td>内容4</td>
                   </tr>
              </tbody>
        </table>
执行代码后:

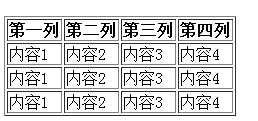
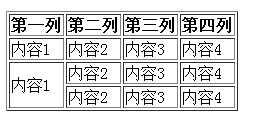
(2)纵向合并
原图如下:

代码:
 <table border="1">
              <thead>
                 <tr>
                         <th >第一列</th>
                         <th>第二列</th>
                         <th>第三列</th>
                         <th>第四列</th>
                 </tr>
              </thead>
              <tbody>
                   <tr>
                         <td>内容1</td>
                         <td>内容2</td>
                         <td>内容3</td>
                         <td>内容4</td>
                   </tr>
                     <tr>
                         <td rowspan="2">内容1</td>
                         <td>内容2</td>
                         <td>内容3</td>
                         <td>内容4</td>
                   </tr>
                     <tr>

                         <td>内容2</td>
                         <td>内容3</td>
                         <td>内容4</td>
                   </tr>
              </tbody>
       </table>
执行代码后:

8、ifname标签:一般用来包含网站
<!DOCTYPE html>
<html lang="en">
<head>
    <meta charset="UTF-8">
    <title>我的百度</title>

</head>
<body>
     <h1>我的百度</h1>
     <iframe style="width: 100%;height: 2000px"src="http://www.baidu.com"></iframe>
</body>
</html>
9、表单标签:
Form标签:用于为用户输入创建 HTML 表单
Input标签:用于搜集用户信息
intup标签中的type属性:
text:文本框
password:密码框
radio:单选框
email:邮件地址(由浏览器提供)
chackbox:复选框
file:文件上传
button:按钮
submit:提交按钮
reset:重置按钮
textarea标签:用于写多行文本<textarea></textarea>
select标签:下拉菜单<select></select>

 <form>
 2          <div style="border: 1px solid red">
 3                  <p>用户名<input type="text"/></p>
 4                  <p>密码:<input type="password" /></p>
 5                  <p>邮箱:<input type="email"/></p>
 6                  <p>性别:
 7                       男<input type="radio" name="ee">
 8                       女<input type="radio" name="ee">
 9                  </p>
10                  <p>爱好:
11                      篮球<input type="checkbox" />
12                      游泳<input type="checkbox" />
13                  </p>
14                  <p>城市:
15                      <!--选择下拉菜单-->
16                      <select>
17                          <option>上海</option>
18                          <option>北京</option>
19                      </select>
20                      <!--展示所有城市(可以利用size,默认显示10个)-->
21                       <select multiple size="10">
22                          <option>上海</option>
23                          <option>北京</option>
24                      </select>
25                       <!--下拉框展示中可以分组查看-->
26                        <select>
27                            <optgroup label="北京市">
28                                  <option>海淀区</option>
29                                  <option>朝阳区</option>
30                            </optgroup>
31                      </select>
32                  </p>
33                  <p>文件上传:<input type="file" /></p>
34                  <p>备注:<textarea></textarea></p>
35                   <p><input type="button" /></p>
36                   <p><input type="submit" /></p>
37                   <p><input type="reset" /></p>
38           </div>
39 </form>
10、Form标签生产中应用:
在生产中你的服务器会从表单中去获取你输入的信息,来处理后返还给你处理的结果。你可以用get或post方式来发送。 发送到服务器中是以字典的方式保存的。而服务器取,只需要在字典中取即可。
例1:
    <!--利用搜狗搜索框定义的name来让搜狗服务器获取-->
           <form action="http://www.sogou.com/web?" method="get"> <!--默认用get方式提交-->
               <input type="text" name="query"/>                  <!--get和post只是格式不同-->
               <input type="submit" value="提交">
           </form>
           <!--
           后台:{
                  ‘query‘="abc"
                  }
           取:dic[query]=query的内容
           -->
例2:
 <!--上传到服务器-->
           <form action="公司服务器ip" method="get" enctype="multipart/form-data">
                用户: <input type="text" name="user"/>
                密码:<input type="password" name="pwd"/>
                <p>性别:
                  男<input type="radio" name="gender" value="1"/> <!--在服务器中获取到的信息会是空,需要定义value来确认值-->
                  女<input type="radio" name="gender" value="0"/>
                </p>
                <p>爱好:
                   游泳<input type="checkbox" name="favor" value="1"/>
                   篮球<input type="checkbox" name="favor" value="2"/>
                   羽毛球<input type="checkbox" name="favor" value="3"/>
               </p>
               <p>文件:
                    <input type="file"/>     <!--文件上传需要"enctype="multipart/form-data""才能上传到服务器-->
               </p>
                   <p>城市:
                    <select name="city">
                         <option value="1">上海</option>
                         <option value="2">北京</option>
                         <option value="3">广州</option>
                    </select>
               <p>备注:
                  <textarea name="extra"></textarea>
               </p>
                    <input type="submit" value="提交" >
                     <input type="reset" value="取消">
            </form>
二、CSS样式(衣服):
1、style和class
1.1、style的三种存放位置(从高到低)
(1)标签属性(在属性中加style)
(2)html头部
(3)单独的CSS文件
优先级:标签属性最高,不管html头部和CSS文件是否存在,绝对以标签属性为准。
html头部和单独的CSS文件是继承关系,如果样式不同便会相互继承,但当 html头部和单独的CSS文件样式相同时html头部优先级比单独的CSS文件高。
<!DOCTYPE html>
<html lang="en">
<head>
    <meta charset="UTF-8">
    <title>我的网页</title>
    <link rel="stylesheet" type="text/css" href="csstest.css"/>
    <style>
        .color{  background-color: black;
                  color: aliceblue;
    }
    </style>
</head>
<body>
<!--第一种方式-->
<!--当前div样式只用着一次,可这样写-->
<div style="color: aliceblue">直接设置样式</div>
       <hr />
<!--第二种方式-->
<!--当前div只用于这一个页面,可这样写-->
<div  class="color">引用样式</div>
       <hr />
<!--第三种方式-->
<!--当前div样式被多个页面引用,可这样写-->
<div class="color2">引用样式文件</div>
</body>
</html>
2、CSS选择器:用于选择不同样式进行引用
<!DOCTYPE html>
<html lang="en">
<head>
    <meta charset="UTF-8">
    <title>我的样式</title>
    <style>
        /*标签选择器*/
         div{
                   background-color: black;
                   color: aliceblue;
         }
        /*id选择器*/
        #i1{
                   background-color: brown;
                   color: aliceblue;
             }
        /*class选择器*/
        .color{
                   background-color: green;
                   color: aliceblue;
               }
        /*层级选择器*/
        .c2 div .c3{
                    background-color: darkmagenta;
                     color: aliceblue;
                      }
        /*组合选择器*/
        .c4,.c5,.c6{
                        background-color: darkkhaki;
                        color: aliceblue;
                   }
    </style>
</head>
<body>
<!--标签选择器(标签名(所有可使用的标签))-->
    <div>标签选择器</div>
<!--id选择器(#表示选择id #i1)-->
     <div id="i1">id为1的样式</div>
<!--class选择器(.表示class本身)-->
     <div class="color">class选择器</div>
<!--层级选择器(.c2 div p .c3{} 空格表示一层)-->
      <div class="c2">
          <div>
               <p>
                  <div class="c3">层级选择器</div>
              </p>
          </div>
      </div>
<!--组合选择器(.c4,.c5,.c6用逗号分隔,用于设置同一个样式)-->
<div class="c4">组合选择器1</div>
<div class="c5">组合选择器2</div>
<div class="c6">组合选择器3</div>
</body>
</html>
3、DIV样式设置
3.1、基本设置(在style中设置属性)常用:
类型:设置字体颜色等
  <style>
           /*类型设置*/
        .type{
               font-saze:12px;               /*字体大小设置*/
               color: red;                  /*字体颜色*/
               text-decoration: none;    /*没有下滑线*/
             }
    </style>
背景:设置页面背景等
    <style>
          /*背景设置*/
        .background
                 {
                  /*当背景颜色和图片同时设置时,你要知道这是两层,背景颜色在图片的下面*/
                   background-color: red;                      /*背景颜色*/
                   background-image: url("image/111.PNG");  /*背景图片*/
                   background-repeat: no-repeat;             /*背景图片不重复*/
                    background-position: 22px/*(水平位置)*/   22px/*垂直位置*/;
                         /*会根据你写X和Y的坐标,去到图片坐标显示的地方*/
                   height: 139px;                             /*背景高度*/
                   width: 100px;                             /*背景宽度*/
                 }
    </style>
区块: 用于块级元素的隐藏和块级元素与块级元素的设置。
 <style>
     /*区块设置*/
        .block
                {
                   display: none;                /*设置DIV隐藏位置和内容*/
                   display: inline;             /*把块级标签变为内联标签*/
                   display: block;               /*把内联标签变为块级标签*/
                   display: inline-block;
                   /*因纯内联标签无法设置高和宽,因此可选用即是内联又是块级标签即可*/
                   visibility: hidden;           /*设置DIV隐藏内容不隐藏位置*/
                }
    </style>
方框:用于设置块级标签,最多的是设置DIV标签的高、宽、内边距、外边距。
    <style>
           /*方框设置*/
        .square_frame
                  {
                    margin_top:300px;
                    /*margin为外边距(自己不增加距离)选项:margin_top、margin_bottom、margin_left、margin_right*/
                    padding_top: 300;
                    /*padding为内边距(自己增加距离),选项和margin一样*/
                     float:left;
                     /*两个方框同时往左或往右漂,选项:left往左、right往右、none不漂浮*/
                     clear:both;
                     /*清除漂浮,选项:both清除所有漂浮、left清除左漂浮、right清除右漂浮*/
                  }
    </style>
边框:用于设置DIV或span的边框
 <style>
       /*边框设置*/
         .cheek
              {
                  border: 1px solid red;
                  /*用于设置边框属性,选项有三个:边框粗细 类型 颜色*/
              }
   </style>
定位:用于在页面滑动时,固定不随页面滑动的元素。
<style>
      .position
               {
               /*position有3种定位:fixed(固定定位)、absolute(绝对定位)、relative(相对定位)*/
                    position: fixed ;
                    top:0px ;
                    right: 0px;
               /*定位有四个方位:top、bottom、left、right*/
               /*重复写方位则先上后右*/
                     position: absolute;
                     bottom:0px ;
                     right: 0px;
                /*absolute会跟着页面一起滑动*/
                     position: relative;
               /*relative必须要和absolute合用*/
               }
</style>
例子:

<!DOCTYPE html>
<html lang="en">
<head>
    <meta charset="UTF-8">
    <title>Title</title>
    <style>
      .position
               {
                     position: absolute;
                     bottom:0px ;
                     right: 0px;
               }
    </style>
<body>
        <div style="height: 500px;width:400px;border: 1px solid red;position:relative">
            <div style="height: 100px;width: 200px">
            <div class="position">类型设置</div>
            </div>
        </div>
       <!--当relative和position一起用时,position只会去找有relative的div-->
</body>
</html>
鼠标:用于在鼠标箭头放到文字上时的显示。
     <style>
         .mouse
                {
                 cursor:pointer;
                 /*选项:pointer手指、help帮助、wait等待、move移动、crossair坐标*/
                }

    </style>
3.2、特殊设置:
透明度设置、DIV之间的层叠和DIV圆角:
<!DOCTYPE html>
<html lang="en">
<head>
    <meta charset="UTF-8">
    <title>Title</title>
    <style>
         .style{
             position: fixed;
             top: 0px;
             left: 0px;
             bottom: 0px;
             right: 0px;
             background-color: black;
             opacity: 0.9;   /*透明度设置(0到1之间)*/
             z-index: 100;   /*z-index值比show的z-index小*/
         }
        .show
           {
                  width: 560px;
                  height: 400px;
                  border: 2px solid black;
                  background-color: cornflowerblue;
                  position: fixed;
                  top:50%;
                  left: 50%;
                   margin-left:-280px ;
                   margin-top:-200px ;
                   z-index: 150;     /*z-index值越大越决定那一层在最外边*/
                   border-radius: 10px;      /*设置DIV圆角圆角*/
           }
    </style>
</head>
<body>
           <div class="show">
               <p style="font-size: 20px;color: white;margin-top: 200px;margin-left: 250px">显示</p>
           </div>
           <div class="style"></div>
</body>
</html>
DIV设置:DIV高度宽度:高度无法设置100%,宽度可设置。
  <!--父div可限制子div,在设置时受到父div的限制-->
        <div style="width: 500px;" style="color: rgb(0, 0, 255);">>
             <div style="width: 20%;" style="color: rgb(0, 0, 255);">>我只有20</div>
             <div style="width: 80%;" style="color: rgb(0, 0, 255);">>我有80!</div>
        </div>
颜色设置:有三种设置
<!--各种颜色代码-->
        <div style="width: 200px;color: aliceblue">我一样</div>
        <hr />
        <!--RGB-->
        <div style="width: 200px;color: aliceblue">我还一样</div>
        <hr />
         <!--16进制-->
         <div style="width: 200px;color: aliceblue">我还是一样</div>
DIV网页菜单设置:

<!DOCTYPE html>
<html lang="en">
<head>
    <meta charset="UTF-8">
    <title>Title</title>
    <!--设置菜单栏有四大样式-->
    <style>
        /*html自带边距,去除上边距*/
          .body
              {
                margin: 0;
              }
          /*第一样式nav*/
          .nav
          {
              height: 44px;
              background-color: black;/*设置颜色*/
              line-height: 44px;  /*按照44px进行居中*/

          }
          .w
          {
              width: 1024px; /*设置网页整体宽度*/
              margin: 0 auto;/*网页自动居中*/
              background-color: red;
          }
          /*第二样式 ul*/
           ul
           {
               margin: 0;
               list-style-type: none;/*设置无序列表前的圆点消失*/
           }
           /*第三样式li*/
           ul li
           {
               float: left; /*左漂移*/
               padding: 0 8px 0 8px;/*设置菜单名的左右边距*/
               color: white;
           }
           /*第四大样式鼠标*/
           ul li:hover/*设置鼠标附加样式*/
              {
               background-color: red;
             }
    </style>
</head>
<body>
<div>
<div name="header" class="w">
<div  name="header_nav" class="nav">
       <ul>
            <li>标题一</li>
            <li>标题二</li>
            <li>标题三</li>
            <li>标题四</li>
       </ul>
</div>
</div>
<div name="body"></div>
<div name="footer"></div>
 </div>
</body>
</html>
标签:
原文地址:http://www.cnblogs.com/programmer-tlh/p/5767768.html