标签:
学习 Neutron 系列文章:
(2)Neutron OpenvSwitch + VLAN 虚拟网络
(3)Neutron OpenvSwitch + GRE/VxLAN 虚拟网络
(4)Neutron OVS OpenFlow 流表 和 L2 Population
(9)Neutron FWaas 和 Nova Security Group
(10)Neutron VPNaas
(11)Neutron DVR
(12)Neutron VRRP
(14)使用 NAT 将 Linux network namespace 连接外网
(15)使用 Linux bridge 将 Linux network namespace 连接外网
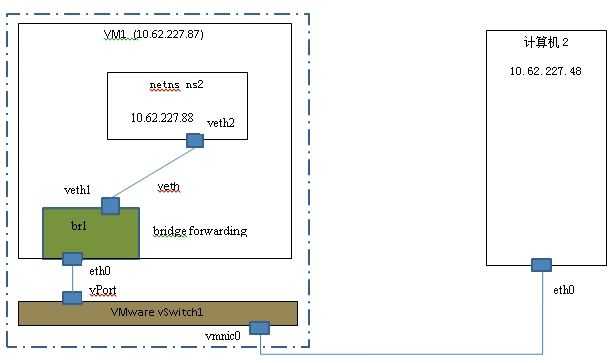
前一篇文章介绍了使用 NAT 将 Linux network namespace 连接外网,但是这种模式有很大的局限,包括它使用的是内部IP,因此,外部计算机不能直接访问其IP,而需要通过访问其主机再通过 DNAT 才能访问它。它的应用场景通常是因为企业使用的公网IP地址一般都数量有限,在内部计算机需要访问公网时,往往采取 NAT 方式。本文将介绍使用 linux bridge 来将 linux network namespace 连接到外网。
 (图1)
(图1)
环境说明:
root@linuxkvm1:/etc# iptables -t filter -S
-P INPUT ACCEPT
-P FORWARD DROP
-P OUTPUT ACCEPT
为了能从在 host1 上的 netns ns2 上能 ping 通 host2 ,你需要做的配置及说明:
| 步骤# | 命令 | 说明 |
| 1 | ip netns add ns2 | 创建名称为 ‘ns2’ 的 linux network namespace |
| 2 | ip link add veth1 type veth peer name veth2 | 创建一个 veth 设备,一头为 veth1,另一头为 veth2 |
| 3 | ip link set veth2 netns ns2 | 将 veth2 加入 ns2 作为其一个 network interface |
| 4 |
brctl addbr br1 brctl addif eth0 br1 ifconfig eth0 0.0.0.0 ifconfig br1 192.168.1.87/24 up brctl addif br1 veth1 |
创建 liux bridge ‘br1’ 删除 eth0 的 IP 地址,并将其地址设给 br1 将 eth0 加入 br1 将 veth1 加入 br1 |
| 5 | ip netns exec ns2 ifconfig veth2 192.168.1.88/24 up | 配置 veth2 的 IP 地址,它和 host1 和 host2 在同一个网段上 |
| 6 | ip netns exec ns2 route add default gw 192.168.1.1 | 将 ns2 的默认路由设为 host1 和 host2 的网关地址 |
| 7 |
iptables -t filter -A FORWARD -m physdev --physdev-in eth0 --physdev-out veth1 -j ACCEPT iptables -t filter -A FORWARD -m physdev --physdev-out eth0 --physdev-in veth1 -j ACCEPT |
设置 FORWARD 规则 |
做了以上配置之后,
当从外部计算机 ping veth2 的 IP 地址时的 iptables 统计:
Chain INPUT (policy ACCEPT 1814 packets, 198K bytes)
 pkts bytes target     prot opt in     out     source               destination

Chain FORWARD (policy DROP 116 packets, 7950 bytes)
 pkts bytes target     prot opt in     out     source               destination
  154 11794 ACCEPT     all  --  *      *       0.0.0.0/0            0.0.0.0/0            PHYSDEV match --physdev-in ens9f0 --physdev-out veth1
  121  8724 ACCEPT     all  --  *      *       0.0.0.0/0            0.0.0.0/0            PHYSDEV match --physdev-in veth1 --physdev-out ens9f0

Chain OUTPUT (policy ACCEPT 2014 packets, 184K bytes)
 pkts bytes target     prot opt in     out     source               destination
说明网络流量确实经过了 linux bridge 做 forwarding。关于 linux bridge 上的 iptables 设置的说明的更详细内容,请参考 ebtables/iptables interaction on a Linux-based bridge。要点包括:
 (图2)
(图2) (图3)
(图3)基于上面的原理,就本文中的案例的要求,
(1)如果使用 physdev 模块的话,可以使用下面两条规则进行精准的控制:
iptables -t filter  -A FORWARD -m physdev --physdev-in eth0 --physdev-out veth1 -j ACCEPT
iptables -t filter  -A FORWARD -m physdev --physdev-out eth0 --physdev-in veth1 -j ACCEPT
备注:
(2)也可以使用常规规则来控制是否允许 br1 进行 forwarding
iptables -t filter -A FORWARD -i br1 -j ACCEPT
(3)linux 内核的 ip forwrading 不需要启用,它主要针对的是 NAT 情形。
Linux bridge 根据收到的帧的目的 MAC 地址来决定其行为:
linux bridge 自身维护了 mac 地址和输入端口的映射表:
root@linuxkvm1:/home/s1# brctl showmacs br-ens9f0
port no mac addr                is local?       ageing timer
  1     30:0e:d5:c6:17:25       no               224.96
  2     7e:60:30:bb:21:93       yes                0.00
  2     7e:60:30:bb:21:93       yes                0.00
  1     a0:36:9f:5c:93:f8       no                58.07
  1     a0:36:9f:97:b1:68       yes                0.00
  1     a0:36:9f:97:b1:68       yes                0.00
  2     ee:67:31:cc:49:11       no                 0.29
根据 wikipedia 的定义,Promisc 模式是指一个 NIC 会把它接受的所有网络流量都交给 CPU,而不是只是把它想转交的部分交给 CPU。在 IEEE 802 网络中,每个网络帧都有一个目的 MAC 地址。在 non-promiscuous 模式下,NIC 只会接受目的 MAC 地址是它自己的 MAC 地址的单播帧,以及多播及广播帧。在混杂模式下,NIC 会接受经过它的所有帧。
简单地,你可以使用 ifconfig 命令或者 netstat -i 命令来查看一个 network interface 上的混杂模式是否打开了:
root@linuxkvm1:/home/s1# ifconfig eth0
eth0      Link encap:Ethernet  HWaddr a0:36:9f:97:b1:68
          inet6 addr: fe80::a236:9fff:fe97:b168/64 Scope:Link
          UP BROADCAST RUNNING PROMISC MULTICAST  MTU:1500  Metric:1
本例中,经过 eth0 的网络流量,既包括发给它的,也包括发给 ns2 的,此时帧的目的 MAC 地址不再是 eth0 自己的MAC地址,因此,eth0 的混杂模式必须打开。但是,在测试过程中,发现两个有意思的事情。
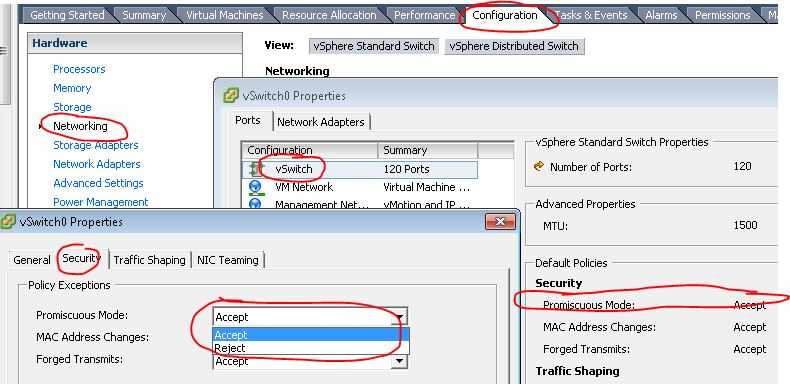
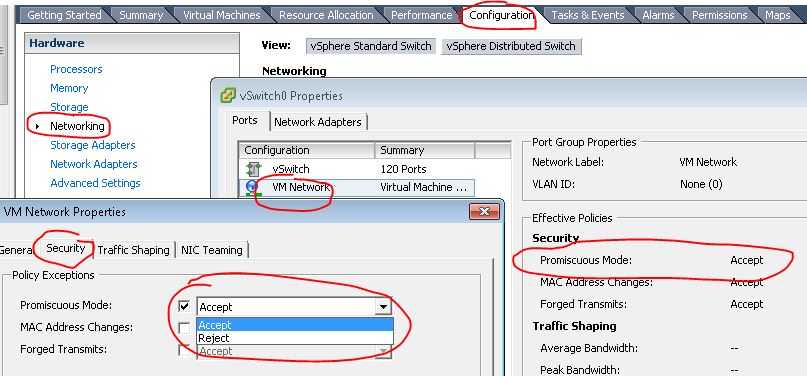
根据 How promiscuous mode works at the virtual switch and portgroup levels 这篇文章,VMware 虚机的 NIC 需要启用混杂模式时,VMware vSwitch 以及它的 Virtual group 中的 vPort 也需要开启混杂模式。当 vSwitch 启用了混杂模式时,它上面的所有端口组(portgroup)也默认开启了混杂模式。好吧,在我的测试中,为了找到这个问题,花了我不少时间。
(1)开启 vSwitch 的混杂模式

(2)端口组的混杂模式,默认是随 vSwitch 的混杂模式,但是你也可以显式地打开或者关闭

测试过程发现,当一个网络接口被加入了 linux bridge 之后,它的混杂模式就会被自动开启,而且无法关闭,直到把它从 bridge 上删除。
(1)当 veth 设备离开 linux bridge 后,自动退出混杂模式
brctl delif br-ens9f0 veth40
dmesg | grep promiscuous
[498665.637647] device veth40 left promiscuous mode
此时可以手工设置其 promisc 模式了:
root@linuxkvm1:/home/s1# netstat -i | grep veth40
veth40 1500 0 68386 0 0 0 280670 0 0 0 BMRU
root@linuxkvm1:/home/s1# ifconfig veth40 promisc
root@linuxkvm1:/home/s1# netstat -i | grep veth40
veth40 1500 0 68386 0 0 0 280670 0 0 0 BMPRU
[498822.803260] device veth40 entered promiscuous mode
(2)当 veth 设备被加入 linux bridge 后,自动进入 promisc 模式
brctl addif br-ens9f0 veth40
dmesg | grep promiscuous
[498681.199680] device veth40 entered promiscuous mode
此时即使通过ifconfig 将其设置为非 promisc 模式,netstat -i 也显示其处于非 promis 模式,但是其实此时它仍然处于 promisc 模式:
dmesg没有记录
root@linuxkvm1:/home/s1# ifconfig veth40 -promisc
root@linuxkvm1:/home/s1# netstat -i | grep veth40
veth40 1500 0 68410 0 0 0 280723 0 0 0 BMRU
结论:
备注:本文所涉及的 linux bridge 以及 iptables 的相关知识比较复杂,本文作者仅确认本文中的测试过程及结果,原理分析部分可能存在错误。本文会保持持续更新。
Netruon 理解(12):使用 Linux bridge 将 Linux network namespace 连接外网
标签:
原文地址:http://www.cnblogs.com/sammyliu/p/5763513.html