标签:
块级元素就是以块显示的元素,高度宽度可以设置。包含以下几种:
所谓多目标指的是可以自由的扩展或嵌套文档的结构,以可以终端的形式出现。当多目标块状元素以结构化的方式使用时就含有结构化的内涵,以终端的形式使用就含有语义的内涵。
多目标块状元素既可以包含块状元素,也可以包含内容(文本与行级元素的组合为内容),但不能同时包含两者。应该把内容放在块状元素中。块状元素不应作为行级元素与文本的兄弟元素,受HTML校验器的限制,目前还没办法检验出此种情况,但是应该避免。
块级元素的特点:
通俗点来说就是文本的显示方式,与块级元素相反,内联元素的高度宽度是不可以设置的,其宽度就是自身文字或者图片的宽度。内联元素的显示特点就是像文本一样的显示,不会独自占据一行,当然内联元素也能变成块级元素,那就是通过 css 的 display:inline 和 float 来实现。
内联元素的特点:
通过CSS,我们可以摆脱上面表格里HTML标签归类的限制,自由地在不同标签/元素上 应用我们需要的属性。例如,我们可以对块元素 [ ul ] 标签加上 display:inline 属性,让原本垂直的列表水平显示,这在我们设置 Blog 导航条时得到了广泛应用;我们也完全可以把内联元素 [ cite ] 加上 display:block 这样的属性,让它也有每次都从新行开始的属性。
Below are a bunch of <div style="width: 50px"...> with different display:
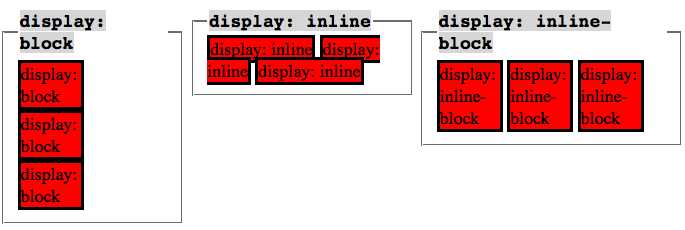
inline-block 是一种混合类型,
模态窗口由三个部分组成;
<div id="overlay">
     <div>
          <p>Content you want the user to see goes here.</p>
     </div>
</div>
1. The CSS rule to take care of the fullscreen/hiding for #overlay.
#overlay {
     visibility: hidden;
     position: absolute;
     left: 0px;
     top: 0px;
     width:100%;
     height:100%;
     text-align:center;
     z-index: 1000;
}
2. The inner <div>
#overlay div {
     width:300px;
     margin: 100px auto;
     background-color: #fff;
     border:1px solid #000;
     padding:15px;
     text-align:center;
}
function overlay() {
    el = document.getElementById("overlay");
    el.style.visibility = (el.style.visibility == "visible") ? "hidden" : "visible";
}
The javascript grabs our overlay element and then toggles its visibility property. If it’s hidden, it makes it visible and vice versa. You could create a function to explicitly show or hide the layer, but I prefer this automatic toggle method since it requires less code.
With the function in place, we then call it whenever we want to show the overlay and then again to hide it. So, somewhere on our page we could add:
<a href=‘#‘ onclick=‘overlay()‘>Click here to show the overlay</a>
When the user clicks on the link our javascript will show the overlay.
Within the overlay’s HTML, we need to add a link to hide it. The code is exactly the same:
Click here to [<a href=‘#‘ onclick=‘overlay()‘>close</a>]
标签:
原文地址:http://www.cnblogs.com/garyang/p/5785878.html