标签:

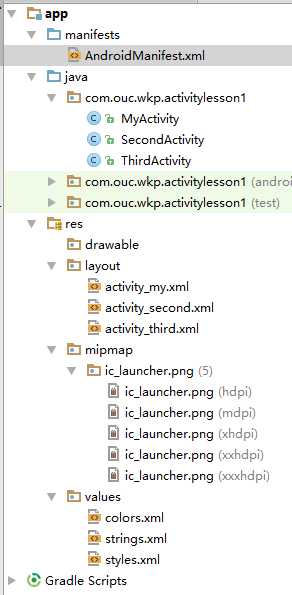
结构图
mainfests文件夹下面有一个AndroidMainfest.xml文件,类似web开发中的web.xml文件负责整个项目的配置,每当我们新建一个activity,都要在这个文件中进行配置。
java文件夹类似src。下面存放源代码。
res文件夹放资源文件 layout是布局文件文件夹,mipmap存放图标,values存放键值。
新建Layout resource file

<?xml version="1.0" encoding="utf-8"?>
<LinearLayout xmlns:android="http://schemas.android.com/apk/res/android"
    android:layout_width="match_parent"
    android:layout_height="match_parent"
    android:orientation="vertical">

    <TextView
        android:layout_width="wrap_content"
        android:layout_height="wrap_content"
        android:text="Hello blue" />

    <Button
        android:id="@+id/btn_start_second"
        android:layout_width="wrap_content"
        android:layout_height="wrap_content"
        android:text="启动第二个界面"/>
</LinearLayout>

<?xml version="1.0" encoding="utf-8"?>
<LinearLayout xmlns:android="http://schemas.android.com/apk/res/android"
    android:orientation="vertical" android:layout_width="match_parent"
    android:layout_height="match_parent">

    <TextView
        android:layout_width="wrap_content"
        android:layout_height="wrap_content"
        android:text="Hello second"/>

    <Button
        android:id="@+id/btn_finish_self"
        android:layout_width="wrap_content"
        android:layout_height="wrap_content"
        android:text="点击"/>
</LinearLayout>
新建class

package com.ouc.wkp.activitylesson1;

import android.app.Activity;
import android.content.ComponentName;
import android.content.Intent;
import android.os.Bundle;
import android.util.Log;
import android.view.View;
import android.widget.Button;

/**
 * Created by wkp on 2016/8/19.
 */
public class MyActivity extends Activity {

    Button btnStart;

    //创建activity时调用
    @Override
    protected void onCreate(Bundle savedInstanceState) {
        super.onCreate(savedInstanceState);
        Log.e("MyActivity","MyActivity_oncreate");
        setContentView(R.layout.activity_my);

        btnStart = (Button) findViewById(R.id.btn_start_second);
        btnStart.setOnClickListener(new View.OnClickListener() {
            @Override
            public void onClick(View view) {
                //在这里启动第二个activity

                //显示启动的第一种写法
//                Intent intent=new Intent();
//                intent.setClass(MyActivity.this,SecondActivity.class);
//                startActivity(intent);

                //显示启动的第二种写法
//                Intent intent1=new Intent();
//                intent1.setClassName(MyActivity.this,"com.ouc.wkp.activitylesson1.SecondActivity");
//                startActivity(intent1);

                //显示启动的第三种写法
//                Intent intent2=new Intent();
//                ComponentName componentName=new ComponentName(MyActivity.this,SecondActivity.class);
//                intent2.setComponent(componentName);
//                startActivity(intent2);

                //隐试启动 第一种写法
//                Intent intent3=new Intent("abcd.SecondActivity");
//                startActivity(intent3);

                //隐试启动 第二种写法
                Intent intent4=new Intent();
                intent4.setAction("abcd.SecondActivity");
                startActivity(intent4);
            }
        });
    }

    //当activity界面变为用户可见时调用
    @Override
    protected void onStart() {
        super.onStart();
        Log.e("MyActivity","MyActivity_onstart");
    }

    //当activity界面获取到焦点时调用(界面按钮可点击,文本框可输入)
    @Override
    protected void onResume() {
        super.onResume();
        Log.e("MyActivity","MyActivity_onresume");
    }

    //当activity失去焦点(按钮不可点,文本框不能输入)
    @Override
    protected void onPause() {
        super.onPause();
        Log.e("MyActivity","MyActivity_onpause");
    }

    //当activity变为不可见时调用
    @Override
    protected void onStop() {
        super.onStop();
        Log.e("MyActivity","MyActivity_onstop");
    }

    //当activity被销毁时调用
    @Override
    protected void onDestroy() {
        super.onDestroy();
        Log.e("MyActivity","MyActivity_ondestroy");
    }
}
配置一下AndroidMainfest.xml文件

<manifest xmlns:android="http://schemas.android.com/apk/res/android"
    package="com.ouc.wkp.activitylesson1">

    <!--icon应用程序图标 label应用程序名称 theme主题-->
    <application
        android:allowBackup="true"
        android:icon="@mipmap/ic_launcher"
        android:label="@string/app_name"
        android:supportsRtl="true"
        android:theme="@style/AppTheme">

        <activity
            android:name=".MyActivity"
            android:label="ppp"
            android:theme="@style/AlertDialog.AppCompat">
            <intent-filter>
                <!--主activity-->
                <action android:name="android.intent.action.MAIN" />
                <!--启动策略-->
                <category android:name="android.intent.category.LAUNCHER" />
            </intent-filter>
        </activity>

        <!-- 四种启动模式standard singleTop  singleTask-->
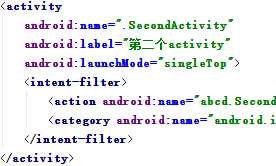
        <activity
            android:name=".SecondActivity"
            android:label="第二个activity"
            android:launchMode="singleTop">
            <intent-filter>
                <action android:name="abcd.SecondActivity" />
                <category android:name="android.intent.category.DEFAULT" />
            </intent-filter>
        </activity>

        <activity android:name=".ThirdActivity">
            <intent-filter>
                <action android:name="abcd.ThirdActivity" />
                <category android:name="android.intent.category.DEFAULT" />
            </intent-filter>
        </activity>
    </application>

</manifest>
我们通过设置MAIN和LAUNCHER吧MyActivity定义为主显示窗口
<intent-filter>
    <!--主activity-->
    <action android:name="android.intent.action.MAIN" />
    <!--启动策略-->
    <category android:name="android.intent.category.LAUNCHER" />
</intent-filter>
我们重写onCreate()方法,
btnStart = (Button) findViewById(R.id.btn_start_second);
获取资源文件中定义的Button,为这个按钮添加点击事件,
btnStart.setOnClickListener(new View.OnClickListener() {
    @Override
    public void onClick(View view) {
  //这里添加点击事件
    }
});
我们看到MyActivity.java中有五种启动方式。运行程序点击按钮后会跳转到SecondActivity.
如果有两个activity的action name相同,比如都是
<intent-filter>
    <action android:name="abcd.SecondActivity" />
    <category android:name="android.intent.category.DEFAULT" />
</intent-filter>
那么点击按钮后会提供两个选择给用户


我们可以给SecondActivity添加点击事件
SecondActivity.this.finish();来返回MyActivity.


Activity的生命周期有6个函数
onCreate 创建activity时调用
onStart 当activity界面变为用户可见时调用
onResume当activity界面获取到焦点时调用(界面按钮可点击,文本框可输入)
onPause 当activity失去焦点(按钮不可点,文本框不能输入)
onStop 当activity变为不可见时调用
onDestroy当activity销毁时调用
运行程序后执行顺序为
myactivity->oncreate onstart onresume
点击跳转按钮 myactivity->onpause secondactivity->oncreate onstart onresume myactivity->onstop
点击关闭按钮 secondActivity->onpause myactivity->onstart onresume
secondactivity->stop destroy
上面的代码不断调试 可能有些地方和描述不符合

activity可以设置launchMode 有四种stardard singleTop singleTask singleInstance
singletop时,安卓系统会判断当前栈顶显示的activity是不是要打开的Activity,如果不是,那么系统会创建一个新的Activity,如果是就不会
singleTask时,和singletop的区别是系统判断的是栈中而不是栈顶
singleInstance时,新的taskId。
按下手机返回键时,原activity从task栈顶弹出。
标签:
原文地址:http://www.cnblogs.com/wangkaipeng/p/5793149.html