标签:
一、使用TextView ImageView Button EditView做出登录页面

<?xml version="1.0" encoding="utf-8"?>
<LinearLayout xmlns:android="http://schemas.android.com/apk/res/android"
    xmlns:tools="http://schemas.android.com/tools"
    android:layout_width="match_parent"
    android:layout_height="match_parent"
    android:orientation="vertical"
    tools:context="com.ouc.wkp.ui1.MainActivity">

    <RelativeLayout
        android:layout_width="match_parent"
        android:layout_height="50dp"
        android:background="#00f">

        <ImageView
            android:layout_width="wrap_content"
            android:layout_height="wrap_content"
            android:layout_centerVertical="true"
            android:layout_marginLeft="15dp"
            android:src="@drawable/more_arrow"/>

        <TextView
            android:layout_width="wrap_content"
            android:layout_height="wrap_content"
            android:layout_centerHorizontal="true"
            android:layout_centerVertical="true"
            android:text="小米账号登录"
            android:textColor="#ffffff" />

        <Button
            android:layout_width="wrap_content"
            android:layout_height="wrap_content"
            android:layout_alignParentRight="true"
            android:text="注册"
            android:textColor="#fff" />
    </RelativeLayout>

    <LinearLayout
        android:layout_width="match_parent"
        android:layout_height="wrap_content"
        android:layout_marginTop="100dp"
        android:orientation="vertical">

        <LinearLayout
            android:layout_width="match_parent"
            android:layout_height="wrap_content"
            android:layout_marginLeft="20dp"
            android:layout_marginRight="20dp">

            <TextView
                android:layout_width="wrap_content"
                android:layout_height="wrap_content"
                android:text="账号" />

            <EditText
                android:layout_width="match_parent"
                android:layout_height="wrap_content"
                android:hint="请输入邮箱/手机号码/小米账号" />

        </LinearLayout>

        <LinearLayout
            android:layout_width="match_parent"
            android:layout_height="wrap_content"
            android:layout_marginLeft="20dp"
            android:layout_marginRight="20dp">

            <TextView
                android:layout_width="wrap_content"
                android:layout_height="wrap_content"
                android:text="密码" />

            <EditText
                android:layout_width="match_parent"
                android:layout_height="wrap_content"
                android:hint="请输入密码"
                android:inputType="textPassword" />

        </LinearLayout>
    </LinearLayout>

    <Button
        android:layout_width="match_parent"
        android:layout_height="wrap_content"
        android:layout_marginLeft="20dp"
        android:layout_marginRight="20dp"
        android:layout_marginTop="70dp"
        android:text="登录" />
</LinearLayout>

二、使用ImageView CheckBox RadioButton
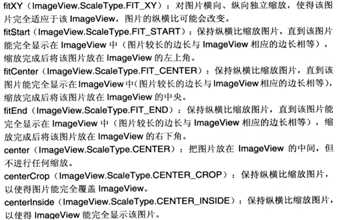
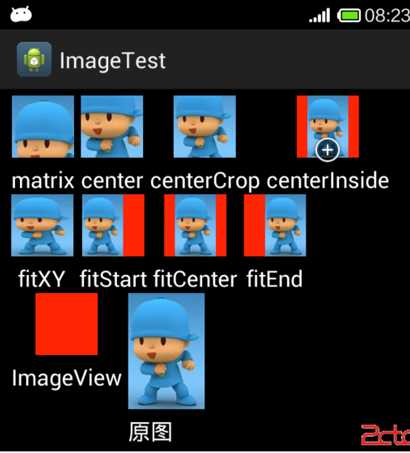
注意ImageView的scaleType属性,截图是麦子学院老师的课件
使用RadioButton注意要在外层包裹一个RadioGroup,每个RadioButton需要指定id
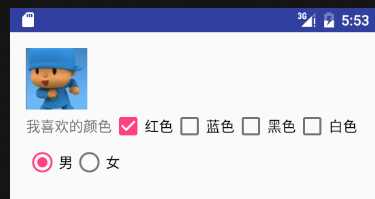
<?xml version="1.0" encoding="utf-8"?>
<LinearLayout xmlns:android="http://schemas.android.com/apk/res/android"
    android:layout_width="match_parent"
    android:layout_height="match_parent"
    android:orientation="vertical"
    android:paddingBottom="16dp"
    android:paddingLeft="16dp"
    android:paddingRight="16dp"
    android:paddingTop="16dp">

    <!-- scaleType默认情况下是fitCenter -->
    <ImageView
        android:layout_width="60dp"
        android:layout_height="60dp"
        android:background="#f00"
        android:scaleType="centerCrop"
        android:src="@drawable/abc" />

    <LinearLayout
        android:layout_width="match_parent"
        android:layout_height="wrap_content">

        <TextView
            android:layout_width="wrap_content"
            android:layout_height="wrap_content"
            android:text="我喜欢的颜色" />

        <CheckBox
            android:layout_width="wrap_content"
            android:layout_height="wrap_content"
            android:checked="true"
            android:text="红色" />

        <CheckBox
            android:layout_width="wrap_content"
            android:layout_height="wrap_content"
            android:text="蓝色" />

        <CheckBox
            android:layout_width="wrap_content"
            android:layout_height="wrap_content"
            android:text="黑色" />

        <CheckBox
            android:layout_width="wrap_content"
            android:layout_height="wrap_content"
            android:text="白色" />

        <CheckBox
            android:layout_width="wrap_content"
            android:layout_height="wrap_content"
            android:text="紫色" />
    </LinearLayout>

    <LinearLayout
        android:layout_width="wrap_content"
        android:layout_height="wrap_content">

        <RadioGroup
            android:layout_width="wrap_content"
            android:layout_height="wrap_content"
            android:orientation="horizontal">

            <RadioButton
                android:id="@+id/boy"
                android:layout_width="wrap_content"
                android:layout_height="wrap_content"
                android:checked="true"
                android:text="男" />

            <RadioButton
                android:id="@+id/girl"
                android:layout_width="wrap_content"
                android:layout_height="wrap_content"
                android:text="女" />

        </RadioGroup>
    </LinearLayout>
</LinearLayout>
标签:
原文地址:http://www.cnblogs.com/wangkaipeng/p/5799056.html
