标签:
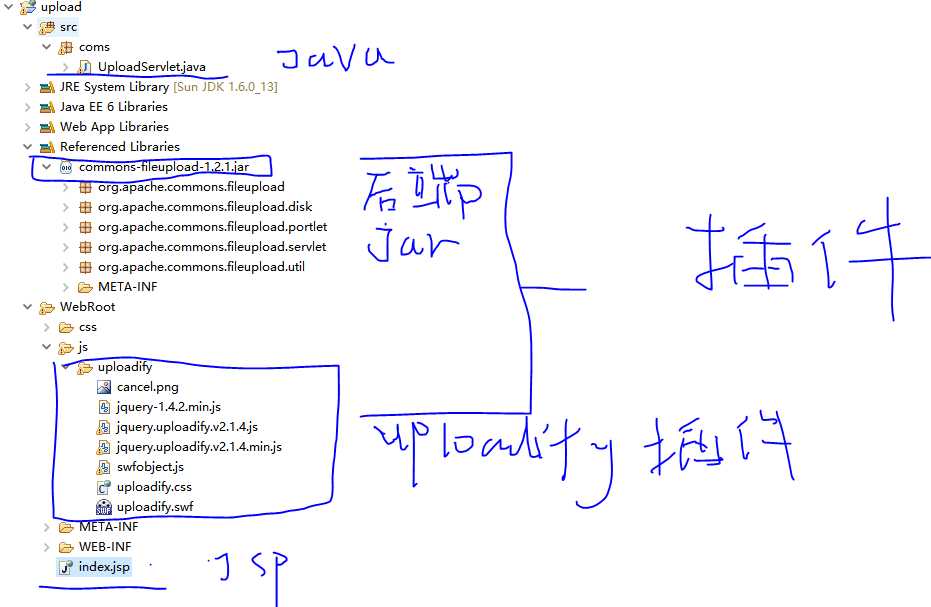
1、先创建一个简单的web项目upload (如图1-1)
2、插件的准备
(1)、去uploadify的官网下载一个uploadify插件,然后解压新建个js文件夹放进去(这个不强求,只要路径对了就可以)
(2)、准备所需要的后端处理上传文件的jar包:commons-fileupload-1.2.1.jar
3、新建一个JSP即index.jsp +servlet即UploadServlet.java

图1-1
4、花几分钟对这些简单的配置完成后就可以看看index.jsp与UoloadServlet.java
(1)index.jsp
<%@ page language="java" import="java.util.*" pageEncoding="UTF-8"%>
<%
String path = request.getContextPath();
String basePath = request.getScheme()+"://"+request.getServerName()+":"+request.getServerPort()+path+"/";
%>

<!DOCTYPE HTML PUBLIC "-//W3C//DTD HTML 4.01 Transitional//EN">
<html>
	<head>
		<base href="<%=basePath%>">
		<title>My JSP ‘index.jsp‘ starting page</title>
		<meta http-equiv="pragma" content="no-cache">
		<meta http-equiv="cache-control" content="no-cache">
		<meta http-equiv="expires" content="0">
		<meta http-equiv="keywords" content="keyword1,keyword2,keyword3">
		<meta http-equiv="description" content="This is my page">
		<meta http-equiv="Content-Type" content="text/html; charset=UTF-8">
		<link rel="stylesheet" type="text/css" href="css/uploadify.css">
		<script src="<%=basePath%>js/uploadify/jquery-1.4.2.min.js"></script>
		<script src="<%=basePath%>js/uploadify/jquery.uploadify.v2.1.4.min.js"></script>
		<script src="<%=basePath%>js/uploadify/swfobject.js"></script>
	</head>
	<body>
		This is my JSP page.
		<br>
		<table class="stable tp0" cellSpacing="0" cellPadding="0" border="0">
            <tr>
                <td width="15%" align="left" colspan="4" style="padding-left: 158px">

                    <input type="hidden" id="fileSize" value="0" />

                    <div id="custom-queue"></div> 附件:<input id="uploadify" type="file"
                    name="Filedata" />
                </td>
            </tr>
        </table>
	</body>
	<script type="text/javascript">
  $(document).ready(function(){

      $(document).ready(function () {
            $("#uploadify").uploadify({
                ‘uploader‘: ‘<%=basePath%>js/uploadify/uploadify.swf‘,
                ‘script‘: ‘<%=basePath%>servlet/UploadServlet‘,
                ‘cancelImg‘: ‘<%=basePath%>js/uploadify/cancel.png‘,
                ‘folder‘: ‘upload‘,
                ‘queueID‘ : ‘custom-queue‘,
                ‘auto‘:true,
                ‘multi‘:true,
                ‘fileDataName‘:‘Filedata‘,
                 ‘onCancel‘ : function(file) {
                },
                ‘onUploadError‘ : function(file, errorCode, errorMsg, errorString) {
                    alert(456);
                }
            });
        });
  });

  </script>
</html>
(2).UoloadServlet.java
package coms;

import java.io.File;
import java.io.IOException;
import java.util.Iterator;
import java.util.List;
import java.util.UUID;

import javax.servlet.ServletException;
import javax.servlet.http.HttpServlet;
import javax.servlet.http.HttpServletRequest;
import javax.servlet.http.HttpServletResponse;

import org.apache.commons.fileupload.FileItem;
import org.apache.commons.fileupload.FileUploadException;
import org.apache.commons.fileupload.disk.DiskFileItemFactory;
import org.apache.commons.fileupload.servlet.ServletFileUpload;

public class UploadServlet extends HttpServlet {

    @Override
    protected void doPost(HttpServletRequest request,
            HttpServletResponse response) throws ServletException, IOException {
        String savePath = this.getServletConfig().getServletContext()
                .getRealPath("");
        //保存文件的路径
        savePath = savePath + "/upload/";
        File f1 = new File(savePath);
        System.out.println(savePath);
        //如果文件不存在,就新建一个
        if (!f1.exists()) {
            f1.mkdirs();
        }
        //这个是文件上传需要的类,具体去百度看看,现在只管使用就好
        DiskFileItemFactory fac = new DiskFileItemFactory();
        ServletFileUpload upload = new ServletFileUpload(fac);
        upload.setHeaderEncoding("utf-8");
        List fileList = null;
        try {
            fileList = upload.parseRequest(request);
        } catch (FileUploadException ex) {
            return;
        }
        //迭代器,搜索前端发送过来的文件
        Iterator<FileItem> it = fileList.iterator();
        String name = "";
        String extName = "";
        while (it.hasNext()) {
            FileItem item = it.next();
            //判断该表单项是否是普通类型
            if (!item.isFormField()) {
                name = item.getName();
                long size = item.getSize();
                String type = item.getContentType();
                System.out.println(size + " " + type);
                if (name == null || name.trim().equals("")) {
                    continue;
                }
                // 扩展名格式: extName就是文件的后缀,例如 .txt
                if (name.lastIndexOf(".") >= 0) {
                    extName = name.substring(name.lastIndexOf("."));
                }
                File file = null;
                do {
                    // 生成文件名:
                    name = UUID.randomUUID().toString();
                    file = new File(savePath + name + extName);
                } while (file.exists());
                File saveFile = new File(savePath + name + extName);
                try {
                    item.write(saveFile);
                } catch (Exception e) {
                    e.printStackTrace();
                }
            }
        }
        response.getWriter().print(name + extName);
    }

}
对于jsp与java没有好好说明,如果不懂可以私聊我,其实花了很多个小时才使用这个uploadify,主要是因为以为上传只要uploadify插件就可以,原来还需要:commons-fileupload-1.2.1.jar ,我是一个喜欢分享的人,希望每个人有能力都能写写博客,让更多人好好学习
标签:
原文地址:http://www.cnblogs.com/imfjj/p/5811342.html