标签:
树与图
3.5 二叉树及其应用
PS:二叉树是最经典的树形结构,适合计算机处理,具有存储方便和操作灵活等特点,而且任何树都可以转换成二叉树。
实例101 二叉树的递归创建 实例102 二叉树的遍历
问题:编程实现递归创建二叉树,要求显示树的节点内容,深度及叶子节点数。
构造一棵二叉树,分别采用先序遍历、中序遍历和后序遍历遍历该二叉树。
逻辑:二叉树是一棵由一个根节点(root)和两棵互不相交的分别称作根的左子树和右子树所组成的非空树,左子树和右子树有同样都是一棵二叉树。
存储二叉树通常采用二叉链表法,即每个节点带两个指针和一个数据域(是不是突然觉得和链表很像呢),一个指针指向左子树,另一个指针指向右子树。
在遍历二叉树时若先左后右,则有三种遍历方法,分别为先序遍历、中序遍历和后序遍历,它们的遍历定义如下:
先序遍历:若二叉树非空,则先访问根结点,再按先序遍历左子树,最后按先序遍历右子树。
中序遍历:若二叉树非空,则先按中序遍历左子树,再访问根结点,最后按中序遍历右子树。
后序遍历:若二叉树非空,则先按后序遍历左子树,再按后序遍历右子树,最后访问根结点。
代码:
  1 #include<stdio.h>
  2 #include<stdlib.h>
  3
  4 typedef struct node
  5 //二叉链表的结构声明
  6 {
  7     struct node *lchild;
  8     char data;
  9     struct node *rchild;
 10 }bitnode,*bitree;
 11 //结构体的类型。
 12
 13 bitree CreatTree()
 14 //自定义函数CreatTree(),用于构造二叉树。
 15 {
 16     char a;
 17     bitree new;
 18     scanf("%c",&a);
 19     if(a==‘#‘)
 20     //二叉树的输入标识
 21         return NULL;
 22     else
 23     {
 24         new=(bitree)malloc(sizeof(bitnode));
 25         //申请内存空间。
 26         new->data=a;
 27         new->lchild=CreatTree();
 28         new->rchild=CreatTree();
 29     }
 30     return new;
 31 }
 32
 33 void print(bitree bt)
 34 //创建函数print(),用于输出二叉树的节点内容。PS:输出方式为中序遍历。
 35 {
 36     if(bt!=NULL)
 37     {
 38         print(bt->lchild);
 39         printf("%c",bt->data);
 40         print(bt->rchild);
 41     }
 42 }
 43
 44 int btreedepth(bitree bt)
 45 //自定义函数btreedepth(),用于求解二叉树的深度。
 46 {
 47     int ldepth,rdepth;
 48     if(bt==NULL)
 49         return 0;
 50     else
 51     {
 52         ldepth=btreedepth(bt->lchild);
 53         rdepth=btreedepth(bt->rchild);
 54         return(ldepth>rdepth?ldepth+1:rdepth+1);
 55         //返回语句中,采用了三目运算符。不知道的可以看该系列之前的篇章。
 56     }
 57 }
 58
 59 int ncount(bitree bt)
 60 //自定义函数ncount(),用于求二叉树中节点个数。
 61 {
 62     if(bt==NULL)
 63         return 0;
 64     else
 65         return(ncount(bt->lchild)+ncount(bt->rchild)+1);
 66 }
 67
 68 int lcount(bitree bt)
 69 //自定义函数lcount(),用于求二叉树中叶子节点个数。
 70 {
 71     if(bt==NULL)
 72         return 0;
 73     else if(bt->lchild==NULL && bt->rchild==NULL)
 74         return 1;
 75     else
 76         return(lcount(bt->lchild)+lcount(bt->rchild));
 77 }
 78
 79 void preorderTraverse(bitree bt)
 80 //自定义函数preorderTraverse(),用于先序遍历、输出二叉树。
 81 {
 82     if(bt!=NULL)
 83     {
 84         printf("%c",bt->data);
 85         preorderTraverse(bt->lchild);
 86         preorderTraverse(bt->rchild);
 87     }
 88 }
 89
 90 void InorderTraverse(bitree bt)
 91 //自定义函数InorderTraverse(),用于中序遍历、输出二叉树。
 92 {
 93     if(bt!=NULL)
 94     {
 95         InorderTraverse(bt->lchild);
 96         printf("%c",bt->data);
 97         InorderTraverse(bt->rchild);
 98     }
 99 }
100
101 void postorderTraverse(bitree bt)
102 //自定义函数postorderTraverse(),用于后序遍历、输出二叉树。
103 {
104     if(bt!=NULL)
105     {
106         postorderTraverse(bt->lchild);
107         postorderTraverse(bt->rchild);
108         printf("%c",bt->data);
109     }
110 }
111
112 void main()
113 {
114     bitree root;
115     //初始化数据root。
116     root=CreatTree();
117     //调用函数创建二叉链表。
118     printf("contents of binary tree:\n");
119     print(root);
120     //调用函数输出节点内容。
121     printf("\ndepth of binary tree:%d\n",btreedepth(root));
122     //调用函数输出树的深度。
123     printf("the number of the nodes:%d\n",ncount(root));
124     //调用函数输出树中节点个数。
125     printf("the number of the leaf nodes:%d\n",lcount(root));
126     //调用函数输出树中叶子节点个数。
127     printf("preorder traversal:\n");
128     preorderTraverse(root);
129     //调用函数先序遍历输出二叉树。
130     printf("\n");
131     printf("inorder traversal:\n");
132     InorderTraverse(root);
133     //调用函数中序遍历输出二叉树。
134     printf("\n");
135     printf("postorder traversal:\n");
136     postorderTraverse(root);
137     //调用函数后序遍历输出二叉树。
138     printf("\n");
139 }
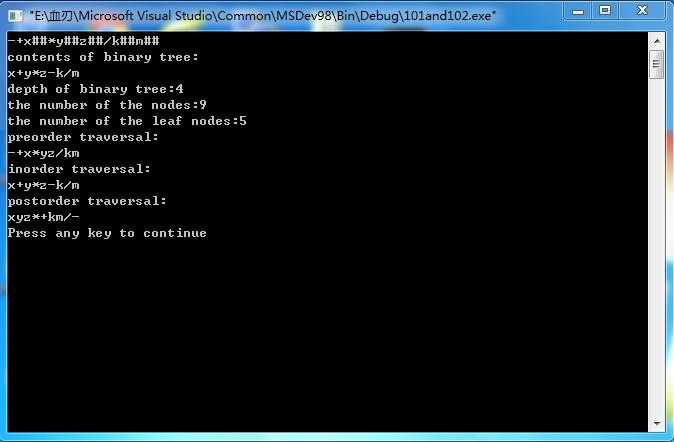
运行结果:

反思:整个程序代码,并没有多少新鲜东西。重要的是通过程序代码,理解二叉树创建、遍历的概念。
二叉树方面还有线索二叉树、二叉排序树等,但都不会打出代码。因为代码上并没有新的内容,主要是对其概念的理解。
不过,其中的哈夫曼编码还是得说说的。
实例105 哈夫曼编码
问题:已知a,b,c,d,e,f各节点的权值分别为18、20、4、13、16、38,采用哈夫曼编码法对各节点进行编码。
逻辑:哈夫曼编码算法:森林中共有n棵二叉树,每棵二叉树中仅有一个孤立的节点,他们既是根又是叶子,将当前森林中的两棵根结点权值最小的二叉树合并称一棵新的二叉树,每合并一次,森林中就减少一棵树。森林中n棵树要进行n-1次合并,才能使森林中的二叉树的数目由n棵减少到一棵最终的哈夫曼树。每次合并时都会产生一个新的节点,合并n-1次也就产生了n-1个新节点,所以最终求得的哈夫曼树有2n-1个节点。
哈夫曼树中没有度为1的节点,实际上一棵具有n个叶子节点的哈夫曼树共有2n-1个节点,可以存储在一个大小为2n-1的一维数组中。在构建完哈夫曼树后再求编码需从叶子节点出发走一条从叶子到根的路径。对每个节点我们既需要知道双亲的信息,又需要知道孩子节点的信息。
代码:
  1 #define MAXSIZE 50
  2 #include<string.h>
  3 #include<stdio.h>
  4
  5 typedef struct
  6 //定义结构体huffnode,存储节点信息。
  7 {
  8     char data;
  9     //节点值
 10     int weight;
 11     //权值
 12     int parent;
 13     //父节点
 14     int left;
 15     //左节点
 16     int right;
 17     //右节点
 18     int flag;
 19     //标志位
 20 }huffnode;
 21 typedef struct
 22 //定义结构体huffcode,存储节点代码。
 23 {
 24     char code[MAXSIZE];
 25     int start;
 26 }huffcode;
 27 huffnode htree[2*MAXSIZE];
 28 huffcode hcode[MAXSIZE];
 29
 30 int select(int i)
 31 //自定义函数select(),用于寻找权值最小的节点。
 32 {
 33     int k=32767;
 34     int j,q;
 35     for(j=0;j<=i;j++)
 36         if(htree[j].weight<k && htree[j].flag==-1)
 37         {
 38             k=htree[j].weight;
 39             q=j;
 40         }
 41     htree[q].flag=1;
 42     //将找到的节点标志位置1。
 43     return q;
 44 }
 45
 46 void creat_hufftree(int n)
 47 //自定义函数creat_hufftree(),用于创建哈夫曼树。
 48 {
 49     int i,l,r;
 50     for(i=0;i<2*n-1;i++)
 51         htree[i].parent=htree[i].left=htree[i].right=htree[i].flag=-1;
 52         //全部赋值为-1.
 53     for(i=n;i<2*n-1;i++)
 54     {
 55         l=select(i-1);
 56         r=select(i-1);
 57         //找出权值最小的左右节点。
 58         htree[l].parent=i;
 59         htree[r].parent=i;
 60         htree[i].weight=htree[l].weight+htree[r].weight;
 61         //左右节点权值相加等于新节点的权值。
 62         htree[i].left=l;
 63         htree[i].right=r;
 64     }
 65 }
 66
 67 creat_huffcode(int n)
 68 //自定义函数creat_huffcode(),用于为各节点进行哈夫曼编码。
 69 {
 70     int i,f,c;
 71     huffcode d;
 72     for(i=0;i<n;i++)
 73     {
 74         d.start=n+1;
 75         c=i;
 76         f=htree[i].parent;
 77         while(f!=-1)
 78         {
 79             if(htree[f].left==c)
 80             //判断c是否是左子树。
 81                 d.code[--d.start]=‘0‘;
 82                 //左边编码为0.
 83             else
 84                 d.code[--d.start]=‘1‘;
 85                 //右边编码为1.
 86             c=f;
 87             f=htree[f].parent;
 88         }
 89         hcode[i]=d;
 90     }
 91 }
 92
 93 void display_huffcode(int n)
 94 //创建函数display_huffcode(),用于输出各节点的编码。
 95 {
 96     int i,k;
 97     printf("huffman is:\n");
 98     for(i=0;i<n;i++)
 99     {
100         printf("%c:",htree[i].data);
101         //输出节点。
102         for(k=hcode[i].start;k<=n;k++)
103             printf("%c",hcode[i].code[k]);
104             //输出各个节点对应的代码。
105         printf("\n");
106     }
107 }
108
109 void main()
110 //定义主函数main(),作为程序的入口,用于输入数据,调用函数。
111 {
112     int n=6;
113     htree[0].data=‘a‘;
114     htree[0].weight=18;
115     htree[1].data=‘b‘;
116     htree[1].weight=20;
117     htree[2].data=‘c‘;
118     htree[2].weight=4;
119     htree[3].data=‘d‘;
120     htree[3].weight=13;
121     htree[4].data=‘e‘;
122     htree[4].weight=16;
123     htree[5].data=‘f‘;
124     htree[5].weight=48;
125     creat_hufftree(n);
126     //调用函数创建哈夫曼树。
127     creat_huffcode(n);
128     //调用函数构造哈夫曼编码。
129     display_huffcode(n);
130     //显示各节点哈夫曼编码。
131 }
运行结果:

反思:整个过程,重在理解哈夫曼编码的概念,以及编码方式。如果有兴趣,完全可以将主函数中的固定输入,添加一个输入函数,稍作修改,改为自主输入。当然,如果有学过信息学的同学,更可以将其他编码方式做成程序试试,有利于理解哦。
3.6 图及图的应用
PS:图是一种比线性表和树更为复杂的非线性结构。图结构可以描述各种复杂的数据对象,特别是近年来迅速发展的人工智能、工程、计算科学、语言学、物理、化学等领域中。当然,这些都是套话。说白了,数据结构中复杂度极高的图可以用来处理许多复杂数据,更为贴近现实的一些操作。
由于图片问题,所以只阐述两个例子的合例。
实例107 图的深度优先搜索 实例108 图的广度优先搜索
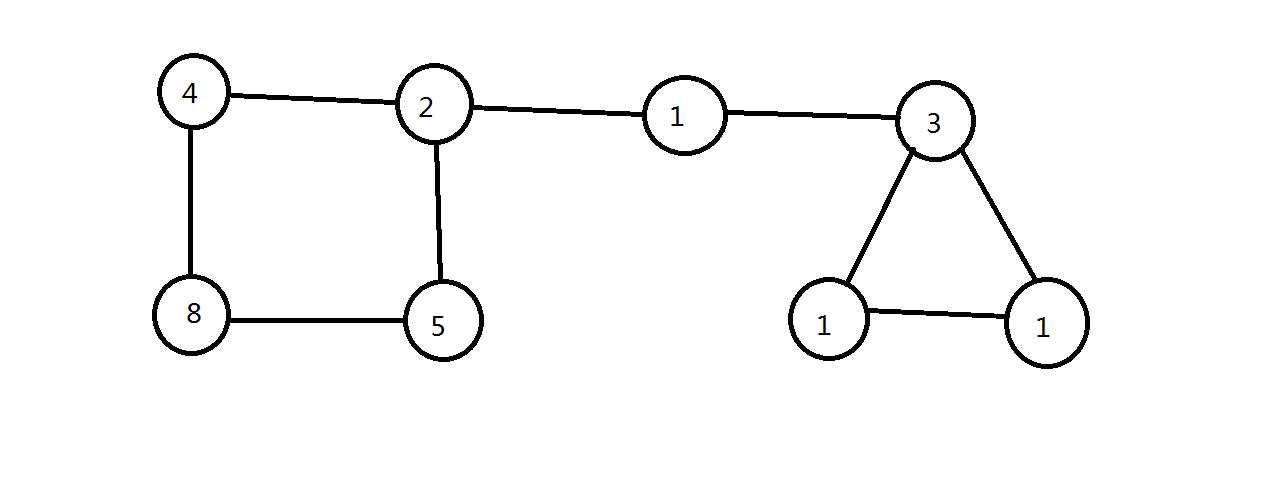
问题:编程实现如图所示的无向图的深度优先搜索、广度优先搜索。

PS:图片是自己画的,将就一下吧。
逻辑:深度优先搜索即尽可能“深“的遍历一个图,在深度优先搜索中,对于最新已经发现的顶点,如果它的邻接顶点未被访问,则深度优先搜索该邻接顶点。
广度优先遍历是连通图的一种遍历策略。其基本思想如下:
1、从图中某个顶点V0出发,并访问此顶点;
2、从V0出发,访问V0的各个未曾访问的邻接点W1,W2,…,Wk;然后,依次从W1,W2,…,Wk出发访问各自未被访问的邻接点;
3、重复步骤2,直到全部顶点都被访问为止。
概念方面TODD911解释得还是相当清晰的。
代码:
  1 #include<stdio.h>
  2 #include<stdlib.h>
  3
  4 struct node
  5 //图的顶点结构
  6 {
  7     int vertex;
  8     int flag;
  9     struct node *nextnode;
 10 };
 11 typedef struct node *graph;
 12 struct node vertex_node[10];
 13
 14 #define MAXQUEUE 100
 15 int queue[MAXQUEUE];
 16 int front=-1;
 17 int rear=-1;
 18 int visited[10];
 19
 20 void creat_graph(int *node,int n)
 21 //自定义函数creat_graph(),用于构造邻接表。
 22 {
 23     graph newnode,p;
 24     //定义一个新节点及指针。
 25     int start,end,i;
 26     for(i=0;i<n;i++)
 27     {
 28         start=node[i*2];
 29         //边的起点。
 30         end=node[i*2+1];
 31         //边的终点。
 32         newnode=(graph)malloc(sizeof(struct node));
 33         newnode->vertex=end;
 34         //新节点的内容为边终点处顶点的内容。
 35         newnode->nextnode=NULL;
 36         p=&(vertex_node[start]);
 37         //设置指针位置。
 38         while(p->nextnode!=NULL)
 39             p=p->nextnode;
 40             //寻找链尾。
 41         p->nextnode=newnode;
 42         //在链尾处插入新节点。
 43     }
 44 }
 45
 46 int enqueue(int value)
 47 //自定义函数enqueue(),用于实现元素入队。
 48 {
 49     if(rear>=MAXQUEUE)
 50         return -1;
 51     rear++;
 52     //移动队尾元素
 53     queue[rear]=value;
 54 }
 55 int dequeue()
 56 //自定义函数dequeue(),用于实现元素出队。
 57 {
 58     if(front==rear)
 59         return -1;
 60     front++;
 61     //移动队首元素
 62     return queue[front];
 63 }
 64
 65 void dfs(int k)
 66 //自定义函数dfs(),用于实现图的深度优先遍历。
 67 {
 68     graph p;
 69     vertex_node[k].flag=1;
 70     //将标志位置1,说明该节点已经被访问过了。
 71     printf("vertex[%d]",k);
 72     p=vertex_node[k].nextnode;
 73     //指针指向下一个节点。
 74     while(p!=NULL)
 75     {
 76         if(vertex_node[p->vertex].flag==0)
 77         //判断该节点的标志位是否为0
 78             dfs(p->vertex);
 79             //继续遍历下一个节点
 80         p=p->nextnode;
 81         //如果已经遍历过,p指向下一个节点
 82     }
 83 }
 84
 85 void bfs(int k)
 86 {
 87     graph p;
 88     enqueue(k);
 89     visited[k]=1;
 90     printf("vertex[%d]",k);
 91     while(front!=rear)
 92     //判断是否为空
 93     {
 94         k=dequeue();
 95         p=vertex_node[k].nextnode;
 96         while(p!=NULL)
 97         {
 98             if(visited[p->flag]==0)
 99             //判断是否访问过。
100             {
101                 enqueue(p->vertex);
102                 visited[p->flag]=1;
103                 //访问过的元素变为1。
104                 printf("vertexp[%d]",p->vertex);
105             }
106             p=p->nextnode;
107             //访问下一个元素。
108         }
109     }
110 }
111
112 main()
113 {
114     graph p;
115     int node[100],i,sn,vn;
116     printf("please input the number of sides:\n");
117     scanf("%d",&sn);
118     //输入无向图的边数。
119     printf("please input the number of vertexes:\n");
120     scanf("%d",&vn);
121     printf("please input the vertexes which connected by the sides:\n");
122     for(i=1;i<=4*sn;i++)
123         scanf("%d",&node[i]);
124         //输入每个边所连接的两个顶点,起始及结束位置不同,每边输入两次。
125     for(i=1;i<=vn;i++)
126     {
127         vertex_node[i].vertex=i;
128         //将每个顶点的信息存入数组中
129         vertex_node[i].flag=0;
130         vertex_node[i].nextnode=NULL;
131     }
132     creat_graph(node,2*sn);
133     //调用函数创建邻接表
134     printf("the result is:\n");
135     for(i=1;i<=vn;i++)
136     {
137         printf("vertex%d:",vertex_node[i].vertex);
138         //将邻接表顶点内容输出
139         p=vertex_node[i].nextnode;
140         while(p!=NULL)
141         {
142             printf("->%3d",p->vertex);
143             //输出邻接顶点的内容
144             p=p->nextnode;
145             //指针指向下一个邻接顶点
146         }
147         printf("\n");
148     }
149     printf("the result of depth-first search is:\n");
150     dfs(1);
151     //调用函数进行深度优先遍历
152     printf("the result of breadth-first search is:\n");
153     bfs(1);
154     //调用函数进行广度优先遍历
155     printf("\n");
156 }
反思:其实,主要还是依靠链表那节的思路。所以说,这些数据结构,方法思路都是不变的。重要的还是理解其中的概念,即思想。至于图当中的其他问题,如求最小生成树等问题就不提了。
到这里,数据结构章节已然完结了。
总结:数据结构在数据处理方面有着极其重要的地位。就算是考研,数据结构在计算机专业中,也占到了80‘,超过了专业分数一半。要知道计算机考研专业150‘里可是一共四门棵啊。所以,希望引起足够重视。更为重要的是可以通过数据结构的程序,可以感受到编程中对数据,问题的处理方式,可以说就是编程思想的一点点体现了。
预告:接下来是算法一章。嗯。其实,看到有些书对算法的看法有两种,一种认为算法很重要,是编程的灵魂。另一种认为算法并没有那么重要,更重要的编程的具体实现。我的看法是 算法体现编程思想,编程思想指引算法。
所以,下一章,我更加侧重于思想,而不是具体代码实现。
谢谢。
(表示我已经好几次因为排版问题被踢出首页区了。这次尽力了。真的就这排版水平了。。。。。。)
标签:
原文地址:http://www.cnblogs.com/Tiancheng-Duan/p/5767754.html