标签:
模仿是最好的学习,这次我们继续山寨百度,通过自定义Infowindow来实现百度风格的BubblePopup
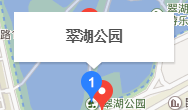
先打开百度地图,按下f12吧BubblePopup的HTML代码和CSS代码拷贝下来,这里我无耻的把类名改了,大家不要在意细节。
HTML模板
1<divclass="dextra-bubble-pop-center"style="z-index: 3; position: relative; height: 50px; width: 160px;"> 2<divclass="dextra-bubble-pop-content" 3style="display: block; width: 160px; height: 50px; overflow-x: auto; overflow-y: hidden;"> 4<divid="poi_info_window"class="dextra-poi-info-window"> 5<divclass="left name-wrap"><spanclass="name"></span></div> 6</div> 7</div> 8</div> 9<divclass="dextra-bubble-pop-bottom"style="display: block; z-index: 2; width: 160px; left: 72px;"> 10<span></span> 11</div>
CSS代码
  1  2 .dextra-bubble-pop {
  3position: absolute;
  4z-index: 100;
  5box-sizing: border-box;
  6box-shadow: 1px 2px 1px rgba(0, 0, 0, .15);
  7background-color: #FFF;
  8 }
  9 10 .dextra-poi-info-window {
 11padding: 4px 0;
 12 }
 13 14 .dextra-poi-info-window .left {
 15padding-left: 10px;
 16padding-right: 10px;
 17height: 40px;
 18line-height: 40px;
 19display: table;
 20table-layout: fixed;
 21width: 140px;
 22text-align: center;
 23 }
 24 25 .dextra-poi-info-window .name-wrap .name {
 26vertical-align: middle;
 27font-size: 14px;
 28font-weight: 700;
 29white-space: nowrap;
 30overflow: hidden;
 31text-overflow: ellipsis;
 32display: block;
 33 }
 34 35 .dextra-bubble-pop-bottomspan {
 36position: absolute;
 37left:72px;
 38width: 16px;
 39height: 10px;
 40background-image: url("../images/tail_shadow.png");
 41 }
要实现BubblePopup,实际上就是自定义一个InfoWindow,我们可以通过继承InfoWindowBase来实现。要实现自定义的InfoWindow。我们可以先参考一下官方的例子Custom info window,注意,这个例子是有缺陷的,如果当infowindow超出当前视图边界就会出现滚动条。下载官方的实例,我们打开infoWindow.js文件。
  1 define([
  2     "dojo/Evented",
  3     "dojo/parser",
  4     "dojo/on",
  5     "dojo/_base/declare",
  6     "dojo/dom-construct",
  7     "dojo/_base/array",
  8     "dojo/dom-style",
  9     "dojo/_base/lang",
 10     "dojo/dom-class",
 11     "dojo/fx/Toggler",
 12     "dojo/fx",
 13     "dojo/Deferred",
 14     "esri/domUtils",
 15     "esri/InfoWindowBase"
 16 17 ],
 18function(
 19     Evented,
 20     parser,
 21     on,
 22     declare,
 23     domConstruct,
 24     array,
 25     domStyle,
 26     lang,
 27     domClass,
 28     Toggler,
 29     coreFx,
 30     Deferred,
 31     domUtils,
 32     InfoWindowBase
 33 ) {
 34return declare([InfoWindowBase, Evented], {
 35 36         isContentShowing :false,
 37 38constructor: function(parameters) {
 39 40 41           lang.mixin(this, parameters);
 42 43 44           domClass.add(this.domNode, "myInfoWindow");
 45 46this._closeButton = domConstruct.create("div",{"class": "close", "title": "Close"}, this.domNode);
 47this._title = domConstruct.create("div",{"class": "title"}, this.domNode);
 48this._content = domConstruct.create("div",{"class": "content"}, this.domNode);
 49 50this._toggleButton = domConstruct.create("div",{"class": "toggleOpen", "title": "Toggle"}, this.domNode);
 51 52var toggler = new  Toggler({
 53             "node": this._content,
 54             showFunc: coreFx.wipeIn,
 55             hideFunc: coreFx.wipeOut
 56           });
 57           toggler.hide();
 58 59           on(this._closeButton, "click", lang.hitch(this, function(){
 60//hide the content when the info window is toggled close. 61this.hide();
 62if(this.isContentShowing){
 63               toggler.hide();
 64this.isContentShowing = false;
 65               domClass.remove(this._toggleButton);
 66               domClass.add(this._toggleButton, "toggleOpen");
 67             }
 68           }));
 69           on(this._toggleButton, "click", lang.hitch(this, function(){
 70//animate the content display  71if(this.isContentShowing){
 72 73                 toggler.hide();
 74this.isContentShowing = false;
 75                 domClass.remove(this._toggleButton);
 76                 domClass.add(this._toggleButton,"toggleOpen");
 77 78               }else{
 79                 toggler.show();
 80this.isContentShowing=true;
 81                 domClass.remove(this._toggleButton);
 82                 domClass.add(this._toggleButton,"toggleClose");
 83               }
 84 85           }));
 86//hide initial display  87           domUtils.hide(this.domNode);
 88this.isShowing = false;
 89 90         },
 91         setMap: function(map){
 92this.inherited(arguments);
 93           map.on("pan-start", lang.hitch(this, function(){
 94this.hide();
 95           }));
 96           map.on("zoom-start", lang.hitch(this, function(){
 97this.hide();
 98           }));
 99// map.on("zoom-start", //this, this.hide);100101         },
102         setTitle: function(title){
103this.place(title, this._title);
104105         },
106         setContent: function(content){
107this.place(content, this._content);
108         },
109         show: function(location){
110if(location.spatialReference){
111location = this.map.toScreen(location);
112           }
113114//Position 10x10 pixels away from the specified location115           domStyle.set(this.domNode,{
116             "left": (location.x + 10) + "px",
117             "top": (location.y + 10) + "px"
118           });
119120//display the info window121           domUtils.show(this.domNode);
122this.isShowing = true;
123this.onShow();
124         },
125         hide: function(){
126           domUtils.hide(this.domNode);
127this.isShowing = false;
128this.onHide();
129130         },
131         resize: function(width, height){
132           domStyle.set(this._content,{
133             "width": width + "px",
134             "height": height + "px"
135           });
136           domStyle.set(this._title,{
137             "width": width + "px"
138           });
139140         },
141         destroy: function(){
142           domConstruct.destroy(this.domNode);
143this._closeButton = this._title = this._content = null;
144145         }
146147148       });
149150 });
我们就在此基础上进行改造,不但要实现需求还要解决缺陷。infoWindowBase是继承自_WidgetBase的,我们先来看一下infoWindowBase的官方描述.
我们可以重写infoWindowBase的一些方法,来实现自己的infoWindow。
首先我们先引入我们要用到的模块
  1 define([
  2         "dojo/Evented",
  3         "dojo/on",
  4         "dojo/query",
  5         "dojo/_base/declare",
  6         "dojo/dom-construct",
  7         "dojo/dom-attr",
  8         "dojo/_base/array",
  9         "dojo/dom-style",
 10         "dojo/_base/lang",
 11         "dojo/dom-class",
 12         "dijit/_TemplatedMixin",
 13         "esri/domUtils",
 14         "esri/InfoWindowBase",
 15         "esri/geometry/ScreenPoint",
 16         "esri/geometry/screenUtils",
 17         "esri/geometry/webMercatorUtils",
 18         "dojo/text!./templates/dextraPopup.html"
 19     ],
 20function (Evented,
 21               on,
 22               query,
 23               declare,
 24               domConstruct,
 25               domAttr,
 26               array,
 27               domStyle,
 28               lang,
 29               domClass,
 30               _TemplatedMixin,
 31               domUtils,
 32               InfoWindowBase, ScreenPoint, screenUtils, webMercatorUtils, template) {
 33var showMapPoint = null;
 34return declare([InfoWindowBase, Evented, _TemplatedMixin], {
 35             isContentShowing: false,
 36             templateString: template,
 37             _events: [],
 38constructor: function (parameters) {
 39                 lang.mixin(this, parameters);
 40             },
 41                 ...
 42               });
对比官方的例子,我去掉了部分模块(coreFx,Toggler),加入了dijit/_TemplateMixin,esri/geometry/webMecratorUtils,
esri/geomtry/srcreenUtils模块。_TemplateMixin是为了使用我在第一步拷贝下来的HTML模板,关于编写基于模板的widget可以到
dojo的官网进行查看;webMecratorUtils和srcreenUtils则是为了实现地理坐标和屏幕坐标的准确转换。
showMapPoint是一个全局的变量,用来记录popup的地理坐标位置。
templateString是_TemplateMixin模块的一个属性,用来保存HTML模板。
_events:是一个数组,用来存储相关的事件,在popup被释放时释放注册的事件。
先用一个私有方法来进行初始化。应为InfoWindowBase是继承自_WidgetBase的,domNode是_WidgetBase的一个属性,用于表示生成Widget的dom节点,可以通过在构造函数里用第二个参数来进行传入,或者在内部自己定义。
  1   _createInfoWindowInstance: function (map) {
  2this.domNode = domConstruct.create("div", null, map.id + "_root");
  3                 domClass.add(this.domNode, "dextra-bubble-pop");
  4                 domStyle.set(this.domNode, {
  5                     width: "160px",
  6                 });
  7  8this.domNode.innerHTML = this.templateString;
  9 10this._content = query("div.name-wrap span.name");
 11this._title=query("div.name-wrap");
 12//hide initial display 13                 domUtils.hide(this.domNode);
 14this.isShowing = false;
 15             },
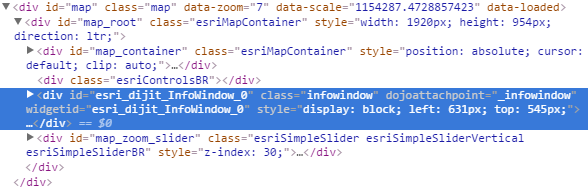
注意,我在这里创建了一个div节点,并把它添加到一个id为{map.id}_root({map.id}占位符,用于表示地图的id)的dom节点中,这一步就是解决当infowindow超出当前视图范围时会出现滚动条。我们可以先用arcgis提供的infowindow来试一试,在浏览器中按
f12,我们看一看infowindow是放在哪的。
利用arcgis自带的infowindow,我们可以看到这个infowindow的dom节点被添加到一个id为map_root的div中。在这里,我的map控件的id为“map”,所以它会生成一个id为“map_root”({map.id}_root)的div。所以我们只要把自定生成的popup放到这个节点中,当popup超出当前视图时,会被裁减了,而不是出现滚动条。这里最关键的部分已经完成了,接下来的操作就是如何在地图上展现这个popup。
  1   _showInfoWindow: function (extent) {
  2if (showMapPoint == null)return;
  3var showScreenPoint = screenUtils.toScreenGeometry(extent, this.map.width, this.map.height, showMapPoint);
  4                 domStyle.set(this.domNode, {
  5                     "left": (showScreenPoint.x - 80) + "px",
  6                     "top": (showScreenPoint.y - 76 ) + "px"
  7                 });
  8  9                 domUtils.show(this.domNode);
 10this.isShowing = true;
 11this.onShow();
 12             },
 13 14             show: function (location) {
 15                 showMapPoint = location;
 16if (webMercatorUtils.canProject(location, this.map)) {
 17                     showMapPoint = webMercatorUtils.project(location, this.map);
 18                 }
 19if (showMapPoint.spatialReference) {
 20var screenPoint = this.map.toScreen(showMapPoint);
 21                     domStyle.set(this.domNode, {
 22                         "left": (screenPoint.x - 80) + "px",
 23                         "top": (screenPoint.y - 76) + "px"
 24                     });
 25                 }
 26 27//display the info window 28                 domUtils.show(this.domNode);
 29this.isShowing = true;
 30this.onShow();
 31             },
_showInfoWindow方法是一个私有方法,用于在地图事件触发时调用。当地图平移,缩放时根据地理坐标从新计算BubblePopup的屏幕坐标。用screenUtils.toScreenGeometry(extent, width, height, mapGeometry)根据地图的范围,宽度,高度,和点计算出相应的屏幕坐标。
show方法是一个公有方法,用于在外部进行调用。在这里利用了arcgis js 提供webMercatorUtils模块,来进行坐标的转换。一般而言,我们都会用经纬度坐标,但是当地图是webMercator投影时,就需要先把经纬度坐标转化成米制坐标,才能在正确的位置显示出来来。
关键的部分已经完成,下面贴出全部代码
  1 define([
  2         "dojo/Evented",
  3         "dojo/on",
  4         "dojo/query",
  5         "dojo/_base/declare",
  6         "dojo/dom-construct",
  7         "dojo/dom-attr",
  8         "dojo/_base/array",
  9         "dojo/dom-style",
 10         "dojo/_base/lang",
 11         "dojo/dom-class",
 12         "dijit/_TemplatedMixin",
 13         "esri/domUtils",
 14         "esri/InfoWindowBase",
 15         "esri/geometry/ScreenPoint",
 16         "esri/geometry/screenUtils",
 17         "esri/geometry/webMercatorUtils",
 18         "dojo/text!./templates/dextraPopup.html"
 19     ],
 20function (Evented,
 21               on,
 22               query,
 23               declare,
 24               domConstruct,
 25               domAttr,
 26               array,
 27               domStyle,
 28               lang,
 29               domClass,
 30               _TemplatedMixin,
 31               domUtils,
 32               InfoWindowBase, ScreenPoint, screenUtils, webMercatorUtils, template) {
 33var showMapPoint = null;
 34return declare([InfoWindowBase, Evented, _TemplatedMixin], {
 35 36             templateString: template,
 37             _events: [],
 38constructor: function (parameters) {
 39                 lang.mixin(this, parameters);
 40             },
 41             _createInfoWindowInstance: function (map) {
 42this.domNode = domConstruct.create("div", null, map.id + "_root");
 43                 domClass.add(this.domNode, "dextra-bubble-pop");
 44                 domStyle.set(this.domNode, {
 45                     width: "160px",
 46                 });
 47 48this.domNode.innerHTML = this.templateString;
 49 50this._content = query("div.name-wrap span.name");
 51this._title=query("div.name-wrap");
 52//hide initial display 53                 domUtils.hide(this.domNode);
 54this.isShowing = false;
 55             },
 56 57             setMap: function (map) {
 58this.inherited(arguments);
 59this._events = [];
 60this._createInfoWindowInstance(map);
 61this._events.push(map.on("pan", lang.hitch(this, function (evt) {
 62if (this.isShowing) {
 63this._showInfoWindow(evt.extent);
 64                     }
 65                 })));
 66 67this._events.push(map.on("zoom-start", lang.hitch(this, function (evt) {
 68this.hide();
 69                 })));
 70 71this._events.push(map.on("zoom-end", lang.hitch(this, function (evt) {
 72this._showInfoWindow(evt.extent);
 73                 })));
 74             },
 75 76             unsetMap: function (map) {
 77this.inherited(arguments);
 78                 array.forEach(this._events, function (event) {
 79                     event.remove();
 80                 });
 81             },
 82             setTitle: function (title) {
 83this._title.forEach(function (node) {
 84                     domAttr.set(node, "title", title);
 85                 });
 86             },
 87 88             setContent: function (content) {
 89this._content.forEach(function (node) {
 90                     node.innerHTML = content;
 91                 });
 92             },
 93 94             _showInfoWindow: function (extent) {
 95if (showMapPoint == null)return;
 96var showScreenPoint = screenUtils.toScreenGeometry(extent, this.map.width, this.map.height, showMapPoint);
 97                 domStyle.set(this.domNode, {
 98                     "left": (showScreenPoint.x - 80) + "px",
 99                     "top": (showScreenPoint.y - 76 ) + "px"
100                 });
101102                 domUtils.show(this.domNode);
103this.isShowing = true;
104this.onShow();
105             },
106107             show: function (location) {
108                 showMapPoint = location;
109if (webMercatorUtils.canProject(location, this.map)) {
110                     showMapPoint = webMercatorUtils.project(location, this.map);
111                 }
112if (showMapPoint.spatialReference) {
113var screenPoint = this.map.toScreen(showMapPoint);
114                     domStyle.set(this.domNode, {
115                         "left": (screenPoint.x - 80) + "px",
116                         "top": (screenPoint.y - 76) + "px"
117                     });
118                 }
119120//display the info window121                 domUtils.show(this.domNode);
122this.isShowing = true;
123this.onShow();
124             },
125             hide: function () {
126if (this.isShowing) {
127                     domUtils.hide(this.domNode);
128this.isShowing = false;
129this.onHide();
130                 }
131             },
132             resize: function (width, height) {
133                 domStyle.set(this._content, {
134                     "width": width + "px",
135                     "height": height + "px"
136                 });
137             },
138             remove: function () {
139this.hide();
140                 showMapPoint = null;
141             },
142             destroy: function () {
143                 domConstruct.destroy(this.domNode);
144             }
145         });
146     });
147
DEMO:
  1<!DOCTYPE html>  2<htmllang="en">  3<head>  4<metacharset="UTF-8">  5<title>DExtra-BubublPoopup</title>  6<linkrel="stylesheet"href="https://js.arcgis.com/3.16/esri/css/esri.css">  7<linkrel="stylesheet"href="../dist/dijit/css/dextraPopup.css">  8<linkrel="stylesheet"href="css/mainApp.css">  9<script> 10         var dojoConfig = {
 11             parseOnLoad:true,
 12             packages: [{
 13                 name: ‘custom‘,
 14                 location: location.pathname.replace(/\/[^/]+$/, ‘‘) + ‘/custom‘//从cdn加载自己定义的模块方法
 15             },
 16                 {
 17                     name: ‘dextra‘,
 18                     location: ‘/extra.arcgis.3.x/dist/‘//从cdn加载自己定义的模块方法
 19                 }]
 20         };
 21</script> 22<scriptsrc="https://js.arcgis.com/3.16/"></script> 23<script> 24         require([
 25                     "dojo/dom",
 26                     "dojo/on",
 27                     "esri/map",
 28                     "esri/symbols/SimpleMarkerSymbol",
 29                     "esri/InfoTemplate",
 30                     "esri/layers/GraphicsLayer",
 31                     "dextra/layers/GoogleVectorLayer",
 32                     "dextra/dijit/DEBubblePopup",
 33                     "dojo/domReady!"],
 34                 function (dom, on,
 35                           Map,  Graphic, SimpleMarkerSymbol, InfoTemplate, GraphicsLayer,
 36                           GoogleVectorLayer,DEBubblePopup) {
 37 38                     var infoWindow = new  DEBubblePopup();
 39                     var map = new Map("map", {
 40                         showAttribution: false,
 41                         center: [102.3, 24.6],
 42                         autoResize: true,
 43                         sliderPosition: "bottom-right",
 44                         logo: false,
 45                         infoWindow:infoWindow,
 46                         zoom:12
 47                     });
 48 49                     var googleVect = new GoogleVectorLayer();
 50                     map.addLayer(googleVect);
 51 52                     var measureLayer = new GraphicsLayer({id: "infoWindowTest"});
 53                     map.addLayer(measureLayer);
 54                     on(dom.byId("infowindow"), "click", function (e) {
 55                         on.once(map, "click", function (evt) {
 56                             console.log(map._container);
 57                             var sms = new SimpleMarkerSymbol({
 58                                 "color": [255, 0, 0],
 59                                 "size": 12,
 60                                 "xoffset": 0,
 61                                 "yoffset": 0,
 62                                 "type": "esriSMS",
 63                                 "style": "esriSMSCircle",
 64                                 "outline": {
 65                                     "color": [0, 0, 0, 255],
 66                                     "width": 1,
 67                                     "type": "esriSLS",
 68                                     "style": "esriSLSSolid"
 69                                 }
 70                             });
 71 72                             var point = map.toMap(evt.screenPoint);
 73                             var attr = {"Xcoord": point.x, "Ycoord": point.y, "Plant": "Mesa Mint"};
 74                             var infoTemplate = new InfoTemplate("Locations", "Latitude: ${Ycoord} Longitude: ${Xcoord}Plant Name:${Plant}");
 75                             var graphic=new Graphic(point, sms,attr,infoTemplate);
 76                             measureLayer.add(graphic);
 77                         });
 78                     });
 79                 });
 80</script> 81<style> 82         #measureTools {
 83             position: absolute;
 84             top: 50px;
 85             left: 50px;
 86             z-index: 1000;
 87         }
 88</style> 89</head> 90<body> 91<divid="measureTools"> 92<buttonid="infowindow">弹出框</button> 93</div> 94 95<divid="map"></div> 96</body> 97</html>
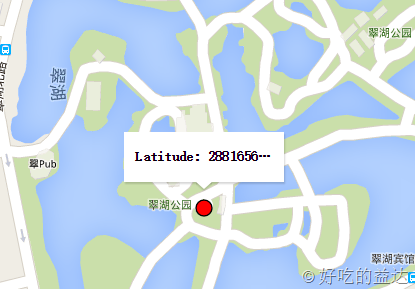
效果截图:
ArcGIS JS 学习笔记3 实现百度风格的BubblePopup
标签:
原文地址:http://www.cnblogs.com/ssk-bak/p/5830159.html