标签:
原文:教你分分钟学会用python爬虫框架Scrapy爬取心目中的女神
本博文将带领你从入门到精通爬虫框架Scrapy,最终具备爬取任何网页的数据的能力。本文以校花网为例进行爬取,校花网:http://www.xiaohuar.com/,让你体验爬取校花的成就感。

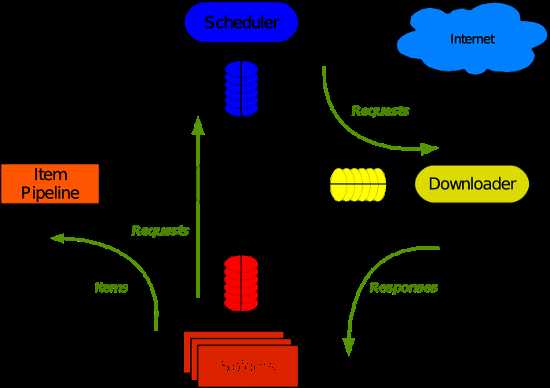
Scrapy主要包括了以下组件:
Scrapy运行流程大概如下:
因为python3并不能完全支持Scrapy,因此为了完美运行Scrapy,我们使用python2.7来编写和运行Scrapy。
|
1
|
pip install Scrapy |
注:windows平台需要依赖pywin32,请根据自己系统32/64位选择下载安装,https://sourceforge.net/projects/pywin32/
其它可能依赖的安装包:lxml-3.6.4-cp27-cp27m-win_amd64.whl,VCForPython27.msi百度下载即可
1、创建项目
运行命令:
|
1
|
scrapy startproject p1(your_project_name) |
2.自动创建目录的结果:
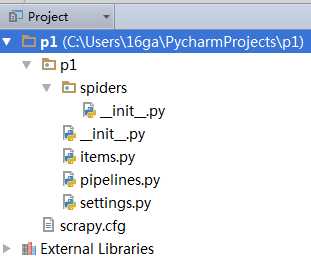
文件说明:
注意:一般创建爬虫文件时,以网站域名命名
3、编写爬虫
在spiders目录中新建 xiaohuar_spider.py 文件
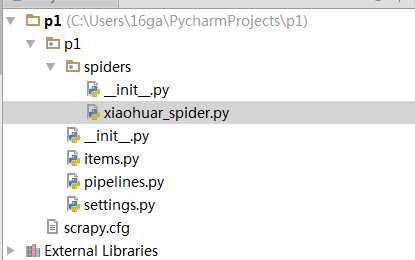
示例代码:
|
1
2
3
4
5
6
7
8
9
10
11
12
13
14
15
16
17
18
19
|
#!/usr/bin/env python# -*- coding:utf-8 -*-import scrapy class XiaoHuarSpider(scrapy.spiders.Spider): name = "xiaohuar" allowed_domains = ["xiaohuar.com"] start_urls = [ "http://www.xiaohuar.com/hua/", ] def parse(self, response): # print(response, type(response)) # from scrapy.http.response.html import HtmlResponse # print(response.body_as_unicode()) current_url = response.url #爬取时请求的url body = response.body #返回的html unicode_body = response.body_as_unicode()#返回的html unicode编码 |
备注:
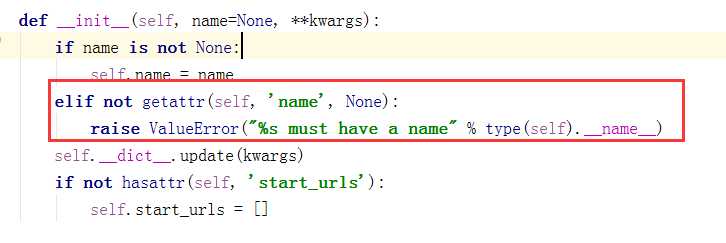


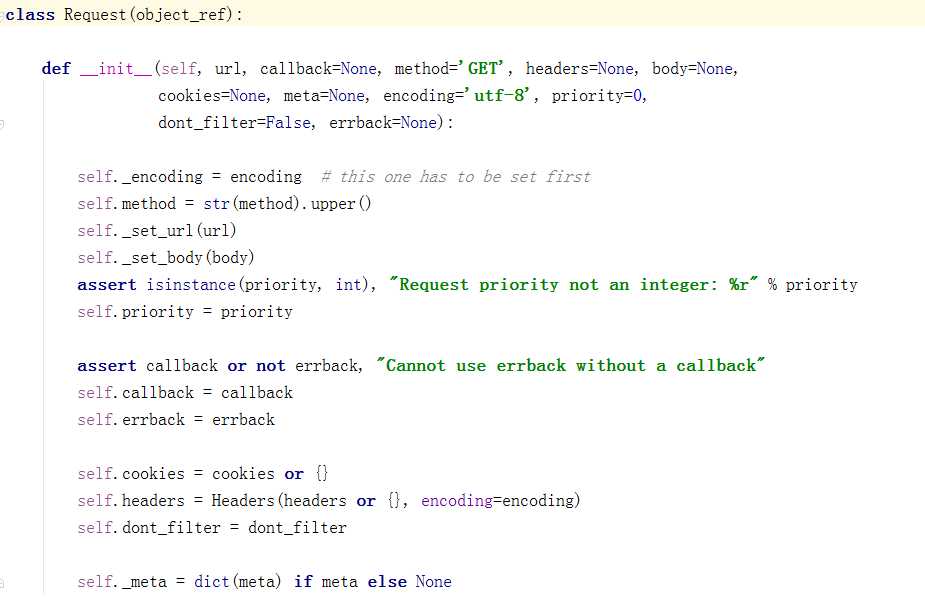
4、运行
进入p1目录,运行命令
|
1
|
scrapy crawl xiaohau --nolog |
格式:scrapy crawl+爬虫名 --nolog即不显示日志
5.scrapy查询语法:
当我们爬取大量的网页,如果自己写正则匹配,会很麻烦,也很浪费时间,令人欣慰的是,scrapy内部支持更简单的查询语法,帮助我们去html中查询我们需要的标签和标签内容以及标签属性。下面逐一进行介绍:
示例代码:
|
1
2
3
4
5
6
7
8
9
10
11
12
13
14
15
16
17
18
19
|
def parse(self, response): # 分析页面 # 找到页面中符合规则的内容(校花图片),保存 # 找到所有的a标签,再访问其他a标签,一层一层的搞下去 hxs = HtmlXPathSelector(response)#创建查询对象 # 如果url是 http://www.xiaohuar.com/list-1-\d+.html if re.match(‘http://www.xiaohuar.com/list-1-\d+.html‘, response.url): #如果url能够匹配到需要爬取的url,即本站url items = hxs.select(‘//div[@class="item_list infinite_scroll"]/div‘) #select中填写查询目标,按scrapy查询语法书写 for i in range(len(items)): src = hxs.select(‘//div[@class="item_list infinite_scroll"]/div[%d]//div[@class="img"]/a/img/@src‘ % i).extract()#查询所有img标签的src属性,即获取校花图片地址 name = hxs.select(‘//div[@class="item_list infinite_scroll"]/div[%d]//div[@class="img"]/span/text()‘ % i).extract() #获取span的文本内容,即校花姓名 school = hxs.select(‘//div[@class="item_list infinite_scroll"]/div[%d]//div[@class="img"]/div[@class="btns"]/a/text()‘ % i).extract() #校花学校 if src: ab_src = "http://www.xiaohuar.com" + src[0]#相对路径拼接 file_name = "%s_%s.jpg" % (school[0].encode(‘utf-8‘), name[0].encode(‘utf-8‘)) #文件名,因为python27默认编码格式是unicode编码,因此我们需要编码成utf-8 file_path = os.path.join("/Users/wupeiqi/PycharmProjects/beauty/pic", file_name) urllib.urlretrieve(ab_src, file_path) |
注:urllib.urlretrieve(ab_src, file_path) ,接收文件路径和需要保存的路径,会自动去文件路径下载并保存到我们指定的本地路径。
5.递归爬取网页
上述代码仅仅实现了一个url的爬取,如果该url的爬取的内容中包含了其他url,而我们也想对其进行爬取,那么如何实现递归爬取网页呢?
示例代码:
|
1
2
3
4
5
|
# 获取所有的url,继续访问,并在其中寻找相同的url all_urls = hxs.select(‘//a/@href‘).extract() for url in all_urls: if url.startswith(‘http://www.xiaohuar.com/list-1-‘): yield Request(url, callback=self.parse) |
即通过yield生成器向每一个url发送request请求,并执行返回函数parse,从而递归获取校花图片和校花姓名学校等信息。
注:可以修改settings.py 中的配置文件,以此来指定“递归”的层数,如: DEPTH_LIMIT = 1
6.scrapy查询语法中的正则:
|
1
2
3
4
5
6
7
8
9
10
11
12
13
14
15
16
17
18
|
from scrapy.selector import Selectorfrom scrapy.http import HtmlResponsehtml = """<!DOCTYPE html><html><head lang="en"> <meta charset="UTF-8"> <title></title></head><body> <li class="item-"><a href="link.html">first item</a></li> <li class="item-0"><a href="link1.html">first item</a></li> <li class="item-1"><a href="link2.html">second item</a></li></body></html>"""response = HtmlResponse(url=‘http://example.com‘, body=html,encoding=‘utf-8‘)ret = Selector(response=response).xpath(‘//li[re:test(@class, "item-\d*")]//@href‘).extract()print(ret) |
语法规则:Selector(response=response查询对象).xpath(‘//li[re:test(@class, "item-\d*")]//@href‘).extract(),即根据re正则匹配,test即匹配,属性名是class,匹配的正则表达式是"item-\d*",然后获取该标签的href属性。
 选择器规则Demo
 获取响应cookie
更多选择器规则:http://scrapy-chs.readthedocs.io/zh_CN/latest/topics/selectors.html
7、格式化处理
上述实例只是简单的图片处理,所以在parse方法中直接处理。如果对于想要获取更多的数据(获取页面的价格、商品名称、QQ等),则可以利用Scrapy的items将数据格式化,然后统一交由pipelines来处理。即不同功能用不同文件实现。
items:即用户需要爬取哪些数据,是用来格式化数据,并告诉pipelines哪些数据需要保存。
示例items.py文件:
|
1
2
3
4
5
6
7
8
9
10
11
12
13
14
15
16
|
# -*- coding: utf-8 -*- # Define here the models for your scraped items## See documentation in:# http://doc.scrapy.org/en/latest/topics/items.html import scrapy class JieYiCaiItem(scrapy.Item): company = scrapy.Field() title = scrapy.Field() qq = scrapy.Field() info = scrapy.Field() more = scrapy.Field() |
即:需要爬取所有url中的公司名,title,qq,基本信息info,更多信息more。
上述定义模板,以后对于从请求的源码中获取的数据同样按照此结构来获取,所以在spider中需要有一下操作:
 spider
上述代码中:对url进行md5加密的目的是避免url过长,也方便保存在缓存或数据库中。
此处代码的关键在于:
 pipelines
上述代码中多个类的目的是,可以同时保存在文件和数据库中,保存的优先级可以在配置文件settings中定义。
|
1
2
3
4
5
|
ITEM_PIPELINES = { ‘beauty.pipelines.DBPipeline‘: 300, ‘beauty.pipelines.JsonPipeline‘: 100,}# 每行后面的整型值,确定了他们运行的顺序,item按数字从低到高的顺序,通过pipeline,通常将这些数字定义在0-1000范围内。 |
总结:本文对python爬虫框架Scrapy做了详细分析和实例讲解,如果本文对您有参考价值,欢迎帮博主点下文章下方的推荐,谢谢!
【转载】教你分分钟学会用python爬虫框架Scrapy爬取心目中的女神
标签:
原文地址:http://www.cnblogs.com/zhehan54/p/5839714.html