标签:
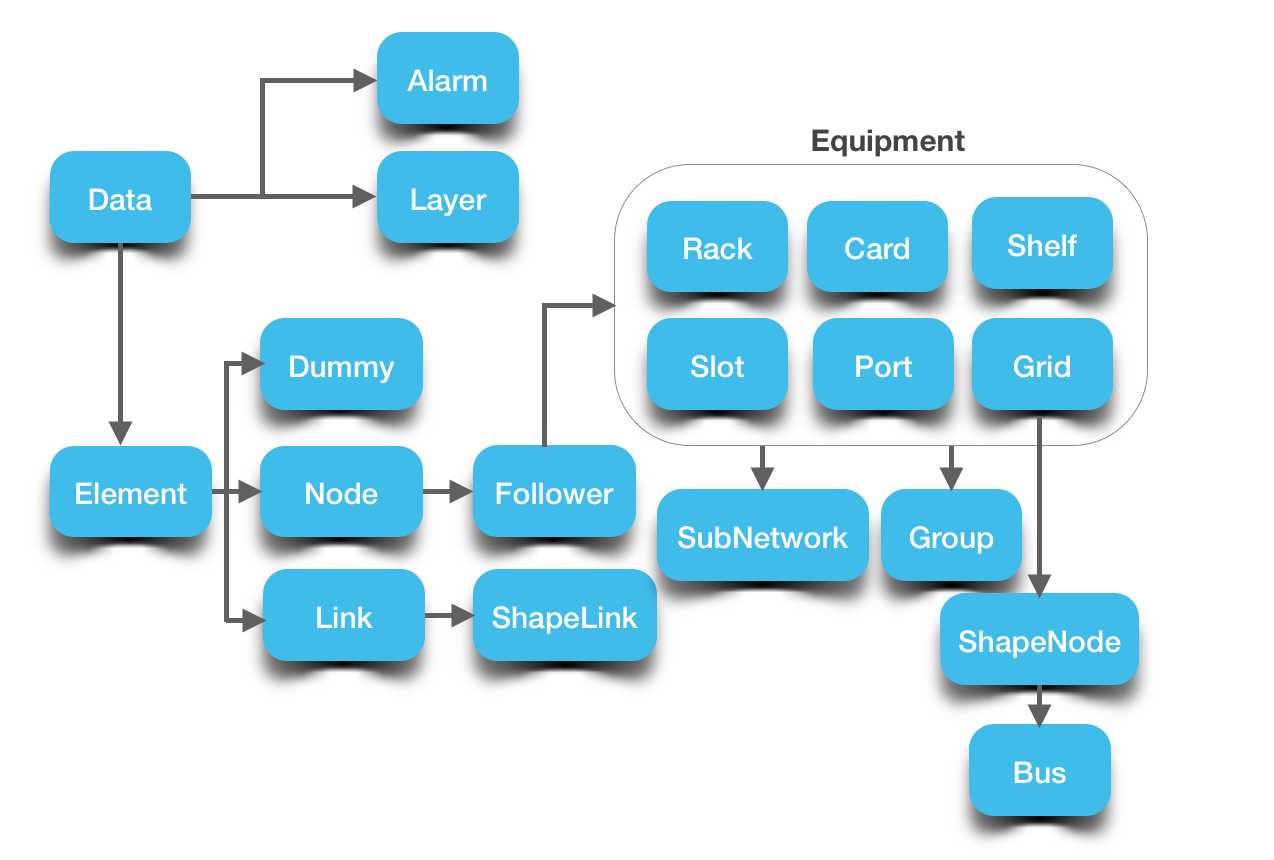
数据元素是数据模型的基本要素,用于描述图形网元,业务网元,或者纯数据。TWaver HTML5中所有数据元素都继承自twaver.Data。为不同功能的需求,预定义了三类数据类型:twaver.Element,twaver.Alarm,twaver.Layer,分别用来描述拓扑的网元,告警和图层。其中拓扑网元扩展定义了十几种网元类型,用以描述丰富的拓扑网元特性,其中最常用的几类拓扑网元包括:Node、Link、Group、SubNetwork、Grid等,TWaver中网元的继承关系如下图,本章将详细介绍这些网元以及其他数据类型的特性,使用以及扩展应用。
twaver.Data是TWaver HTML5中最基本的数据元素,默认定义了id,name,name2,icon,toolTip,parent,children等基本属性,支持事件派发和监听,由它扩展出来还有twaver.Element,twaver.Alarm,twaver.Layer等数据类型。
twaver.Data继承于twaver.PropertyChangeDispatcher类,内部包含一个twaver.EventDispatcher实例对象,这使得Data具有派发事件和监听事件的功能,可以通过调用下面的方法派发事件或者添加监听器:
//派发属性变化事件
firePropertyChange:function(property,oldValue,newValue)
//添加属性变化监听器
addPropertyChangeListener:function(listener,scope,ahead)
//删除属性变化监听器
removePropertyChangeListener:function(listener)
//属性发生变化的处理方法
onPropertyChanged:function(listener)
定义了一些基本属性,包括id,name,name2,icon,toolTip等。
/**
 *id:网元的id,如果未设置,TWaver内部会分配唯一的Id。
 */
twaver.Data:function(id)

getId:function()
setName:function(value)
getName:function()
setName2:function(value)
getName2:function()
setIcon:function(value)
getIcon:function()
setToolTip:function(value)
getToolTip:function()
Note:name2为新增加的属性,增大了label设置的灵活性。
如果需要设置其他属性,可以通过setClient()/getClient()方法设置自定义的属性(包括对象)。
//设置Client属性;
setClient = function(clientProp,newValue)
//获取Client属性
getClient = function(clientProp)
Note:setClient()存放数据类似于Java中的HashMap。
示例:
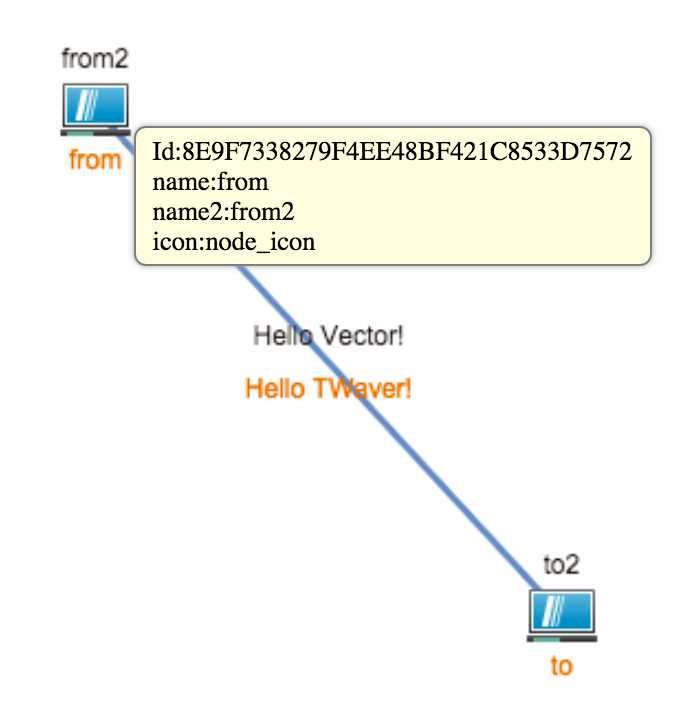
 var box = new twaver.ElementBox();
    var network = new twaver.vector.Network(box);
    function init() {
        initNetwork();
        initDataBox();
    }
    function initNetwork() {
        var view = network.getView();
        document.body.appendChild(view);
        network.adjustBounds({x: 0, y: 0, width: 1300, height: 600});
        network.getToolTip = function (element) {
            var Id = element.getId();
            var name = element.getName();
            var name2 = element.getName2();
            var icon = element.getIcon();
            var clientProperty = element.getClient(‘clientProperty‘);
            return ‘Id:‘ + Id + ‘ ‘ + ‘name:‘ + name + ‘ ‘ + ‘name2:‘ + name2+ ‘ ‘ + ‘icon:‘ + icon;
        }
        twaver.Styles.setStyle(‘label.color‘,‘#ec6c00‘);
        twaver.Styles.setStyle(‘label2.color‘,‘#57ab9a‘);
        twaver.Styles.setStyle(‘select.color‘,‘#ef8200‘);
    }
    function initDataBox() {
        var node = new twaver.Node({ name: ‘from‘, name2: ‘from2‘, location: { x: 300, y: 200 } });
        box.add(node);
        var node2 = new twaver.Node({ name: ‘to‘, name2: ‘to2‘, location: { x: 500, y: 250 } });
        box.add(node2); var link = new twaver.Link(node, node2);
        link.setName(‘Hello TWaver!‘);
        link.setName2(‘Hello Vector!‘);
        link.setClient(‘clientProperty‘,node); box.add(link);
    }
Note:从示例中我们学会了什么?
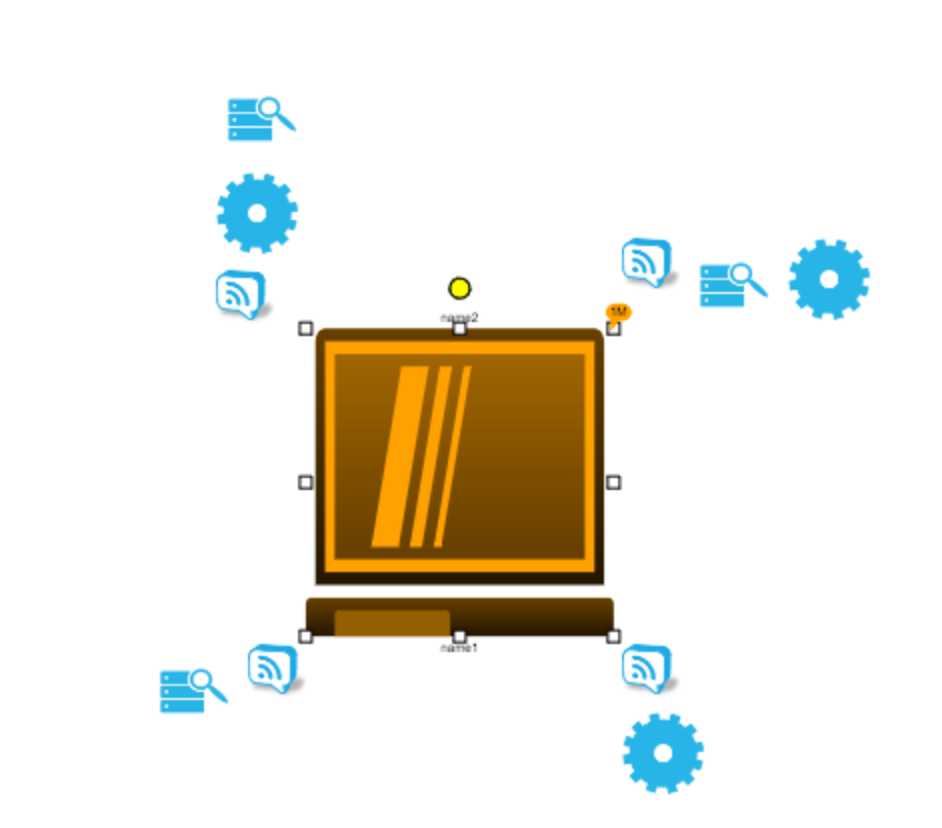
在这我们特别列举出icon的布局问题,icon作为网元的附件可以围绕在网元的周围,呈现一些特殊信息。TWaver支持多组icon同时存在,且摆放的位置可以分别设置。下面列举使用方法:
function registerImage(){
  registerNormalImage(‘./images/list_view.png‘,‘list_view‘);
  registerNormalImage(‘./images/settings1.png‘,‘setting1‘);
  registerNormalImage(‘./images/ic_mech_wheel.png‘,‘wheel‘);
  registerNormalImage(‘./images/ic_search_archive.png‘,‘archive‘);
  registerNormalImage(‘./images/super_mono.png‘,‘mono‘);
  registerNormalImage(‘./images/twitter_04.png‘,‘twitter‘);
}
function registerNormalImage(url, name) {
  var image = new Image();
  image.src = url;
  image.onload = function() {
    twaver.Util.registerImage(name, image, image.width, image.height);
    image.onload = null;
    network.invalidateElementUIs();
  };
}
function initNode() {
    var node2 = new twaver.Node("node2");
    node2.setLocation(450, 205);
    box.add(node2);
    node2.setName(‘name1‘);
    node2.setName2(‘name2‘);
    node2.setSize(300,300);
    node2.setStyle(‘icons.names‘, [["mono","wheel",‘archive‘],["wheel",‘archive‘,‘mono‘],["archive",‘mono‘],["mono",‘wheel‘]]);
    node2.setStyle(‘icons.position‘, [‘topleft.topleft‘,‘topright.topright‘,‘bottomleft.bottomleft‘,
      ‘bottomright.bottomright‘]);
    node2.s(‘icons.orientation‘,[‘top‘,‘left‘,‘right‘,‘bottom‘]);
}
此外,Data中还定义了其他功能函数
//获取所有子网元
getChildren:function()
getChildSize:function()
//获取符合macthFunction的所有childs组成的List
toChildren:function(macthFunction,scope)
addChild:function(child,index)
removeChild:function(child)
getChildAt:function(index)
clearChildren:function()
getParent:function()
setParent:function(parent)
hasChildren:function()
isRelatedTo:function(data)
isParentOf:function(data)
isDescendantOf:function(data)
//toChildren:function(macthFunction,scope)的使用方法
parent.toChildren(function(e){
    return e.getName() === ‘vector‘;
});
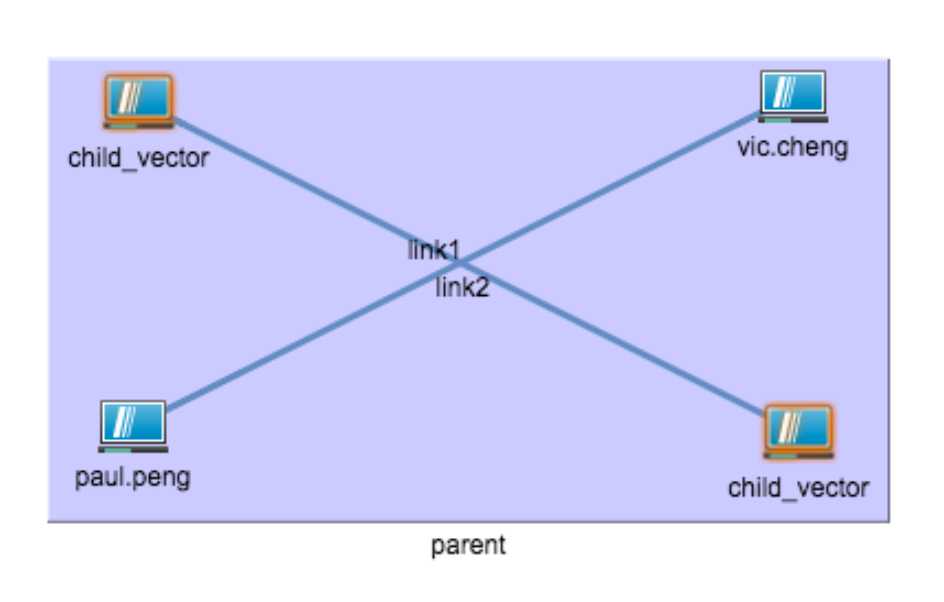
var box = new twaver.ElementBox();
var network = new twaver.vector.Network(box);
function init() {
  initNetwork();
  registerImage();
  initDataBox();
}
function initNetwork() {
  var view = network.getView();
  document.body.appendChild(view);
  network.adjustBounds({x: 0, y: 0, width: 1300, height: 600});
  twaver.Styles.setStyle(‘select.color‘, ‘#57ab9a‘);
}
function registerImage() {
//register shadow
twaver.Util.registerImage(‘shadow‘, { w: 37, h: 29, shadowOffsetX: 0, shadowOffsetY: 0, shadowBlur: 5, shadowColor: ‘#ec6c00‘, v: [ { shape: ‘vector‘, name: ‘node_image‘, x: 0, y: 0 } ] });
}
function initDataBox() {
  var parent = new twaver.Group({ name: ‘parent‘, location: {x: 300, y: 400 }, });
  box.add(parent);
  var node1 = new twaver.Node({ name: ‘Jeff.fu‘, location: { x: 200, y: 200 } });
  node1.setClient(‘vector‘, true);
  box.add(node1);
  var node2 = new twaver.Node({ name: ‘alex.dong‘, location: { x: 500, y: 350 } });
  node2.setClient(‘vector‘, true); box.add(node2);
  var node3 = new twaver.Node({ name: ‘paul.peng‘, location: { x: 200, y: 350 } }); box.add(node3);
  var node4 = new twaver.Node({ name: ‘vic.cheng‘, location: { x: 500, y: 200 } }); box.add(node4);
  var link = new twaver.Link(node1, node2);
  link.setName(‘link1‘);
  link.setStyle(‘label.position‘,‘topleft.topleft‘);
  box.add(link);
  var link2 = new twaver.Link(node3, node4);
  link2.setName(‘link2‘);
  box.add(link2);
  parent.addChild(node1);
  parent.addChild(node2);
  parent.addChild(node3);
  parent.addChild(node4);
  matchFunction = function (e) {
    if (e.getClient(‘vector‘)) {
      return true;
    }
  }
  var childrenMatch = parent.toChildren(matchFunction);
  childrenMatch.forEach(function (element) {
    element.setImage(‘shadow‘);
    element.setName(‘child_vector‘);
  });
}
Note:上述示例我们学会了什么?
标签:
原文地址:http://www.cnblogs.com/ClassNotFoundException/p/5849031.html