标签:
CSS(Cascading Style Sheets的简称),层叠样式表
CSS的引入方式:
1.行内式
行内式是在标签的style属性中设定CSS样式。
<div style="..."></div>
2.嵌入式
嵌入式是将CSS样式集中写在网页的<head>标签的<style></style>标签对中。
<head>
    ...
    <style type="text/css">
        ...此处写CSS样式
    </style>
</head>
3.导入式
将一个独立的.css文件引入HTML文件中,导入式使用@import 引入外部CSS文件,<style>标记也是写在<head>标记中。
导入式会在整个网页装载完后再装载CSS文件。
<head>
    ...
    <style type="text/css">
        @import "My.css"; 此处注意.css文件的路径
    </style>
</head>
4.链接式
将一个独立的.css文件引入到HTML文件中,使用<link>标记写在<head>标记中。
链接式会以网页文件主体装载前装载CSS文件
<head>
    ...
    <link href="My.css" rel="stylesheet" type="text/css">
</head>
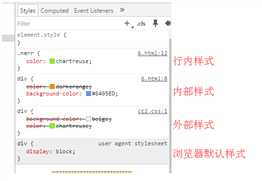
!important 指定样式规则应用最优先
基本选择器:
1.通用元素选择器
* 表示应用到所有的标签。
* {color: yellow}
2.标签选择器
匹配所有使用 div 标签的元素(可以匹配所有标签)
div {color: yellow}
3.类选择器
匹配所有class属性中包含info的元素。
语法:.类名{样式}(类名不能以数字开头,类名要区分大小写。)
.Mycolor {color: yellow}
<h3 class="Mycolor">nic</h3>
4.ID选择器
使用id属性来调用样式,在一个网页中id的值都是唯一的(是W3C规范而不是规则,所以不会报错)。
语法:#ID名{样式}(ID名不能以数字开头)
#Mycolor {color: yellow}
<h3 id="Mycolor">Nic</h3>
1.多元素选择器
同时匹配h3,h4标签,之间用逗号分隔。
h3,h4 {color: yellow;}
<h3>N</h3>
<h4>Jenny</h4>
2.后代元素选择器
匹配所有div标签里嵌套的P标签,之间用空格分隔。
 div p {color: yellow;}

<div>
    <p>Ni</p>
    <div>
        <p>Nic</p>
    </div>
</div>
3.子元素选择器
匹配所有div标签里嵌套的子P标签,之间用>分隔。
div > p {color: yellow;}

<div>
    <p>Ni</p>
    <p>Nic</p>
</div>
4.毗邻元素选择器
匹配所有紧随div标签之后的同级标签P,之间用+分隔(只能匹配一个)。
    div + p {color: yellow;}

<div>Nic</div>
<p>Ni</p
1.[title] & P[title]
设置所有具有title属性的标签元素;
设置所有具有title属性的P标签元素。
 [title]
    {    color: yellow;}

    p[title]
    {    color: yellow;  }
<div title>Nic</div> <p title>Nic</p>2.[title=Ni]
设置所有title属性等于“Nick”的标签元素。
    [title="Nic"]
    {
        color: yellow;
    }

<p title="Nic">Nic</p
3.[title~=Ni]
设置所有title属性具有多个空格分隔的值、其中一个值等于“Nick”的标签元素。
    [title~="Nic"]
    {
        color: yellow;
    }

<p title="Nic Jenny">Nic</p>
<p title="Jenny Nic">Nic</p>
4.[title|=Ni]
设置所有title属性具有多个连字号分隔(hyphen-separated)的值、其中一个值以"Nic"开头的标签元素。
例:lang属性:"en"、"en-us"、"en-gb"等等
    [title|="Nic"]
    {
        color: yellow;
    }

<p title="Nic-Jenny">Nic</p>
5.[title^=Ni]
设置属性值以指定值开头的每个标签元素。
    [title^="Nic"]
    {
        color: yellow;
    }

<p title="NicJenny">Nic</p>
6.[title$=Ni]
设置属性值以指定值结尾的每个标签元素。
    [title$="Nic"]
    {
        color: yellow;
    }

<p title="JennyNic">Nic</p>
7.[title*=Ni]
设置属性值中包含指定值的每个元素
  [title*="Nic"]
    {
        color: yellow;
    }
<p title="SNicJenny">Nic</p>
1. link、hover、active、visited
 a:link{color: black}
    a:hover{color: yellow}
    a:active{color: blue}
    a:visited{color: red}

<a href="#">Nic</a>
2. before、after
 p {
        color: yellow;
    }
    p:before{
        content: "before...";
    }
    p:after{
        content: "after...";
    }
<p> Nic </p>
color
transparent
opacity
font-style: 用于规定斜体文本
font-weight: 设置文本的粗细
font-size: 设置字体的大小
font-family:字体名称
font:简写属性
white-space: 设置元素中空白的处理方式
direction: 规定文本的方向
text-align: 文本的水平对齐方式
line-height: 文本行高
vertical-align: 文本所在行高的垂直对齐方式
text-indent: 文本缩进
letter-spacing: 添加字母之间的空白
word-spacing: 添加每个单词之间的空白
text-transform: 属性控制文本的大小写
text-overflow: 文本溢出样式

<!DOCTYPE html>
<html lang="en">
<head>
    <meta charset="UTF-8">
    <title>Title</title>
    <!--<link href="cc2.css" rel="stylesheet" type="text/css">-->
    <style>
        div {
            width: 100px;
            height: 100px;
            white-space: nowrap;
            overflow: hidden;
            text-overflow: ellipsis;
        }
    </style>
</head>
<body>
    <div>吾问无为谓吾问无为谓吾问无为谓我我我我</div>
</body>
</html>
text-decoration: 文本的装饰
text-shadow:文本阴影
word-wrap:自动换行

<!DOCTYPE html>
<html lang="en">
<head>
    <meta charset="UTF-8">
    <title>Title</title>
    <style>
        p {
            width: 150px;
            height: 160px;
            background-color: #FFA500;
            /*边框阴影*/
            box-shadow: 10px 10px 5px #888;
            /*自动换行*/
            word-wrap: break-word;
        }
        h1 {
            text-shadow: 5px 5px 5px #888;
        }
    </style>
</head>
<body>
    <p>
        When you are old and grey and full of sleep,And nodding by the fire, take down this book,And slowly read, and dream of the soft look
    </p>
    <h1>拧</h1>
</body>
</html>

a {
    text-decoration: none;
    /*去除a标签下划线*/
}
background-color: 背景颜色
background-image 设置图像为背景
background-position 设置背景图像的位置坐标
background-repeat 设置背景图像不重复平铺
round 自动缩放直到适应并填充满整个容器
background-attachment 背景图像是否固定或者随着页面的其余部分滚动
background 简写
background: url("o_ns.png") no-repeat center bottom 15px;
background: url("o_ns.png") no-repeat left 30px bottom 15px;
list-style-type: 列表项标志的类型
list-style-image:将图象设置为列表项标志
list-style-position:列表项标志的位置
list-style:缩写
border-style:边框样式
border-color:边框颜色
border-width:边框宽度
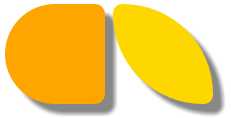
border-radius:圆角
border: 简写
box-shadow:边框阴影

<!DOCTYPE html>
<html lang="en">
<head>
    <meta charset="UTF-8">
    <title>Title</title>
    <style>
        div {
            border:2px solid;
            border-radius:25px;
            width: 140px;
        }
    </style>
</head>
<body>
    <div>
         点赞哦!dear.
    </div>
</body>
</html>


<!DOCTYPE html>
<html lang="en">
<head>
    <meta charset="UTF-8">
    <title>Title</title>
    <style>
        .radius1 {
            display: inline-block;
            width: 100px;
            height: 100px;
            background-color: yellow;
            border-radius: 20px;
        }
        .radius2 {
            display: inline-block;
            width: 100px;
            height: 100px;
            background-color: red;
            border-radius: 20px 35px;
        }
        .radius3 {
            display: inline-block;
            width: 100px;
            height: 100px;
            background-color: blue;
            border-radius: 20px 35px 50px;
        }
        .radius4 {
            display: inline-block;
            width: 100px;
            height: 100px;
            background-color: green;
            border-radius: 20px 35px 50px 60px;
        }
    </style>
</head>
<body>
    <div>
        <span class="radius1"></span>
        <span class="radius2"></span>
        <span class="radius3"></span>
        <span class="radius4"></span>
    </div>
</body>
</html>

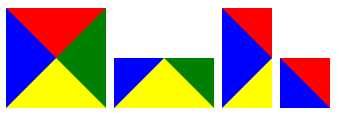
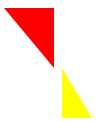
边框实现各种三角符号:


<!DOCTYPE html>
<html lang="en">
<head>
    <meta charset="UTF-8">
    <title>Title</title>
    <style>
        .triangle-one {
            display: inline-block;
            border-top: 50px red solid;
            border-right: 50px green solid;
            border-bottom: 50px yellow solid;
            border-left: 50px blue solid;
        }
        .triangle-two {
            display: inline-block;
            border-top: 0 red solid;
            border-right: 50px green solid;
            border-bottom: 50px yellow solid;
            border-left: 50px blue solid;
        }
        .triangle-stree {
            display: inline-block;
            border-top: 50px red solid;
            border-right: 0 green solid;
            border-bottom: 50px yellow solid;
            border-left: 50px blue solid;
        }
        .triangle-four {
            display: inline-block;
            border-top: 50px red solid;
            border-right: 0 green solid;
            border-bottom: 0 yellow solid;
            border-left: 50px blue solid;
        }

        .triangle-five {
            display: inline-block;
            border: 50px transparent solid;
            border-top: 50px red solid;
        }
        .triangle-six {
            display: inline-block;
            border: 50px transparent solid;
            border-bottom: 50px yellow solid;
        }
        .triangle-seven {
            display: inline-block;
            border: 50px transparent solid;
            border-top: 60px red solid;
            border-right: 0;
        }
        .triangle-eight {
            display: inline-block;
            border: 50px transparent solid;
            border-left: 30px yellow solid;
            border-bottom: 0;
        }
    </style>
</head>
<body>
    <div class="triangle-one"></div>
    <div class="triangle-two"></div>
    <div class="triangle-stree"></div>
    <div class="triangle-four"></div>
    <div class="triangle-five"></div>
    <div class="triangle-six"></div>
    <div class="triangle-seven"></div>
    <div class="triangle-eight"></div>
</body>
</html>
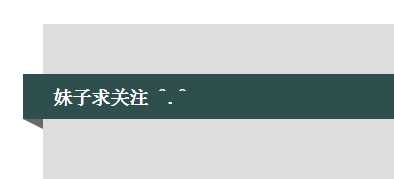

<!DOCTYPE html>
<html lang="en">
<head>
    <meta charset="UTF-8">
    <title>Title</title>
    <style>
        .back {
            width: 1000px;
            height: 1000px;
            margin: 0 auto;
            background-color: #ddd;
            position: relative;
        }
        .back-in {
            position: absolute;
            width: 1020px;
            height: 45px;
            left: -20px;
            top: 50px;
            background-color: #2F4F4F;
        }
        .back-img {
            border: 20px solid transparent;
            border-top: 10px solid dimgrey;
            border-right: 0;
            display: inline-block;
            position: absolute;
            top: 95px;
            left: -20px;
        }
        .back-font {
            line-height: 9px;
            margin-left: 30px;
            color: white;
        }
    </style>
</head>
<body>
    <div class="back">
        <div class="back-in"><h3 class="back-font">妹子求关注 ^.^</h3></div>
        <div class="back-img"></div>
    </div>
</body>
</html>
一个标准的盒子模型:
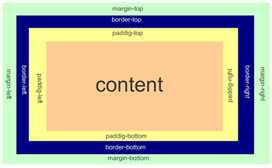
padding:用于控制内容与边框之间的距离;
margin: 用于控制元素与元素之间的距离;
一个参数,应用于四边。
两个参数,第一个用于上、下,第二个用于左、右。
三个参数,第一个用于上,第二个用于左、右,第三个用于下。
边框在默认情况下会定位于浏览器窗口的左上角,但是并没有紧贴着浏览器的窗口的边框,这是因为body本身也是一个盒子,外层还有html,
在默认情况下,body距离html会有若干像素的margin,所以body中的盒子不会紧贴浏览器窗口的边框了。

解决方法:
body {
    margin: 0;
}
让一行显示两个块级标签,会脱离文档流
clear 清除浮动:
首先要知道,div是块级元素,在页面中独占一行,自上而下排列,也就是传说中的流。
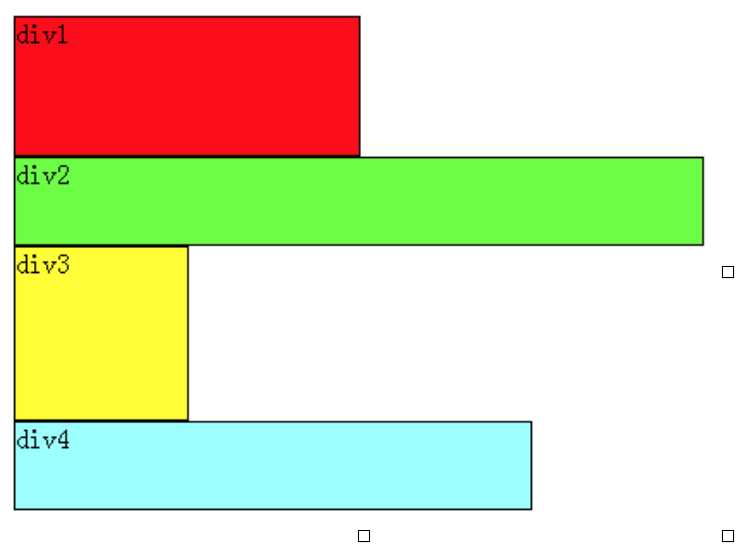
可以看出,即使div1的宽度很小,页面中一行可以容下div1和div2,div2也不会排在div1后边,因为div元素是独占一行的。注意,以上这些理论,是指标准流中的div。
无论多么复杂的布局,其基本出发点均是:“如何在一行显示多个div元素”。浮动可以理解为让某个div元素脱离标准流,漂浮在标准流之上,和标准流不是一个层次。
例如,假设上图中的div2浮动,那么它将脱离标准流,但div1、div3、div4仍然在标准流当中,所以div3会自动向上移动,占据div2的位置,重新组成一个流。如图: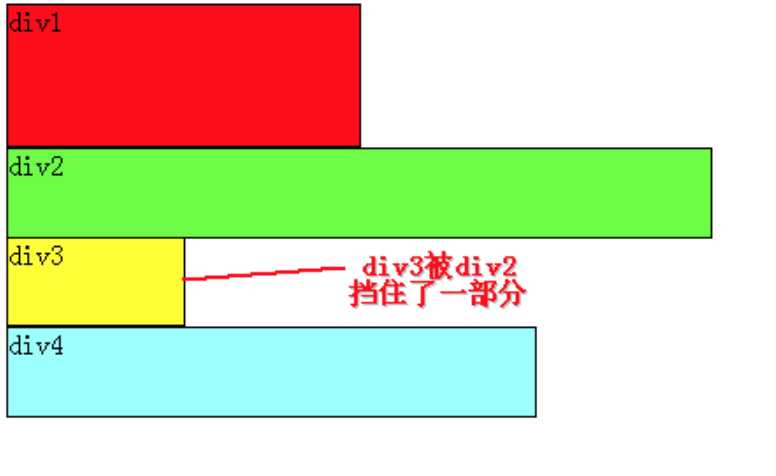
从图中可以看出,由于对div2设置浮动,因此它不再属于标准流,div3自动上移顶替div2的位置,div1、div3、div4依次排列,成为一个新的流。又因为浮动是漂浮在标准流之上的,因此div2挡住了一部分div3,div3看起来变“矮”了
这里div2用的是左浮动(float:left;),可以理解为漂浮起来后靠左排列,右浮动(float:right;)当然就是靠右排列。这里的靠左、靠右是说页面的左、右边缘。
如果我们把div2采用右浮动,会是如下效果:

此时div2靠页面右边缘排列,不再遮挡div3,读者可以清晰的看到上面所讲的div1、div3、div4组成的流。
目前为止我们只浮动了一个div元素,多个呢?
下面我们把div2和div3都加上左浮动,效果如图:
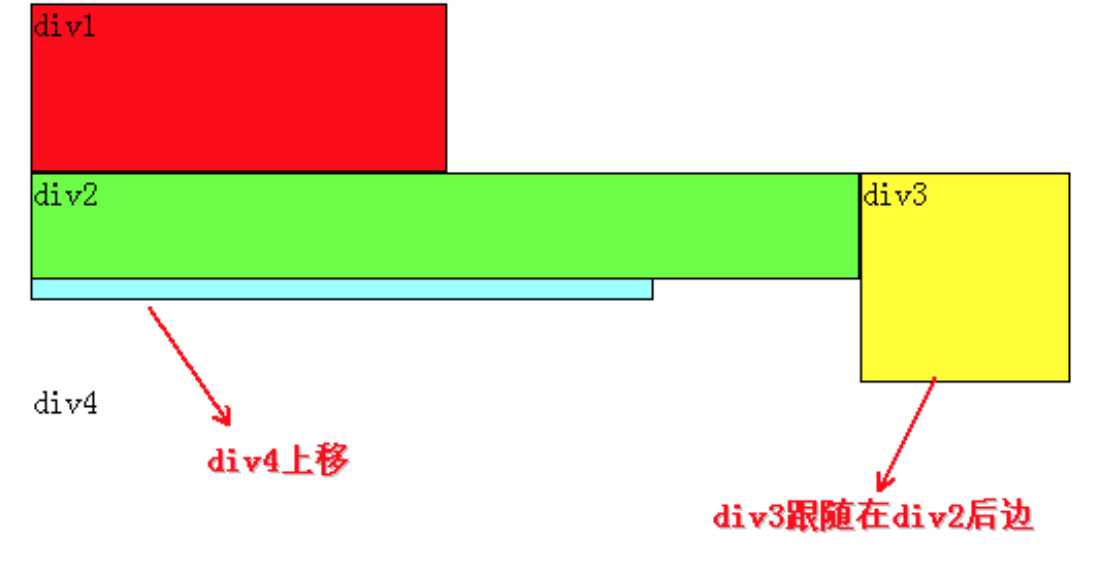
同理,由于div2、div3浮动,它们不再属于标准流,因此div4会自动上移,与div1组成一个“新”标准流,而浮动是漂浮在标准流之上,因此div2又挡住了div4。
咳咳,到重点了,当同时对div2、div3设置浮动之后,div3会跟随在div2之后,不知道读者有没有发现,一直到现在,div2在每个例子中都是浮动的,但并没有跟随到div1之后。因此,我们可以得出一个重要结论:
假如某个div元素A是浮动的,如果A元素上一个元素也是浮动的,那么 A元素会跟随在上一个元素的后边(如果一行放不下这两个元素,那么A元素会被挤到下一行);如果A元素上一个元素是标准流中的元素,那么A的相对垂直位置 不会改变,也就是说A的顶部总是和上一个元素的底部对齐。
div的顺序是HTML代码中div的顺序决定的。
靠近页面边缘的一端是前,远离页面边缘的一端是后。
为了帮助读者理解,再举几个例子。
假如我们把div2、div3、div4都设置成左浮动,效果如下:

根据上边的结论,跟着小菜理解一遍:先从div4开始分析,它发现上边的元素div3是 浮动的,所以div4会跟随在div3之后;div3发现上边的元素div2也是浮动的,所以div3会跟随在div2之后;而div2发现上边的元素 div1是标准流中的元素,因此div2的相对垂直位置不变,顶部仍然和div1元素的底部对齐。由于是左浮动,左边靠近页面边缘,所以左边是前,因此 div2在最左边。
假如把div2、div3、div4都设置成右浮动,效果如下:

道理和左浮动基本一样,只不过需要注意一下前后对应关系。由于是右浮动,因此右边靠近页面边缘,所以右边是前,因此div2在最右边。
假如我们把div2、div4左浮动,效果图如下:
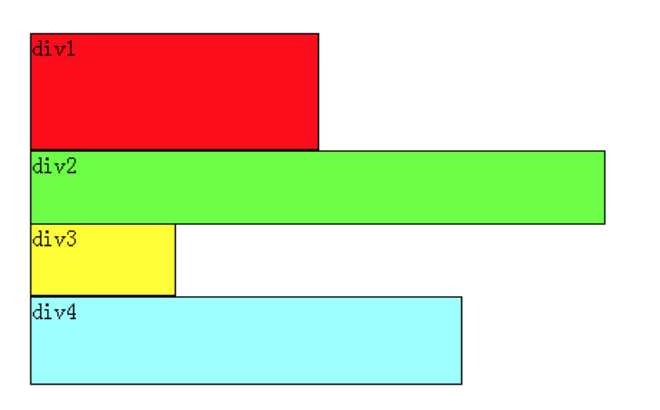
依然是根据结论,div2、div4浮动,脱离了标准流,因此div3将会自动上移,与 div1组成标准流。div2发现上一个元素div1是标准流中的元素,因此div2相对垂直位置不变,与div1底部对齐。div4发现上一个元素 div3是标准流中的元素,因此div4的顶部和div3的底部对齐,并且总是成立的,因为从图中可以看出,div3上移后,div4也跟着上移,div4总是保证自己的顶部和上一个元素div3(标准流中的元素)的底部对齐。
至此,恭喜读者已经掌握了添加浮动,但还有清除浮动,有上边的基础清除浮动非常容易理解。
经过上边的学习,可以看出:元素浮动之前,也就是在标准流中,是竖向排列的,而浮动之后可以理解为横向排列。
清除浮动可以理解为打破横向排列。
清除浮动的关键字是clear,官方定义如下:
语法:
clear : none | left | right | both
取值:
none : 默认值。允许两边都可以有浮动对象
left : 不允许左边有浮动对象
right : 不允许右边有浮动对象
both : 不允许有浮动对象
定义非常容易理解,但是读者实际使用时可能会发现不是这么回事。
定义没有错,只不过它描述的太模糊,让我们不知所措。
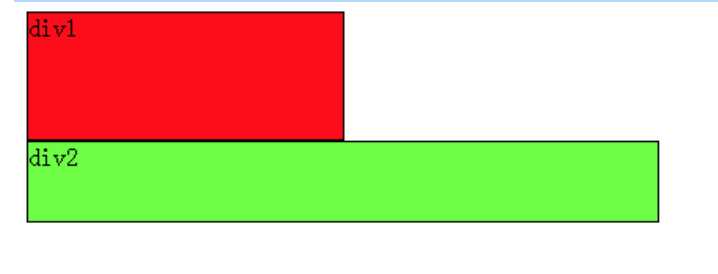
根据上边的基础,假如页面中只有两个元素div1、div2,它们都是左浮动,场景如下:

此时div1、div2都浮动,根据规则,div2会跟随在div1后边,但我们仍然希望div2能排列在div1下边,就像div1没有浮动,div2左浮动那样。
这时候就要用到清除浮动(clear),如果单纯根据官方定义,读者可能会尝试这样写:在div1的CSS样式中添加clear:right;,理解为不允许div1的右边有浮动元素,由于div2是浮动元素,因此会自动下移一行来满足规则。
其实这种理解是不正确的,这样做没有任何效果。
对于CSS的清除浮动(clear),一定要牢记:这个规则只能影响使用清除的元素本身,不能影响其他元素。
怎么理解呢?就拿上边的例子来说,我们是想让div2移动,但我们却是在div1元素的 CSS样式中使用了清除浮动,试图通过清除div1右边的浮动元素(clear:right;)来强迫div2下移,这是不可行的,因为这个清除浮动是在 div1中调用的,它只能影响div1,不能影响div2。
根据小菜定论,要想让div2下移,就必须在div2的CSS样式中使用浮动。本例中div2的左边有浮动元素div1,因此只要在div2的CSS样式中使用clear:left;来指定div2元素左边不允许出现浮动元素,这样div2就被迫下移一行。
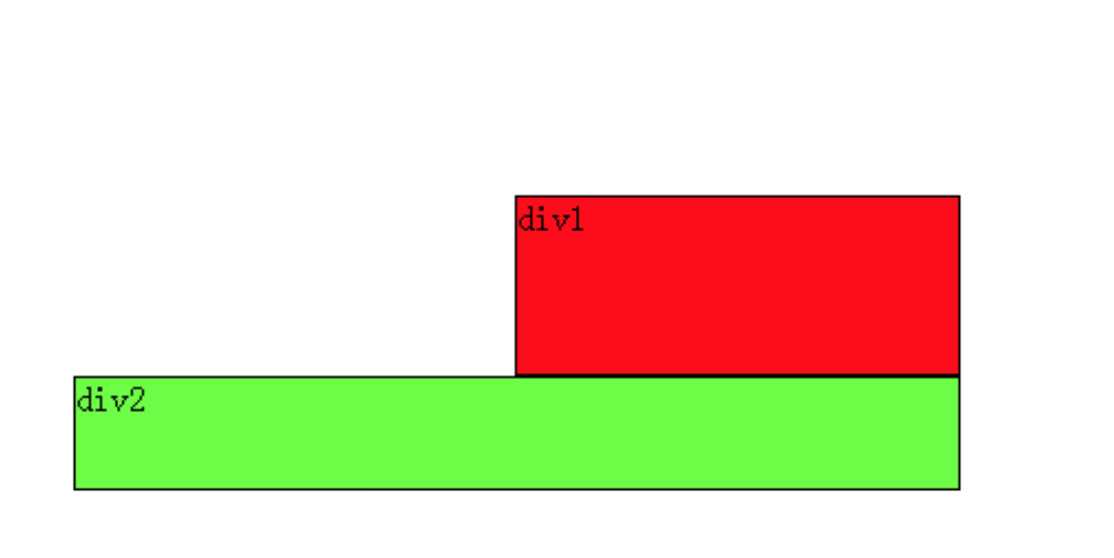
那么假如页面中只有两个元素div1、div2,它们都是右浮动呢?读者此时应该已经能自己推测场景,如下:

此时如果要让div2下移到div1下边,要如何做呢?
同样根据小菜定论,我们希望移动的是div2,就必须在div2的CSS样式中调用浮动,因为浮动只能影响调用它的元素。
可以看出div2的右边有一个浮动元素div1,那么我们可以在div2的CSS样式中使用clear:right;来指定div2的右边不允许出现浮动元素,这样div2就被迫下移一行,排到div1下边。
rect 剪裁定位元素:
例:clip:rect(0px,60px,200px,0px);|
static |
默认值,没有定位,遵从正常的文档流 |
| relative |
相对定位元素,相对于其正常位置进行定位,遵从正常的文档流 |
| absolute |
绝对定位元素,脱离正常文档流 |
| fixed | 绝对定位元素,固定在浏览器某处 |

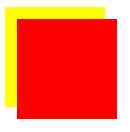
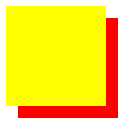
<!DOCTYPE html>
<html lang="en">
<head>
    <meta charset="UTF-8">
    <title>Title</title>
    <style>
        .z-index1 {
            width: 100px;
            height: 100px;
            background-color: yellow;
            position: absolute;
            z-index: -1;
        }
        .z-index2 {
            width: 100px;
            height: 100px;
            background-color: red;
            position: absolute;
            top: 20px;
            left: 20px;
            z-index: 5;
        }
    </style>
</head>
<body>
    <div class="z-index1"></div>
    <div class="z-index2"></div>
</body>
</html>

<!DOCTYPE html>
<html lang="en">
<head>
    <meta charset="UTF-8">
    <title>Title</title>
    <style>
        .zoom1 {
            zoom: 100%;
        }
        .zoom2 {
            zoom: 150%;
        }
        .zoom3 {
            zoom: 200%;
        }
    </style>
</head>
<body>
    <div class="zoom1">Ni 100%</div>
    <div class="zoom2">Ni 200%</div>
    <div class="zoom3">Ni 300%</div>
</body>
</html>
鼠标放在以下单词上,There will be a miracle:
url: 自定义光标

<!DOCTYPE html>
<html lang="en">
<head>
    <meta charset="UTF-8">
    <title>Title</title>
    <!--<link href="cc2.css" rel="stylesheet" type="text/css">-->
    <style>
        body {
            cursor: url("mouse.png"), auto;
            /*图片地址:http://images.cnblogs.com/cnblogs_com/suoning/845162/o_mouse.png*/
        }
    </style>
</head>
<body>
    <div><img src="http://images.cnblogs.com/cnblogs_com/suoning/845162/o_ns.png" height="100%" width="100%"></div>
</body>
</html>
Auto: 默认
Default: 默认
e-resize
ne-resize
nw-resize
n-resize
se-resize
sw-resize
s-resize
w-resize
Crosshair
Pointer
Move
text
wait
help
transform 转换,变形

<!DOCTYPE html>
<html>
<head>
    <meta http-equiv="Content-Type" content="text/html; charset=utf-8" />
    <title>nick</title>
    <meta charset="utf-8" />
    <style type="text/css">
        div {
            border: 1px solid black;
            height: 30px;
            width: 30px;
            background-color: yellow;

            /*transform-origin: 50px 50px;*/
            transform-origin: left;
            transform: rotate(50deg);
            /*transform: skew(50deg,50deg);*/
            /*transform: translate(50px,50px);*/
            /*transform: scale(2);*/
        }
    </style>
</head>
<body>
    <div></div>
</body>
</html>
Transition 平滑过渡

#property 指定属性对应类型

1、color: 通过红、绿、蓝和透明度组件变换(每个数值单独处理),如:background-color,border-color,color,outline-color等CSS属性;

2、length:真实的数字,如:word-spacing,width,vertical- align,top,right,bottom,left,padding,outline-width,margin,min-width,min- height,max-width,max-height,line-height,height,border-width,border- spacing,background-position等属性;

3、percentage:真实的数字,如:word-spacing,width,vertical- align,top,right,bottom,left,min-width,min- height,max-width,max-height,line-height,height,background-position等属性;

4、integer 离散步骤(整个数字),在真实的数字空间,以及使用floor()转换为整数时发生,如:outline-offset,z-index等属性;

5、number真实的(浮点型)数值,如:zoom,opacity,font-weight等属性;

6、transform list。

7、rectangle:通过x、 y、 width和height(转为数值)变换,如:crop;

8、visibility:离散步骤,在0到1数字范围之内,0表示“隐藏”,1表示完全“显示”,如:visibility;

9、shadow:作用于color、x、y、和blur(模糊)属性,如:text-shadow;

10、gradient:通过每次停止时的位置和颜色进行变化。它们必须有相同的类型(放射状的或是线性的)和相同的停止数值以便执行动画,如:background-image;

11、paint server (SVG):只支持下面的情况:从gradient到gradient以及color到color,然后工作与上面类似;

12、space-separated list of above:如果列表有相同的项目数值,则列表每一项按照上面的规则进行变化,否则无变化;

13、a shorthand property:如果缩写的所有部分都可以实现动画,则会像所有单个属性变化一样变化。

#支持执行transition效果的属性

Property Name    Type
background-color    as color
background-position    as repeatable list of simple list of length, percentage, or calc
border-bottom-color    as color
border-bottom-width    as length
border-left-color    as color
border-left-width    as length
border-right-color    as color
border-right-width    as length
border-spacing    as simple list of length
border-top-color    as color
border-top-width    as length
bottom    as length, percentage, or calc
clip    as rectangle
color    as color
font-size    as length
font-weight    as font weight
height    as length, percentage, or calc
left    as length, percentage, or calc
letter-spacing    as length
line-height    as either number or length
margin-bottom    as length
margin-left    as length
margin-right    as length
margin-top    as length
max-height    as length, percentage, or calc
max-width    as length, percentage, or calc
min-height    as length, percentage, or calc
min-width    as length, percentage, or calc
opacity    as number
outline-color    as color
outline-width    as length
padding-bottom    as length
padding-left    as length
padding-right    as length
padding-top    as length
right    as length, percentage, or calc
text-indent    as length, percentage, or calc
text-shadow    as shadow list
top    as length, percentage, or calc
vertical-align    as length
visibility    as visibility
width    as length, percentage, or calc
word-spacing    as length
z-index    as integer

<!DOCTYPE html>
<html>
<head>
    <meta http-equiv="Content-Type" content="text/html; charset=utf-8" />
    <title>nick</title>
    <meta charset="utf-8" />
    <style type="text/css">
        .img-see-2016-7-2 {
            background-image: url("http://images.cnblogs.com/cnblogs_com/suoning/845162/o_sea.jpg");
            background-size: 660px;
            background-repeat: no-repeat;
            height: 300px;
            width: 600px;

            transition-duration: 30s;
            transition-timing-function: ease;
            transition-property: background-size;
        }
        .img-see-2016-7-2:hover {
            background-size: 2000px;
        }
    </style>
</head>
<body>
    <div class="img-see-2016-7-2"></div>
</body>
</html>
标签:
原文地址:http://www.cnblogs.com/mosson/p/5880317.html