标签:style blog http color java 使用 os io
通过HTML5 canvas画布创建简单的热点图,当鼠标划过时产生热点,停留时间越长,热点亮度越高。
下面是HTML部分:
<!DOCTYPE html>
<html>
  <head></head>
  <style type="text/css">
    #heatmap {
      background-image: url("mapbg.jpg");
    }
  </style>
  <body>
    <canvas id="heatmap" class="clear" width="300" height="300"></canvas>
    <button id="resetButton">Reset</button>
  </body>
</html>
接着进行变量声明及初始化:
<script type="text/javascript">
    var points = {}; // 保存每个点击点的值,用于选取颜色
    var SCALE = 3; // 缩放比例,为使保存在points中的坐标点在一定范围内

    // 初始化x,y
    var x = -1;
    var y = -1;
</script>
接着是绘制热点图主函数方法:
function drawHeatMap() {
      document.getElementById("resetButton").onclick = reset; //点击button使调用reset函数。


      // 根据id获取canvas并获取其上下文
      canvas = document.getElementById("heatmap");
      context = canvas.getContext("2d");

      // 为canvas设置一个高透明度
      context.globalAlpha = 0.2;
      // 设置混合模式,源图像与目标图像混合
      context.globalCompositeOperation = "lighter";


      // 绘图后,每个0.1秒热点加亮
      function lighten() {
        if (x != -1) {
          addToPoint(x, y);
        }
        setTimeout(lighten, 100);
      }

      // 在canvas画布中获取鼠标坐标(相对于画布)
      canvas.onmousemove = function(e) {
        x = e.clientX  - e.target.offsetLeft;
        y = e.clientY  - e.target.offsetTop;

        addToPoint(x, y);
      }

      // 移出canvas画布后停止热点加亮
      canvas.onmouseout = function(e) {
        x = -1;
        y = -1;
      }

      lighten();
    }
获取canvas画布绘图的鼠标坐标为:x = e.clientX - e.target.offsetLeft; 因为clientX是鼠标相对于窗口的位置,而绘图是基于canvas坐标基准的,所以要减去鼠标点击目标的offsetLeft(即减去margin,padding的left值,使其为相对于canvas的坐标值)。
reset函数:
    function reset() {
      points = {};
      context.clearRect(0, 0, 300, 300);
      x = -1;
      y = -1;
    }
调用canvas的claerRect函数,将整个canvas区域清空并重制。
getColor函数:
function getColor(intensity) {
      var colors = ["#072933", "#2E4045", "#8C593B", "#B2814E", "#FAC268", "#FAD237"];
      return colors[Math.floor(intensity/2)]; // colors数组下标最大值为5,故intensity <= 11
    }
drawPoint函数,使用context.arc根据特定半径绘制园。
    function drawPoint(x, y, radius) {
      context.fillStyle = getColor(radius);
      radius = Math.sqrt(radius)*6;

      context.beginPath();
      context.arc(x, y, radius, 0, Math.PI*2, true);

      context.closePath();
      context.fill();
    }
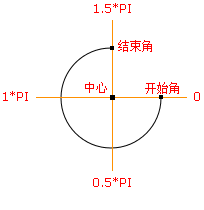
注:arc() 方法创建弧/曲线(用于创建圆或部分圆)。
提示:如需通过 arc() 来创建圆,请把起始角设置为 0,结束角设置为 2*Math.PI。
addToPoint函数,每次移动鼠标或悬停都会调用这个函数。设置最高热度值为10。
function addToPoint(x, y) {

      x = Math.floor(x/SCALE);
      y = Math.floor(y/SCALE);

      if (!points[[x, y]]) {
        points[[x, y]] = 1;
      } else if(points[[x, y]] == 10) {
        return;
      } else {
        points[[x, y]]++;
      }
      drawPoint(x*SCALE, y*SCALE, points[[x, y]]);
    }
最后注册一个loadDemo函数,窗口加载完毕后调用
window.addEventListener("load", drawHeatMap, true);
最后完整代码如下:

 1 <!DOCTYPE html>
 2 <html>
 3   <head></head>
 4   <style type="text/css">
 5     #heatmap {
 6       background-image: url("mapbg.jpg");
 7     }
 8   </style>
 9   <body>
10     <canvas id="heatmap" class="clear" width="300" height="300"></canvas>
11     <button id="resetButton">Reset</button>
12   </body>
13   <script type="text/javascript">
14     var points = {};
15     var SCALE = 3;
16     var x = -1;
17     var y = -1;
18
19     function drawHeatMap() {
20       document.getElementById("resetButton").onclick = reset;
21
22       canvas = document.getElementById("heatmap");
23       context = canvas.getContext("2d");
24       context.globalAlpha = 0.2;
25       context.globalCompositeOperation = "lighter";
26
27       function lighten() {
28         if (x != -1) {
29           addToPoint(x, y);
30         }
31         setTimeout(lighten, 100);
32       }
33
34       canvas.onmousemove = function(e) {
35         x = e.clientX  - e.target.offsetLeft;
36         y = e.clientY  - e.target.offsetTop;
37
38         addToPoint(x, y);
39       }
40
41       canvas.onmouseout = function(e) {
42         x = -1;
43         y = -1;
44       }
45
46       lighten();
47     }
48
49     function reset() {
50       points = {};
51       context.clearRect(0, 0, 300, 300);
52       x = -1;
53       y = -1;
54     }
55
56     function getColor(intensity) {
57       var colors = ["#072933", "#2E4045", "#8C593B", "#B2814E", "#FAC268", "#FAD237"];
58       return colors[Math.floor(intensity/2)];
59     }
60
61     function drawPoint(x, y, radius) {
62       context.fillStyle = getColor(radius);
63       radius = Math.sqrt(radius)*6;
64
65       context.beginPath();
66       context.arc(x, y, radius, 0, Math.PI*2, true);
67
68       context.closePath();
69       context.fill();
70     }
71
72
73     function addToPoint(x, y) {
74
75       x = Math.floor(x/SCALE);
76       y = Math.floor(y/SCALE);
77
78       if (!points[[x, y]]) {
79         points[[x, y]] = 1;
80       } else if(points[[x, y]] == 10) {
81         return;
82       } else {
83         points[[x, y]]++;
84       }
85       drawPoint(x*SCALE, y*SCALE, points[[x, y]]);
86     }
87
88     window.addEventListener("load", drawHeatMap, true);
89
90
91   </script>
92 </html>
标签:style blog http color java 使用 os io
原文地址:http://www.cnblogs.com/yanjliu/p/3906068.html
