标签:
(1)基本配置
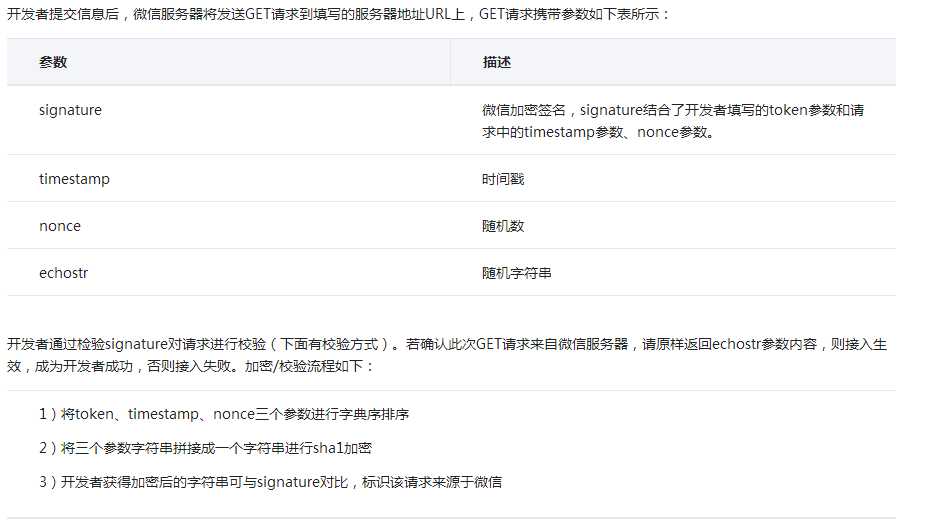
这节具体的详情请看官方文档,我只提示一点,非常重要,非常容易忽视的,我是吃了苦头的。。。
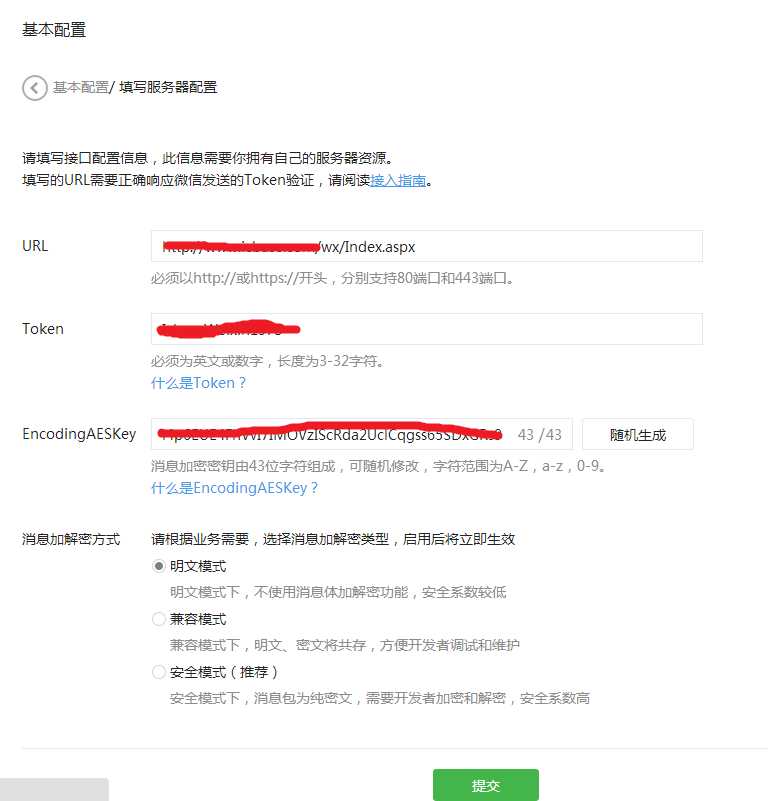
在“修改配置”这个地方,如下图:

在URL处,一定要填写http://www.xxx.com/wx/index.aspx这样的,就是要具体指到某个页面,不能这样写:http://www.xxx.com/wx,就算你把index.aspx在iis中设为主页也没用,必须要指到index.aspx页面,这个要切记,我就因为这个问题伤了脑的。。。
接下来点“提交”肯定总是会有提示不成功的消息的,需要下一步配置。
(2)验证URL

从上面的官方文档可以看出,点击提交后微信会向我们填写的服务器发送几个参数,然后需要原样返回出来,所以在提交url的时候,先在服务器创建接口测试返回echostr参数内容。
我们在index.aspx页面写下代码如下:
protected void Page_Load(object sender, EventArgs e)
        {
            //以下代码只要用一次就行了,通过了就不必 再用了
            string postString = string.Empty;

            if (HttpContext.Current.Request.HttpMethod.ToUpper() == "GET")
            {
                string token = "填写你的token"; //填写微信服务端的TOKEN

                if (string.IsNullOrEmpty(token))
                {
                    return;
                }

                string echoString = HttpContext.Current.Request.QueryString["echoStr"];
                string signature = HttpContext.Current.Request.QueryString["signature"];
                string timestamp = HttpContext.Current.Request.QueryString["timestamp"];
                string nonce = HttpContext.Current.Request.QueryString["nonce"];

                if (!string.IsNullOrEmpty(echoString))
                {
                    HttpContext.Current.Response.Write(echoString);
                    HttpContext.Current.Response.End();
                }

            }

        }
注意token要和申请填写的一致,以上代码完成后,再去修改配置,提交,不出意外就成功了。
标签:
原文地址:http://www.cnblogs.com/sky6699/p/5886250.html