标签:style blog http color os io 文件 2014
下面是我研究了好几天和同事一起才研究出来的,原创。
1伪静态的定义:
伪静态是相对真实静态来讲的,通常我们为了增强搜索引擎的友好面,都将文章内容生成静态页面,但是有的朋友为了实时的显示一些信息。或者还想运用动态脚本解决一些问题。不能用静态的方式来展示网站内容。但是这就损失了对搜索引擎的友好面。怎么样在两者之间找个中间方法呢,这就产生了伪静态技术。就是展示出来的是以html一类的静态页面形式,但其实是用ASP一类的动态脚本来处理的。
2伪静态的实现:
2.1创建URL重写类URLRewiter.cs 代码如下:

 1 using System;
 2 using System.Data;
 3 using System.Configuration;
 4 using System.Web;
 5 using System.Web.Security;
 6 using System.Web.UI;
 7 using System.Web.UI.WebControls;
 8 using System.Web.UI.WebControls.WebParts;
 9 using System.Web.UI.HtmlControls;
10 namespace WebApplication1
11 {
12     public class URLRewiter : IHttpHandler
13     {
14         public URLRewiter()
15         {
16         // TODO: 在此处添加构造函数逻辑
17           }
18         public void ProcessRequest(HttpContext Context)
19         {
20             try
21             {
22                 //取得原始URL屏蔽掉参数
23                 string Url = Context.Request.RawUrl;
24                 //建立正则表达式
25                 System.Text.RegularExpressions.Regex Reg = new System.Text.RegularExpressions.Regex
26                 (@"/show-(\d+)\..+", System.Text.RegularExpressions.RegexOptions.IgnoreCase);
27                 //用正则表达式进行匹配
28                 System.Text.RegularExpressions.Match m = Reg.Match(Url, Url.LastIndexOf("/"));//从最后一个“/”开始匹配
29                 if (m.Success)//匹配成功
30                 {
31                     String RealPath = @"~/aspx/show.aspx?type=" + m.Groups[1];
32                     Context.Server.Execute(RealPath);
33                 }
34                 else
35                 {
36                     Context.Response.Redirect(Context.Request.Url.ToString());
37                 }
38             }
39             catch
40             {
41                 Context.Response.Redirect(Context.Request.Url.ToString());
42             }
43         }
44
45         /// <summary>
46         /// 实现“IHttpHandler”接口所必须的成员
47         /// </summary>
48         /// <value></value>
49         /// Author:yoyo
50         /// blog:http://yangmingsheng.cn
51         public bool IsReusable
52         {
53             get { return false; }
54         }
55     }
56 }
2.2Web.Config的修改代码如下:
1 <httpHandlers>
2         <add verb="*" path="*/show-?*.aspx" type="WebApplication1.URLRewiter" />
3         <add verb="*" path="*/show-?*.html" type="WebApplication1.URLRewiter" />
4 </httpHandlers>
目前为止在本地浏览已经没有问题:
http://localhost:56321/aspx/show.aspx----可以改为下面的地址效果一样,代表本地已经成功。
http://localhost:56321/aspx/show-9.html
3接下来是IIS的配置。(我的是win7 32位系统 IIS7)
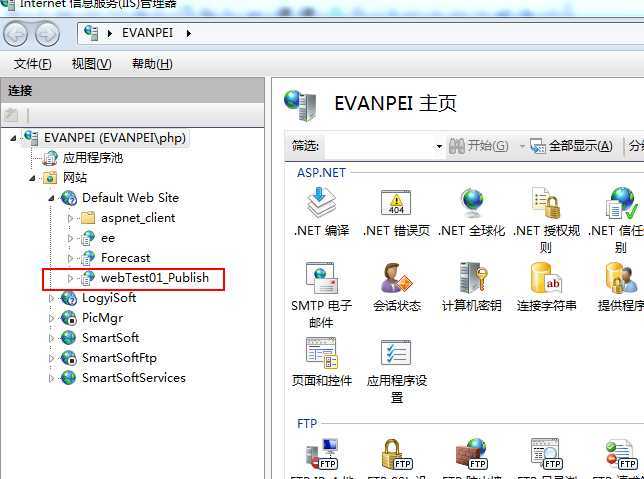
3.1将你的程序发布到iis与平时发布一样,看看能否访问。

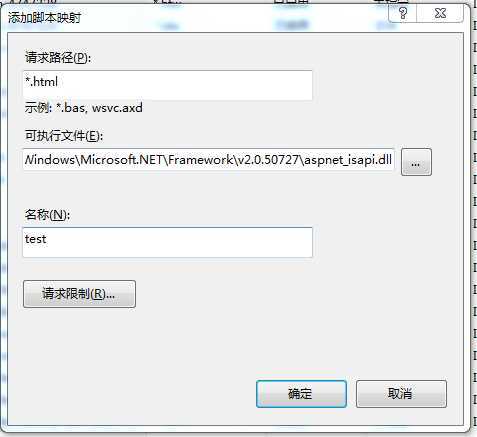
3.2选择你的应用程序,双击中间的【处理程序映像】,进去后点击右边【添加脚本映射】如下图:
请求路径:*.html
可执行文件:C:\Windows\Microsoft.NET\Framework\v2.0.50727\aspnet_isapi.dll(注意64位系统进Framework64文件夹)
名称随意:

3.3再点击右边的【添加通配符脚本映射】
请求路径不管,可执行文件同【处理程序映像】一样,名称也随意。
4.目前为止已经配置成功,注意上面代码配置的格式是show-9.html,就是减号后面只有一个整数,这个可以修改规则。
谢谢!
标签:style blog http color os io 文件 2014
原文地址:http://www.cnblogs.com/Evan-Pei/p/3906659.html