标签:
RH436_EX集群
介绍Linux环境下集群架构,Linux开源集群软件的安装及配置使用,软件与软件之间的组合。实现高可用集群,负载均衡集群;负载均衡、高可用集群与存储集群间的多集群混合架构使用。
本次试验我使用了多种安装包:pcs为集群的基本架构,fence为警报装置,targetcli和iscsi实现远程磁盘共享,dlm和lvm2.cluster为集群中解决底层共享的逻辑卷,gfs-utiils中gfs2与clvm可扩展性集群共享存储。
实验环境中多台PC,真实机 :foundation0;低层存储:noded;三个节点:nodea、nodeb、nodec。
首先我们讲所用PC端的防火墙关掉
在/etc/selinux/config或/etc/sysconfig/selinux 配置文件内第7行的 内容改成SELINUX=diabled
[root@nodea ~]# setenforce 0
[root@nodea ~]# getenforce
Permissive
并用命令修改当前的状态
安装集群架构包pcs,并将用户hacluster加入其中及修改了
hacluster的密码为redhat
[root@nodea、root@nodeb、root@nodec]:
yum -y install pcs ;systemctl restart pcsd;systemctl enable pcsd;systemctl stop firewalld.service ;systemctl disable firewalld.service ;echo redhat |passwd --stdin hacluster
[root@nodea]:
[root@nodea ~]# pcs cluster auth nodea.cluster0.example.com nodeb.cluster0.example.com nodec.cluster0.example.com
Username: hacluster
Password:
nodea.cluster0.example.com: Authorized
nodeb.cluster0.example.com: Authorized
nodec.cluster0.example.com: Authorized
[root@nodea、root@nodeb、root@nodec]:
systemctl restart pcsd
真机打开浏览器浏览集群架构
[root@foundation0 ]:
firefox https://nodea.cluster0.example.com:2224
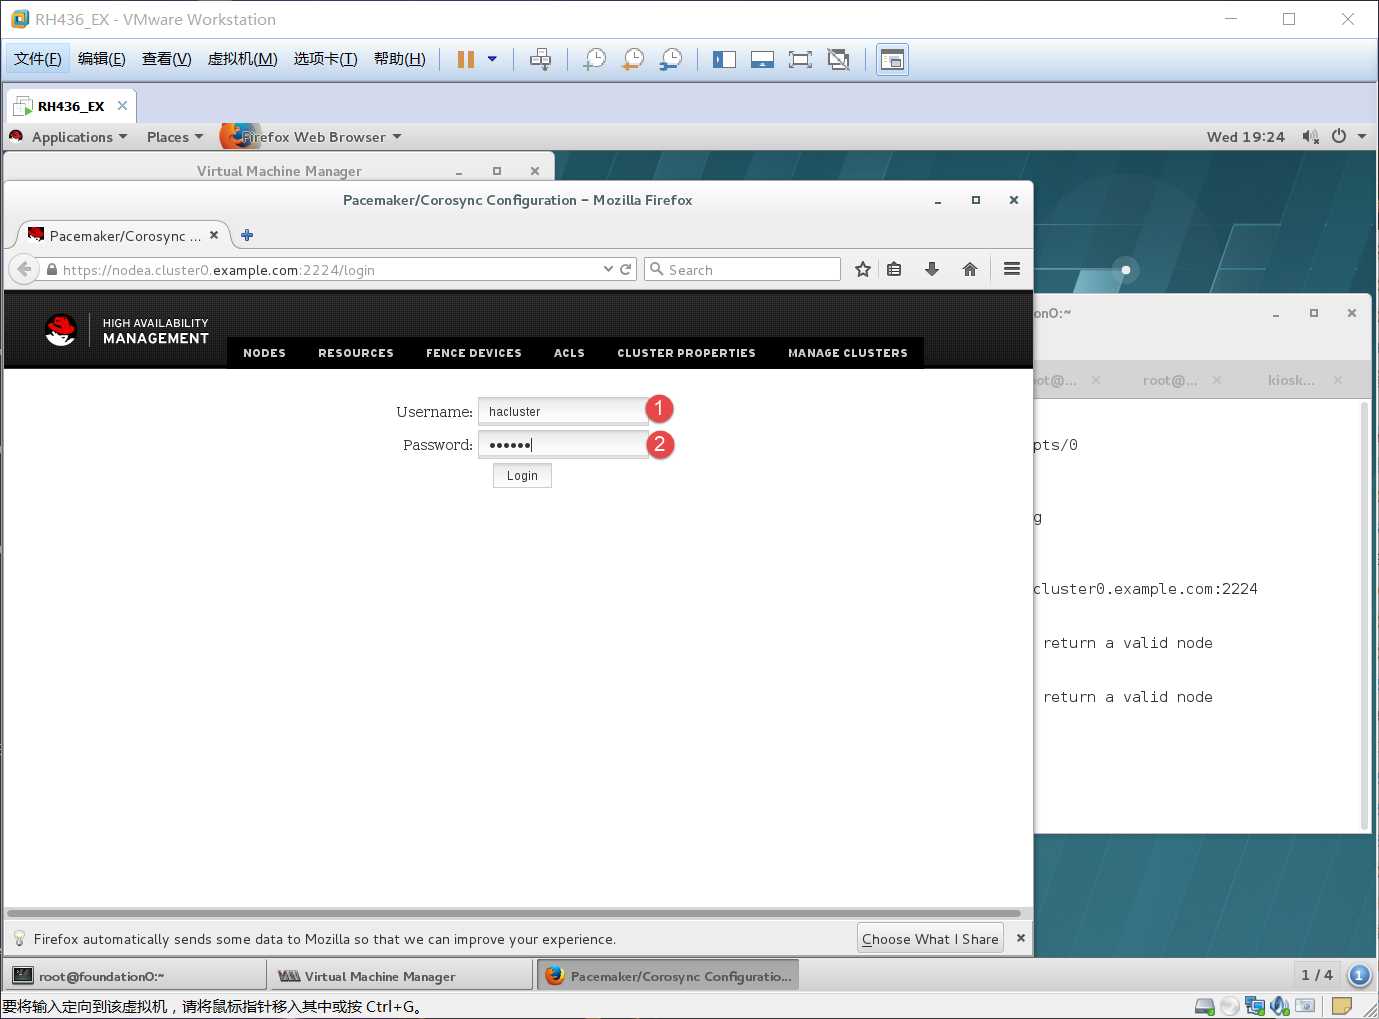
1、用户名:hacluster
2、密码:redhat
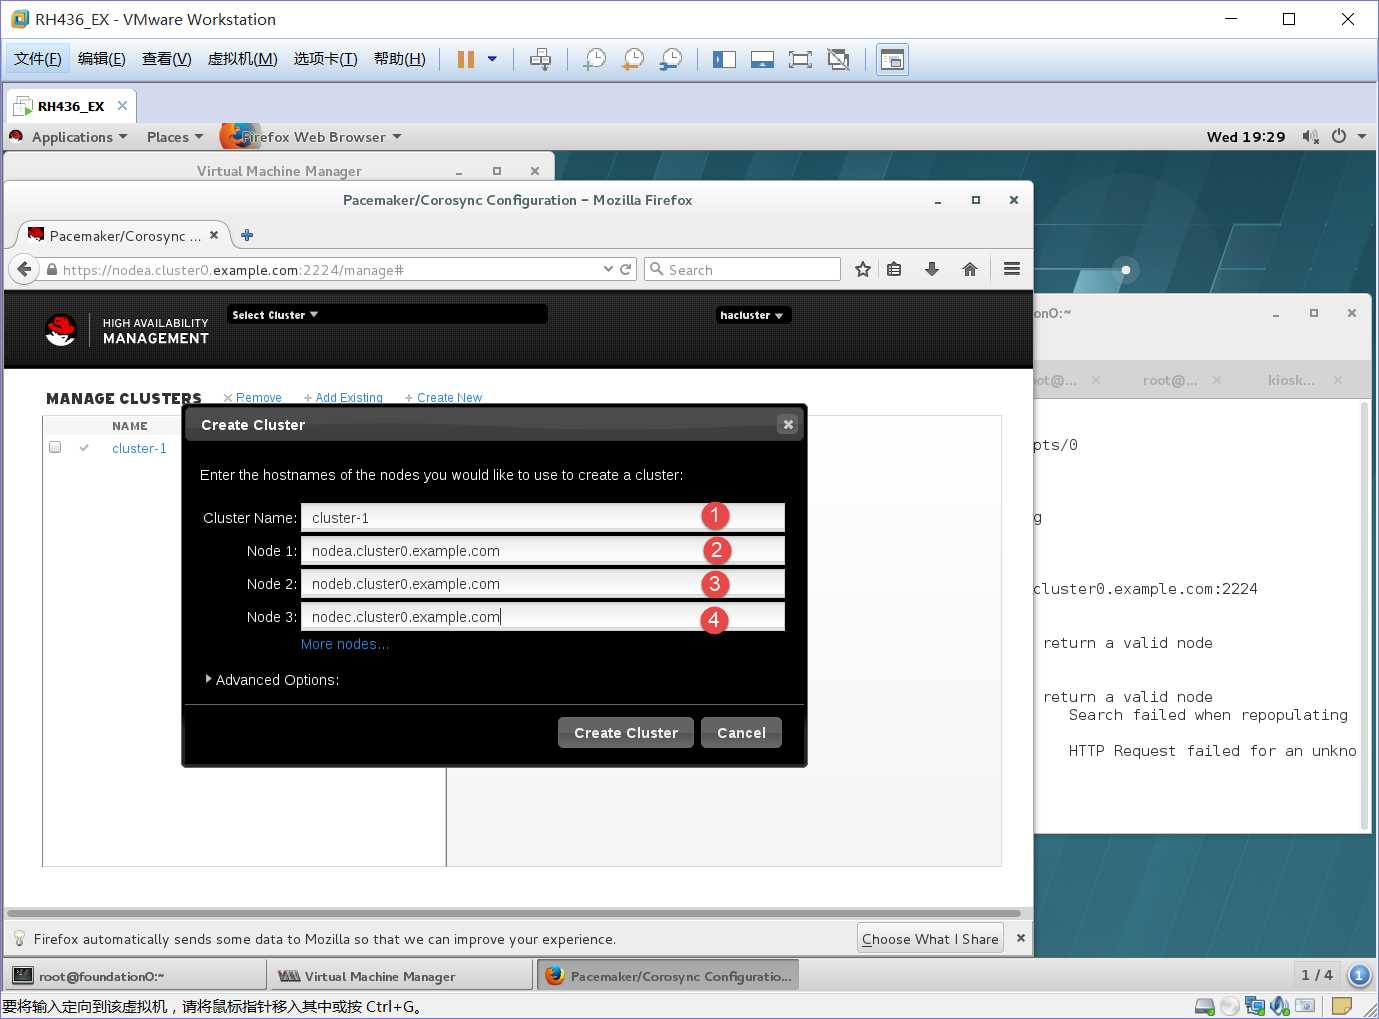
1、集群名:cluster-1
2-4、所加入的节点:nodea.cluster0.example.com,nodeb.cluster0.example.com,nodec.cluster0.example.com
[root@noded ]:
[root@noded ~]# mkdir /virtio
[root@noded ~]# cd /virtio/
[root@noded virtio]# ls
[root@noded virtio]# dd if=/dev/zero of=/virtio/vdisk1 bs=1M count=1024
1024+0 records in
1024+0 records out
1073741824 bytes (1.1 GB) copied, 14.5206 s, 73.9 MB/s
[root@noded virtio]# cd
[root@noded ~]# yum -y install targetcli 安装targetcli包
[root@noded virtio]# targetcli 进入磁盘编辑
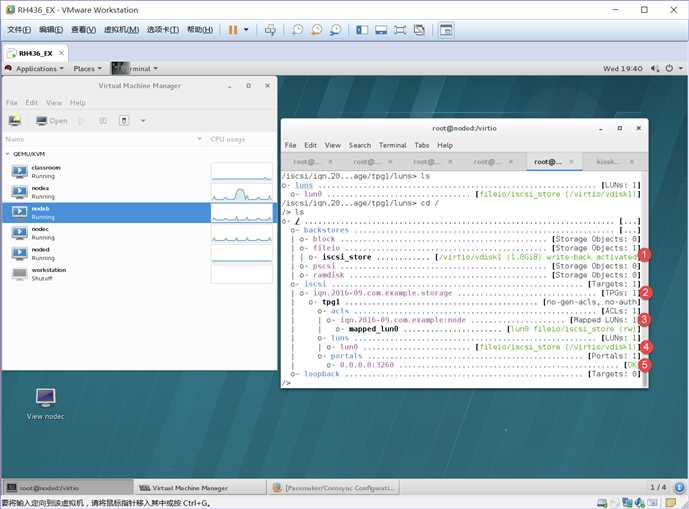
1、在/backstores/fileio下create iscsi_store /virtio/vdisk1 创建iscsi_store名接vdisk1目录
2、在/iscsi下create iqn.2016-09.com.example.storage 创建一个广播名(用来发现)
3、在/iscsi/iqn.2016-09.com.example.storage/tpg1/acls下 create iqn.2016-09.com.example:node 创建一个访问控制列表(用来允许客户端连接的密钥 node为域)
4、在/iscsi/iqn.2016-09.com.example.storage/tpg1/luns下create /backstores/fileio/iscsi_store 标识每一个设备的ID(默认从0开始)
5、会自动生成一个IP 地址
[root@noded virtio]# systemctl restart target ;systmctl enable target
[root@nodea 、root@nodeb、root@nodec]:
yum -y install iscsi*
[root@nodea ~]# vim /etc/iscsi/initiatorname.iscsi 修改配置文件
[root@nodea ~]# cat /etc/iscsi/initiatorname.iscsi
InitiatorName=iqn.2016-09.com.example:node
[root@nodea ~]# scp /etc/iscsi/initiatorname.iscsi 将修改好的配置文件cp到nodeb、nodec上 root@nodeb.cluster0.example.com:/etc/iscsi/initiatorname.iscsi
[root@nodea ~]# scp /etc/iscsi/initiatorname.iscsi root@nodec.cluster0.example.com:/etc/iscsi/initiatorname.iscsi
[root@nodea ~]# systemctl restart iscsid;systemctl enable iscsid.service
ln -s ‘/usr/lib/systemd/system/iscsid.service‘ ‘/etc/systemd/system/multi-user.target.wants/iscsid.service‘
[root@nodea ~]# iscsiadm -m discovery -t sendtargets -p 192.168.1.13
192.168.1.13:3260,1 iqn.2016-09.com.example.storage
[root@nodea ~]# iscsiadm -m discovery -t sendtargets -p 192.168.2.13
192.168.2.13:3260,1 iqn.2016-09.com.example.storage
如果上面的命令不能连接noded上的磁盘,那就最先做targetcli和iscsi后做pcs。
[root@nodea ~]# iscsiadm -m node -T iqn.2016-09.com.example.storage -p 192.168.1.13 -l
Logging in to [iface: default, target: iqn.2016-09.com.example.storage, portal: 192.168.1.13,3260] (multiple)
Login to [iface: default, target: iqn.2016-09.com.example.storage, portal: 192.168.1.13,3260] successful.
[root@nodea ~]#
[root@nodea ~]# iscsiadm -m node -T iqn.2016-09.com.example.storage -p 192.168.2.13 -l
Logging in to [iface: default, target: iqn.2016-09.com.example.storage, portal: 192.168.2.13,3260] (multiple)
Login to [iface: default, target: iqn.2016-09.com.example.storage, portal: 192.168.2.13,3260] successful.
[root@nodea ~]# fdisk -l
Disk /dev/vda: 10.7 GB, 10737418240 bytes, 20971520 sectors
Units = sectors of 1 * 512 = 512 bytes
Sector size (logical/physical): 512 bytes / 512 bytes
I/O size (minimum/optimal): 512 bytes / 512 bytes
Disk label type: dos
Disk identifier: 0x000272f4
Device Boot Start End Blocks Id System
/dev/vda1 * 2048 20970332 10484142+ 83 Linux
Disk /dev/sda: 1073 MB, 1073741824 bytes, 2097152 sectors
Units = sectors of 1 * 512 = 512 bytes
Sector size (logical/physical): 512 bytes / 512 bytes
I/O size (minimum/optimal): 512 bytes / 4194304 bytes
Disk /dev/sdb: 1073 MB, 1073741824 bytes, 2097152 sectors
Units = sectors of 1 * 512 = 512 bytes
Sector size (logical/physical): 512 bytes / 512 bytes
I/O size (minimum/optimal): 512 bytes / 4194304 bytes
/dev/sda和/dev/sdb为远程noded上的同一个虚拟磁盘,sda、sdb是2个接口做双网卡的备份。
[root@nodea ~]# yum -y install device-mapper-multipath 做多路径及线路预警
[root@nodea ~]# modprobe md_multipath 添加multipath模块
[root@nodea ~]# multipath -l
Sep 21 21:31:19 | /etc/multipath.conf does not exist, blacklisting all devices.
Sep 21 21:31:19 | A default multipath.conf file is located at
Sep 21 21:31:19 | /usr/share/doc/device-mapper-multipath-0.4.9/multipath.conf
Sep 21 21:31:19 | You can run /sbin/mpathconf to create or modify /etc/multipath.conf
提示报错,缺少文件
[root@nodea ~]# systemctl restart multipathd.service ;systemctl enable multipathd
[root@nodea ~]# cp /usr/share/doc/device-mapper-multipath-0.4.9/multipath.conf /etc/multipath.conf
[root@nodea ~]# multipath -l
Sep 21 21:35:25 | vda: No fc_host device for ‘host-1‘
Sep 21 21:35:25 | vda: No fc_host device for ‘host-1‘
Sep 21 21:35:25 | vda: No fc_remote_port device for ‘rport--1:-1-0‘
mpatha (3600140597279744f247488683521b4c2) dm-0 LIO-ORG ,iscsi-test
size=1.0G features=‘0‘ hwhandler=‘0‘ wp=rw
|-+- policy=‘service-time 0‘ prio=0 status=active
| - 2:0:0:0 sda 8:0 active undef running-+- policy=‘service-time 0‘ prio=0 status=enabled
`- 3:0:0:0 sdb 8:16 active undef running
提示上面信息就对了,原先的sda/sdb现在统称为mpatha名,不过mpatha名也可以自定义。
下面将mpatha定义为mymu
[root@nodea ~]# vim .bash_profile
[root@nodea ~]# cat .bashp
cat: .bashp: No such file or directory
[root@nodea ~]# cat .bash_profile
.bash_profile
#Get the aliases and functions
if [ -f ~/.bashrc ]; then
. ~/.bashrc
fi
User specific environment and startup programs
PATH=$PATH:$HOME/bin:/usr/lib/udev
export PATH
[root@nodea ~]# source .bash_profile
[root@nodea ~]# scp .bash_profile root@nodeb.cluster0.example.com:/root/.bash_profile
root@nodeb.cluster0.example.com‘s password:
.bash_profile 100% 190 0.2KB/s 00:00
[root@nodea ~]# scp .bash_profile root@nodec.cluster0.example.com:/root/.bash_profile
root@nodec.cluster0.example.com‘s password:
.bash_profile 100% 190 0.2KB/s 00:00
[root@nodea ~]# scsi_id -u -g /dev/sda
3600140597279744f247488683521b4c2
[root@nodea ~]# scsi_id -u -g /dev/sdb
3600140597279744f247488683521b4c2
上面的修改配置文件是便于使用scsi_id命令查看UUID的信息
[root@nodea ~]# vim /etc/multipath.conf
user_friendly_name no 开启默认命名 23行
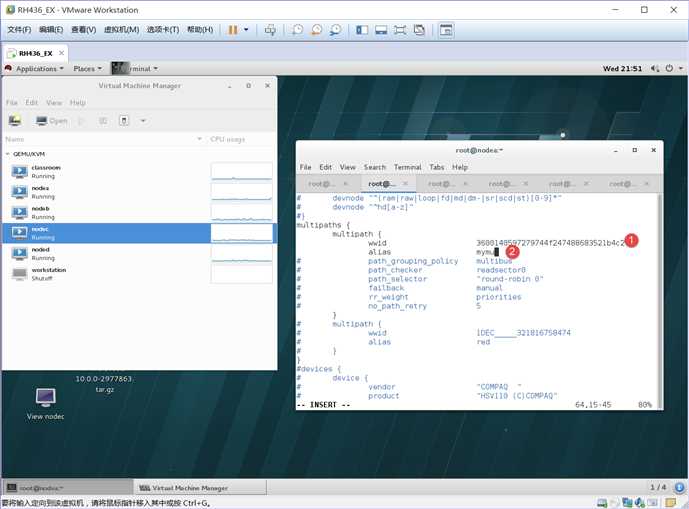
1、wwid 3600140597279744f247488683521b4c2 填写UUID 73行
2、 alias mymu 匿名 74行
[root@nodea ~]# systemctl restart multipathd.service
[root@nodea ~]# multipath -l
Sep 21 21:57:01 | vda: No fc_host device for ‘host-1‘
Sep 21 21:57:01 | vda: No fc_host device for ‘host-1‘
Sep 21 21:57:01 | vda: No fc_remote_port device for ‘rport--1:-1-0‘
mymu (3600140597279744f247488683521b4c2) dm-0 LIO-ORG ,iscsi-test
size=1.0G features=‘0‘ hwhandler=‘0‘ wp=rw
|-+- policy=‘service-time 0‘ prio=0 status=active
| - 2:0:0:0 sda 8:0 active undef running-+- policy=‘service-time 0‘ prio=0 status=enabled
`- 3:0:0:0 sdb 8:16 active undef running
[root@nodea ~]# more /proc/partitions 查看磁盘简略信息
major minor #blocks name
253 0 10485760 vda
253 1 10484142 vda1
8 0 1048576 sda
8 16 1048576 sdb
252 0 1048576 dm-0
[root@nodea ~]# yum -y install dlm lvm2-cluster.x86_64 将本地的lvm升级成lvm2-cluster 解决集群中的逻辑卷
[root@nodea ~]# vim /etc/lvm/lvm.conf 在配置文件内567行改成locking_type = 3 , 1为单机版,3为克隆模式 。或用命令lvmconf --enable-cluster自动改为3模式
[root@foundation0]:
[root@foundation0 ~]# mkdir /etc/cluster
[root@foundation0 ~]# cd /etc/cluster/
[root@foundation0 cluster]# ls
[root@foundation0 cluster]# dd if=/dev/zero of=/etc/cluster/fence_xvm.key bs=4k count=1
1+0 records in
1+0 records out
4096 bytes (4.1 kB) copied, 0.000129868 s, 31.5 MB/s
[root@nfoundation0 cluster]# yum -y install fence-virt* 安装fence是对资源内clvm和dlm做对应
[root@foundation0 cluster]# fence_virtd -c
以上都回车
Interface [virbr0]: br0
回车
Replace /etc/fence_virt.conf with the above [y/N]? y
[root@foundation0 cluster]# ls
fence_xvm.key
[root@foundation0 cluster]# scp fence_xvm.key root@nodea.cluster0.example.com:/etc/cluster
Warning: Permanently added ‘nodea.cluster0.example.com,172.25.0.10‘ (ECDSA) to the list of known hosts.
fence_xvm.key 100% 4096 4.0KB/s 00:00
[root@foundation0 cluster]# scp fence_xvm.key root@nodeb.cluster0.example.com:/etc/cluster
Warning: Permanently added ‘nodeb.cluster0.example.com,172.25.0.11‘ (ECDSA) to the list of known hosts.
fence_xvm.key 100% 4096 4.0KB/s 00:00
[root@foundation0 cluster]# scp fence_xvm.key root@nodec.cluster0.example.com:/etc/cluster
Warning: Permanently added ‘nodec.cluster0.example.com,172.25.0.12‘ (ECDSA) to the list of known hosts.
fence_xvm.key 100% 4096 4.0KB/s 00:00
firefox https://nodea.cluster0.example.com:2224
add添加一个fence
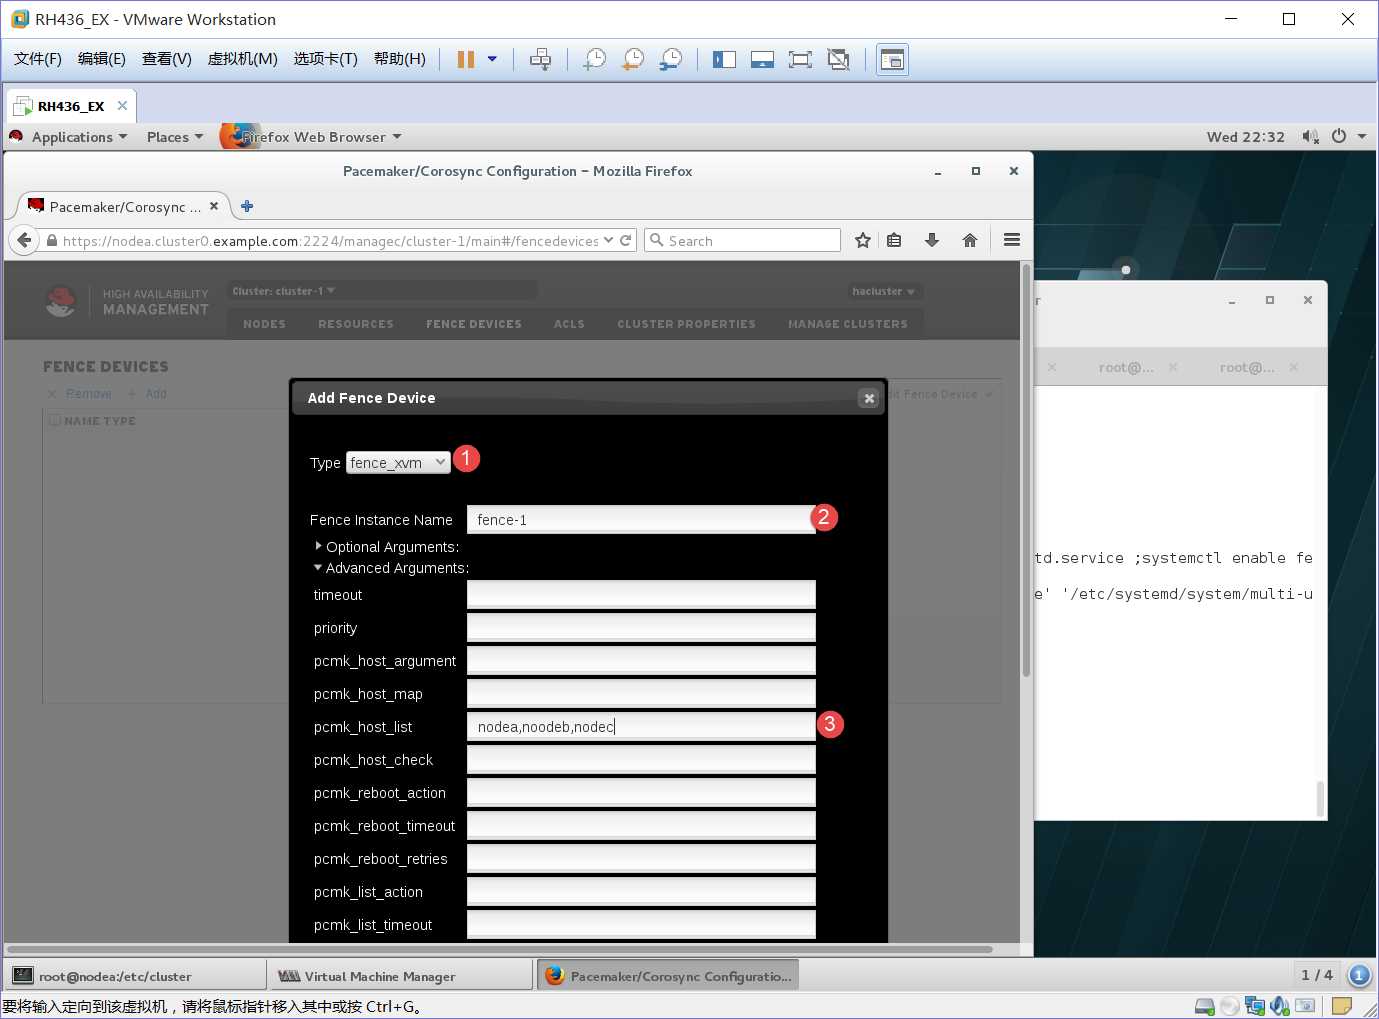
1、选择fence_xvm模式
2、名字:fence-1
3、指定对应的PC:nodea,noodeb,nodec
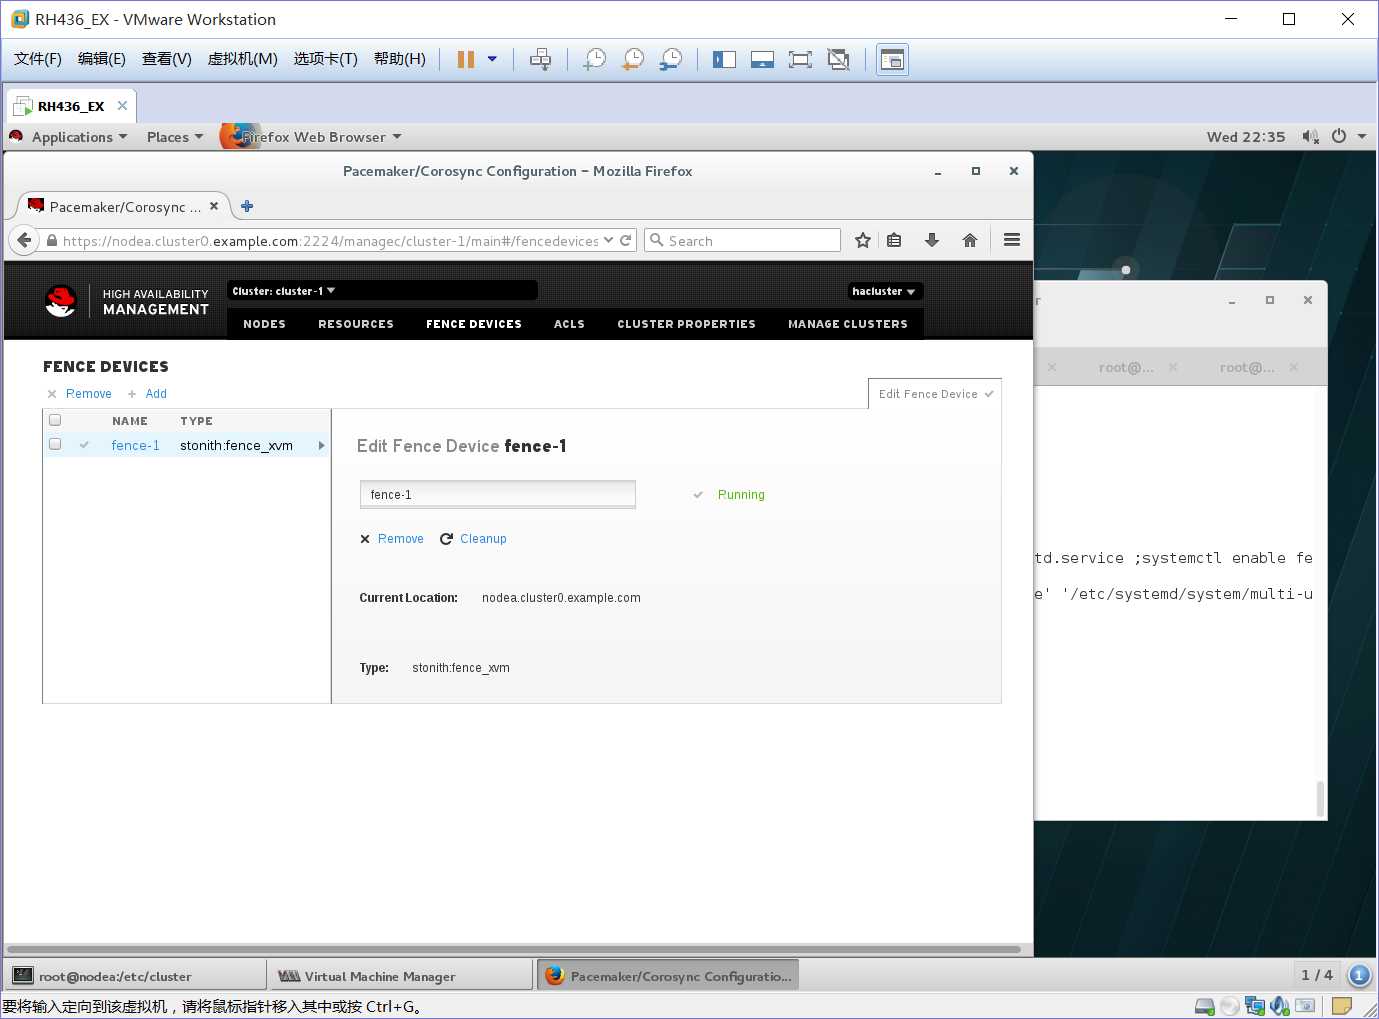
add添加一个
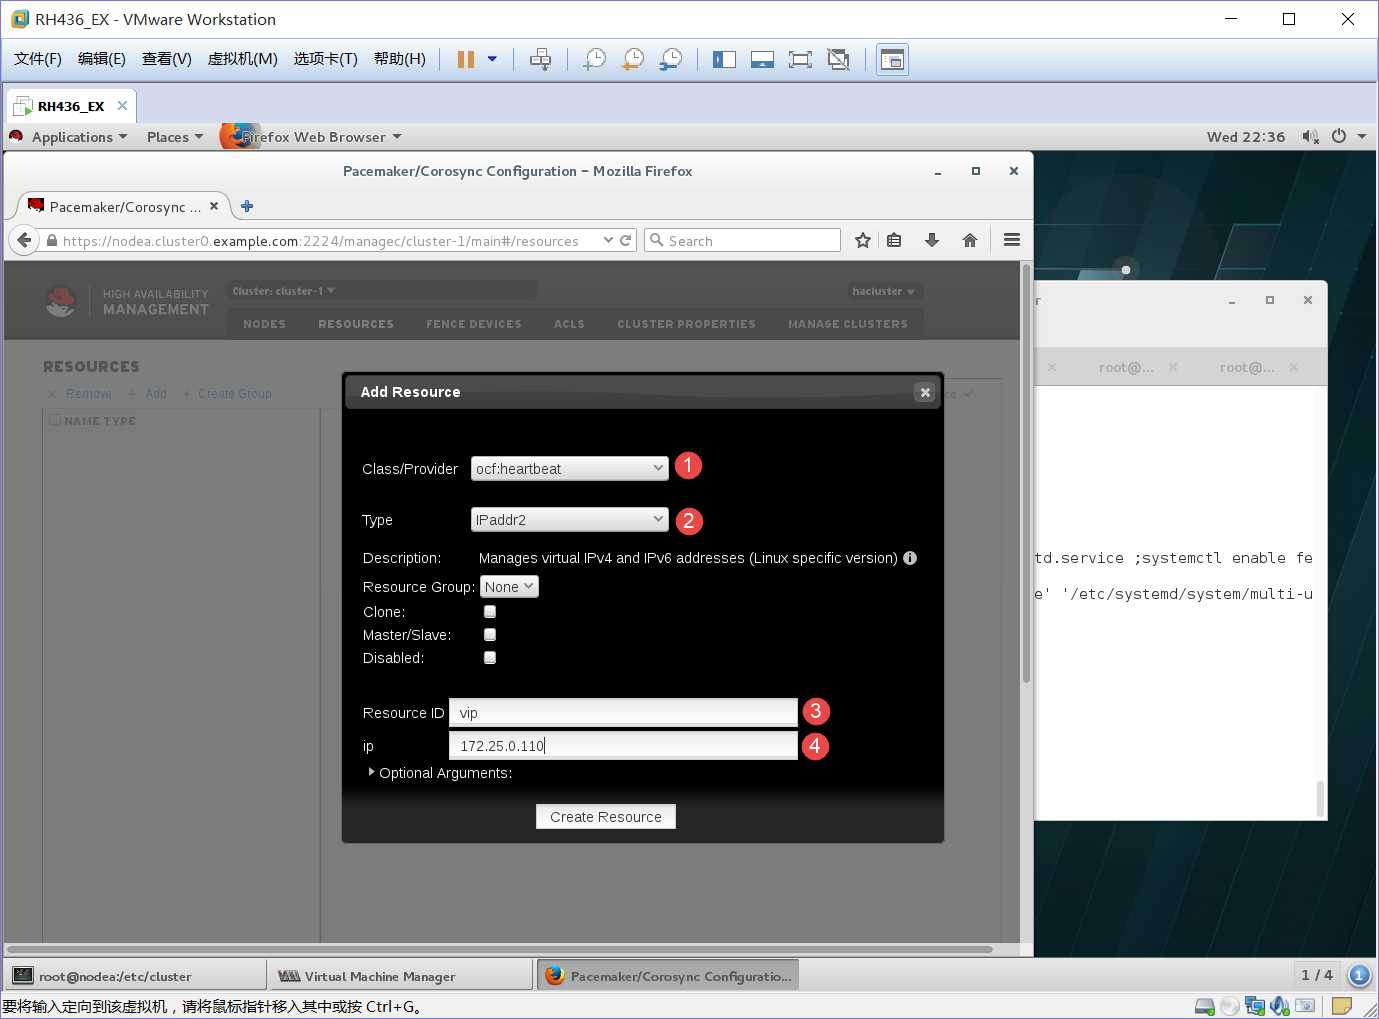
1、ocf:heartbeat
2、IPaddr2模式
3、名字:vip
4、IP地址:172.25.0.110
add添加一个
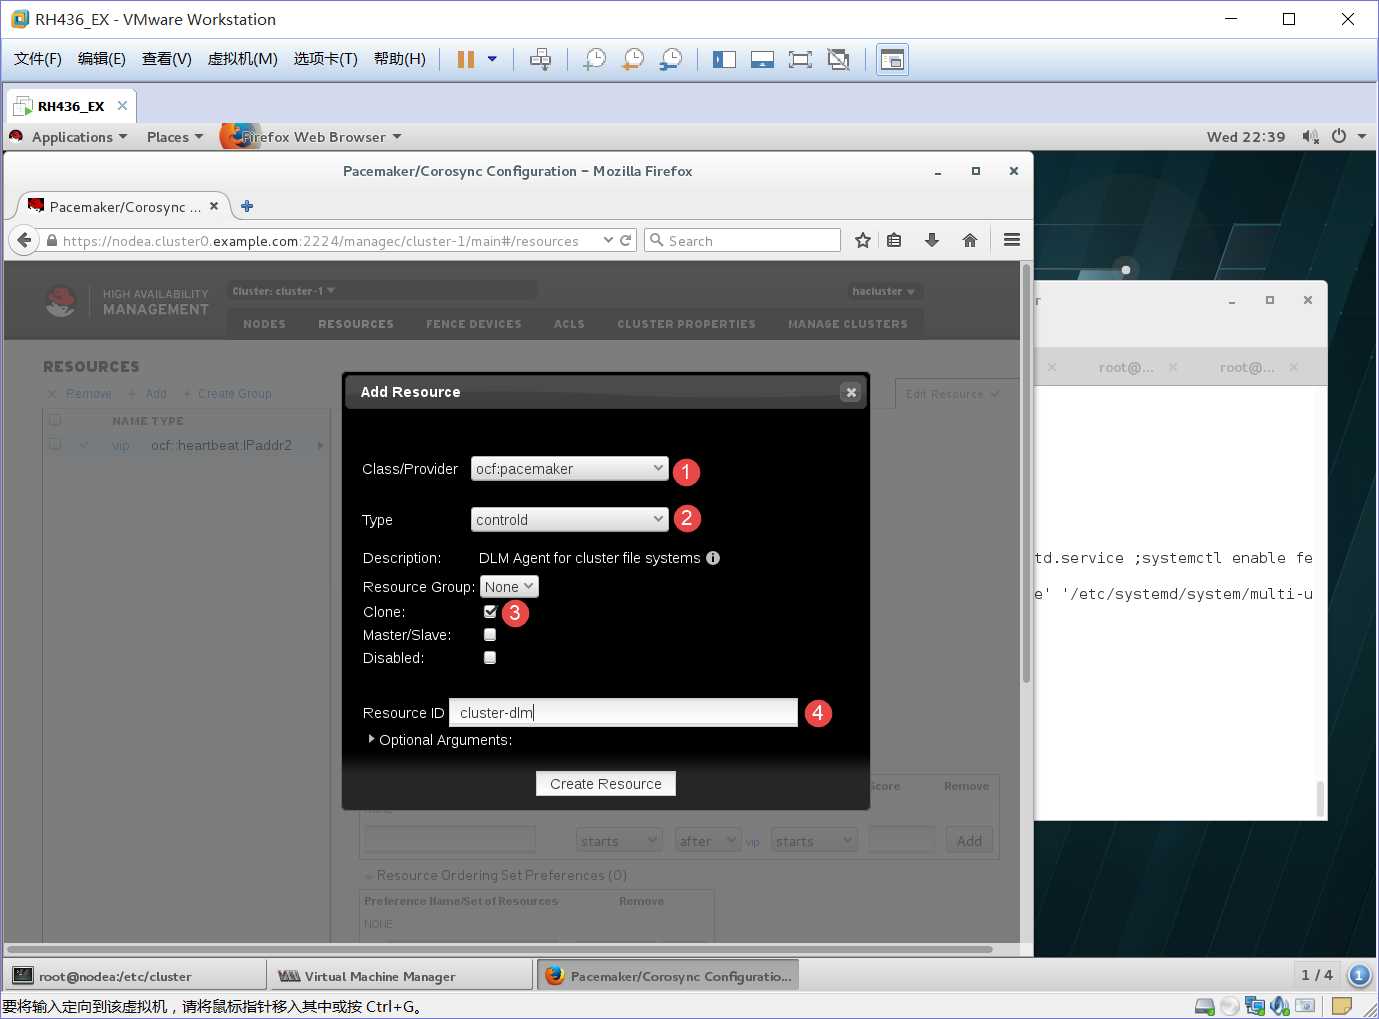
add添加一个
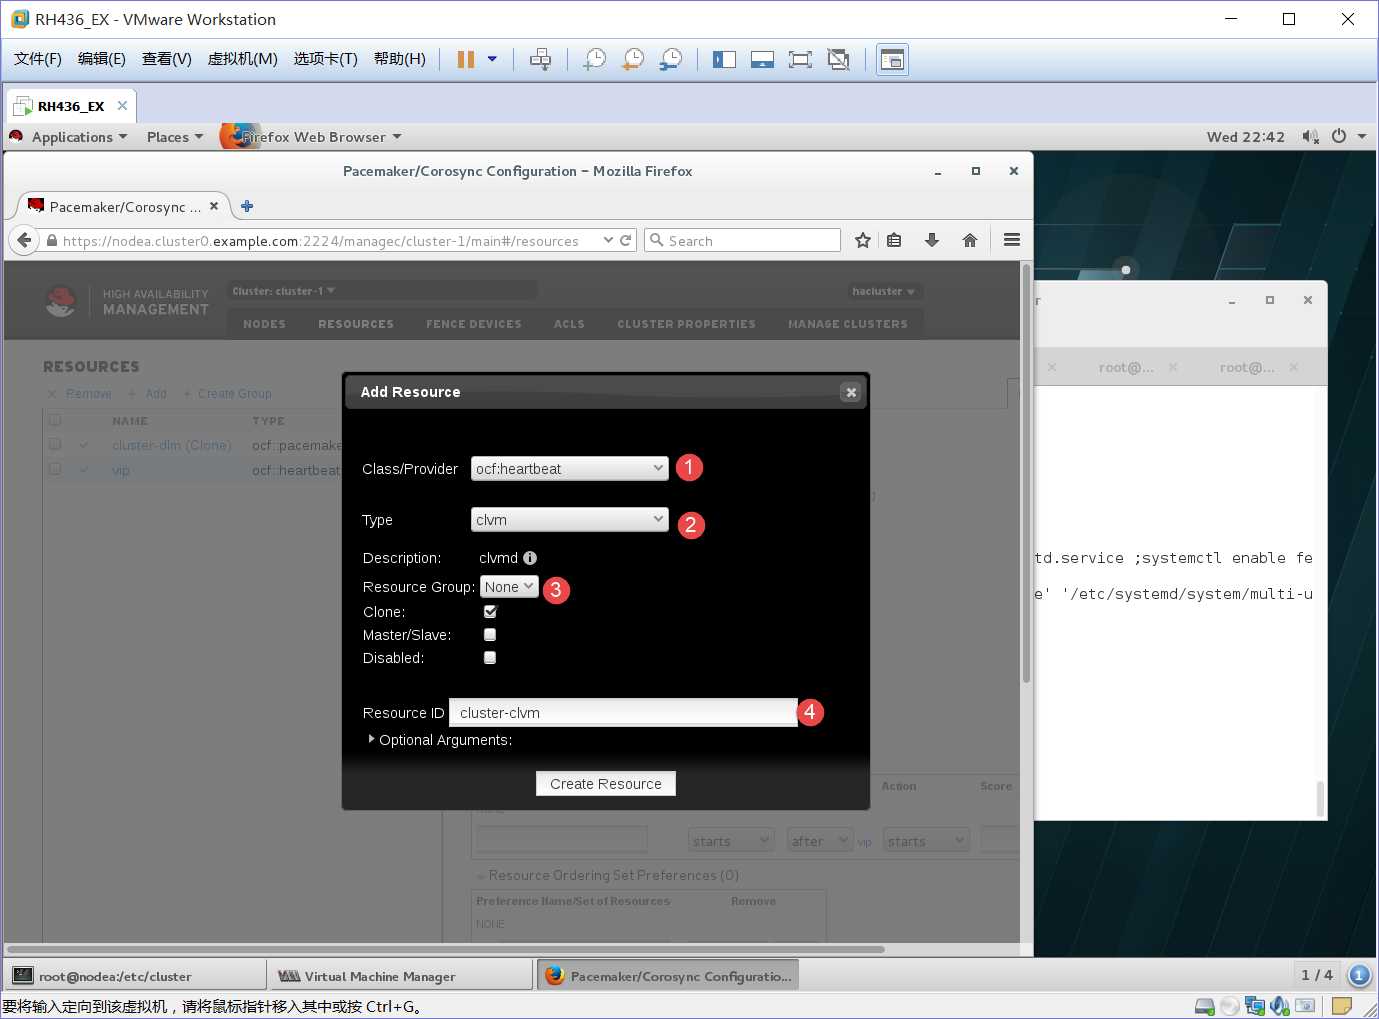
1、ocf:heartbeat
2、clvm模式
3、Clone√ 克隆模式
4、名字:cluster-clvm
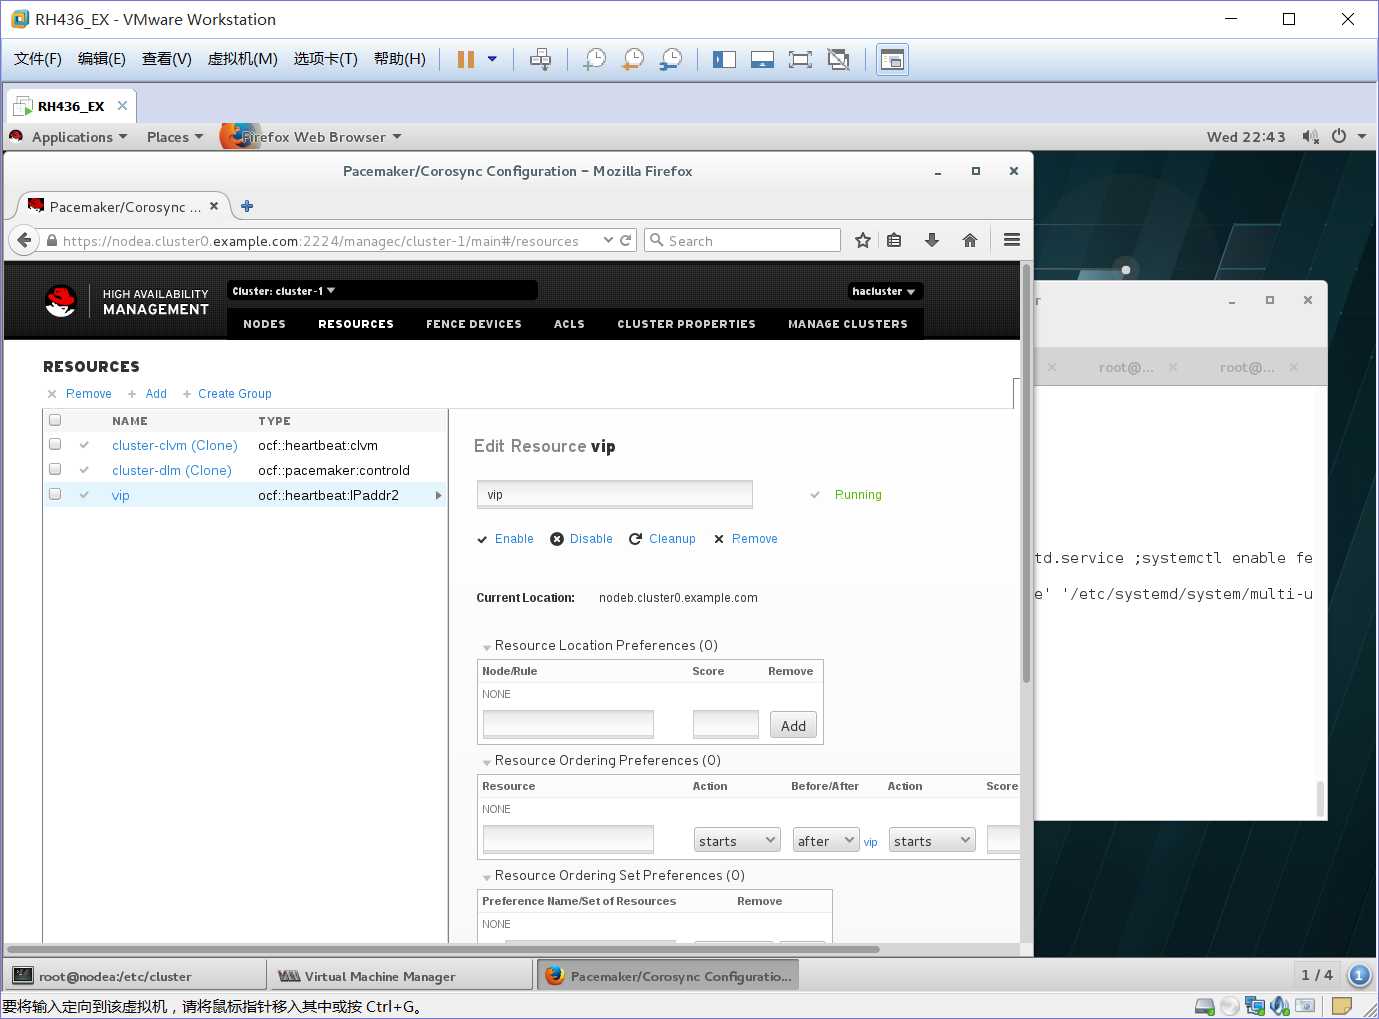
[root@nodea】:
[root@nodea cluster]# fdisk -l
Disk /dev/mapper/mymu: 1073 MB, 1073741824 bytes, 2097152 sectors
Units = sectors of 1 * 512 = 512 bytes
Sector size (logical/physical): 512 bytes / 512 bytes
I/O size (minimum/optimal): 512 bytes / 4194304 bytes
[root@nodea cluster]# cd /dev/mapper/
[root@nodea mapper]# ls
total 0
crw-------. 1 root root 10, 236 Sep 21 20:49 control
lrwxrwxrwx. 1 root root 7 Sep 21 21:56 mymu -> ../dm-0
[root@nodea mapper]# fdisk /dev/mapper/mymu
Device Boot Start End Blocks Id System
/dev/mapper/mymu1 8192 1851391 921600 83 Linux
[root@nodea mapper]# partprobe
[root@nodea mapper]# fdisk -l
Disk /dev/mapper/mymu: 1073 MB, 1073741824 bytes, 2097152 sectors
Units = sectors of 1 * 512 = 512 bytes
Sector size (logical/physical): 512 bytes / 512 bytes
I/O size (minimum/optimal): 512 bytes / 4194304 bytes
Disk label type: dos
Disk identifier: 0xd8583874
Device Boot Start End Blocks Id System
/dev/mapper/mymu1 8192 1851391 921600 83 Linux
Disk /dev/mapper/mymu1: 943 MB, 943718400 bytes, 1843200 sectors
Units = sectors of 1 * 512 = 512 bytes
Sector size (logical/physical): 512 bytes / 512 bytes
I/O size (minimum/optimal): 512 bytes / 4194304 bytes
[root@nodea mapper]# pvcreate /dev/mapper/mymu1
WARNING: lvmetad is running but disabled. Restart lvmetad before enabling it!
Physical volume "/dev/mapper/mymu1" successfully created
[root@nodea mapper]# vgcreate vg1 /dev/mapper/mymu1
WARNING: lvmetad is running but disabled. Restart lvmetad before enabling it!
Clustered volume group "vg1" successfully created
[root@nodea mapper]# lvcreate -L 800M -n lv1 vg1
WARNING: lvmetad is running but disabled. Restart lvmetad before enabling it!
Logical volume "lv1" created.
[root@nodeb ~]# lvs
WARNING: lvmetad is running but disabled. Restart lvmetad before enabling it!
LV VG Attr LSize Pool Origin Data% Meta% Move Log Cpy%Sync Convert
lv1 vg1 -wi-a----- 800.00m
[root@nodec ~]# lvs
WARNING: lvmetad is running but disabled. Restart lvmetad before enabling it!
LV VG Attr LSize Pool Origin Data% Meta% Move Log Cpy%Sync Convert
lv1 vg1 -wi-a----- 800.00m
[root@nodea mapper]# yum -y install gfs2-utils.x86_64
[root@nodea mapper]# mkfs.gfs2 -p lock_dlm -t cluster-1:mygfs2 -j 4 /dev/vg1/lv1
-p:类型
-t:集群名:自定义名
-j:n+1 n为节点个数,1为保留
/dev/vg1/lv1 is a symbolic link to /dev/dm-2
This will destroy any data on /dev/dm-2
Are you sure you want to proceed? [y/n]y
Device: /dev/vg1/lv1
Block size: 4096
Device size: 0.78 GB (204800 blocks)
Filesystem size: 0.78 GB (204797 blocks)
Journals: 4
Resource groups: 6
Locking protocol: "lock_dlm"
Lock table: "cluster-1:mygfs2"
UUID: e89181f7-1251-8c4b-496e-305aeff9b780
[root@nodea ~]# mkdir /zzz
[root@nodea ~]# mount /dev/vg1/lv1 /zzz/
[root@nodea ~]# cd /zzz/
[root@nodea zzz]# ls
[root@nodea zzz]# vim zlm
[root@nodea zzz]# cat zlm
haha.................
[root@nodeb ~]# mkdir /zzz
[root@nodeb ~]# mount /dev/vg1/lv1 /zzz/
[root@nodeb zzz]# cat /zzz/zlm
haha.................
[root@nodec ~]# mkdir /zzz
[root@nodec ~]# mount /dev/vg1/lv1 /zzz/
root@nodec zzz]# cat /zzz/zlm
haha.................
[root@nodec zzz]# vim zlm
[root@nodec zzz]# cat zlm
haha
[root@nodea zzz]# cat zlm
haha
上面文件查看说明底层文件是可以同步了,如果要对文件做对应的权限控制可以天acl或磁盘配额
acl的添加权限为mount -o remount,acl /zzz
磁盘配额的添加权限为mount -o remount,quota=on /zzz
[root@nodea ~]# umount /zzz/
[root@nodeb ~]# umount /zzz/
[root@nodec ~]# umount /zzz/
[root@nodea ~]# yum -y install httpd
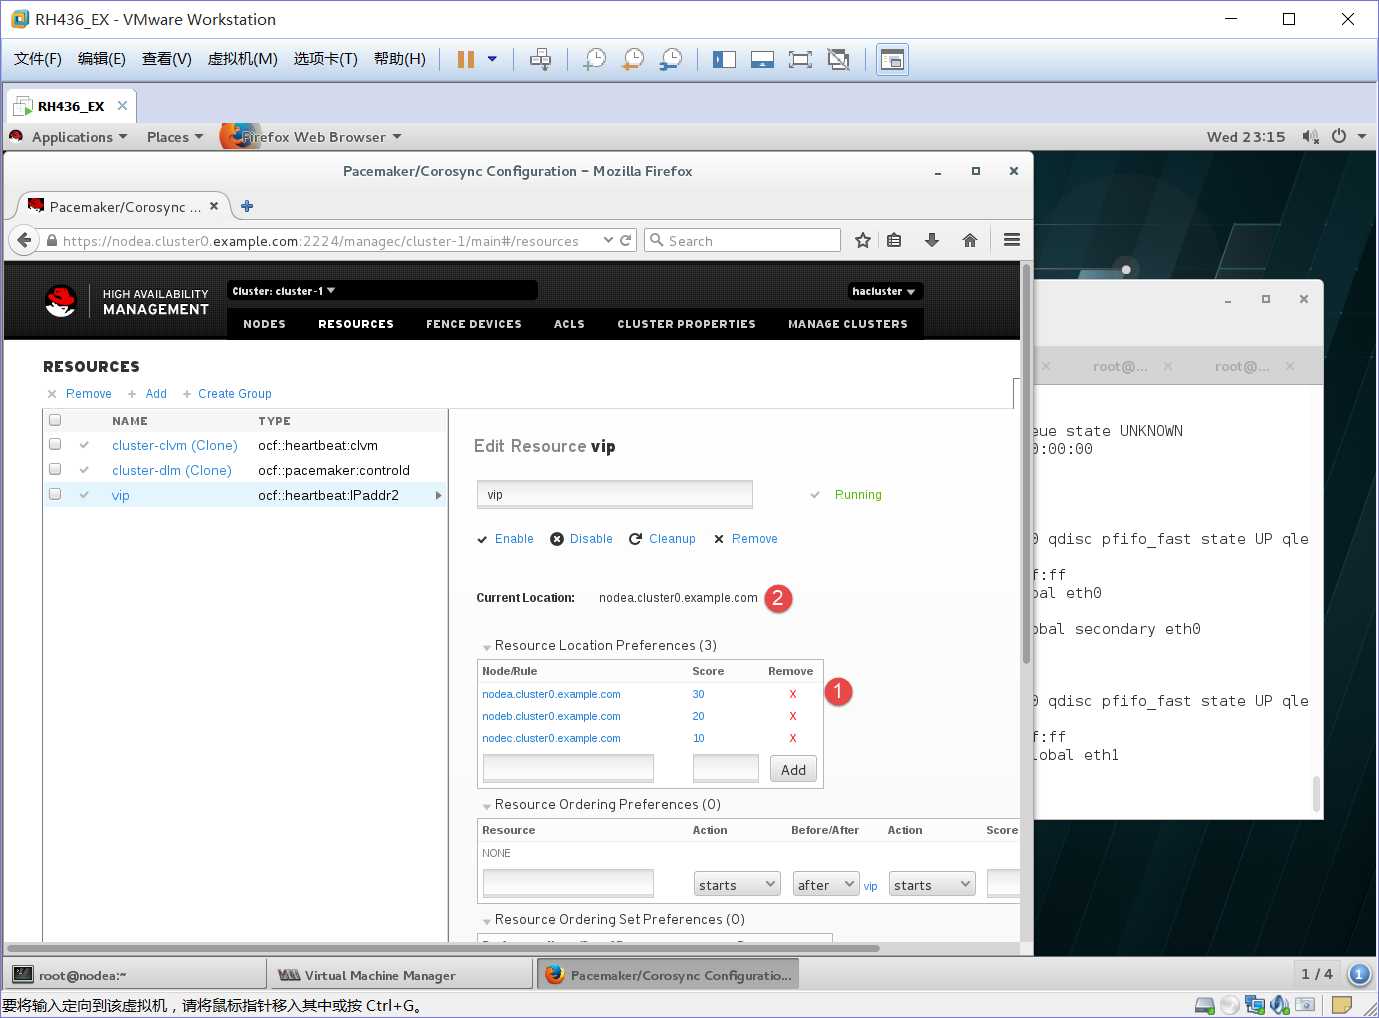
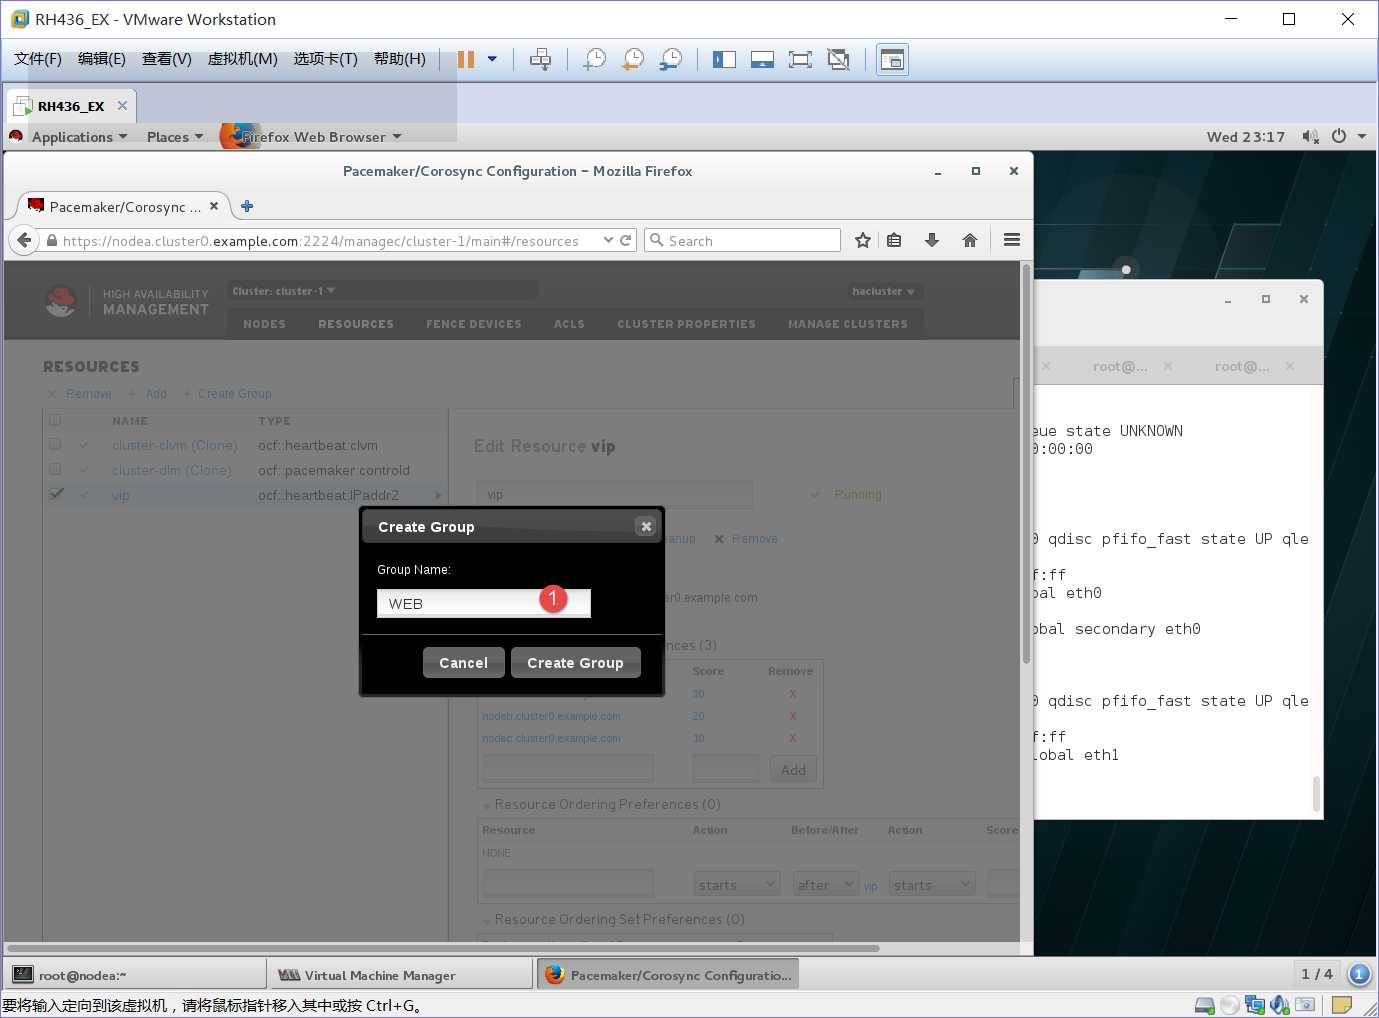
1、添加一个资源名WEB先绑定vip
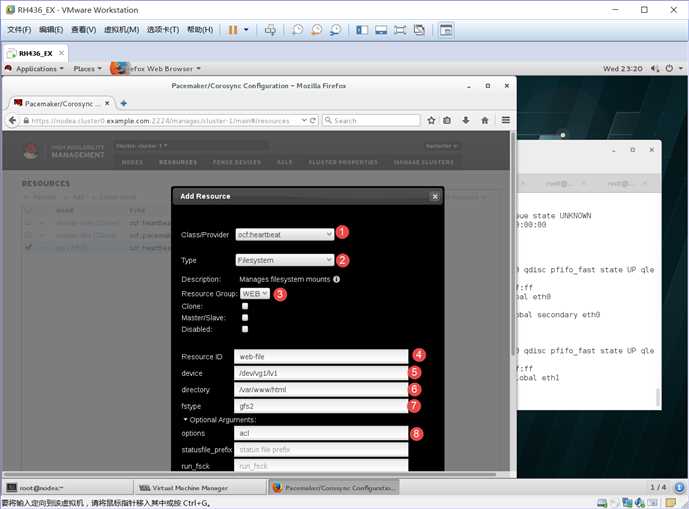
1、ocf:heartbeat
2、filesystem模式
3、绑定WEB上
4、资源名:web-file
5、磁盘:/dev/vg1/lv1
6、挂在地方:/var/www/html
7、磁盘格式:gfs2
8、权限:acl
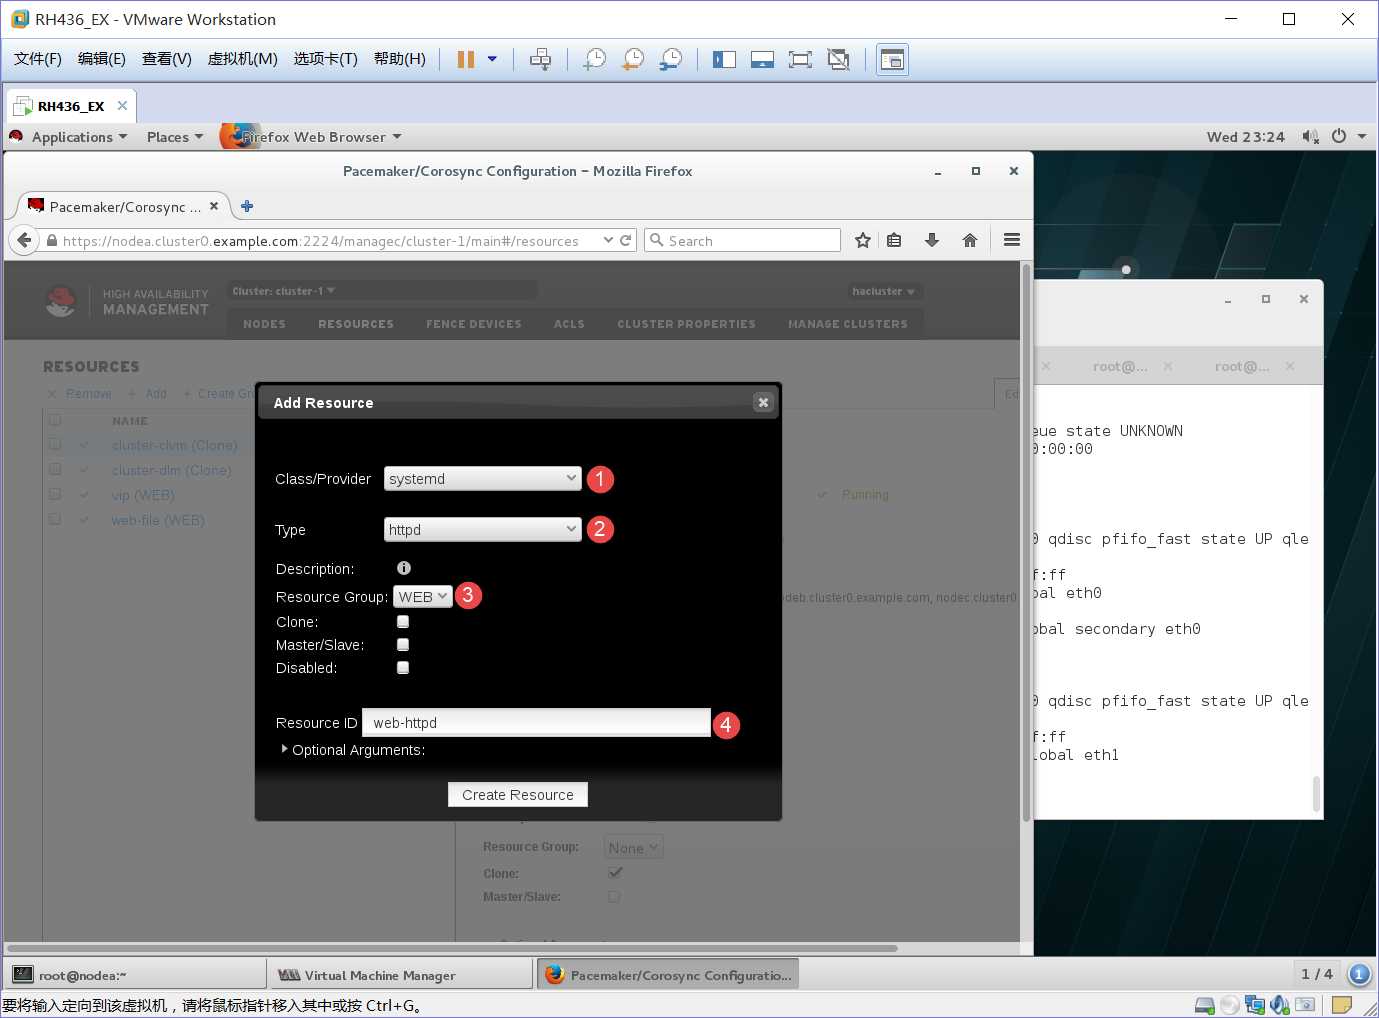
1、systemd
2、httpd模式
3、绑定WEB
4、资源名:web-httpd
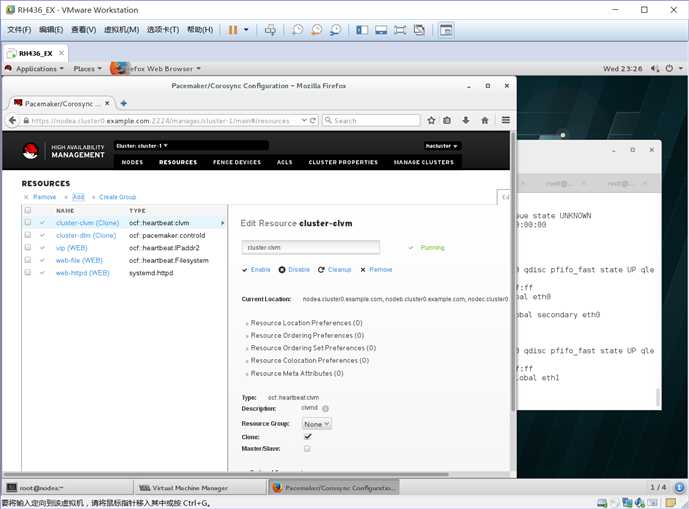
[root@nodea html]# df -h
Filesystem Size Used Avail Use% Mounted on
/dev/vda1 10G 1.2G 8.9G 12% /
devtmpfs 904M 0 904M 0% /dev
tmpfs 921M 61M 861M 7% /dev/shm
tmpfs 921M 28M 893M 4% /run
tmpfs 921M 0 921M 0% /sys/fs/cgroup
/dev/mapper/vg1-lv1 800M 518M 283M 65% /var/www/html
说明/dev/mapper/vg1-lv1自动挂在再 /var/www/html上了
[root@nodea ~]# cd /var/www/html/
[root@nodea html]# ls
zlm
[root@nodea html]# cat zlm
haha
刚才测试的文件还在,说明文件已经写到noded下的底层磁盘
[root@nodea html]# vim index.html
[root@nodea html]# cat index.html
nodea
[root@nodea html]# pcs cluster standby
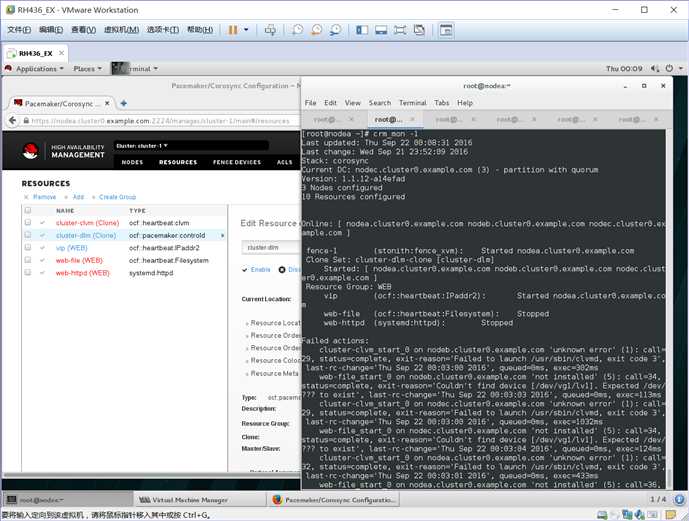
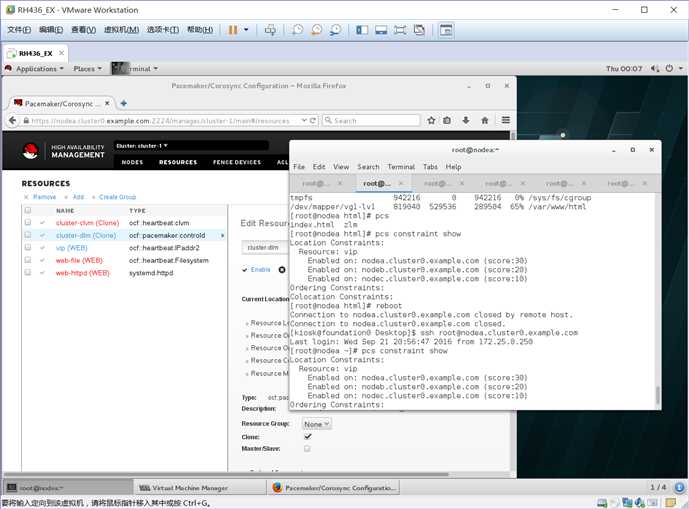
*****当关掉nodea后,http的服务就红了,底层的磁盘不能跑到nodeb上。随后cluster-clvm也红 了,现在还不知道什么原因,看到此篇文章知道最后失败的原因可以留言讨论。
标签:
原文地址:http://www.cnblogs.com/ZhengLiming/p/5894692.html