标签:
django的数据库相关表配置在models.py文件中,数据库的连接相关信息配置在settings.py中
from django.db import models

class userinfo(models.Model):
    name = models.CharField(max_length=30)
    email = models.EmailField()
    memo = models.TextField()
可用的字段:
1、models.AutoField  自增列 = int(11)
  如果没有的话,默认会生成一个名称为 id 的列,如果要显示的自定义一个自增列,必须将给列设置为主键 primary_key=True。
2、models.CharField  字符串字段
  必须 max_length 参数
3、models.BooleanField  布尔类型=tinyint(1)
  不能为空,Blank=True
4、models.ComaSeparatedIntegerField  用逗号分割的数字=varchar
  继承CharField,所以必须 max_lenght 参数
5、models.DateField  日期类型 date
  对于参数,auto_now = True 则每次更新都会更新这个时间;auto_now_add 则只是第一次创建添加,之后的更新不再改变。
6、models.DateTimeField  日期类型 datetime
  同DateField的参数
7、models.Decimal  十进制小数类型 = decimal
  必须指定整数位max_digits和小数位decimal_places
8、models.EmailField  字符串类型(正则表达式邮箱) =varchar
  对字符串进行正则表达式
9、models.FloatField  浮点类型 = double
10、models.IntegerField  整形
11、models.BigIntegerField  长整形
  integer_field_ranges = {
    ‘SmallIntegerField‘: (-32768, 32767),
    ‘IntegerField‘: (-2147483648, 2147483647),
    ‘BigIntegerField‘: (-9223372036854775808, 9223372036854775807),
    ‘PositiveSmallIntegerField‘: (0, 32767),
    ‘PositiveIntegerField‘: (0, 2147483647),
  }
12、models.IPAddressField  字符串类型(ip4正则表达式)
13、models.GenericIPAddressField  字符串类型(ip4和ip6是可选的)
  参数protocol可以是:both、ipv4、ipv6
  验证时,会根据设置报错
14、models.NullBooleanField  允许为空的布尔类型
15、models.PositiveIntegerFiel  正Integer
16、models.PositiveSmallIntegerField  正smallInteger
17、models.SlugField  减号、下划线、字母、数字
18、models.SmallIntegerField  数字
  数据库中的字段有:tinyint、smallint、int、bigint
19、models.TextField  字符串=longtext
20、models.TimeField  时间 HH:MM[:ss[.uuuuuu]]
21、models.URLField  字符串,地址正则表达式
22、models.BinaryField  二进制
23、models.ImageField   图片
24、models.FilePathField 文件
字段相关参数:
1、null=True
  数据库中字段是否可以为空
2、blank=True
  django的 Admin 中添加数据时是否可允许空值
3、primary_key = False
  主键,对AutoField设置主键后,就会代替原来的自增 id 列
4、auto_now 和 auto_now_add
  auto_now   自动创建---无论添加或修改,都是当前操作的时间
  auto_now_add  自动创建---永远是创建时的时间
5、choices
GENDER_CHOICE = (
        (u‘M‘, u‘Male‘),
        (u‘F‘, u‘Female‘),
    )
gender = models.CharField(max_length=2,choices = GENDER_CHOICE)
6、max_length
7、default  默认值
8、verbose_name  Admin中字段的显示名称
9、name|db_column  数据库中的字段名称
10、unique=True  不允许重复
11、db_index = True  数据库索引
12、editable=True  在Admin里是否可编辑
13、error_messages=None  错误提示
14、auto_created=False  自动创建
15、help_text  在Admin中提示帮助信息
16、validators=[]
17、upload-to
数据库连接配置:
DATABASES = {
    ‘default‘: {
        #‘ENGINE‘: ‘django.db.backends.‘, # Add ‘postgresql_psycopg2‘, ‘mysql‘, ‘sqlite3‘ or ‘oracle‘.
        ‘ENGINE‘: ‘django.db.backends.sqlite3‘, #添加数据库引擎;选项[‘postgresql_psycopg2‘, ‘mysql‘, ‘sqlite3‘ or ‘oracle‘].
        ‘NAME‘: ‘F:/TestPython/blog/blog/db/data.db‘, # 数据库文件的路径.
        # The following settings are not used with sqlite3:
        # 下面的配置不适用于sqlite3:
        ‘USER‘: ‘‘,    # 数据库登陆用户名
        ‘PASSWORD‘: ‘‘, # 数据库登陆密码
        ‘HOST‘: ‘‘,                      # Empty for localhost through domain sockets or ‘127.0.0.1‘ for localhost through TCP. # 主机名
        ‘PORT‘: ‘‘,                      # Set to empty string for default. # 端口号
    }
}
注册app:
在settings里的INSTALLED_APPS里面加上你的app名字
INSTALLED_APPS = [
    ‘django.contrib.admin‘,
    ‘django.contrib.auth‘,
    ‘django.contrib.contenttypes‘,
    ‘django.contrib.sessions‘,
    ‘django.contrib.messages‘,
    ‘django.contrib.staticfiles‘,
    ‘app01‘,
]
生成数据库表
python  manage.py makemigrations
# 生成一个数据库结构migrations里面一个表
python  manage.py migrate
# 根据migrations里面的表来创建数据库
将app的数据库注册到admin
在app01下面的admin.py写入以下内容:from django.contrib import admin # Register your models here. # 导入app01的数据库模块 from app01 import models # 注册咱们创建的类,通过他来访问 admin.site.register(models.UserInfo)
# 插入数据:
UserInfo.objects.create(name=‘rain‘,password=‘123‘,email=‘rain@163.com‘)

# 删除数据:
UserInfo.objects.filter(name=‘rain‘).delete()

# 修改数据:
UserInfo.objects.filter(name=‘rain‘).update(name=‘Rain1‘)

# 查找数据:
UserInfo.objects.filter(name=‘rain‘)
UserInfo.objects.all()
UserInfo.objects.all()[:10]
# 切片操作,获取10个人,不支持负索引,切片可以节约内存
UserInfo.objects.get(name=‘rain‘)
#查找所有
models.UserInfo.objects.all()
#查找指定条件
models.UserInfo.objects.filter(age=18)
#查找第一个
models.UserInfo.objects.filter(age=18).first()
#查找所有并且显示出来
user_list_obj = models.UserInfo.objects.all()
for line in user_list_obj:
    print(line.username,line.age)
  # 获取个数

    models.Tb1.objects.filter(name=‘seven‘).count()

    # 大于,小于

    models.Tb1.objects.filter(id__gt=1)              # 获取id大于1的值
    models.Tb1.objects.filter(id__lt=10)             # 获取id小于10的值
    models.Tb1.objects.filter(id__lt=10, id__gt=1)   # 获取id大于1 且 小于10的值

    # in

    models.Tb1.objects.filter(id__in=[11, 22, 33])   # 获取id等于11、22、33的数据
    models.Tb1.objects.exclude(id__in=[11, 22, 33])  # not in

    # contains

    models.Tb1.objects.filter(name__contains="ven")
    models.Tb1.objects.filter(name__icontains="ven") # icontains大小写不敏感
    models.Tb1.objects.exclude(name__icontains="ven")

    # range

    models.Tb1.objects.filter(id__range=[1, 2])   # 范围bettwen and

    # 其他类似

    startswith,istartswith, endswith, iendswith,

    # order by

    models.Tb1.objects.filter(name=‘seven‘).order_by(‘id‘)    # asc
    models.Tb1.objects.filter(name=‘seven‘).order_by(‘-id‘)   # desc

    # limit 、offset

    models.Tb1.objects.all()[10:20]

    # group by
    from django.db.models import Count, Min, Max, Sum
    models.Tb1.objects.filter(c1=1).values(‘id‘).annotate(c=Count(‘num‘))
    SELECT "app01_tb1"."id", COUNT("app01_tb1"."num") AS "c" FROM "app01_tb1" WHERE "app01_tb1"."c1" = 1 GROUP BY "app01_tb1"."id"
# F 使用查询条件的值

from django.db.models import F
models.Tb1.objects.update(num=F(‘num‘)+1)

# Q 构建搜索条件
from django.db.models import Q
con = Q()

q1 = Q()
q1.connector = ‘OR‘
q1.children.append((‘id‘, 1))
q1.children.append((‘id‘, 10))
q1.children.append((‘id‘, 9))

q2 = Q()
q2.connector = ‘OR‘
q2.children.append((‘c1‘, 1))
q2.children.append((‘c1‘, 10))
q2.children.append((‘c1‘, 9))

con.add(q1, ‘AND‘)
con.add(q2, ‘AND‘)

models.Tb1.objects.filter(con)

from django.db import connection
cursor = connection.cursor()
cursor.execute("""SELECT * from tb where name = %s""", [‘Lennon‘])
row = cursor.fetchone()
应用场景:
from django.db import models
# Create your models here.

class UserType(models.Model):
    caption = models.CharField(max_length=32)
        # 超级管理员,普通用户,游客,黑河
    def __str__(self):
        return self.caption

class UserInfo(models.Model):
    user = models.CharField(max_length=32)
    pwd = models.CharField(max_length=32)
    user_type = models.ForeignKey(‘UserType‘)
#方法一:需要进行两次数据库操作,不推荐
UserInfo.objects.create(user=‘test‘,pwd=‘123‘,user_type=UserType.objects.get(id=1))
#方法二:利用外键关系进行直接插入值,此时user_type代指的就是usertype表
UserInfo.objects.create(user=‘test‘,pwd=‘123‘,user_type_id=1)

>>> from app01 import models
>>> models.UserInfo.objects.create(user=‘test‘,pwd=‘123‘,user_type=models.UserType.objects.get(id=1))
<UserInfo: UserInfo object>
>>> models.UserInfo.objects.create(user=‘asdasdadas‘,pwd=‘123‘,user_type_id=3)
<UserInfo: UserInfo object>
 ?
? ?
?
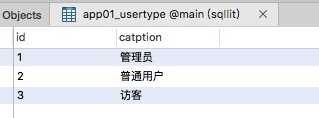
1.根据用户,查找用类型
>>> models.UserInfo.objects.filter(user="test")[0].user_type.caption
‘管理员‘
此时user_type对应的就是usertype的表,所以直接使用.caption就可以拿到数据
2.根据用户类型查找用户
#方法一:先查找出用户类型对应的user_type的id,然后再去userinfo表中查找id对应的用户
>>> role_id = models.UserType.objects.get(caption=‘管理员‘).id
>>> role_id
1
>>> models.UserInfo.objects.filter(user_type=role_id).values(‘user‘,‘pwd‘)
<QuerySet [{‘pwd‘: ‘123‘, ‘user‘: ‘张三‘}, {‘pwd‘: ‘123‘, ‘user‘: ‘test2‘}, {‘pwd‘: ‘123‘, ‘user‘: ‘test‘}]>

#方法二:使用双下划线进行一次连表操作
>>> models.UserInfo.objects.filter(user_type__caption="管理员")
<QuerySet [<UserInfo: UserInfo object>, <UserInfo: UserInfo object>, <UserInfo: UserInfo object>]>
>>> sql[0].user
‘张三‘
>>> sql[0].pwd
‘123‘
>>> sql[0].user_type.caption
‘管理员‘
>>> sql[0].user_type.id
1

继续封装,同时取用户的所有信息:
>>> sql = models.UserInfo.objects.filter(user_type__caption="管理员").values(‘user‘,‘pwd‘,‘user_type__id‘,‘user_type__caption‘)
>>> sql
<QuerySet [{‘user_type__id‘: 1, ‘pwd‘: ‘123‘, ‘user‘: ‘张三‘, ‘user_type__caption‘: ‘管理员‘}, {‘user_type__id‘: 1, ‘pwd‘: ‘123‘, ‘user‘: ‘test2‘, ‘user_type__caption‘: ‘管理员‘}, {‘user_type__‘pwd‘: ‘123‘, ‘user‘: ‘test‘, ‘user_type__caption‘: ‘管理员‘}]>


打印sql语句:
>>> print(sql.query)
SELECT "app01_userinfo"."user", "app01_userinfo"."pwd", "app01_userinfo"."user_type_id", "app01_usertype"."caption" FROM "app01_userinfo" INNER JOIN "app01_usertype" ON ("app01_userinfo"."user_type_id" = "app01_usertype"."id") WHERE "app01_usertype"."caption" = 管理员
跨多张表进行操作,如果UserType表中还有外键指向另一张表的主键,怎么查呢?
新的表结构如下:
from django.db import models
# Create your models here.

class UserType(models.Model):
    caption = models.CharField(max_length=32) # 超级管理员,普通用户,游客,黑河
    s = models.ForeignKey(‘something‘)
    def __str__(self):
        return self.caption

class UserInfo(models.Model):
    user = models.CharField(max_length=32)
    pwd = models.CharField(max_length=32)
    user_type = models.ForeignKey(‘UserType‘)

class something(models.Model):
    name = models.CharField(max_length=32)
查询:
models.UserInfo.objects.filter(user_type__s__name="一些条件值"
这是跨两张表,跨三张表、四张表都这样
class Girl(models.Model):
    name = models.CharField(max_length=32)
    b = models.ManyToManyField(‘Boy‘)

class Boy(models.Model):
    name = models.CharField(max_length=32)
PS:多对多关系需要三张表,两张数据表,一张关系表,但是在django 中如果使用ManyToManyField的话,不需要在指定第三张表,默认django会创建。当然,如果不使用该字段的话,也可以手动指定第三张表,然后使用models.ForeignKey做外键关联
添加数据到关系表:
女孩跟男孩建立关系   正向操作
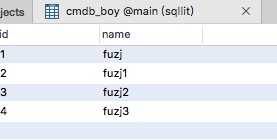
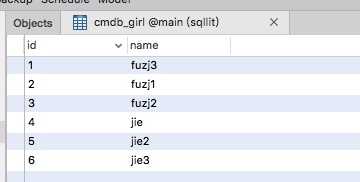
>>> G = models.Girl.objects.get(id=1)
>>> g = models.Girl.objects.get(id=1)
>>> girl = models.Girl.objects.get(id=1)
>>> boy = models.Boy.objects.get(id=3)
>>> girl.name
‘fuzj3‘
>>> boy.name
‘fuzj2‘

    #使用对象建立关系

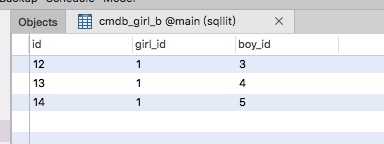
>>> girl.b.add(boy)         #此时的b时多对多的字段
>>> bs = models.Boy.objects.all()   #获取男孩的所有对象,返回数组
>>> g.b.add(*bs)        #批量将关系插入到关系表

    #使用主键值建立关系
>>> girl = models.Girl.objects.get(id=3)
>>> girl.b.add(3)
>>> bs_list = [1,4,5]
>>> girl.b.add(*bs_list)


男孩跟女孩建立关系  反向操作

>>> boy = models.Boy.objects.get(id=1)
>>> boy
<Boy: Boy object>
>>> boy.girl_set.add(3)
 ?
?
 ?
?
 ?
?
删除
remove() 删除
clear() 清空
>>> g1 = models.Girl.objects.get(id=1)   #获取一个女孩对象
>>> g1.b.remove(2)              #单个删除一个关系
>>> g1.b.remove(*[3,4])     #批量删除多个关系
>>> g1.b.clear()                #清空本对象对应的所有关系
查询
支持all() filer()等操作
1.通过女孩查找男孩(正向查找)
>>> models.Girl.objects.filter(name=‘fuzj2‘).values(‘id‘,‘name‘,‘b__name‘)
<QuerySet [{‘name‘: ‘fuzj2‘, ‘id‘: 3, ‘b__name‘: ‘fuzj‘}, {‘name‘: ‘fuzj2‘, ‘id‘: 3, ‘b__name‘: ‘fuzj2‘}, {‘name‘: ‘fuzj2‘, ‘id‘: 3, ‘b__name‘: ‘fuzj3‘}, {‘name‘: ‘fuzj2‘, ‘id‘: 3, ‘b__name‘: None}]>

‘b__name‘中 b此时代指的关系表,所以b__name 就是跨到了boy表,。此时相当于直接跨了两张表
    2. 通过男孩查找女孩(反向查找)
>>> models.Boy.objects.filter(name=‘fuzj‘).values(‘id‘,‘name‘,‘girl__name‘)
<QuerySet [{‘name‘: ‘fuzj‘, ‘id‘: 1, ‘girl__name‘: ‘fuzj2‘}]>

‘girl__name‘ 中,girl是boy表中隐藏的字段,代指的是和girl的关系表,所以girl__name就跨到了girl表
修改
默认django不支持修改操作,如果实现修改操作,只能是先删除,然后再创建,显然这个效率不是很高。所以,我们可以通过原生的sql语句进行操作
from django.db import connection
cursor = connection.cursor()
cursor.execute("update tbname set girl_id = ‘3‘ where boy_id = %s",[3])
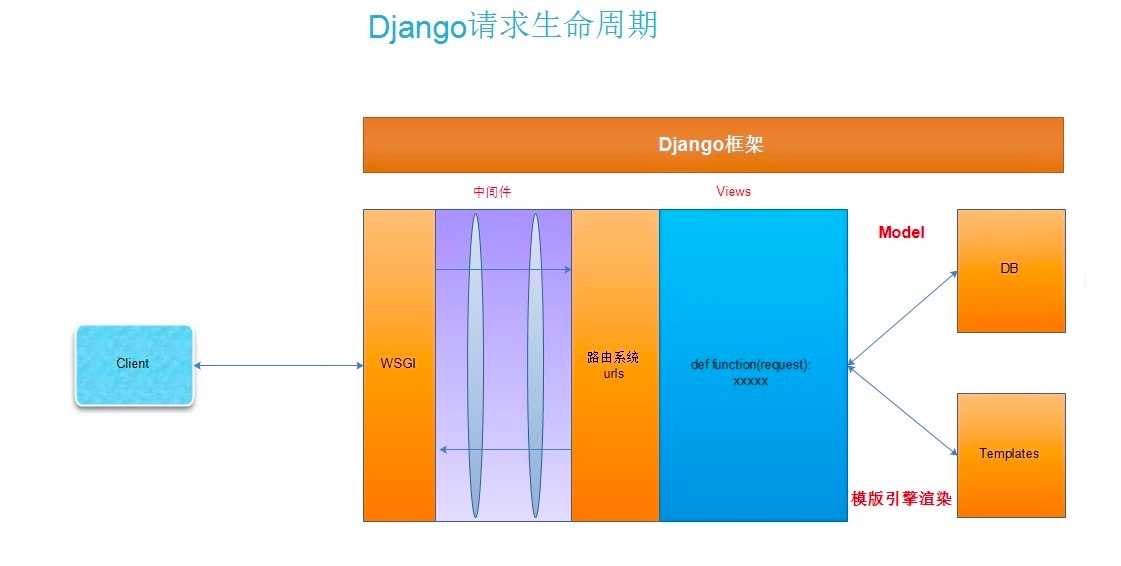
中间件是一个、一个的管道,如果相对任何所有的通过Django的请求进行管理都需要自定义中间件
中间件可以对进来的请求和出去的请求进行控制
中间件是一类。
 ?
?
由上图可知,中间件是位于wsgi和路由系统中间的环节。用户请求和和回应请求都会经过中间件。
看下面的代码在settings里中间件的类:
MIDDLEWARE_CLASSES = [
    ‘django.middleware.security.SecurityMiddleware‘,
    ‘django.contrib.sessions.middleware.SessionMiddleware‘,
    ‘django.middleware.common.CommonMiddleware‘,
    ‘django.middleware.csrf.CsrfViewMiddleware‘,
    ‘django.contrib.auth.middleware.AuthenticationMiddleware‘,
    ‘django.contrib.auth.middleware.SessionAuthenticationMiddleware‘,
    ‘django.contrib.messages.middleware.MessageMiddleware‘,
    ‘django.middleware.clickjacking.XFrameOptionsMiddleware‘,
]
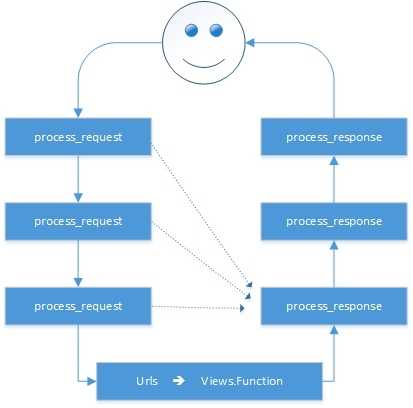
当有请求过来的时候,默认从上倒下执行!然后在返回的时候从下面在返回回去
中间件中可以定义四个方法,分别是:
以上方法的返回值可以是None和HttpResonse对象,如果是None,则继续按照django定义的规则向下执行,如果是HttpResonse对象,则直接将该对象返回给用户。
 ?
?
在django的的project目录下创建一个middleware目录,并创建一个md.py的脚本,内容如下:
class Testmiddle:
    def process_request(self,request):
        print ‘Testmiddle process_request‘
    def process_view(self, request, callback, callback_args, callback_kwargs):
        print ‘Testmiddle process_view‘
    def process_exception(self, request, exception):
        pass
    def process_response(self, request, response):
        print ‘Testmiddle process_response‘
        return response

class Nextmiddle:
    def process_request(self,request):
        print ‘Nextmiddle process_request‘
    def process_view(self, request, callback, callback_args, callback_kwargs):
        print ‘Nextmiddle process_view‘
    def process_exception(self, request, exception):
        pass
    def process_response(self, request, response):
        print ‘Nextmiddle process_response‘
        return response
修改settings.py文件,在MIDDLEWARE_CLASSES中添加我们创建的中间件
MIDDLEWARE_CLASSES = [
    ‘django.middleware.security.SecurityMiddleware‘,
    ‘django.contrib.sessions.middleware.SessionMiddleware‘,
    ‘django.middleware.common.CommonMiddleware‘,
    ‘django.middleware.csrf.CsrfViewMiddleware‘,
    ‘django.contrib.auth.middleware.AuthenticationMiddleware‘,
    ‘django.contrib.auth.middleware.SessionAuthenticationMiddleware‘,
    ‘django.contrib.messages.middleware.MessageMiddleware‘,
    ‘django.middleware.clickjacking.XFrameOptionsMiddleware‘,
    ‘middleware.middle.Testmiddle‘,
    ‘middleware.middle.Nextmiddle‘,
]
Testmiddle process_request
Nextmiddle process_request
Testmiddle process_view
Nextmiddle process_view
This app01 Views.index
Nextmiddle process_response
Testmiddle process_response
从输出结果可以看出:
他是先执行Testmiddle 的request 方法又执行了Nextmiddle的 process_request方法, 然后在执行Testmiddle的view方法,Nextmiddle的view方法
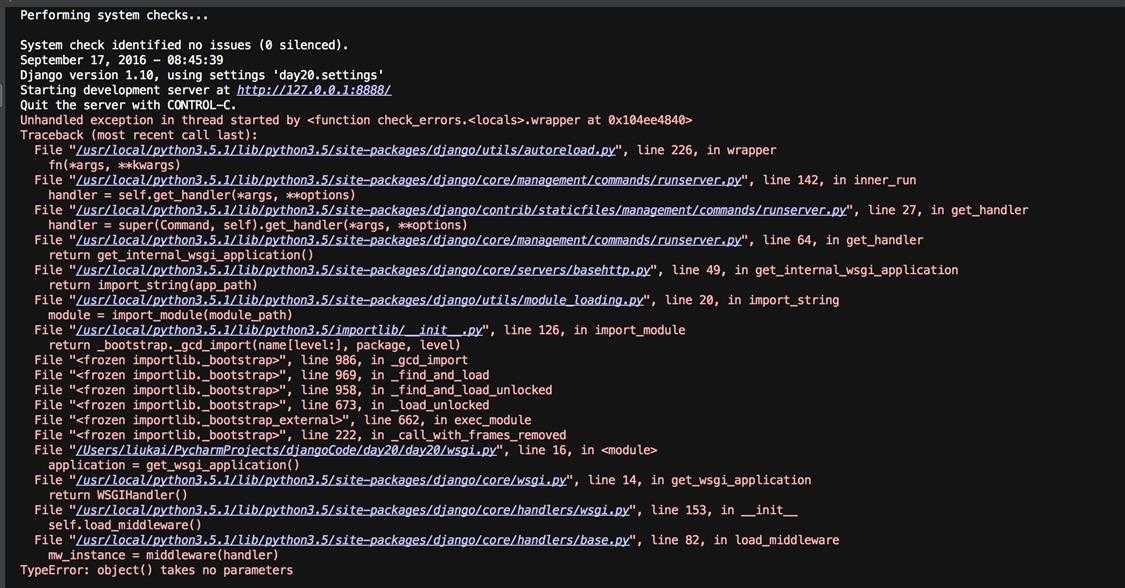
注意:django版本1.10以后,会报如下错误:
 ?
?
解决如下:
from django.utils.deprecation import MiddlewareMixin
class Testmiddle(MiddlewareMixin):
    def process_request(self,request):
        print ‘Testmiddle process_request‘
    def process_view(self, request, callback, callback_args, callback_kwargs):
        print ‘Testmiddle process_view‘
    def process_exception(self, request, exception):
        pass
    def process_response(self, request, response):
        print ‘Testmiddle process_response‘
        return response

class Nextmiddle(MiddlewareMixin):
    def process_request(self,request):
        print ‘Nextmiddle process_request‘
    def process_view(self, request, callback, callback_args, callback_kwargs):
        print ‘Nextmiddle process_view‘
    def process_exception(self, request, exception):
        pass
    def process_response(self, request, response):
        print ‘Nextmiddle process_response‘
        return response
注意:
* 老版本中在中间件中如果某个中间件类的方法返回的不是none,则后面的中间件不会再处理请求,也不会到达路由系统,而是直接到第一个process_response,开始所有的process_response处理
* 新版本中在中间件中如果某个中间件类的方法返回的不是none,则后面的中间件不会再处理请求,也不会到达路由系统,而是直接到最后一个process_response处理,然后返回给客户端
标签:
原文地址:http://www.cnblogs.com/pycode/p/db-middleware.html