标签:redhat 7 apache apache2.4 httpd apachectl 虚拟主机
前两天测试了在RedHat 6上安装配置Apache httpd 2.2.31(详见http://jiangjianlong.blog.51cto.com/3735273/1858453)后,再来测试一下在RedHat 7安装配置Apache httpd 2.4.23。本文的内容主要包括:安装部署Apache 2.4.23、配置基于域名的虚拟主机、配置基于端口的虚拟主机、配置虚拟目录、修改默认页面、配置系统服务并设置开机启动。
测试环境:
操作系统版本:Red Hat Enterprise Linux Server release 7.2 (Maipo),最小化安装
gcc版本:gcc-4.8.5-4.el7.x86_64(操作系统介质自带)
gcc-c++版本:gcc-c++-4.8.5-4.el7.x86_64(操作系统介质自带)
Apache版本:httpd-2.4.23.tar.gz
apr版本:apr-1.5.2.tar.gz
apr-util版本:apr-util-1.5.4.tar.gz
pcre版本:pcre-8.38.tar.gz
一、安装部署
1、通过官网查阅安装Apache 2.4的要求(见下图)发现跟Apache 2.2相比有所变化,主要是apr与apr-util不再附随在Apache httpd的源码包中,需要自己下载,以及还要求PCRE,也需要自己下载。其他的如磁盘可用空间大于50M、ANSI-C编译器及编译环境(如gcc)、确保准确的时间(如NTP时间同步,其实不配置也不影响安装)、Perl5(可选)等要求跟Apache httpd 2.2基本上差不多,但需要注意的是在编译pcre时仅安装gcc是不够的,还提示需要gcc-c++。
2、通过yum安装gcc-c++:yum install gcc-c++,若只是安装了gcc而未安装gcc-c++,那么在编译安装pcre时执行configure命令会报错提示需要C++:configure: error: You need a C++ compiler for C++ support。而gcc-c++依赖gcc,因此我们只需要直接通过yum安装gcc-c++,就会自动把gcc也装上,
3、上传相关的源码包,并解压pcre包:tar -zxvf pcre-8.38.tar.gz
4、进入pcre包解压后的目录
5、执行配置源码的命令:./configure
[root@rh7coreApache pcre-8.38]# ./configure
6、再执行编译命令:make
7、最后执行编译安装命令:make install
[root@rh7coreApache pcre-8.38]# make install
8、根据官网说明,可以先解压httpd-2.4.23.tat.gz,再将apr和apr-util的源码包分别解压到httpd-2.4.23/srclib/apr和httpd-2.4.23/srclib/apr-util目录中,最后编译安装Apache httpd时使用--with-included-apr参数即可。本文便是采用此种方式进行编译安装Apache(当然也可以将apr和apr-util分别进行编译安装,网上也有相关资料)
[root@rh7coreApache tmp]# tar -zxvf httpd-2.4.23.tar.gz
[root@rh7coreApache tmp]# tar -zxvf apr-1.5.2.tar.gz
[root@rh7coreApache tmp]# mv apr-1.5.2 /tmp/httpd-2.4.23/srclib/apr
[root@rh7coreApache tmp]# tar -zxvf apr-util-1.5.4.tar.gz
[root@rh7coreApache tmp]# mv apr-util-1.5.4 /tmp/httpd-2.4.23/srclib/apr-util
9、检查一下apr和apr-util包都已解压并移动到指定目录
10、进入httpd包解压后的目录,使用./configure --with-included-apr --with-pcre命令配置源代码,pcre包必须先单独编译安装,如果也只是解压到httpd-2.4.23/srclib/pcre目录会报错提示configure: error: pcre-config for libpcre not found。关于./configure还可以使用的参数选项如下:
--prefix=<Install_Path> 指明编译后的二进制文件安装到<Install_Path>目录,用实际安装路径替换<Install_Path>,如--prefix=/usr/local/apache24 ,如果省略此配置参数,默认安装到/usr/local/apache2目录。
--enable-so 指明编译动态加载模块(DSO)支持到httpd二进制文件,此模块使得Apache的各功能模块可以与核心分开编译、运行时动态加载。有了DSO支持,升级和增加模块时只需编译相关的模块即可,不必重新编译整个系统。最新版本的Apache缺省编译此模块到httpd二进制文件,如果使用早期版本的apache并且需要DSO支持,则要明确指出此选项。
--enable-mods-shared=<MODULE-LIST> 明确指明要以DSO方式编译的模块,<MODULE-LIST>为空格分隔的模块名列表、all或者most,all表示包含所有模块,most表示包含大部分模块,如--enable-mods-share="rewrite deflate",--enable-mods-share=most,效果等同于多个--enable-<FEATURE>=share
--with-mpm=<MPM> 选择Apache多路处理模块,<MPM>={beos|event|worker|prefork|mpmt_os2},prefork为Unix系统下默认处理模块,它运行一个非线程型的、预派生的Web服务器,适合于没有线程安全库,需要避免线程兼容性问题的系统,每个请求相互独立,若一个请求出现问题就不会影响到其他请求。worker为支持混合的多线程多进程的多路处理模块,它使用了多进程,每个进程又有多个线程,可以处理海量请求,而且系统资源的开销小于基于进程的MPM。
11、使用make命令编译httpd:
[root@rh7coreApache httpd-2.4.23]# make
12、使用make install命令编译安装httpd
[root@rh7coreApache httpd-2.4.23]# make install
13、默认的编译安装路径是/usr/local/apache2,编辑/usr/local/apache2/conf/httpd.conf文件,修改ServerName为服务器IP地址:80
14、启动Apache服务
[root@rh7coreApache ~]# /usr/local/apache2/bin/apachectl -k start
15、使用浏览器访问服务器IP,出现"It works!"表明Apache httpd服务器已经安装成功并启动。
16、启动、停止、重启Apache的命令
启动服务 apachectl -k start
停止服务 apachectl -k stop
重启服务 apachectl -k resar
优雅地重启 apachectl -k graceful
优雅地停止 apachectl -k graceful-stop
二、配置基于域名的虚拟主机
1、Apache httpd 2.4配置虚拟主机与Apache httpd 2.2基本一样,只是对于Directory的权限控制的参数用法有所改动。首先我们建立一个目录/test1,并在其中创建一个index.html文件,内容为 welcome to jiangjianlong.blog.51cto.com
2、再建立目录/test2,并在其中创建一个index.html文件,内容为 GoodGoodStudy,DayDayUp
3、编辑httpd.conf文件,将Include conf/extra/httpd-vhosts.conf这一行的注释符删掉,以启用conf/extra/httpd-vhosts.conf
[root@rh7coreApache ~]# vi /usr/local/apache2/conf/httpd.conf
4、修改conf/extra/httpd-vhosts.conf文件,将两个默认示例修改为下图所示,分别配置为www.test1.com和www.test2.com两个虚拟主机,需要注意Directory的权限控制的参数用法已与Apache httpd 2.2不同
[root@rh7coreApache
~]# vi /usr/local/apache2/conf/extra/httpd-vhosts.conf
<VirtualHost*:80>
ServerAdminwebmaster@dummy-host.example.com
DocumentRoot "/test1"
ServerName www.test1.com
ErrorLog"logs/www.test1.com-error_log"
CustomLog"logs/www.test1.com-access_log" common
<Directory "/test1">
AllowOverride none
Options None
Require all granted
</Directory>
</VirtualHost>
<VirtualHost*:80>
ServerAdminwebmaster@dummy-host2.example.com
DocumentRoot "/test2"
ServerName www.test2.com
ErrorLog"logs/www.test2.com-error_log"
CustomLog"logs/www.test2.com-access_log" common
<Directory "/test2">
AllowOverride none
Options None
Require all granted
</Directory>
</VirtualHost>
5、重启Apache httpd服务
[root@rh7coreApache ~]# /usr/local/apache2/bin/apachectl -k restart
6、在笔记本做hosts解析,将www.test1.com和www.test2.com都解析到相同的服务器IP
192.168.10.13 www.test1.com
192.168.10.13 www.test2.com
7、使用浏览器访问www.test1.com,成功访问到/test1/index.html的页面
8、使用浏览器访问www.test2.com,成功访问到/test2/index.html的页面
9、而此时如果用IP访问,仍是访问到默认页面
三、配置基于端口的虚拟主机
1、修改conf/httpd.conf文件,增加监听 90和91端口
[root@rh7coreApache ~]# vi /usr/local/apache2/conf/httpd.conf
2、修改conf/extra/httpd-vhosts.conf文件,将两个虚拟主机的*:80分别修改成*:90和*:91
[root@rh7coreApache ~]# vi /usr/local/apache2/conf/extra/httpd-vhosts.conf
3、重启Apache服务
[root@rh7coreApache ~]# /usr/local/apache2/bin/apachectl -k restart
4、使用IP地址+端口进行访问,成功访问到不同页面
5、使用域名+不同端口进行访问,也成功访问到不同页面,访问到哪个页面取决于端口而非域名,如果不加端口则访问到默认页面
四、配置虚拟目录
1、在/test1中建立子目录/test1/earth,并创建一个index.html页面,内容为“Hello Earth”
2、在/test2中建立子目录/test2/moon,并创建一个index.html页面,内容为“Hello Moon”
3、修改conf/httpd.conf文件,在文件末尾增加2行,分别是Alias /earth "/test1/earth"、Alias /moon "/test2/moon“
4、重启Apache服务
[root@rh7coreApache ~]# /usr/local/apache2/bin/apachectl -k restart
5、使用IP+端口+虚拟目录成功访问到对应的页面
6、使用域名+端口+虚拟目录进行访问,也成功访问到对应的页面
五、修改默认页面
1、创建/www/index.html,内容为 This is Apache 2.4.23
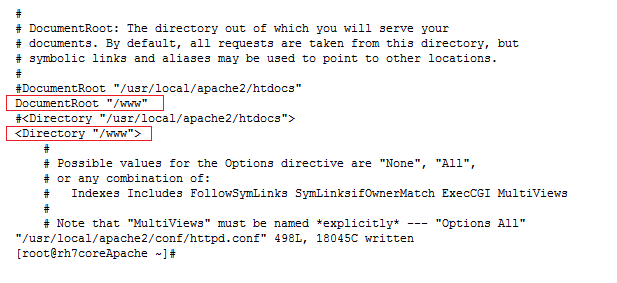
2、编辑conf/httpd.conf文件,修改下图红框处的路径为 /www
[root@rh7coreApache
~]# vi /usr/local/apache2/conf/httpd.conf
3、重启Apache服务
[root@rh7coreApache ~]# /usr/local/apache2/bin/apachectl -k restart
4、使用IP或域名+默认的80端口都能成功访问到/www下的页面,说明默认页面已成功修改,若加上端口则访问到对应的其他页面
六、配置系统服务并设置开机启动
1、指定PID文件,编辑httpd.conf文件,在文件末尾加上一行:PidFile /usr/local/apache2/httpd.pid
2、创建/lib/systemd/system/httpd.service文件并添加以下内容,完成后如果服务启动与停止还不太正常,可reboot服务器后再试一下
[unit]配置了服务的描述,规定了在network启动之后执行。[service]配置服务的pid,服务的启动,停止,重启。[install]配置了使用用户。
[Unit]
Description=Apache 2.4
After=syslog.target network.target remote-fs.target nss-lookup.target
[Service]
Type=forking
PIDFile=/usr/local/apache2/httpd.pid
ExecStart=/usr/local/apache2/bin/apachectl -k start
ExecReload=/usr/local/apache2/bin/apachectl -k restart
ExecStop=/usr/local/apache2/bin/apachectl -k stop
PrivateTmp=true
[Install]
WantedBy=multi-user.target
3、使用systemctl start httpd命令启动Apache服务,并使用systemctl status httpd查看服务状态,使用ls /usr/local/apache2可以看到自动生成了httpd.pid文件
4、如果这时再使用命令bin/apachectl -k start启动服务,会发现提示httpd已经在运行,说明systemctl start httpd命令是生效的
5、使用systemctl stop httpd命令停止Apache服务,使用systemctl status httpd查看服务状态,使用ls /usr/local/apache2可以看到自动删除了httpd.pid文件
6、如果这时再使用命令bin/apachectl -k stop停止服务,会发现提示httpd没在运行,说明systemctl stop httpd命令是生效的
7、设置开机运行httpd服务:systemctl enable httpd
8、reboot一下服务器再登录,然后使用命令/usr/local/apache2/bin/apachectl -k start启动Apache,提示httpd已经在运行,说明开机自动启动Apache服务已经生效。
本文出自 “江健龙的技术博客” 博客,请务必保留此出处http://jiangjianlong.blog.51cto.com/3735273/1858650
标签:redhat 7 apache apache2.4 httpd apachectl 虚拟主机
原文地址:http://jiangjianlong.blog.51cto.com/3735273/1858650