标签:style blog http color java os io 文件
近期集成了一次较新版本的s2sh,出现了不少问题,网上资料也是良莠不齐,有的甚至就是扯淡,简单的把jar包扔进去就以为是集成成功了,在这里整理一下详细的步骤,若哪位有什么不同看法,可以留言,欢迎批评改正。
首先说下集成的环境,Eclipse 4.4,Tomcat 7.0.54,Struts2.3.16,Hibernate3.6.10,Spring3.2.6
相关JAR包已上传至百度云:http://pan.baidu.com/s/1pJluA5l
1. 创建Java Web工程SSH
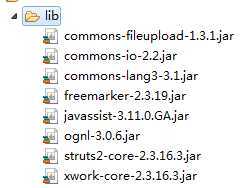
2. 添加struts2.3.16的8个基本类库,可能以前版本是6个,但是2.3.16版本本人测试是8个,大家可以自己测试下
3. 在src下创建config.struts包,并创建struts2的配置文件struts.xml
4. 在web.xml文件中添加过滤器
 1 <filter>
 2     <filter-name>struts2</filter-name>
 3     <filter-class>
 4       org.apache.struts2.dispatcher.ng.filter.StrutsPrepareAndExecuteFilter
 5     </filter-class>
 6     <init-param>
 7         <param-name>config</param-name>
 8         <param-value>
 9             struts-default.xml,struts-plugin.xml,config/struts/struts.xml
10         </param-value>
11     </init-param>
12 </filter>
13 <filter-mapping>
14     <filter-name>struts2</filter-name>
15     <url-pattern>/*</url-pattern>
16 </filter-mapping>
5. 向struts.xml中添加如下代码
<?xml version="1.0" encoding="UTF-8"?>
<!DOCTYPE struts PUBLIC
    "-//Apache Software Foundation//DTD Struts Configuration 2.3//EN"
    "http://struts.apache.org/dtds/struts-2.3.dtd">
<struts>
    <package name="ssh" namespace="/" extends="struts-default">

        <action name="" class="" method="">
            <result name=""></result>
        </action>

    </package>
</struts>
6. 创建以下路径用于测试
WebContent/Web-INF/jsp/index.jsp
(Web-INF为安全目录,无法直接访问)
7. 在src目录下创建action包,用于放置Struts2的Action,然后创建MainAction,用于测试,以及以后的页面跳转,并添加如下代码:
1 package action;
2
3 public class MainAction {
4
5     public String start(){
6         return "start";
7     }
8
9 }
8. 在struts.xml中进行配置
1 <struts>
2     <package name="ssh" namespace="/" extends="struts-default">
3         <default-action-ref name="index" />
4         <action name="index" class="action.MainAction" method="start">
5             <result name="start">WEB-INF/jsp/index.jsp</result>
6         </action>
7     </package>
8 </struts>
9. 启动web服务器,测试http://localhost:8080/SSH/
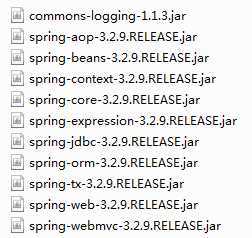
1. 添加spring类库
2. 添加strut2集成spring类库:struts2-spring-plugin-2.3.16.3.jar
3. 添加spring配置文件applicationContext.xml,并添加如下信息
<?xml version="1.0" encoding="UTF-8"?>
<!DOCTYPE beans PUBLIC "-//SPRING//DTD BEAN//EN" "http://www.springframework.org/dtd/spring-beans.dtd">
<beans>

</beans>
4. 在web.xml文件中添加spring监听器,在filter标签外
1 <listener>
2   <listener-class>
3     org.springframework.web.context.ContextLoaderListener
4     </listener-class>
5 </listener>
6 <context-param>
7     <param-name>contextConfigLocation</param-name>
8     <param-value> classpath:config/spring/applicationContext.xml </param-value>
9 </context-param>
5. 启动Tomcat测试
6. spring管理struts2中Action,在spring文件中配置
<bean id="mainAction" class="action.MainAction"></bean>
7. 修改struts对应配置文件信息,换成spring配置文件中<bean id="mainAction">
<struts>
     <package name="ssh" namespace="/" extends="struts-default">
         <default-action-ref name="index" />
         <action name="index" class="mainAction" method="start">
             <result name="start">WEB-INF/jsp/index.jsp</result>
         </action>
     </package>
</struts>
8. 重启tomcat测试是否可用
1. 添加hibernate必须的jar包

2. 添加hibernate配置文件,位置设置在config/hibernate/cfg目录下,文件名:hibernate.cfg.xml,并向其中添加如下配置
<?xml version="1.0" encoding="UTF-8"?>
<!DOCTYPE hibernate-configuration PUBLIC
    "-//Hibernate/Hibernate Configuration DTD 3.0//EN"
    "http://www.hibernate.org/dtd/hibernate-configuration-3.0.dtd">
<hibernate-configuration>
  <session-factory></session-factory>
</hibernate-configuration
3. 创建包hibernate.hbm,用于存放hibernate的映射文件,创建User.hbm.xml并添加如下信息
<?xml version="1.0" encoding="UTF-8"?>
<!DOCTYPE hibernate-mapping PUBLIC
    "-//Hibernate/Hibernate Mapping DTD 3.0//EN"
    "http://www.hibernate.org/dtd/hibernate-mapping-3.0.dtd">
<hibernate-mapping>
</hibernate-mapping>
4. 配置spring的数据源,添加Tomcat JDBC POOL连接池类库

5. 在spring配置文件中配置连接池,在src目录下创建properties包,用于存属性文件,并创建文件db.properties,用于保存数据库连接池的配置属性之后向db.properties中添加数据库连接池的属性数据,包括:url、driver、username、password、initialSize、maxActive、maxIdle、minIdle、maxWait、removeAbandoned、 removeAbandonedTimeOut等
<bean id="PropertyPlaceholderConfigurer" class="org.springframework.beans.factory.config.PropertyPlaceholderConfigurer">
  <property name="location" value="classpath:config/properties/datasource.properties" />
</bean>

<bean id="dataSource" class="org.apache.tomcat.jdbc.pool.DataSource" >
  <property name="driverClassName" value="${driver}" />
  <property name="url" value="${url}" />
  <property name="username" value="${username}" />
  <property name="password" value="${password}" />

  <property name="initialSize" value="${initialSize}" />
  <property name="maxActive" value="${maxActive}" />
  <property name="maxIdle" value="${maxIdle}" />
  <property name="minIdle" value="${minIdle}" />
  <property name="maxWait" value="${maxWait}" />
  <property name="removeAbandoned" value="${removeAbandoned}" />
  <property name="removeAbandonedTimeout" value="${removeAbandonedTimeout}" />
</bean>
6. 在spring中完全管理hibernate配置,删除hibernate.cfg.xml,在spring配置文件中创建id为sessionFactory的bean
<bean id="sessionFactory" class="org.springframework.orm.hibernate3.LocalSessionFactoryBean">
  <property name="dataSource" ref="dataSource" />
  <property name="hibernateProperties">
    <props>
      <prop key="hibernate.dialect">
        org.hibernate.dialect.MySQLDialect
      </prop>
      <prop key="hibernate.format_sql">true</prop>
      <prop key="hibernate.show_sql">true</prop>
    </props>
  </property>
  <property name="mappingLocations">
    <list>
      <value>classpath:config/hibernate/User.hbm.xml</value>
    </list>
  </property>
</bean>
7. 创建User实体类,UserDao、jsp等,并在spring中配置提供注入,进行测试
附:sping事务配置(基于tx、aop声明式)
1. 在spring配置文件中添加声明
<beans xmlns="http://www.springframework.org/schema/beans"
    xmlns:xsi="http://www.w3.org/2001/XMLSchema-instance"
    xmlns:p="http://www.springframework.org/schema/p"
    xmlns:context="http://www.springframework.org/schema/context"
    xmlns:aop="http://www.springframework.org/schema/aop"
    xmlns:tx="http://www.springframework.org/schema/tx"
    xsi:schemaLocation="http://www.springframework.org/schema/beans
        classpath:/org/springframework/beans/factory/xml/spring-beans-3.2.xsd
        http://www.springframework.org/schema/context
        classpath:/org/springframework/context/config/spring-context-3.2.xsd
        http://www.springframework.org/schema/tx
        classpath:/org/springframework/transaction/config/spring-tx-3.2.xsd
        http://www.springframework.org/schema/aop
        classpath:/org/springframework/aop/config/spring-aop-3.2.xsd">
2. 添加事务配置,bean标签之外,beans标签之内
<tx:advice id="txAdvice" transaction-manager="transactionManager">
  <tx:attributes>
    <tx:method name="find*" read-only="false"/>
    <tx:method name="add*" rollback-for="Exception"/>
  </tx:attributes>
</tx:advice>
<aop:config>
  <aop:pointcut id="serviceMethod" expression="execution(* action.*.*(..))"/>
  <aop:advisor pointcut-ref="serviceMethod" advice-ref="txAdvice"/>
</aop:config>
S2SH框架集成详解(Struts 2.3.16 + Spring 3.2.6 + Hibernate 3.6.10),布布扣,bubuko.com
S2SH框架集成详解(Struts 2.3.16 + Spring 3.2.6 + Hibernate 3.6.10)
标签:style blog http color java os io 文件
原文地址:http://www.cnblogs.com/aotian/p/3909384.html